Sitecore
Creating a WFFM Save action with Field Mappings

Creating a WFFM Save action with Field Mappings

The Sitecore Web Form for Marketers module offers content editors a flexible way to create data capture forms and then trigger certain actions to occur on submission. There's a whole host of save action options out the box, such as sending an email, enrolling the user in an engagement plan or updating some user details.

However one save action that is often required is the ability to send the data onto a CRM system so that it can get to the people that need to act on it, rather than staying in Sitecore with the content editors. To do this your best option is to create a custom save action that can send on the information.

Creating a Save Action in Sitecore

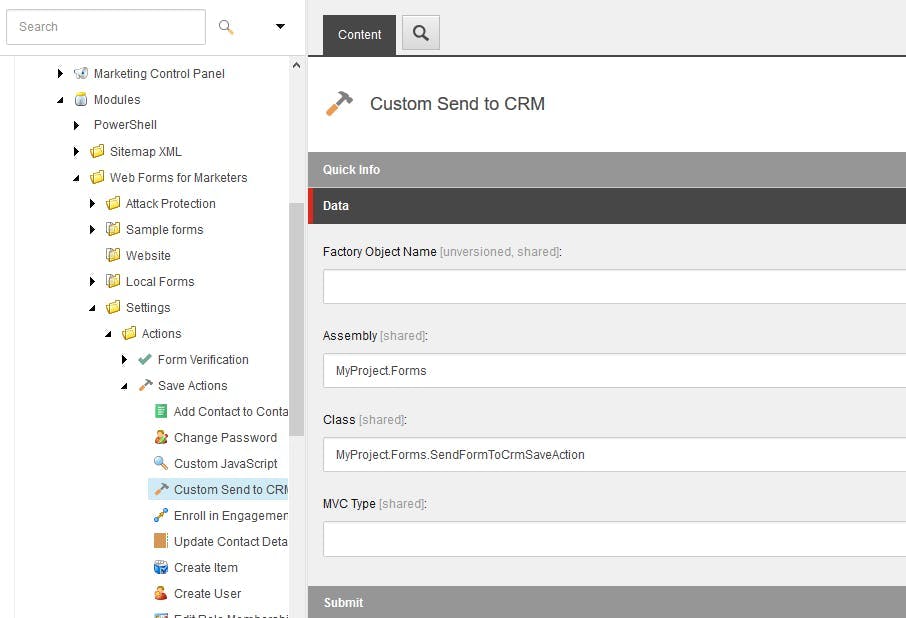
Save actions in Sitecore are configured under /sitecore/system/Modules/Web Forms for Marketers/Settings/Actions/Save Actions. Here you can see all the standard ones that come out the box and add your own.

Right click Save Actions and insert a new Save Action. You will need to fill out the Assembly and Class fields so that Sitecore knows which bit of code to execute (details on creating this bit below).
Adding Field Mappings

To really make your save action usable you will want to allow the content editor to map the fields on their form with the ones in the CRM, rather than relying on them both having the same name and hard coding the expected WFFM field names in your save action logic.

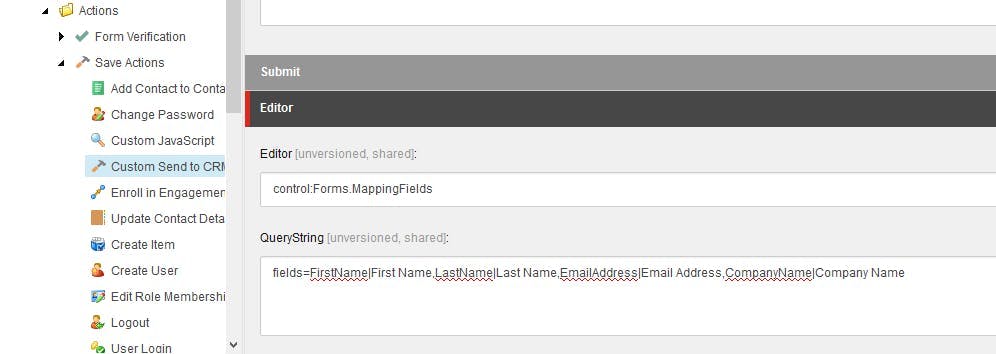
On your Save Action Item in Sitecore their are 2 fields to fill out to enable the editor in WFFM (Editor and QueryString). Luckily Sitecore provide a mapping editor out the box so there's very little effort involved here.

Within the Editor filed add the value:

1control:Forms.MappingFields

And within the querystring field, add your list of fields in the format fields=FieldName|FieldDisplayText

1fields=FirstName|First Name,LastName|Last Name,EmailAddress|Email Address,CompanyName|Company Name
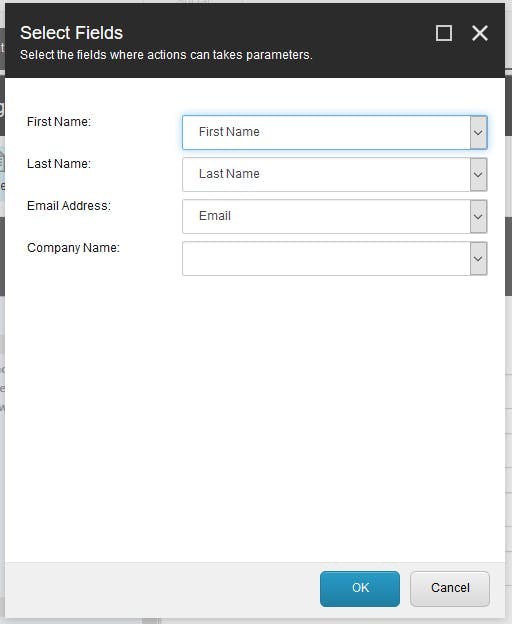
When the content editor now adds the save action to their form they will now be able to select a form field for each of these fields.
Creating the Save Action in code

To create the save action you will need a class that inherits from either ISaveAction or WffmSaveAction. I've used WffmSaveAction as it already has some of the interface implemented for you.

The field list you added to the Querystring property of the save action in Sitecore will need to be added as public properties to your class. Sitecore will then populate each of these with the ID the field gets mapped to or null if it has no mapping.

Then all that's left is to add an Execute method to populate your CRM's model with the data coming in through the adaptedFields parameter and send it onto your CRM.

1using Sitecore.Data;
2using Sitecore.WFFM.Abstractions.Actions;
3using Sitecore.WFFM.Actions.Base;
4using System;
5
6namespace MyProject.Forms
7{
8 public class SendFormToCrmSaveAction : WffmSaveAction
9 {
10 public string EmailAddress { get; set; }
11 public string FirstName { get; set; }
12 public string LastName { get; set; }
13 public string CompanyName { get; set; }
14
15 public override void Execute(ID formId, AdaptedResultList adaptedFields, ActionCallContext actionCallContext = null, params object[] data)
16 {
17 // Map values from adapted fields into enquiry model
18 IEnquiry enquiry = new Enquiry();
19
20 enquiry.Email = GetValue(this.EmailAddress, adaptedFields);
21 enquiry.FirstName = GetValue(this.FirstName, adaptedFields);
22 enquiry.LastName = GetValue(this.LastName, adaptedFields);
23 enquiry.CompanyName = GetValue(this.CompanyName, adaptedFields);
24
25 // Add logic to send data for CRM here
26 }
27
28 /// <summary>
29 /// Get Value from field list data for a given form field id, or return null if not found
30 /// </summary>
31
32 /// <param name="formFieldId"></param>
33 /// <param name="fields"></param>
34 /// <returns></returns>
35 private string GetValue(string formFieldId, AdaptedResultList fields)
36 {
37 if (string.IsNullOrWhiteSpace(formFieldId))
38 {
39 return null;
40 }
41 if (fields == null || fields.GetEntryByID(formFieldId) == null)
42 {
43 return null;
44 }
45 return fields.GetValueByFieldID(formFieldId);
46 }
47 }
48 }
49}
How I structure Sitecore Templates

How I structure Sitecore Templates

Templates are the building blocks for a Sitecore installation, they're amazingly flexible and with capabilities such as inheritance you can produce an elegant architecture, or alternatively a complete mess. Here's how I like to structure things:

Base Templates

First off I have a folder of base templates. These are the building blocks for all the fields that will end up in a component data source or an actual page via inheritance. By setting them up as a base template we can re-use the same field definition for things like headings, but more importantly it keeps them focused on a specific purpose rather including details of the entire eventual item.

One additional rule I have for base templates is that they should only contain one data section within them. This in turn helps keep them focused on a specific purpose.

Page Templates

Next we have pages. You guessed it, a page template is what a content editor will create an instance of when they make a page. It's responsibility is to bring together default presentation details, the set of fields on the page and insert options for the pages beneath it.

All fields are inherited from base templates and standard values are used to define the defaults for the page.

Additionally to make the CMS experience as easy as possible for the content editors an icon should be set so that a page type can be visually identifiable.

Component Templates

A component template is the equivalent of a page template but for data sources.

Like page templates all the fields are inherited from base templates and standard values are used to define the defaults for the page. An icon should also be set to make content types easily identifiable by content editors.

Folder Templates

Folder templates are often overlooked but they are an essential part of creating a decent user experience.

Folder templates are created to define the insert options for components and site settings rather than having them set on the site content tree.

Where relevant a folder template should also include itself as one of the insert options so that content editors can organise their content into sub-folders.

Parameter Templates

When a component needs some config to customise its look and feel that is not content, it can be better to use Rendering Parameters rather than a data source.

Site Setting Templates

A Site configuration template is useful to contain various global settings for a site. This could include things such as the Site Logo, Google Analytics account details etc. Settings should be segmented into logical sections that have been defined in Base Templates and then inherited.

It can also be useful to separate some settings into their own template item depending on the scenario of what the setting is for.

Group Into Folders

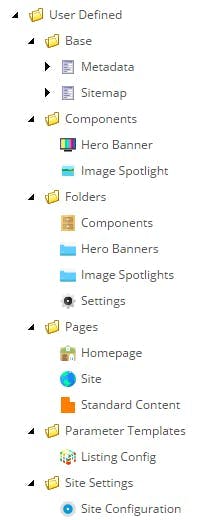
With each these template types created, you'll end up with a tree structure that looks something like this.

Pipelines - remember the big picture

Pipelines - remember the big picture

Sitecore pipelines are great. With them you can relatively easily add and remove functionality as you wish. Pipelines like httpRequestBegin, httpRequestProcessed and mvc.beginRequest are also really useful if you need some logic to run on a page load that shouldn't really be part of a rendering. This could be anything from login checks to updating the way 404 pages are returned. However you do need to remember the big picture of what you are changing.

Pipelines don't just effect the processes of the website your building, Sitecore uses them too. That means when you add a new processor to the httpRequestBegin pipeline, that's going to effect every request in the admin CMS too. Just checking the context item also isn't enough as some things. e.g. opening a node in a tree view, will have the context of the node you clicked on!

Adding this snippet of code to the beginning of your process should keep you safe though.

1using Sitecore.Diagnostics;
2using Sitecore.Pipelines.HttpRequest;
3using Sitecore;
4using Sitecore.SecurityModel;
5
6namespace CustomPiplelineNamespace
7{
8 public class CustomPipeline : HttpRequestProcessor
9 {
10 public override void Process(HttpRequestArgs args)
11 {
12 //Check args isn't null
13 Assert.ArgumentNotNull(args, "args");
14 //Check we have a site
15 if (Context.Site == null)
16 return;
17 //Check the sites domain isn't one for sitecore
18 if (Context.Site.Domain != DomainManager.GetDomain("sitecore"))
19 return;
20 //Check that we're not in a redirect
21 if (args.Url.FilePathWithQueryString.ToUpperInvariant().Contains("redirected=true".ToUpperInvariant()))
22 return;
23 //Check that we're not in the page editor
24 if (Context.PageMode.IsPageEditor)
25 return;
26
27 // DO CODE
28 }
29 }
30}
Sitecore xDB - How to get count of interactions

Sitecore xDB - How to get count of interactions

If you need to rebuild your Path Analyzer maps, Sitecore have a knowledge base article on how to do it here - https://kb.sitecore.net/articles/766858

In the FAQ section it gives some info on how long you should expect it to take

What it doesn't tell you though is how you find out how many interactions your site has to process. The data is stored in analytics collection in your Mongo DB, so go there an then run...

1db.getCollection('Interactions').find({}).count()