Tag: Sitecore
Integrating Sitecore with Algolia

Integrating Sitecore with Algolia

Out of the box Sitecore ships with Solr as its search provider. As a Sitecore developer the amount of Solr knowledge you need is relatively low, as you access it through Sitecore's own APIs. This makes things simple to get going as it doesn't require a huge amount of effort. However this is where all that's good about using Solr seems to end.

It's not that Solr is bad, it's actually very powerful, has a load of config options for boosting fields, result items etc. If there's something you want to do with your search results then it can probably do it. For admin users though it's just a bit of a black box. Results come out in an order and sometimes your not sure why. If you asked a content editor to change the order of search results they would look at you blankly and not have a clue where to start, other than to ask their dev to do it for them.

Algolia on the other hand, has been designed for the end user. They can try searches through the admin interface, drag and drop results into a different order, run campaigns and affect results in numerous other ways. Not only that but it offers analytics so they can see what searches are returning no results along with searches that have results, but no click throughs.

For devs it's also easy to see what's actually in the search index and front end devs can easily integrate through the APIs rather than requiring a .NET dev to write something against Sitecore's search provider for them.

Creating a search with Algolia and Sitecore

In this article I'm going to show you how to populate an Algolia index with data from Sitecore. What I'm not doing is creating a new Sitecore search provider for Algolia. Other people have attempted that before, but it requires a lot of maintenance. You also have to implement a lot of functionality that your unlikely to use!

My aim also isn't to replace Solr. Sitecore uses it for some of it's functionality and is doing that job perfectly fine. My aim is to add a search to the front end of a Sitecore site powered by Algolia so that a content editor can make use of Algolias features. For that I just need relevant content from Sitecore to be added and removed from Algolias index when a publish happens.

Populating Algolias Index from Sitecore

We want our Algolia Index to contain data for published items and to update as future publishes occur. Publishing being when content is published from the Master DB to the Web DB. A good way to do this is to hook into the Sitecore publishing pipeline.

In my solution I am creating a new pipeline processor that calls directly to Algolia. In my case the amount of content is relatively small and for usability when the publish dialogue completes I want the content editors to be confident that the index has updated. A more scalable solution that is less blocking would be to first post the data to a service bus and then have the integration to Algolia subscribe to the bus. This way any delay caused by Algolia wont affect the publishing experience.

The default PublishItem pipeline in Sitecore is as follows:

1<publishItem help="Processors should derive from Sitecore.Publishing.Pipelines.PublishItem.PublishItemProcessor">
2<processor type="Sitecore.Publishing.Pipelines.PublishItem.RaiseProcessingEvent, Sitecore.Kernel"/>
3<processor type="Sitecore.Publishing.Pipelines.PublishItem.CheckVirtualItem, Sitecore.Kernel"/>
4<processor type="Sitecore.Publishing.Pipelines.PublishItem.CheckSecurity, Sitecore.Kernel"/>
5<processor type="Sitecore.Publishing.Pipelines.PublishItem.DetermineAction, Sitecore.Kernel"/>
6<processor type="Sitecore.Buckets.Pipelines.PublishItem.ProcessActionForBucketStructure, Sitecore.Buckets" patch:source="Sitecore.Buckets.config"/>
7<processor type="Sitecore.Publishing.Pipelines.PublishItem.MoveItems, Sitecore.Kernel"/>
8<processor type="Sitecore.Publishing.Pipelines.PublishItem.PerformAction, Sitecore.Kernel"/>
9<processor type="Sitecore.Publishing.Pipelines.PublishItem.AddItemReferences, Sitecore.Kernel"/>
10<processor type="Sitecore.Publishing.Pipelines.PublishItem.RemoveUnknownChildren, Sitecore.Kernel"/>
11<processor type="Sitecore.Publishing.Pipelines.PublishItem.RaiseProcessedEvent, Sitecore.Kernel" runIfAborted="true"/>
12<processor type="Sitecore.Publishing.Pipelines.PublishItem.UpdateStatistics, Sitecore.Kernel" runIfAborted="true">
13<traceToLog>false</traceToLog>
14</processor>
15</publishItem>

The Sitecore.Publishing.Pipelines.PublishItem.PerformAction step in the pipeline is the one which does the actual work of updating the web db.

To capture deletes as well as inserts / updates we need a step to happen both before and after this action. The step before will capture the deletes and the step after will push the update to Algolia.

My code for capturing the deletes is as follows. This is needed as once the PerformAction step has finished, the item no longer exists so we need to grab it first.

1using Sitecore.Diagnostics;
2using Sitecore.Publishing;
3using Sitecore.Publishing.Pipelines.PublishItem;
4
5namespace SitecoreAlgolia
6{
7 public class DelateAlgoliaItemsAction : PublishItemProcessor
8 {
9 public override void Process(PublishItemContext context)
10 {
11 Assert.ArgumentNotNull(context, "context");
12
13 // We just want to process deletes because this is the only time the item being deleted may exist.
14 if (context.Action != PublishAction.DeleteTargetItem && context.Action != PublishAction.PublishSharedFields)
15 return;
16
17 // Attempt to find the item. If not found, item has already been deleted. This can occur when more than one langauge is published. The first language will delete the item.
18 var item = context.PublishHelper.GetTargetItem(context.ItemId) ??
19 context.PublishHelper.GetSourceItem(context.ItemId);
20
21 if (item == null)
22 return;
23
24 // Hold onto the item for the PublishChangesToAlgoliaAction PublishItemProcessor.
25 context.CustomData.Add("Item", item);
26 }
27 }
28}
29

With the deletes captured the next pipeline action will push each change to Algolia.

The first part of my function is going to ignore anything we're not interested in. This includes:

  • Publishes where the result of the operation was skipped or none (as nothings changed)
  • If we don't have an item
  • If the template of the item isn't one we're interested in pushing to Algolia
  • If the item is a standard values
1// Skip if the publish operation was skipped or none.
2if ((context.Action != PublishAction.DeleteTargetItem || context.PublishOptions.CompareRevisions) && (context.Result.Operation == PublishOperation.Skipped || context.Result.Operation == PublishOperation.None))
3 return;
4
5// For deletes the VersionToPublish is the parent, we need to get the item from the previous step
6var item = (Item)context.CustomData["Item"] ?? context.VersionToPublish;
7 if (item == null)
8 return;
9
10// Restrict items to certain templates
11var template = TemplateManager.GetTemplate(item);
12// SearchableTemplates is a List<ID>
13if (!SearchableTemplates.Any(x => template.ID == x))
14 return;
15
16// Don't publish messages for standard values
17if (item.ParentID == item.TemplateID)
18 return;

Next I convert the Sitecore items into a simple poco object. This is what the Algolia client requires for updating the index.

Notice the first property is called ObjectID, this is a required property for Algolia and is used to identify the record for updates and deletes. I'm using the Sitecore Item ID for this.

1// Convert item to the model for Algolia
2var searchItem = new SearchResultsItem()
3{
4 ObjectID = item.ID.ToString(),
5 Title = item.Fields[FieldNames.Standard.MenuTitle].Value,
6 Content = item.Fields[FieldNames.Base.Content].Value,
7 Description = item.Fields[FieldNames.Standard.ShortDescription].Value,
8};

One thing to note that I've not included here is to be careful with any link fields. If you are wanting to add a URL into Algolia you may find that the site context the publishing pipeline runs in may not be the same as your final website and therefore you need to set some additional URLOptions on the LinkManager to get the correct URLs.

Finally to push to Algolia it's a case of creating the SearchClient, initializing the index and picking the relevant operation on the index. Just make sure you install the Algolia.Search NuGet package.

1// Init Algolia Client
2SearchClient client = new SearchClient("<Application ID>", "<API Key>");
3SearchIndex index = client.InitIndex("<Index Name>");
4
5// Decide what type of update is going to Algolia
6var operation = (context.Action == PublishAction.DeleteTargetItem && !context.PublishOptions.CompareRevisions) ? PublishOperation.Deleted : context.Result.Operation;
7switch (operation)
8{
9 case PublishOperation.Deleted:
10 // Delete
11 index.DeleteObject(item.ID.ToString());
12 break;
13 case PublishOperation.Skipped:
14 // Skipped
15 break;
16 default:
17 // Created / Update
18 index.SaveObject(searchItem);
19 break;
20}

My complete class looks like this. For simplicity of the article I've built this quite crudely with everything in one giant function. For production you would want to split up as per good coding standards.

1using Algolia.Search.Clients;
2using SitecoreAlgolia.Models;
3using Sitecore.Data;
4using Sitecore.Data.Items;
5using Sitecore.Data.Managers;
6using Sitecore.Diagnostics;
7using Sitecore.Links;
8using Sitecore.Publishing;
9using Sitecore.Publishing.Pipelines.PublishItem;
10using System.Collections.Generic;
11using System.Linq;
12
13namespace SitecoreAlgolia
14{
15 public class PublishChangesToAlgoliaAction : PublishItemProcessor
16 {
17 private static readonly List<ID> SearchableTemplates = new[] {
18 ItemIds.Templates.PageTemplates.EventItem,
19 ItemIds.Templates.PageTemplates.Content,
20 }.Select(x => new ID(x))
21 .ToList();
22
23 public override void Process(PublishItemContext context)
24 {
25 Assert.ArgumentNotNull(context, "context");
26
27 // Skip if the publish operation was skipped or none.
28 if ((context.Action != PublishAction.DeleteTargetItem || context.PublishOptions.CompareRevisions) &&
29 (context.Result.Operation == PublishOperation.Skipped ||
30 context.Result.Operation == PublishOperation.None))
31 return;
32
33 // For deletes the VersionToPublish is the parent, we need to get the item from the previous step
34 var item = (Item)context.CustomData["Item"] ?? context.VersionToPublish;
35 if (item == null)
36 return;
37
38 // Restrict items to certain templates
39 var template = TemplateManager.GetTemplate(item);
40 // SearchableTemplates is a List<ID>
41 if (!SearchableTemplates.Any(x => template.ID == x))
42 return;
43
44 // Don't publish messages for standard values
45 if (item.ParentID == item.TemplateID)
46 return;
47
48 // Convert item to the model for Algolia
49 var searchItem = new SearchResultsItem()
50 {
51 ObjectID = item.ID.ToString(),
52 Title = item.Fields[FieldNames.Standard.MenuTitle].Value,
53 Content = item.Fields[FieldNames.Base.Content].Value,
54 Description = item.Fields[FieldNames.Standard.ShortDescription].Value,
55 };
56
57 // Init Algolia Client
58 SearchClient client = new SearchClient("<Application ID>", "<API Key>");
59 SearchIndex index = client.InitIndex("<Index Name>");
60
61 // Decide what type of update is going to Algolia
62 var operation = (context.Action == PublishAction.DeleteTargetItem && !context.PublishOptions.CompareRevisions) ? PublishOperation.Deleted : context.Result.Operation;
63 switch (operation)
64 {
65 case PublishOperation.Deleted:
66 // Delete
67 index.DeleteObject(item.ID.ToString());
68 break;
69 case PublishOperation.Skipped:
70 // Skipped
71 break;
72 default:
73 // Created / Update
74 index.SaveObject(searchItem);
75 break;
76 }
77 }
78 }
79}
80

To get our code to run we now need to patch them in using a config file.

1<configuration xmlns:patch="http://www.sitecore.net/xmlconfig/">
2 <sitecore>
3 <pipelines>
4 <publishItem>
5 <processor patch:before="*[@type='Sitecore.Publishing.Pipelines.PublishItem.PerformAction, Sitecore.Kernel']" type="SitecoreAlgolia.DelateAlgoliaItemsAction, SitecoreAlgolia"/>
6 <processor patch:after="*[@type='Sitecore.Publishing.Pipelines.PublishItem.PerformAction, Sitecore.Kernel']" type="SitecoreAlgolia.PublishChangesToAlgoliaAction, SitecoreAlgolia"/>
7 </publishItem>
8 </pipelines>
9 </sitecore>
10</configuration>

And that's it. As you publish changes the Algolia index will get updated and a front end can be implemented against Algolias API's as it would on any other site.

Special thanks to Mike Scutta for his blog post on Data Integrations with Sitecore which served as a basis for the logic here.

Reducing the size of Sitecore Master DB

Reducing the size of Sitecore Master DB

When it comes to Sitecore development, an issue every developer has likely experienced is the size of the databases in relation to the size of their hard disk. In an ideal world production DBs would contain production data, test environments would have data ideally suited for testing and developer workstation would have the minimum required to develop the solution.

In reality though, I think most people have the experience of everything being a copy from production. This ends up being the case due to a clients requirements that UAT needs to looks the same as prod, QA needs prod content to replicate a bug and although critical Sitecore items may have been serialized, not having any content in your local makes it a bit hard to dev.

When a website is new and doesn't have much content this isn't a huge issue, but when you inherit one 5 years old with a 25gb DB, things start to become a problem. Not only is the hard disc space required an issue, but just setting a new developer up takes hours from download times.

After getting a new laptop and being faced with the challenge of needing to copy multiple DBs (and not even having enough space to back them up on my existing machine), I decided to finally do something about reducing the size of them,

Removing old item versions

Having a history of item versions is a great feature for content editors, however as a dev I don't really need them on my local. They also hold references to media items that aren't used any more.

This Sitecore Powershell script from Webbson does exactly that and even lets your specify how many version you want to keep. I went for 1.

1<#
2 This script will remove old versions of items in all languages so that the items only contains a selected number of versions.
3#>
4
5$item = Get-Item -Path "master:\content"
6$dialogProps = @{
7 Parameters = @(
8 @{ Name = "item"; Title="Branch to analyse"; Root="/sitecore/content/Home"},
9 @{ Name = "count"; Value=10; Title="Max number of versions"; Editor="number"},
10 @{ Name = "remove"; Value=$False; Title="Do you wish to remove items?"; Editor="check"}
11 )
12 Title = "Limit item version count"
13 Description = "Sitecore recommends keeping 10 or fewer versions on any item, but policy may dictate this to be a higher number."
14 Width = 500
15 Height = 280
16 OkButtonName = "Proceed"
17 CancelButtonName = "Abort"
18}
19
20$result = Read-Variable @dialogProps
21
22if($result -ne "ok") {
23 Close-Window
24 Exit
25}
26
27$items = @()
28Get-Item -Path master: -ID $item.ID -Language * | ForEach-Object { $items += @($_) + @(($_.Axes.GetDescendants())) | Where-Object { $_.Versions.Count -gt $count } | Initialize-Item }
29$ritems = @()
30$items | ForEach-Object {
31 $webVersion = Get-Item -Path web: -ID $_.ID -Language $_.Language
32 if ($webVersion) {
33 $minVersion = $webVersion.Version.Number - $count
34 $ritems += Get-Item -Path master: -ID $_.ID -Language $_.Language -Version * | Where-Object { $_.Version.Number -le $minVersion }
35 }
36}
37if ($remove) {
38 $toRemove = $ritems.Count
39 $ritems | ForEach-Object {
40 $_ | Remove-ItemVersion
41 }
42 Show-Alert "Removed $toRemove versions"
43} else {
44 $reportProps = @{
45 Property = @(
46 "DisplayName",
47 @{Name="Version"; Expression={$_.Version}},
48 @{Name="Path"; Expression={$_.ItemPath}},
49 @{Name="Language"; Expression={$_.Language}}
50 )
51 Title = "Versions proposed to remove"
52 InfoTitle = "Sitecore recommendation: Limit the number of versions of any item to the fewest possible."
53 InfoDescription = "The report shows all items that have more than <b>$count versions</b>."
54 }
55 $ritems | Show-ListView @reportProps
56}
57
58Close-Window

Removing unpublished items

After a few failed attempts at reducing the size of the DB's, I discovered that the content editors working on the website had seemingly never deleted any content. Instead that had just marked things as unpublishable. I can see the logic in this, but after 5+ years, they have a lot of unpublished content filling up the content tree.

Well if it's unpublished I probably don't need it on my local machine so lets delete it.

Here's a script I wrote, the first part removes items set to never publish. After running just this part I found lots of the content items had the item set to publish but the version set to hidden. The second part loops through versions on items and removes any version set to hidden. If the item has no version left then it is removed too.

1
2
3// Remove items set to never publish
4Get-ChildItem -Path "master:\sitecore\content" -Recurse |
5Where-Object { $_."__Never publish" -eq "1" } | Remove-Item -Recurse -Force -Confirm:$false
6
7// Loop through items and remove versions set to never publish, then remove the item if it has no versions left
8foreach($item in Get-ChildItem -Path "master:\sitecore\content" -Recurse) {
9
10 $item
11 foreach ($version in $item.Versions.GetVersions($true))
12 {
13 $version
14 $version."__Hide version"
15 if ($version."__Hide version" -eq "1" ) {
16 $version| Remove-ItemVersion -Recurse -Confirm:$false
17 }
18 }
19
20 if ($item.Versions.GetVersions($true).count -eq 0) {
21 $item | Remove-Item -Recurse -Force -Confirm:$false
22 }
23}

Remove dead links

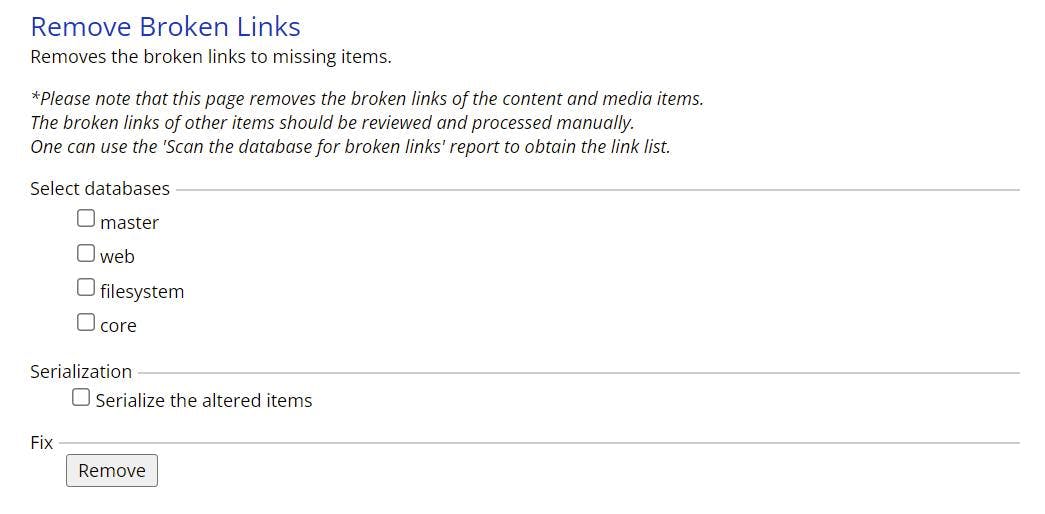
In the next step I rebuild the links DB, but I kept ending up with entries in the link table with target items that didn't exist. After a bit of searching I came across an admin page for clearing up dead links.

/sitecore/admin/RemoveBrokenLinks.aspx

With this page you can remove all those pesky dead links caused by editors deleting items and leaving the links behind.

Remove broken links screen in Sitecore

Clean Up DBs

With our content reduced the DB's now need a clean up before we do anything else.

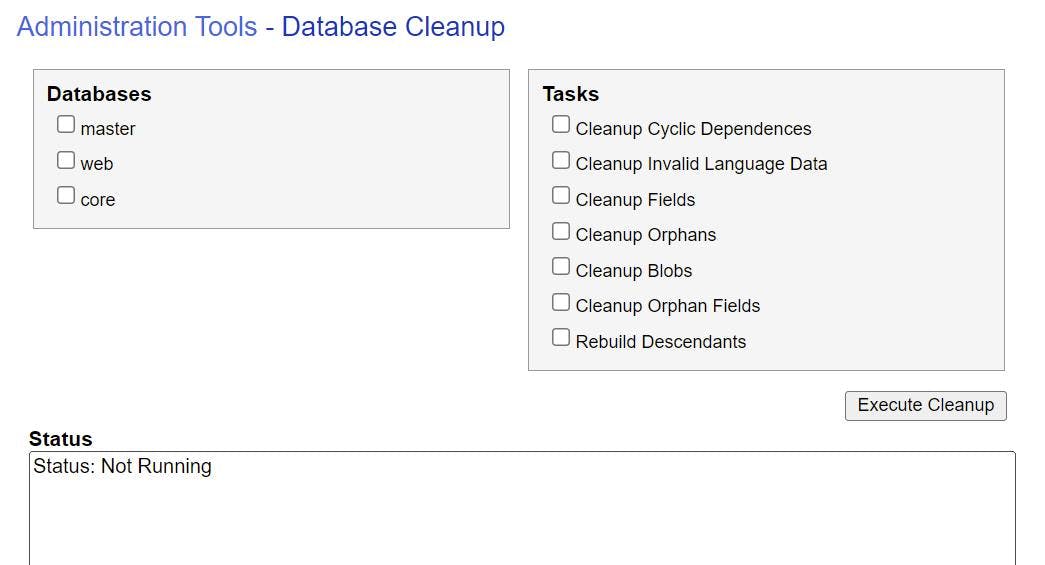
In the admin section there is a DB Cleanup page that will let you perform various tasks on the DB. I suggest doing all of these.

/sitecore/admin/DBCleanup.aspx

Sitecore Database cleanup page

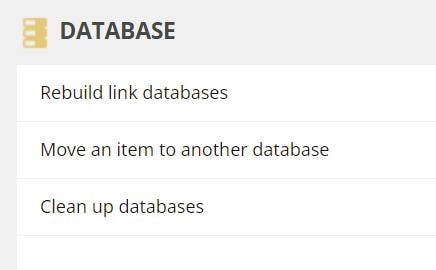
Once this is done navigate to the control panel and rebuild the link database. From the control panel you can also run the clean up database script, but it won't give you as much feedback.

/sitecore/client/Applications/ControlPanel.aspx?sc_bw=1

Sitecore rebuild link database screen

Remove unused media

With all the old versions/items/dead links removed and the DB's cleaned up its time to get rid of any unused media items. It's likely if you have a large DB that most of the space will be taken up by the media items. Fortunately with another PowerShell script we can removed any media that isn't linked too.

This PowerShell script is an adapted version of one by Michael West. You can find his version here https://michaellwest.blogspot.com/2014/10/sitecore-powershell-extensions-tip.html?_sm_au_=iVVB4RsPtStf5MfN

The main difference is I've been more aggressive and removed the checks on item owner and age.

1filter Skip-MissingReference {
2 $linkDb = [Sitecore.Globals]::LinkDatabase
3 if($linkDb.GetReferrerCount($_) -eq 0) {
4 $_
5 }
6}
7
8$items = Get-ChildItem -Path "master:\sitecore\media library" -Recurse |
9 Where-Object { $_.TemplateID -ne [Sitecore.TemplateIDs]::MediaFolder } |
10 Skip-MissingReference
11
12if($items) {
13 Write-Log "Removing $($items.Length) item(s)."
14 $items | Remove-Item
15}

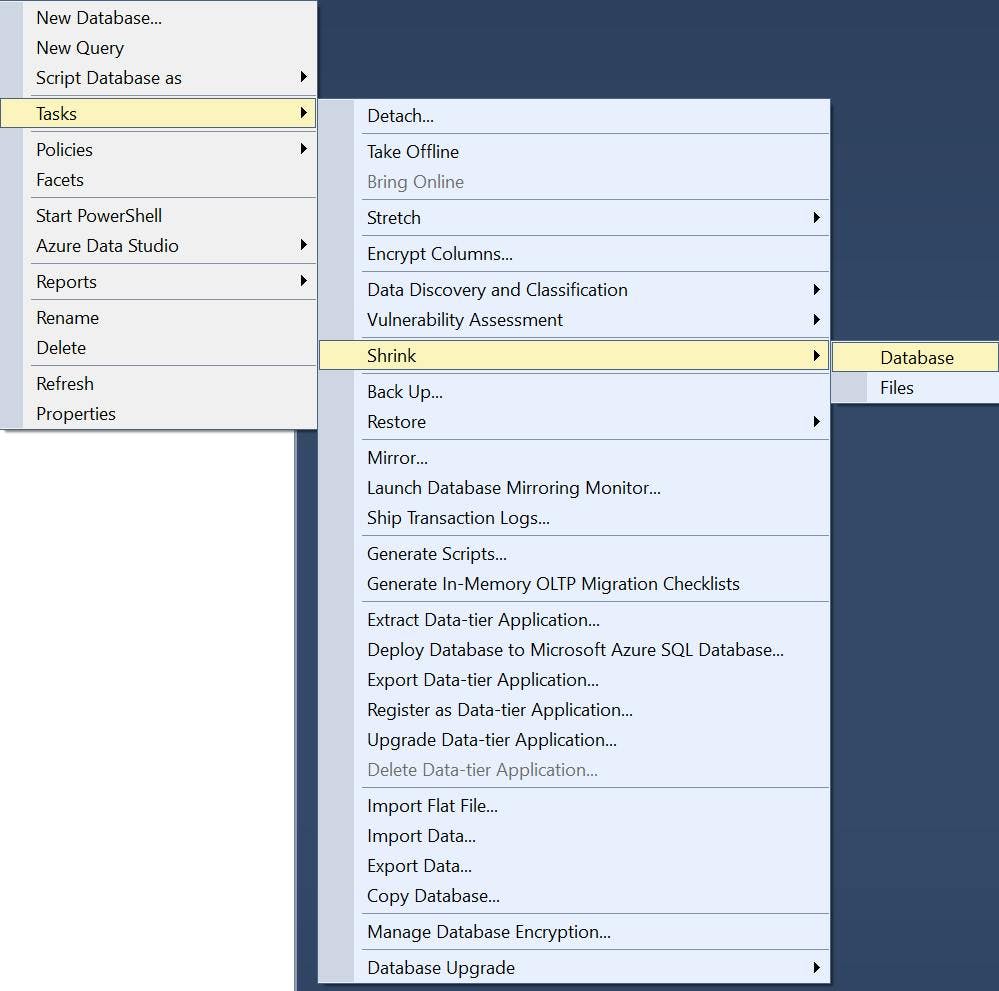
Shrink databases

Lastly through SQL management studio, shrink your database and files to recover unused space you hopefully now have from removing all of that media.

In my case I was able to turn a 20+ GB database into a 7 GB database by doing these steps.

If your local is running with both web and master DB, you should now do a full publish. The item versions which are published should stay exactly the same as we only removed items set to not publish. You should however get a reduction in your web DB from the media items being removed.

Creating a SSL for your local Sitecore Site

Creating a SSL for your local Sitecore Site

When you install Sitecore, the installer will quite handily setup some SSL certificates for you. That way when you test locally your site will correctly run under https. However for various reasons you may not have used the installer to setup your local instance, in which case you need to do it yourself.

Creating a self signed SSL certificate however is one of those things that's always been far harder than is should. Previously I've written about how you can do it using mkcert, but recently I've found another way.

Creating a new self-signed SSL certificate with PowerShell

First open a PowerShell window or if you use the new Windows Terminal then one of those will do. Make sure you run it as an administrator or you'll run into permissions errors.

Then run the following command filling in your site URL and a friendly name.

1New-SelfSignedCertificate -CertStoreLocation Cert:\LocalMachine\My -DnsName "my-site.local" -FriendlyName "MySiteName" -NotAfter (Get-Date).AddYears(5)

This will create a cert with the expiry date set in 5 years time.

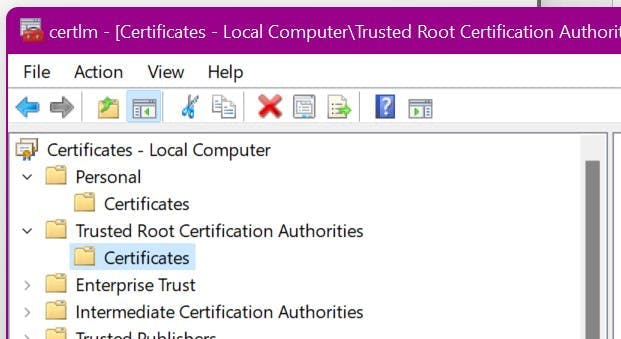
Next, it needs moving to the Trusted Root Certification Authorities store.

Click Start and type:

1certlm.msc

Find the certificate you just created in your personal certificates, and copy it into the trusted root certificates.

IIS HTTPS Site Bindings

To instruct your site to use the new certificate you need to update the IIS bindings for your site.

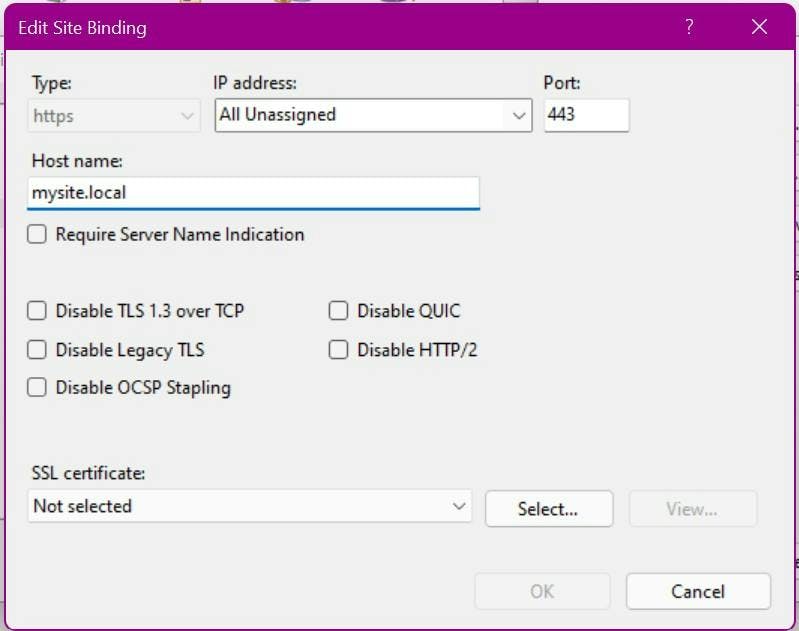
Go to IIS > selects site > Bindings... and then choose the https bindings.

You should have something like this.

In the SSL certificate drop down, pick your newly created certificate.

At this point you should have an SSL certificate which browsers actually like!

Other Sitecore Settings

Despite the newly working certificate you may still run into issues with Sitecore which could either be due to SSL thumbprints in config files or config settings for URLs not including https. e.g. In {IDENTITYSERVER_ROOT}/Config/production/Sitecore.IdentityServer.Host.xml there is a setting for AllowedCorsOrigins which will need the https version of the url.

Automated Deployments with Sitecore Managed Cloud

Automated Deployments with Sitecore Managed Cloud

I think it's fair to say automated deployments are a fairly standard practice at this point, long gone are the days when we would remote onto a server and copy some files over.

However when you get your shiny new Sitecore managed cloud environment, unlike other cloud offerings it doesn't come with any automated deployments setup for you. Which to be frank is a bit of a let down. Getting one setup though isn't the hardest thing in the world.

A few requirements we're after:

  1. Deployments should be a button click, no copying and pasting files.
  2. Deployments should get promoted through multiple environments. e.g. Test, Staging and Production.
  3. Deployments should be gated and approved to be released.
  4. There shouldn't be any downtime during the deployment.

So lets dive in.

Azure Devops

The first thing to note, is that Sitecore Managed Cloud is essentially vanilla Microsoft Azure with Sitecore setup on it. As a developer or devops engineer you get given a regular login to the Azure portal and as far as I've seen there's nothing specifically Sitecore about it.

This means however you would normally deploy other things to Azure will work perfectly well for Sitecore. My preference is to use Azure Devops as being from Microsoft it fits really well into the Azure ecosystem.

To do this, first off sign up for Azure Devops, get a pipeline created that compiles your solution and outputs it to an artifact. I'm going to skip past all the details on how you do this as it's not specific to managed cloud and at this point lots of people have written articles on how to do it, there's also a high chance your solution is already doing this. If not then go Google it :)

Release Pipeline

To do a release we need a release pipeline. Unlike build pipelines which control a build and are written in yaml, release pipelines control a release and are created through a UI. With these you can configure the different steps, add gates, configure variables, everything you need for a release.

Once you've got a Devops project and your solution compiling, the next step is to create a release pipeline. So head onto the release pipeline section and click the big blue button to make your first pipeline.

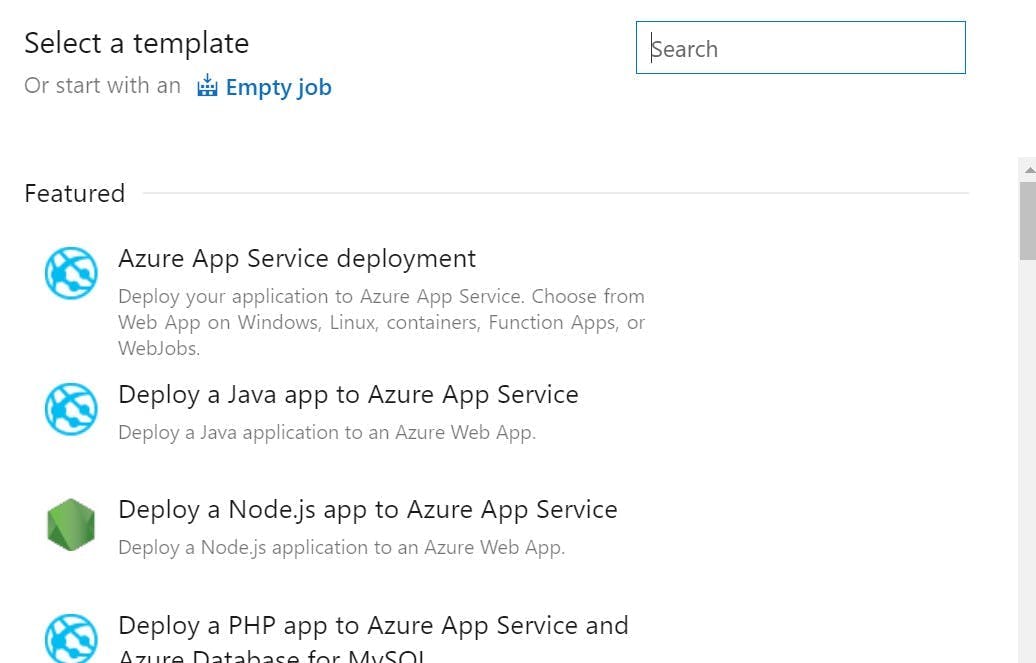
Sitecore Managed Cloud runs Sitecore as Azure App Services, so you will want to pick the Azure App Service deployment template.

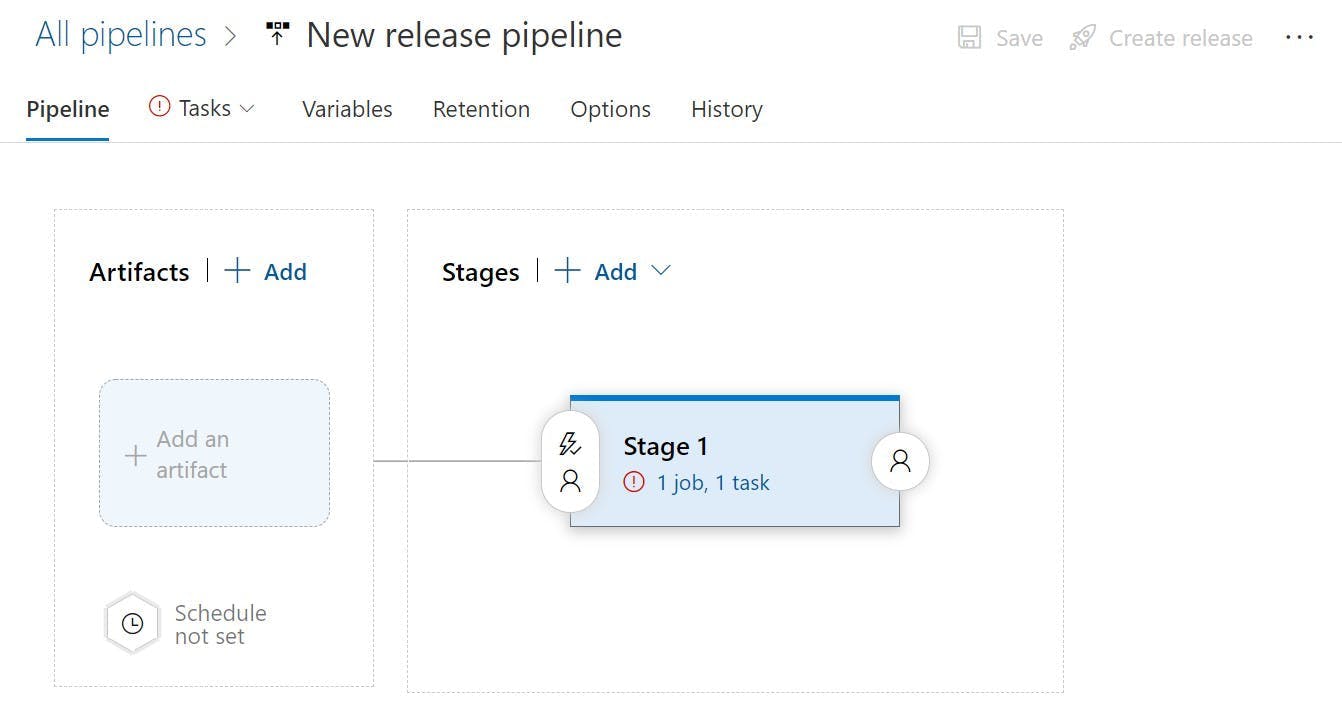
This template will create a stage with a job, but before it can release anything it needs an artifact to deploy.

Click the Add an Artifact button and pick the artifact from your build. On the artifact you can now click a lightening bolt icon to set up continuous deployment triggers. From here you can set the release to run whenever there is a new build on your master / main branch.

The deployment stage will also need some details completing so click into that next.

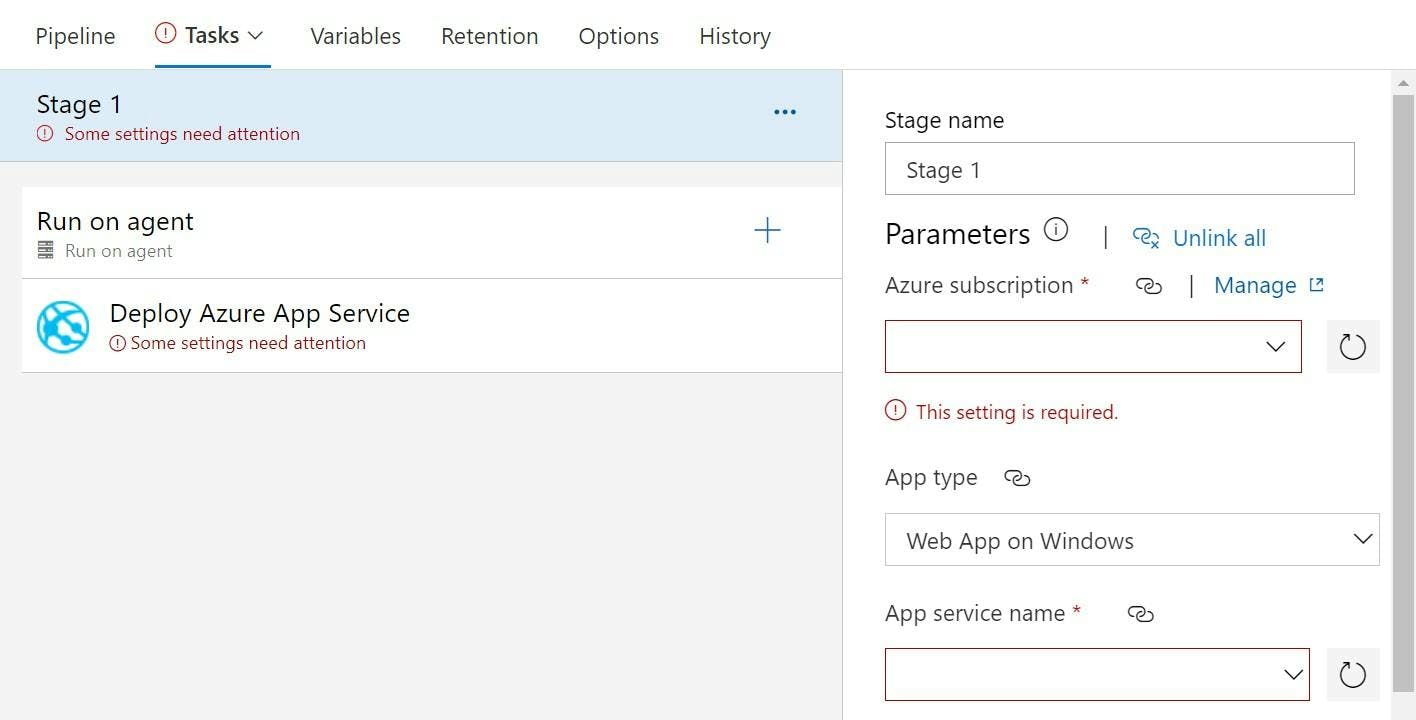
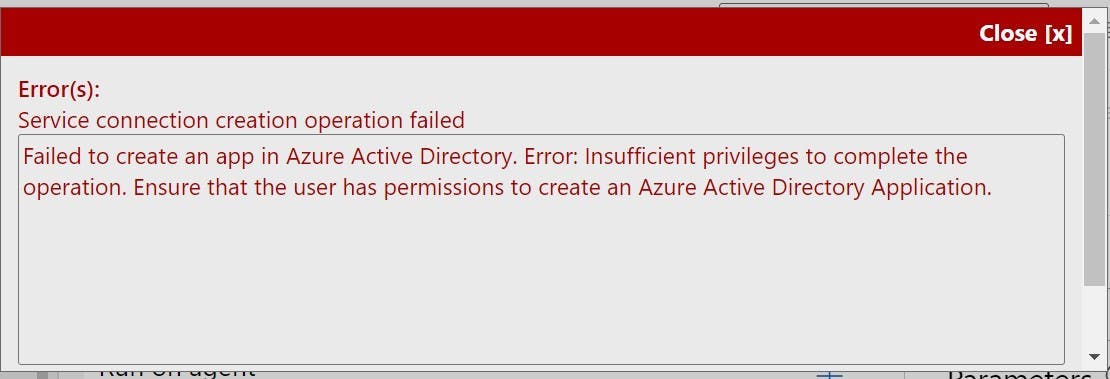
Now when you try to pick the Azure subscription for Sitecore Managed Cloud, you will likely get an error saying Failed to create an app in Azure Active Directory. Error: Insufficient privileges to complete the operation. Ensure that the user has permissions to create an Azure Active Directory Application.

Don't worry, you can't solve this on your own, but Sitecore Support can fix it for you. To get Azure Devops connected to the azure subscription you need a service principal setup. They will know what you mean and send you a service principal id and key.

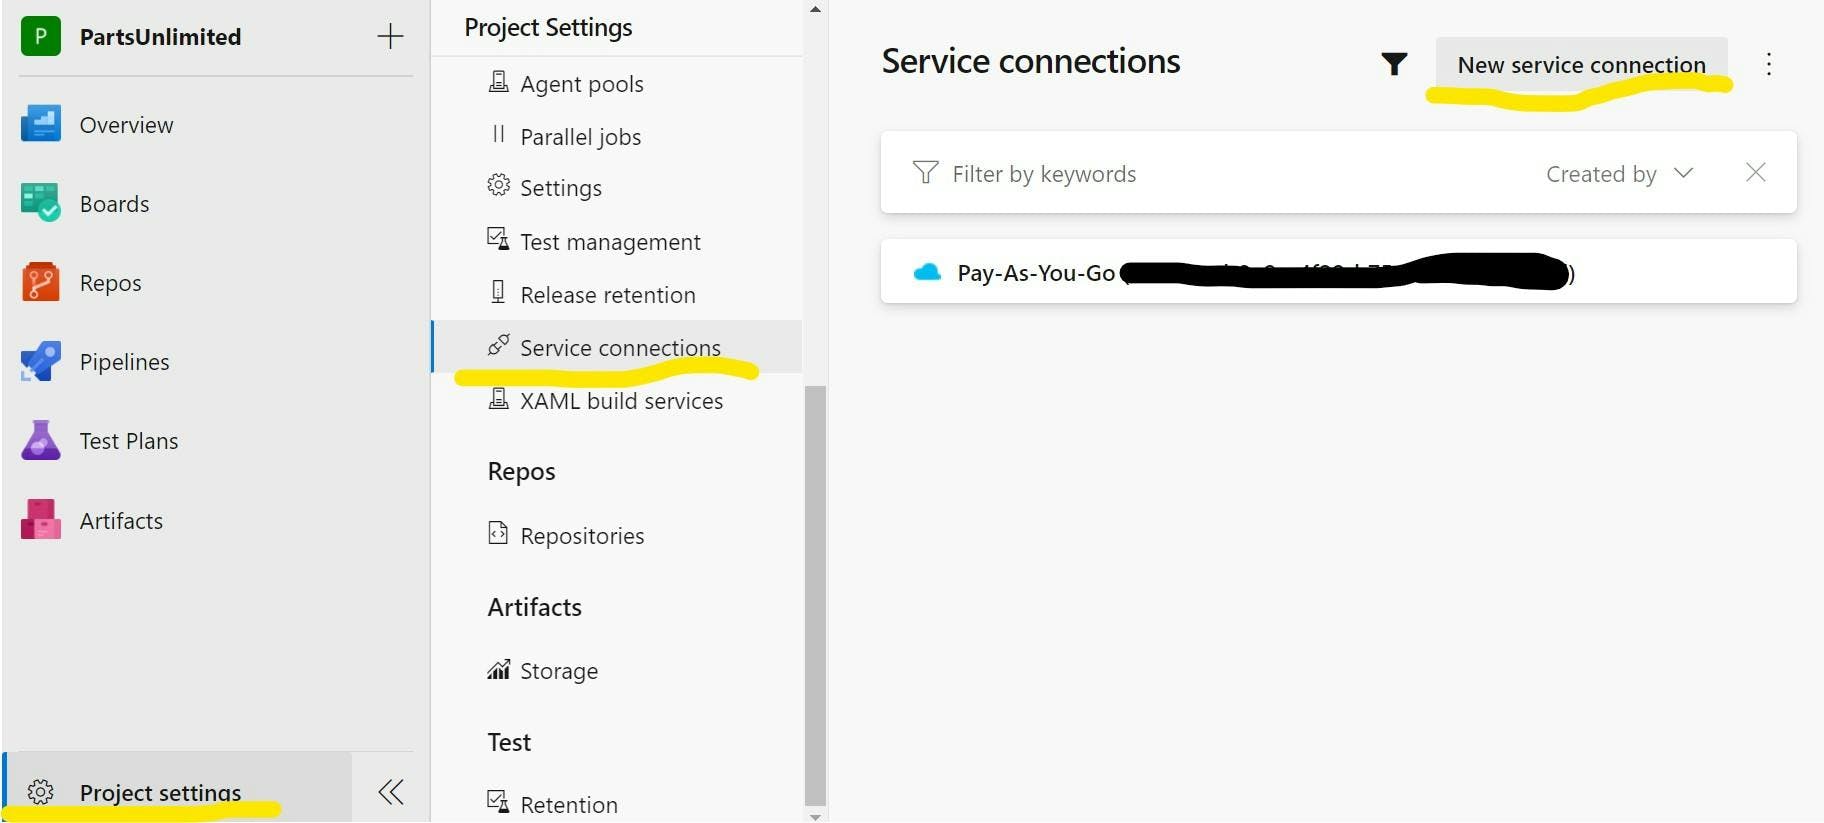
To setup the service principal go to, Project Settings > Service Connections > New Service Connection.

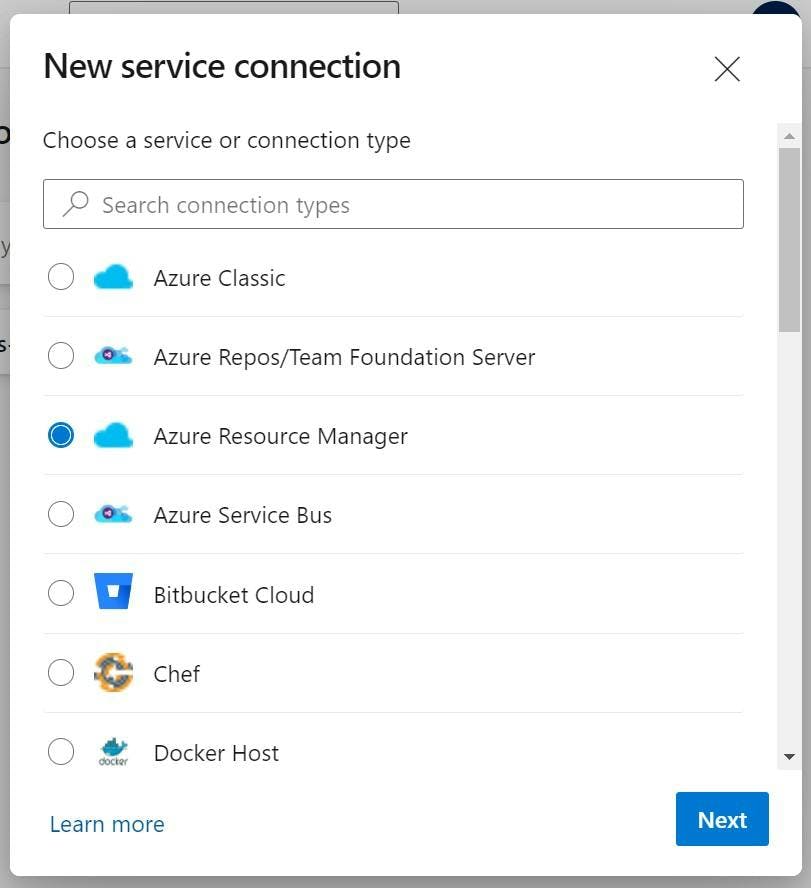
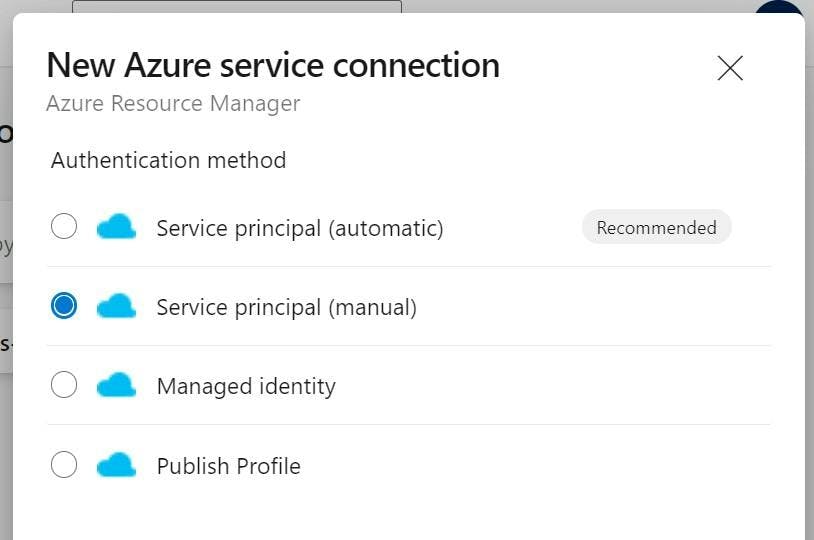
Pick Azure Resource Manager.

And Service Principal (manual).

Enter the details and you'll have a connection into Sitecore Managed Cloud.

Back in the release pipeline you can now select the Azure subscription and App service name. Run the pipeline and your solution will deploy.

You now have a solution deploying to the Azure App Service. Some things to note:

1. This process does not delete any files already on the target machine. This is intentional as with managed cloud the files have a split responsibility. Sitecore installs Sitecore and manage the SSLs which include config file changes, none of which will be in your source control. You however are doing everything else.

2. Right now whenever you deploy the site will experience downtime as there no concept of green / blue deployments setup.

Blue / Green Deployments

One of the great things about using Azure App Services is all the infrastructure stuff like load balancers, multiple instances etc is done for you. If you want to scale horizontally and add instances, you just move a slider and all the deployments and load balancing is done for you.

If you want to do a blue / green deployment that can be done for you using slots.

Creating an App Service Deployment Slot

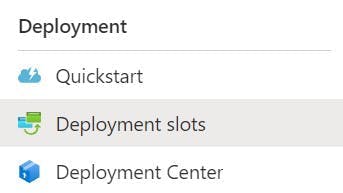
To create a slot navigate to the app service you are deploying to, and select Deployment Slots on the left nav.

Click Add Slot, give it a name. e.g. staging and choose to clone the settings from the existing default slot.

You will now have a second slot that can be deployed to and then swapped to be the live one. When slots are swapped the application is warmed up first meaning no downtime when the slot happens.

However although you copied the settings from the original slot, your staging slot won't have an application on it yet and as your source control won't contain the whole of Sitecore, you will need to copy it from the existing slot.

Connecting to Deployment Slots with FTP

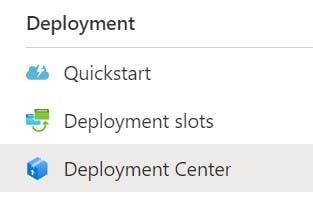
The easiest way to setup the slot with the base files is to copy them with FTP. To get the FTP details select one of the slots from the slots list and then select Deployment Center in the left nav.

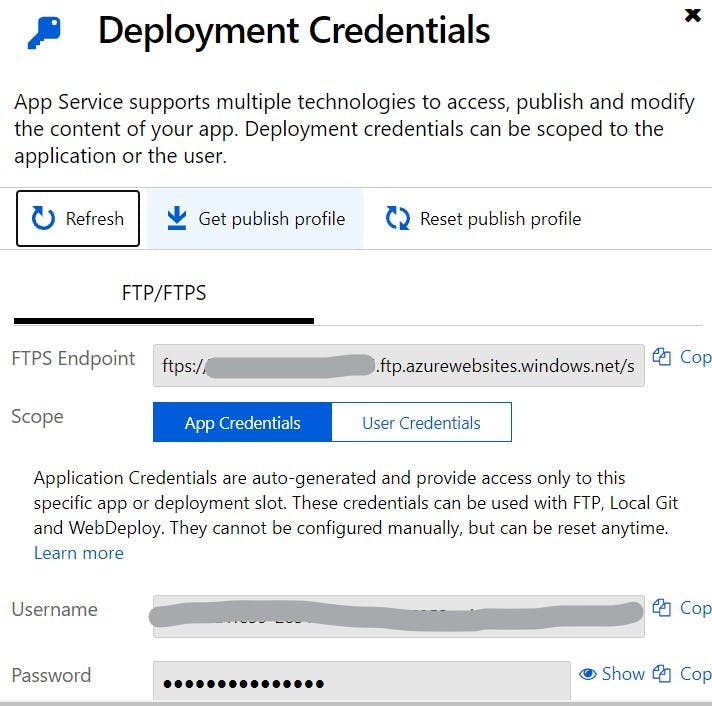
Now in the top nav, select Deployment Credentials.

A panel will now show giving you the FTP details.

Repeat this with the other slot and you now have the details to be able to FTP to the different environments and copy the contents from one to the other.

Configuring Azure Pipelines to deploy to a slot

The last thing on our list is to start deploying to the slot and then swapping the slot to achieve no downtime.

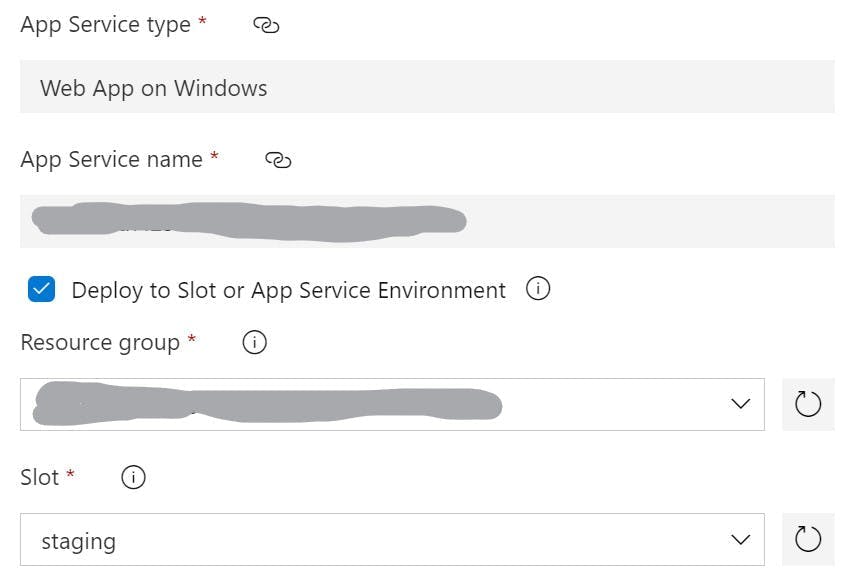
Within Azure Devops navigate back to the release pipeline and edit the pipeline. Go into the job/task and select the Deploy Azure App Service task. Under the App Service Name setting you will see a checkbox to deploy to a slot. Select this and then complete the details for Resource Group and Slot.

If you were to deploy now, your code would be deployed to the slot rather than the production instance. You could then preview the site running on the slot and manually swap the slots in the Deployment slots section of the portal.

Alternatively you can configure the release pipeline to swap the slots for you.

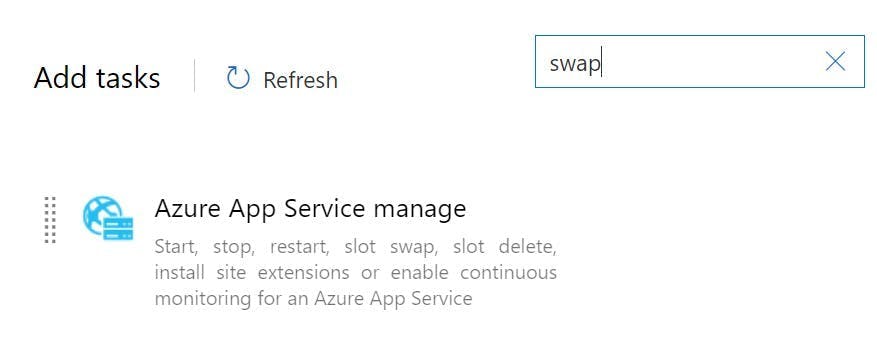
Add a new task to the pipeline job called Azure App Service Manage. This will come up if you search for swap.

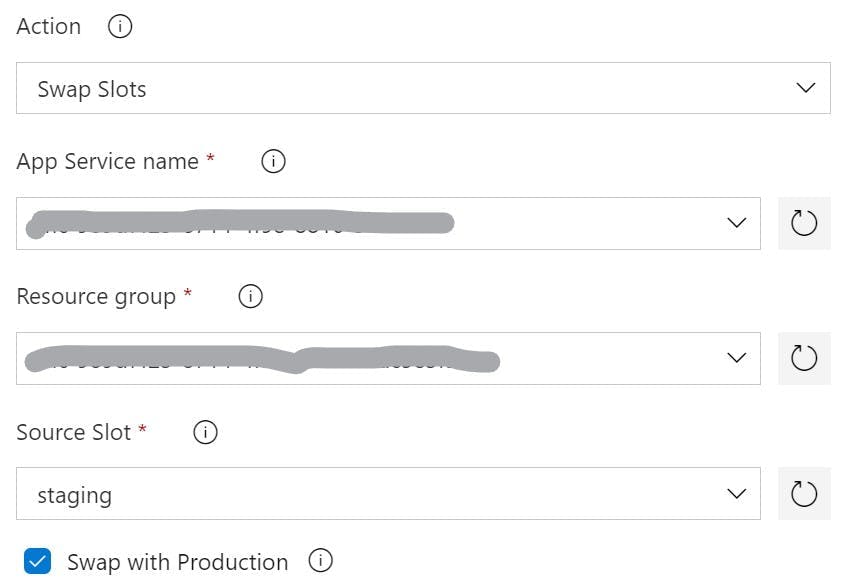
Complete the details for the task, setting Action to Swap Slots, and enter your App Service name, Resource group, and the Source Slot that it needs to swap with. Check the checkbox to Swap with Production.

With this all configured you can now run your pipeline and have an automated deployment with no downtime. The solution will first be deployed to the slot and then the slot swap action will swap the two over. When it does this the staging slot will be warmed up first meaning that when the swap completes there will be no downtime as Sitecore will have already started.

Downloading multiple images from Sitecore

Downloading multiple images from Sitecore

Initially it seems like an easy request, "can I have a copy of the images from this folder including all the sub-folders", and then you remember Sitecore stores all the images in the DB so those folders that they're in aren't real file folders for you to copy and paste from. Hopefully you check the admin for an export button only to discover that the only download button for an image is on the individual image, not the folder. Being a developer faced with the prospect of having to click a download button on an unknown number of images, you do what every good developer does and try and find an alternative.

The good news is your in luck, there is a way and I'm going to tell you it.

Sitecore Powershell Extensions

Not only is Sitecore Powershell extensions a great way of writing scripts to interact with your Sitecore DB without having to do code releases. It also comes with the exact script you need!

First head over to the Sitecore Marketplace and download the correct package for your Sitecore version. https://marketplace.sitecore.net/en/Modules/Sitecore_PowerShell_console.aspx

Installation is simple, you just install the package, no config changes needed.

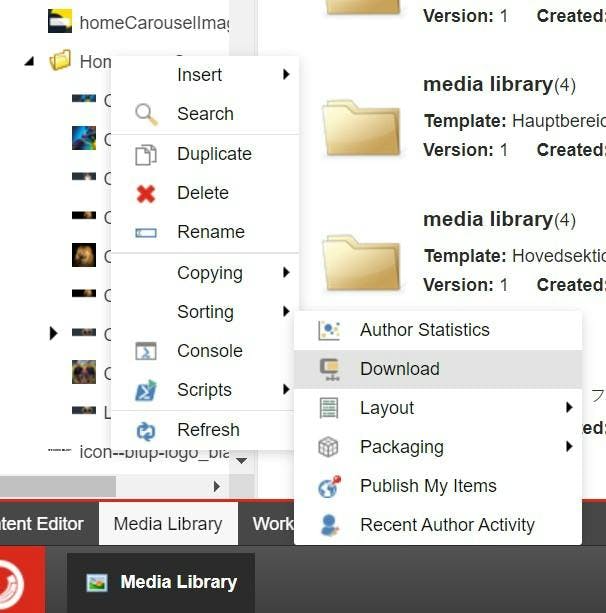
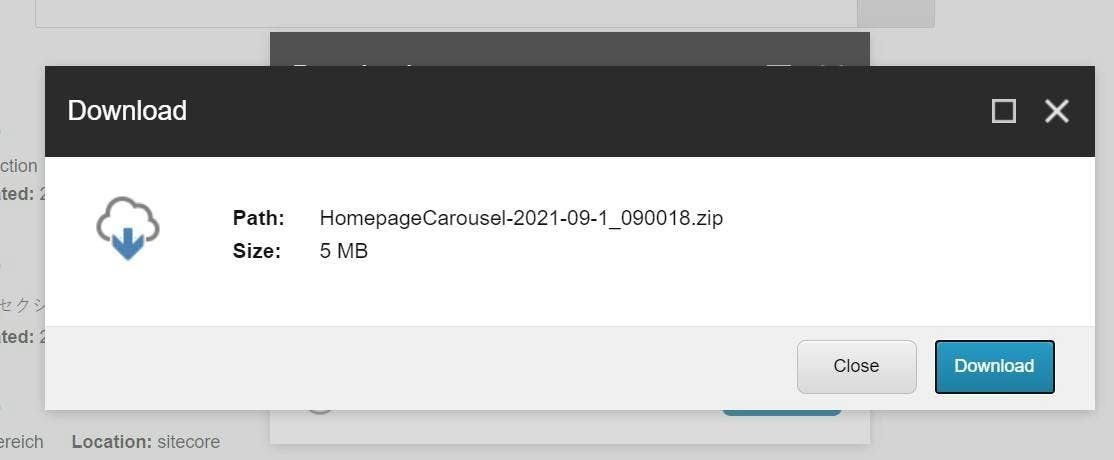
Now go to the media library and right click the folder you want to export. In the context menu, select scripts and then download.

Just like that, a dialogue appears asking you if you want to download the zip it just created. Click download and you will have all the images.

They will even be organized with the correct folders inside.

How to create a custom droplist in Sitecore

How to create a custom droplist in Sitecore

You could call this how to create a custom drop down, or select list, potentially even picker, but if you've ended up here hopefully what your after is a way to create a drop down list in the Sitecore admin populated with options that aren't from Sitecore.

Fortunately this is quite simple to do by creating a new field type. First we will create the code are new custom field type, then add it to the list of field types in the core db and then use it in a template.

Custom Field Type Code

  • Either create a new class library or decide on an existing one to put the code for your new field type in.
    I've imaginatively gone for one called HiMyNameIsTim.Sitecore.FieldTypes
  • Add a reference to Sitecore.Kernel (you can get this from the Sitecore NuGet feed)
  • Create a class for your custom field type
  • Add the following code, replacing the options with your logic to get the values.
1using Sitecore.Web.UI.HtmlControls;
2
3namespace HiMyNameIsTim.Sitecore.FieldTypes
4{
5 public class SchemeDropList : Control
6 {
7 protected override void DoRender(System.Web.UI.HtmlTextWriter output)
8 {
9 output.Write("<select" + ControlAttributes + ">");
10 output.Write("<option></option>");
11
12 string s;
13 if (base.Value == "1")
14 s = "selected";
15 else
16 s = "";
17 output.Write("<option value=\"1\" " + s + ">First</option>");
18
19 if (base.Value == "2")
20 s = "selected";
21 else
22 s = "";
23 output.Write("<option value=\"2\" " + s + ">Second</option>");
24
25 output.Write("</select>");
26
27 RenderChildren(output);
28 }
29 }
30}

  • Publish this into your site
  • Login to the admin and switch to the core db
  • Navigate to "/sitecore/system/Field types/List Types/" in the tree
  • Create a new item of type "/sitecore/templates/System/Templates/Template field type"
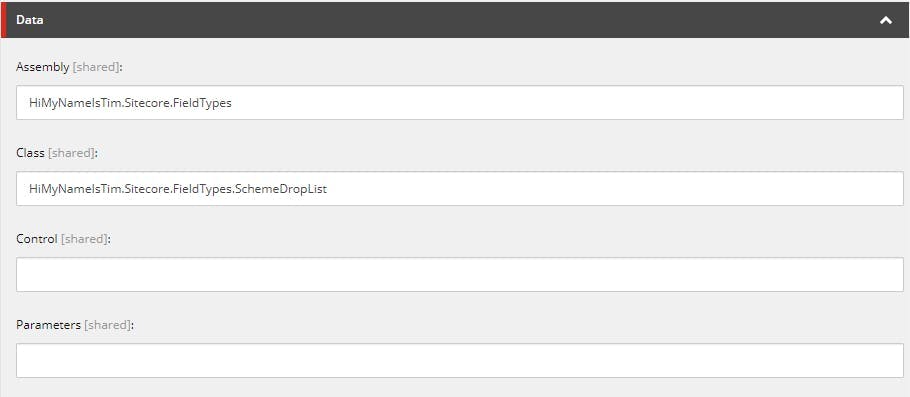
  • Populate the assembly and class option with the values for the class you just made. For me this is:
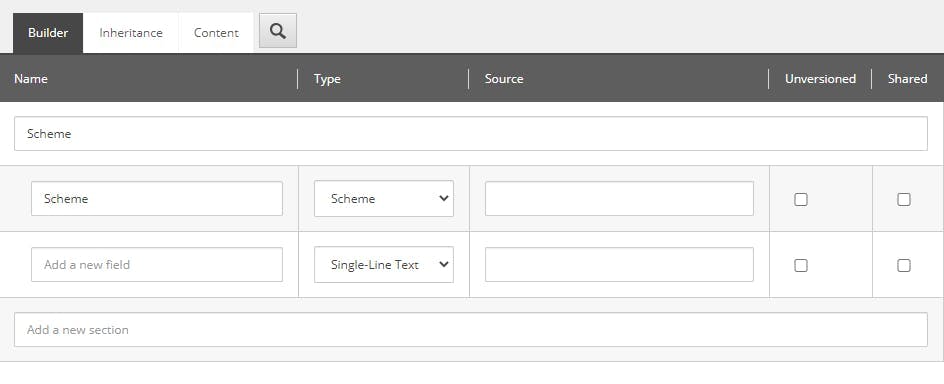
  • Switch to the master DB and create a template using your new field type. Here's mine:
  • Create a page and you should have a drop down list with the values from your class.
Sitecore 10 with headless ASP.NET Core

Sitecore 10 with headless ASP.NET Core

Sitecore 10 is here and with it comes the new developer experience with what Sitecore are calling Sitecore Headless Development.

Now you may be thinking, "didn't Sitecore already have a Headless setup in Sitecore 9" and the answer would be yes, is still exists and is referred to as Sitecore Javascript Services (JSS). What makes this difference is the rendering layer is now using ASP.NET Core rather than Javascript libraries like Angular, VueJS and React. This gives us the benefits of a headless setup without having to program in one language for the back end (C#) and another for the front (JS). It's now C# everywhere.

Before we get any further into what this new experience is, let's clear one thing up. Like Sitecore JSS, this isn't actually a true headless setup, it's decoupled. The subtle difference being that a headless CMS has no rendering engine and has a purpose to feed content to multiple heads that could be anything from a website or app to physical display boards. They generally lack the ability to do things like preview because they have no knowledge of how the content will be rendered. Decoupled on the other hand still has a rendering engine but its been split off from the backend. Headless however is far more of a buzz word right now and alas Sitecore have called this headless.

So how does it work?

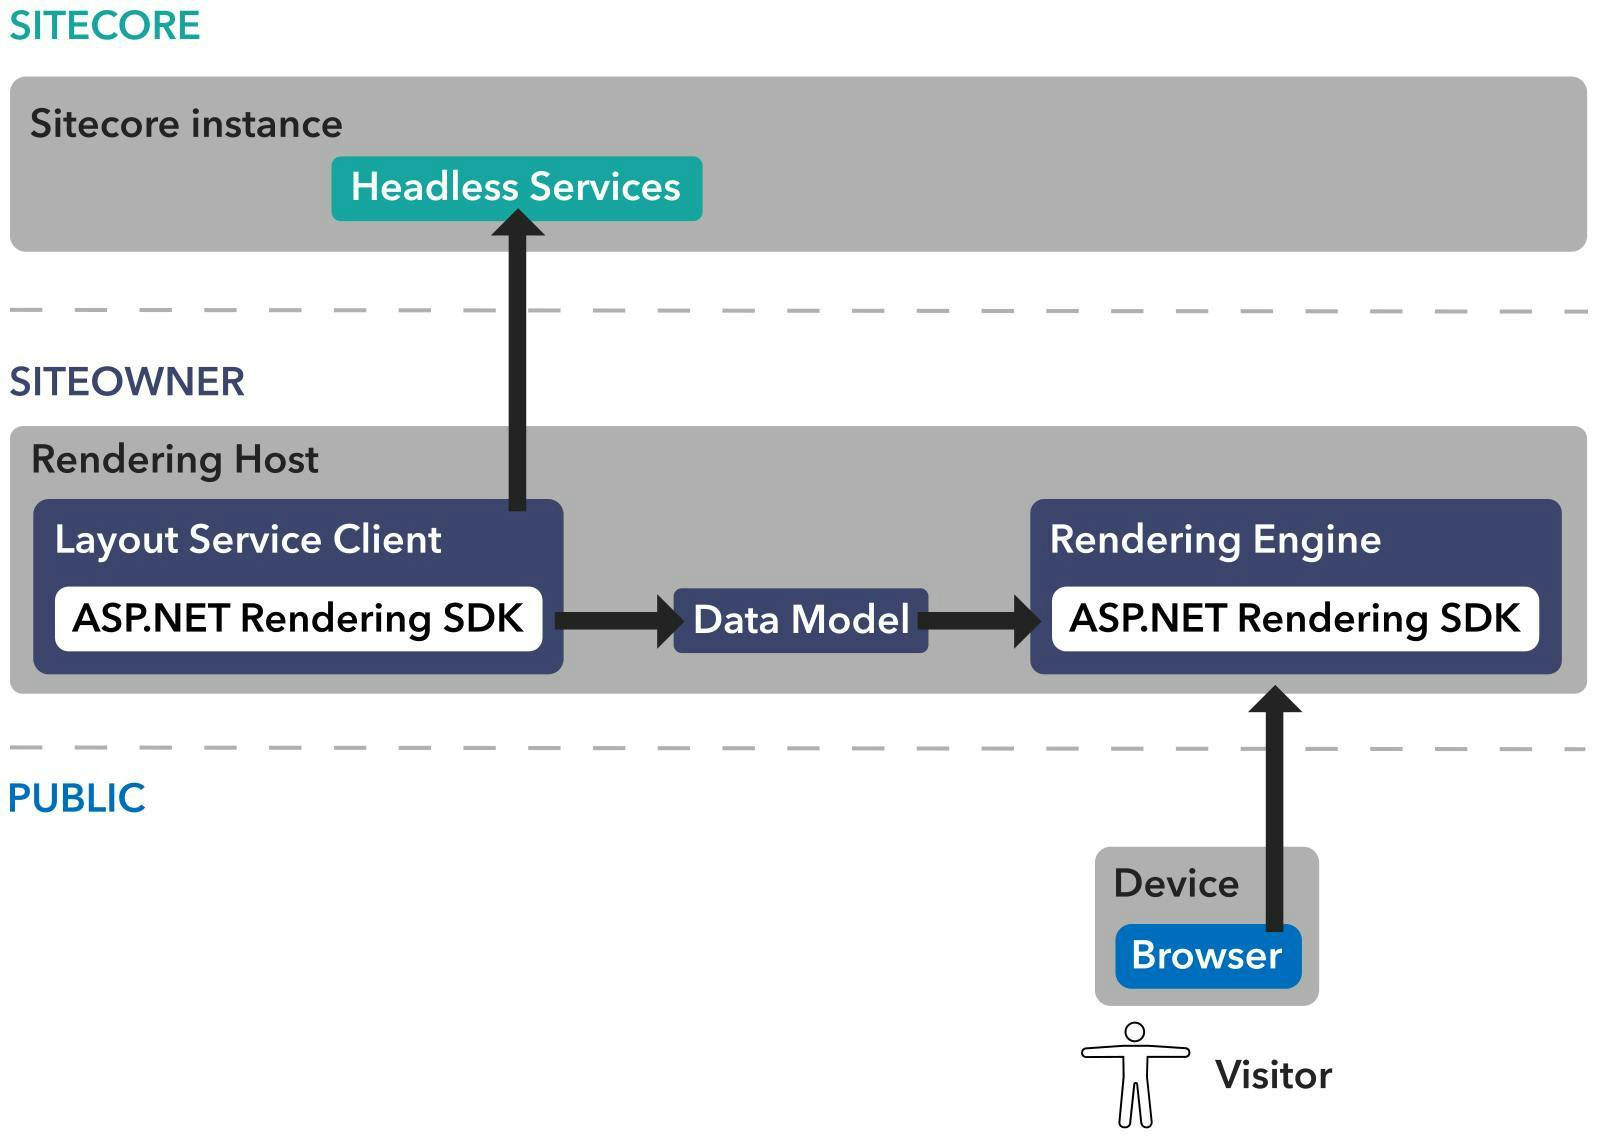
The traditional part of Sitecore is essentially the same as it is now. You still have Content Manager and Content Delivery servers, XConnect, Identity and all the other roles exist just as they did in Sitecore 9. However rather than creating View and Controller Renderings in Sitecore to return HTML, you will now create JSON renderings that will return item data through an API.

Communicating with that API is a new Rendering Host layer written in ASP.NET Core.

So now when a visitor comes to your site they will be interacting with the ASP.NET Core site which in turn will call the Headless Service API on your content delivery server, this will return JSON objects for the item data. The ASP.NET Core site then renders the page and returns it to the visitor.

This may sound like a bit more work, as you now have to setup a completely separate ASP.NET Core site and have that talk to an API but there's good news. Sitecore have written a Sitecore ASP.NET Rendering SDK (included via NuGet) which will do most of the communication with the API for you. Most of what you will actually do is just a mapping of a View in the Rendering Host to a Layout Rendering item in Sitecore. The SDK will take care of the rest.

What's the benefit?

As a developer there are three massive benefits that I can see for this setup.

Installs and Upgrades should be easier

If I had one complaint about Sitecore, it's the amount of config to get the site running. With platforms like Umbraco and EPI, you just include a NuGet package in your project, run it from Visual Studio and you have a working CMS. Sitecore has to be installed in one of countless ways (SIF, GUI, Serverless, Containers) and that install process creates an ever increasing number of roles that all need to communicate with each other, and all need to be upgraded at some point.

Now this isn't quite a SASS model, but it's getting closer. With your rendering host now separated from the Sitecore install there's less reasons to ever touch what gets setup by the installer.

Notice I do say less and not no reason. You will still be making changes to the CM and CD instances. For any type of rendering where you would have written a controller you will likely create what is called a contents resolver class that will need to go on the CM/CD to generate the object for your view.

You can run and debug directly from Visual Studio

Whenever I switch away from working on Sitecore and then go back the first point of pain is always the realisation that I'm going back to a process of Write code in Visual Studio > Publish to local site > Look at local site > if there's a need to debug ctrl+alt+p to attach to process > realize Visual Studio isn't in admin mode so restart Visual Studio etc etc etc, but with this setup it's Write code > Press F5 > watch the lightweight front end instantly spin up and work.

Front End devs only need the ASP.NET Core project

Life is hard for a Front End developer working on Sitecore. There skill set is in HTML and CSS, but they have to work with this beast of a CMS and get updates from the back end devs to work on their local environments. Tools like Feydra help improve the situation, but it's still not perfect.

In theory with a decoupled setup, with the Sitecore instance running on a server somewhere and a decent internet connection, all they now need is the ASP.NET Core Rendering Host project which will run direct from source control. No need to install anything and they can even work on a Mac!

How do you get setup?

To get going is a relatively simple experience due to the fact Siteocre have provided a getting started template (https://doc.sitecore.com/developers/100/developer-tools/en/walkthrough--using-the-getting-started-template.html) and a guide for creating your first model-bound view.

The guide uses a Sitecore Container setup (also new in Sitecore 10) which makes it even easier to get started with (no more installing all those pesky pre-req's like Solr with https and debugging SIF errors).

I ran into a few issues with the containers that came down to ports not being available (if you do get errors, check the documentation for containers, it lists some additional port numbers that need to be free), but once you have it setup I would say you end up with more questions on the container side of things and the rendering host part just works.

What is missing?

This is a first release so obviously some things are missing right now. The biggest things I've come across so far are:

  • Information on how you debug. Wanting to know if an issue is with the API not returning data or the rendering host not rending it lacks any guidance on how to do this right now.
  • Sitecore Forms. A relatively important module for sites which won't be available if you choose this setup.
  • Ability or at least instructions on how the Rendering Host should interact with the Sitecore DB or Search. For instance if you wanted to create an API to provide an autocomplete on a search box, logically you would now create the API in the rendering host, but the best practice way to retrieve the data from Sitecore is not yet clear.
Using Sitecore TDS with Azure Pipelines

Using Sitecore TDS with Azure Pipelines

Sitecore TDS allows developers to serialize Sitecore items into a file format which enables them to be stored in source control. These items can then be turned into a Sitecore update package to be deployed into a Sitecore solution.

With tools like Team City it was possible to install the TDS application on the server, and MSBuild would pick it up in the same way that Visual Studio would when you create a build locally. However, with build tools like Azure Piplelines that are a SAAS service you do not have any access to install components on a server.

If your solution contains a TDS project and you run an Azure Pipeline, you will probably see this error saying that the target 'Build' does not exist in the project.

Fortunately, TDS can be added to a project as a NuGet package. The documentation I found on Hedgehogs site for TDS says the package is unlisted on NuGet.org but can be installed in the normal way if you know what it's called. When I tried this is didn't work, but the NuGet package is also available in the TDS download so we can do it a different way.

Firstly download TDS from Hedgehogs website. https://www.teamdevelopmentforsitecore.com/Download/TDS-Classic

Next create a folder in the root of your drive called LocalNuGet and copy the nuget package from the download into this folder.

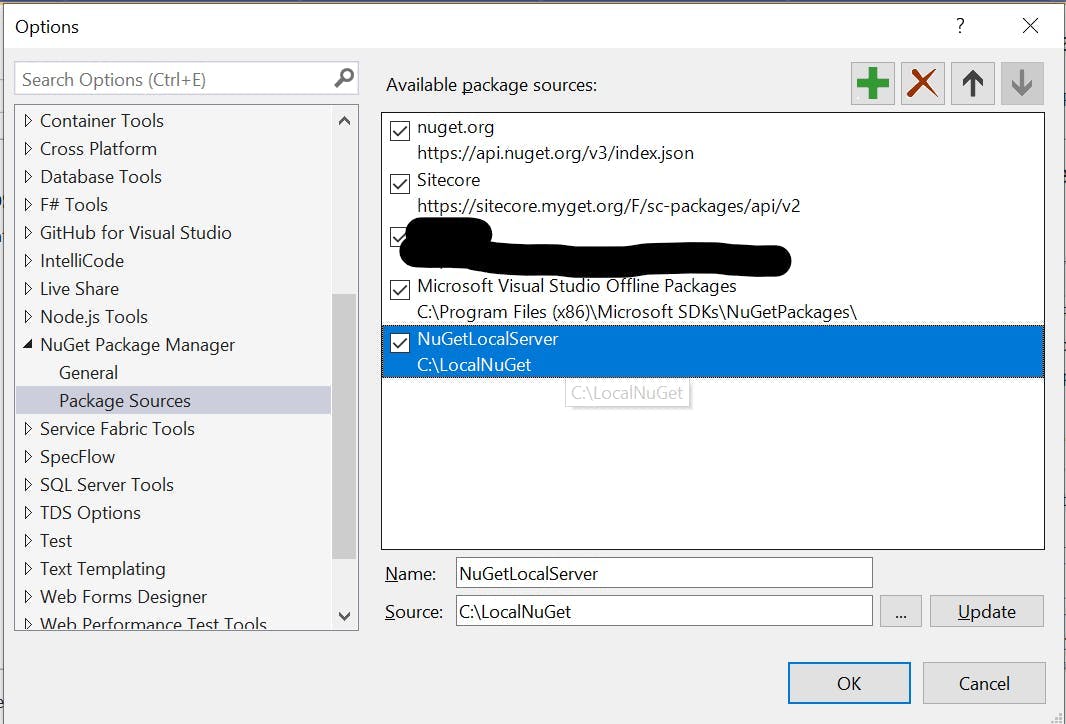
Within Visual Studio go to Tools > NuGet Package Manager > Package Manager Settings, and in the window that opens select Package Sources on the left.

Add a new package source and set it to your LocalNuGet folder.

From the package manager screen select your local nuget server as the package source and then add the TDS package to the relevant projects.

When you commit to source control make sure you add the hedgehog package in your projects packages folder. Normally this will be excluded as your build will try and restore the NuGet packages from a NuGet feed rather than containing them in the repo.

If you run your Azure Pipleine now you should get the following error:

This is a great first step as we can now see TDS is being used and we're getting an error from it.

If you're not getting this, then open the csproj file for your solution and check that there are no references to c:\program files (x86)\Hedgehog Development\ you should have something like this:

1<Target Name="EnsureNuGetPackageBuildImports" BeforeTargets="PrepareForBuild">
2 <PropertyGroup>
3 <ErrorText>This project references NuGet package(s) that are missing on this computer. Use NuGet Package Restore to download them. For more information, see http://go.microsoft.com/fwlink/?LinkID=322105. The missing file is {0}.</ErrorText>
4 </PropertyGroup>
5 <Error Condition="!Exists('..\packages\HedgehogDevelopment.TDS.6.0.0.10\build\HedgehogDevelopment.TDS.targets')" Text="$([System.String]::Format('$(ErrorText)', '..\packages\HedgehogDevelopment.TDS.6.0.0.10\build\HedgehogDevelopment.TDS.targets'))" />
6 </Target>
7 <Import Project="..\packages\HedgehogDevelopment.TDS.6.0.0.10\build\HedgehogDevelopment.TDS.targets" Condition="Exists('..\packages\HedgehogDevelopment.TDS.6.0.0.10\build\HedgehogDevelopment.TDS.targets')" />

To fix the product key error we need to add our license details.

Edit your pipeline and then click on the variables button in the top right. Add two new variables:

  • TDS_Key - Which should be set to your license key
  • TDS_Owner - Which should be set to the company name the key is linked to

Now run your pipleline again and the build should succeed

Moving the Media Cache folder in Sitecore

Moving the Media Cache folder in Sitecore

One of the cache’s that Sitecore has is the Media Cache. Whenever you use an image from Sitecore’s media library, Sitecore will retrieve the image from the database, scale it to the size you requested and then store it to disk in the media cache folder. On any subsequent request the image will now be retrieved from the media cache rather than the database.

By default each content management and content delivery server will locate the media cache in /App_Data/MediaCache

This is a relatively logical place to store a cache for images that wont cause you many issues. However, if you have automated deployments setup then you are likely wiping the whole of your website folder each time you do a deploy to ensure that your deploy remains the same on all environments. As the App_Data folder is in the website, your Media Cache will be deleted too.

Depending on your site then deleting the media cache potentially isn’t much of an issue. After all it’s a cache so all that will happen is the images will get cached the next time they are requested. But depending how many images get retrieved at the same time this could slow down performance, particularly if your content editors decided to put every image they ever uploaded into the same folder. Opening the that folder in the admin will create a nice amount of load on your server, particularly if you also have some extra image optimization logic installed.

Like most things in Sitecore though, you can change the location through a config setting.

In Sitecore.config you will find a property called Media.CacheFolder. Change this to somewhere outside of your website folder and Sitecore will now start storing the Media Cache in this location and it will be safe your all your deploys.

1<!-- MEDIA - CACHE FOLDER
2 The folder under which media files are cached by the system.
3 Default value: /App_Data/MediaCache
4 -->
5 <setting name="Media.CacheFolder" value="/App_Data/MediaCache"/>
Do I need a Headless CMS?

Do I need a Headless CMS?

What is a Headless CMS?

Headless CMS’s have become the hot topic in recent years along with preferences to move to microservices over monolithic architectures and to decouple parts of applications where possible. So, you may be wondering do I need one?

Let’s start with what a Headless CMS actually is. A typical CMS does two jobs;

Firstly, it provides a place for marketers to login and create pages of content that appear on the website. Some allow very basic content editing, other provide the capabilities to construct entire pages from pre-built components, preview what it looks like, apply personalisation rules, split testing and a whole host of other features.

Secondly, they allow developers to create templates of skins to render the pages to visitors. They also provide authentication, form data collection, track visits, browsing habits etc.

Essentially the functionality splits into what the marketer sees and what the visitor sees.

A Headless CMS on the other hand, chops of the second part and in its place leaves an API so that another application can pull content out of the CMS for it to display. The CMS then becomes a place solely responsible for managing content rather than managing a website.

Decoupling in this way offers a few advantages:

  1. The technology/platform is no longer determined by the CMS. You could have a .net based CMS and write the website in JavaScript, php, or any other language.
  2. The content can be provided to more than just a website. In the same way that digital asset management platforms specialise in serving digital assets to other systems. E.g. mobile app, web, print etc. A headless CMS can provide content to multiple other systems too.
  3. It’s much easier for a headless CMS to become a SASS offering. Most custom development when you install a CMS is to tailor the visitor website experience, rather than the admin experience. Once the visitor website is removed there leaves little reason for it to be a product you install and maintain making it much easier for vendors to supply as SASS.

So, should I have one?

With all these advantages the answer should be yes, right? Well its not quite that simple, there are also some disadvantages, so let’s answer some more questions to see if it’s really suited for your situation;

Do you want to use a different website language?

One of the advantages of going headless was that you could pick the language you write the head in, but which language do you want to write it in? Most articles will talk about writing the head in JavaScript frameworks such as React, Vuejs or Angular. The reason for this is simple, if you want to write your application in one of these then you’re a bit stuck for CMS choices as no viable CMSs exist written in React, Vuejs or Angular so using a headless CMS is the only option other than writing an entire bespoke admin.

But what if you want to write the head in .Net or PHP? A headless CMS won’t restrict you doing this in any way, in-fact Umbraco Heartcore even provides a .Net client library to help. The only thing you must question is if it’s going to give you more advantages than disadvantages. By cutting off the head you now have to create it, so are you creating something different to what Umbraco’s Head originally did or are you just recreating the same thing?

Is there a specific pre-built head you want to use?

An alternative to writing your own head is to buy one that is premade. The biggest downside I see to headless is that you have to build and support the head, so using one that is pre-built and compatible with your CMS is a big advantage.

However, this does also mean that you may end up paying a higher price in license fees. Unless your CMS costs decrease enough to cover the additional costs of the head, your ultimately now licensing two products which could add up to more than one.

How many heads are you going to have?

If the answer is one and it’s a website, then it’s highly likely that you don’t need a headless CMS as you’ll effectively end up writing an inferior head to the one, you’re replacing.

CMSs like Wordpress have almost 2 decades of work gone into advancing them at this point getting them to a place where they are feature rich, reliable and most importantly secure. Creating your own head will require you to do they work they have already done.

Are you building a website?

If the answer to this is no, then a headless website makes a great option to provide an admin experience for your content to become editable. They are pre-built, integrate with the popular enterprise authentication systems and offer great features around workflow and user permissions.

However, if the answer is yes, then you need to think carefully. Going truly headless has some quite major disadvantages for a website:

  1. You need to write and maintain the head, and if that head is doing the same thing the CMS one did than you’re just reinventing the wheel.
  2. As the CMS is now only providing content to another application less will be possible through the admin interface. E.g. No ability to preview pages, no drag and drop page creation.
  3. Creating things like campaign landing pages or any new page layout creation may no longer be possible without involving the IT team. Because the CMS is now only providing the content rather than the layout, unless the head provides an admin to manage this you could end up with very fixed page templates.

A CMS that can work both head on and headless may be a better option. For instance, Sitecore can be set up like a traditional CMS where the custom rendering logic is added to the main application. However, it can also be set up as a decoupled CMS where the page rendering is achieved using Angular, Vue or React, but note this is decoupled and not headless. The visitor site can be hosted separate from the CMS like with headless, but a lot of the logic is still provided by Sitecore so things like personalisation, admin previews, page construction, Sitecore forms etc are all still possible. It also can work in a truly headless way by using the same API that powers the decoupled head to power a bespoke non-Sitecore head, like a mobile app.

Is your content reusable?

A news corporation writing articles that appear in newspapers, websites or mobile apps are obviously creating a lot of reusable content that can stay the same on each destination.

Alternatively, a typical brochure site (done well) are created with a journey in mind where the whole page has been designed to achieve an outcome. Some content may just be a 3 words combined with an image to evoke an emotional response. Other content may be specifically written to fit a certain gap so that it appears the same size as 2 other pieces of content next to it. None of which may actually translate into mobile.

If this is the case what you may end up actually doing is rather than creating a content repository that can be reused. Is creating a repository where 90% can’t be reused and the other 10% is lost amongst it.