Tag: SQL Server
Reducing the size of Sitecore Master DB

Reducing the size of Sitecore Master DB

When it comes to Sitecore development, an issue every developer has likely experienced is the size of the databases in relation to the size of their hard disk. In an ideal world production DBs would contain production data, test environments would have data ideally suited for testing and developer workstation would have the minimum required to develop the solution.

In reality though, I think most people have the experience of everything being a copy from production. This ends up being the case due to a clients requirements that UAT needs to looks the same as prod, QA needs prod content to replicate a bug and although critical Sitecore items may have been serialized, not having any content in your local makes it a bit hard to dev.

When a website is new and doesn't have much content this isn't a huge issue, but when you inherit one 5 years old with a 25gb DB, things start to become a problem. Not only is the hard disc space required an issue, but just setting a new developer up takes hours from download times.

After getting a new laptop and being faced with the challenge of needing to copy multiple DBs (and not even having enough space to back them up on my existing machine), I decided to finally do something about reducing the size of them,

Removing old item versions

Having a history of item versions is a great feature for content editors, however as a dev I don't really need them on my local. They also hold references to media items that aren't used any more.

This Sitecore Powershell script from Webbson does exactly that and even lets your specify how many version you want to keep. I went for 1.

1<#
2 This script will remove old versions of items in all languages so that the items only contains a selected number of versions.
3#>
4
5$item = Get-Item -Path "master:\content"
6$dialogProps = @{
7 Parameters = @(
8 @{ Name = "item"; Title="Branch to analyse"; Root="/sitecore/content/Home"},
9 @{ Name = "count"; Value=10; Title="Max number of versions"; Editor="number"},
10 @{ Name = "remove"; Value=$False; Title="Do you wish to remove items?"; Editor="check"}
11 )
12 Title = "Limit item version count"
13 Description = "Sitecore recommends keeping 10 or fewer versions on any item, but policy may dictate this to be a higher number."
14 Width = 500
15 Height = 280
16 OkButtonName = "Proceed"
17 CancelButtonName = "Abort"
18}
19
20$result = Read-Variable @dialogProps
21
22if($result -ne "ok") {
23 Close-Window
24 Exit
25}
26
27$items = @()
28Get-Item -Path master: -ID $item.ID -Language * | ForEach-Object { $items += @($_) + @(($_.Axes.GetDescendants())) | Where-Object { $_.Versions.Count -gt $count } | Initialize-Item }
29$ritems = @()
30$items | ForEach-Object {
31 $webVersion = Get-Item -Path web: -ID $_.ID -Language $_.Language
32 if ($webVersion) {
33 $minVersion = $webVersion.Version.Number - $count
34 $ritems += Get-Item -Path master: -ID $_.ID -Language $_.Language -Version * | Where-Object { $_.Version.Number -le $minVersion }
35 }
36}
37if ($remove) {
38 $toRemove = $ritems.Count
39 $ritems | ForEach-Object {
40 $_ | Remove-ItemVersion
41 }
42 Show-Alert "Removed $toRemove versions"
43} else {
44 $reportProps = @{
45 Property = @(
46 "DisplayName",
47 @{Name="Version"; Expression={$_.Version}},
48 @{Name="Path"; Expression={$_.ItemPath}},
49 @{Name="Language"; Expression={$_.Language}}
50 )
51 Title = "Versions proposed to remove"
52 InfoTitle = "Sitecore recommendation: Limit the number of versions of any item to the fewest possible."
53 InfoDescription = "The report shows all items that have more than <b>$count versions</b>."
54 }
55 $ritems | Show-ListView @reportProps
56}
57
58Close-Window

Removing unpublished items

After a few failed attempts at reducing the size of the DB's, I discovered that the content editors working on the website had seemingly never deleted any content. Instead that had just marked things as unpublishable. I can see the logic in this, but after 5+ years, they have a lot of unpublished content filling up the content tree.

Well if it's unpublished I probably don't need it on my local machine so lets delete it.

Here's a script I wrote, the first part removes items set to never publish. After running just this part I found lots of the content items had the item set to publish but the version set to hidden. The second part loops through versions on items and removes any version set to hidden. If the item has no version left then it is removed too.

1
2
3// Remove items set to never publish
4Get-ChildItem -Path "master:\sitecore\content" -Recurse |
5Where-Object { $_."__Never publish" -eq "1" } | Remove-Item -Recurse -Force -Confirm:$false
6
7// Loop through items and remove versions set to never publish, then remove the item if it has no versions left
8foreach($item in Get-ChildItem -Path "master:\sitecore\content" -Recurse) {
9
10 $item
11 foreach ($version in $item.Versions.GetVersions($true))
12 {
13 $version
14 $version."__Hide version"
15 if ($version."__Hide version" -eq "1" ) {
16 $version| Remove-ItemVersion -Recurse -Confirm:$false
17 }
18 }
19
20 if ($item.Versions.GetVersions($true).count -eq 0) {
21 $item | Remove-Item -Recurse -Force -Confirm:$false
22 }
23}

Remove dead links

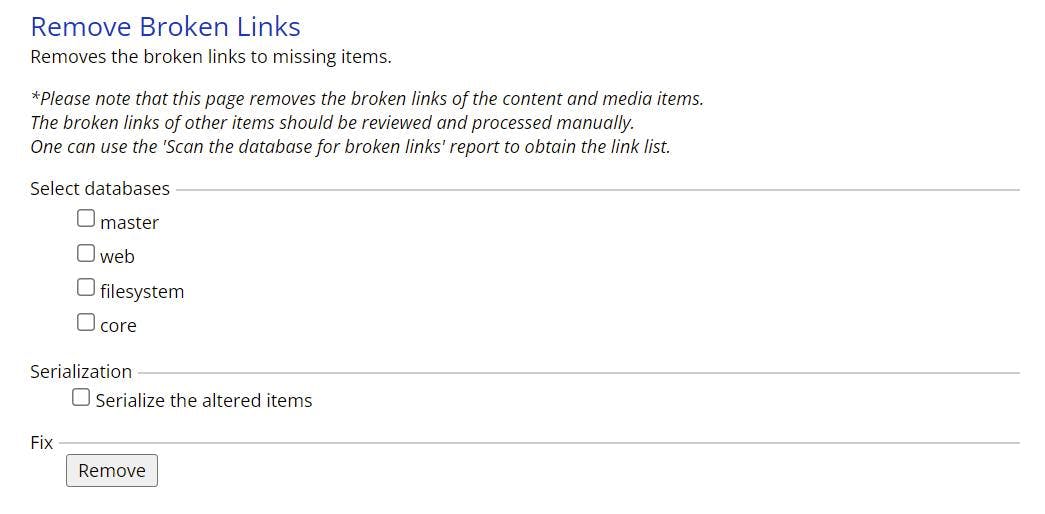
In the next step I rebuild the links DB, but I kept ending up with entries in the link table with target items that didn't exist. After a bit of searching I came across an admin page for clearing up dead links.

/sitecore/admin/RemoveBrokenLinks.aspx

With this page you can remove all those pesky dead links caused by editors deleting items and leaving the links behind.

Remove broken links screen in Sitecore

Clean Up DBs

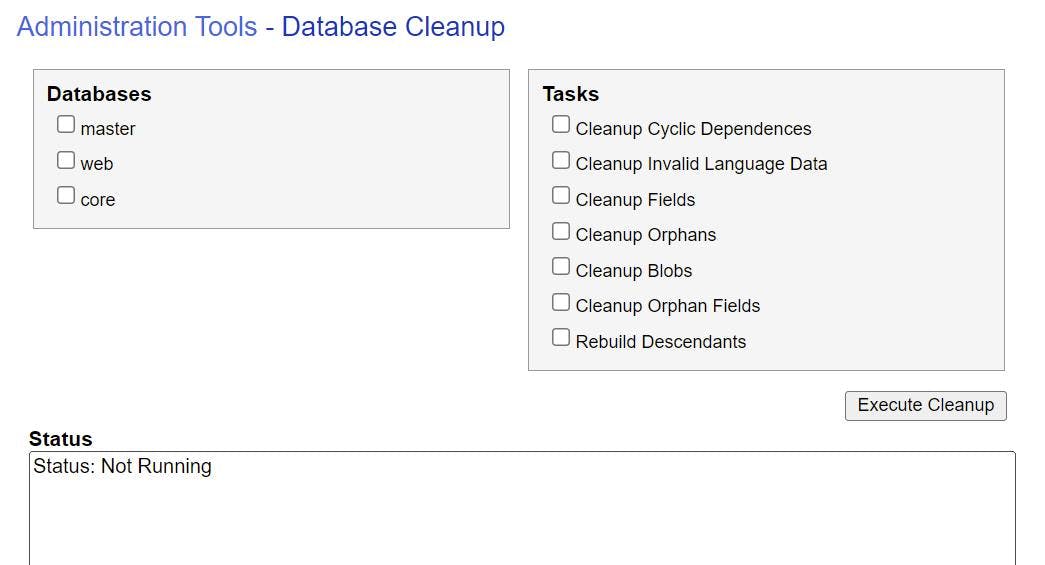
With our content reduced the DB's now need a clean up before we do anything else.

In the admin section there is a DB Cleanup page that will let you perform various tasks on the DB. I suggest doing all of these.

/sitecore/admin/DBCleanup.aspx

Sitecore Database cleanup page

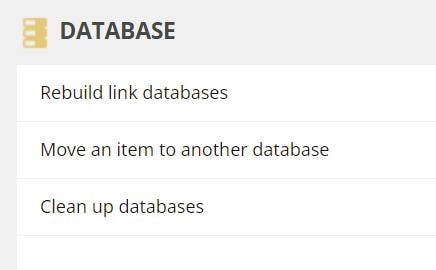
Once this is done navigate to the control panel and rebuild the link database. From the control panel you can also run the clean up database script, but it won't give you as much feedback.

/sitecore/client/Applications/ControlPanel.aspx?sc_bw=1

Sitecore rebuild link database screen

Remove unused media

With all the old versions/items/dead links removed and the DB's cleaned up its time to get rid of any unused media items. It's likely if you have a large DB that most of the space will be taken up by the media items. Fortunately with another PowerShell script we can removed any media that isn't linked too.

This PowerShell script is an adapted version of one by Michael West. You can find his version here https://michaellwest.blogspot.com/2014/10/sitecore-powershell-extensions-tip.html?_sm_au_=iVVB4RsPtStf5MfN

The main difference is I've been more aggressive and removed the checks on item owner and age.

1filter Skip-MissingReference {
2 $linkDb = [Sitecore.Globals]::LinkDatabase
3 if($linkDb.GetReferrerCount($_) -eq 0) {
4 $_
5 }
6}
7
8$items = Get-ChildItem -Path "master:\sitecore\media library" -Recurse |
9 Where-Object { $_.TemplateID -ne [Sitecore.TemplateIDs]::MediaFolder } |
10 Skip-MissingReference
11
12if($items) {
13 Write-Log "Removing $($items.Length) item(s)."
14 $items | Remove-Item
15}

Shrink databases

Lastly through SQL management studio, shrink your database and files to recover unused space you hopefully now have from removing all of that media.

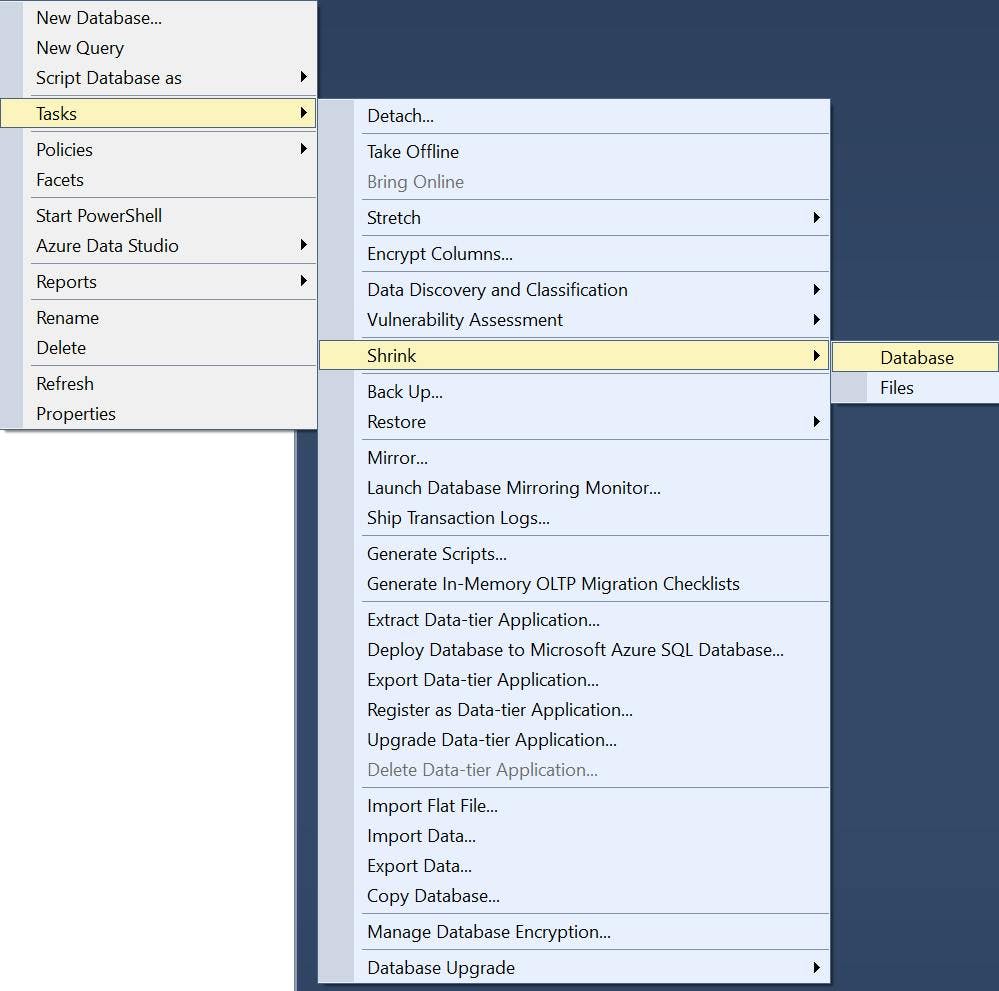
In my case I was able to turn a 20+ GB database into a 7 GB database by doing these steps.

If your local is running with both web and master DB, you should now do a full publish. The item versions which are published should stay exactly the same as we only removed items set to not publish. You should however get a reduction in your web DB from the media items being removed.

Deploying a SQL DB with Azure Pipelines

Deploying a SQL DB with Azure Pipelines

Normally when I work with SQL Azure I handle DB schema changes with Entity Framework migrations. However if you using Azure Functions rather than Web Jobs it seems there's a number of issues with this and I could not find a decent guide which resulted in a working solution.

Migrations isn't the only way to release a DB change though. SQL Server Database projects have existed for a long time and are a perfectly good way of automating a DB change. My preference to use EF Migrations really comes from a place of not wanting to have an EF model and a separate table scheme when they're essentially a duplicate of each other.

Trying to find out how to deploy this through Azure Devops Pipelines however was far harder than I expected (my expectation was about 5 mins). A lot of guides weren't very good and virtually all of them start with Click new pipeline, then select Use the classic editor. WAIT Classic Editor on an article written 3 months ago!?!?! Excuse me while I search for a solution slightly more up to date.

Creating a dacpac file

High level the solution solution is to have a SQL Server Database project, use an Azure Pipeline to compile that to a dacpac file. Then use a release pipeline to deploy that to the SQL Azure DB.

I'm not going to go into any details about how you create a SQL Server Database project, its relatively straightforward, but the one thing to be aware of is the project needs to have a target platform of Microsoft Azure SQL Database otherwise you'll get a compatibility error when you try to deploy.

Building a SQL Server Database project in Azure Devops

To build a dacpac file create a new pipeline in Azure Devops (the yaml kind), select your repo and get yourself a blank configuration file. Also at this point make sure your code is actually in the repo!

The configuration I used looks like this; I've included notes in the code to explain what's going on.

1# The branch you want to trigger a build
2trigger:
3- master
4
5pool:
6 vmImage: "windows-latest"
7
8variables:
9 configuration: release
10 platform: "any cpu"
11 solutionPath: # Add the path to your Visual Studio solution file here
12
13steps:
14 # Doing a Visual Studio build of your solution will trigger the dacpac file to be created
15 # if you have more projects in your solution (which you probably will) you may get an error here
16 # as we haven't restored any nuget packages etc. For just a SQL DB project, this should work
17 - task: VSBuild@1
18 displayName: Build solution
19 inputs:
20 solution: $(solutionPath)
21 platform: $(platform)
22 configuration: $(configuration)
23 clean: true
24
25 # When the dacpac is built it will be in the projects bin/configuation folder
26 # to get into an artifact (probably with some other things you want to publish like an Azure function)
27 # we need to move it somewhere else. This will move it to a folder called drop
28 - task: CopyFiles@2
29 displayName: Copy DACPAC
30 inputs:
31 SourceFolder: "$(Build.SourcesDirectory)/MyProject.Database/bin/$(configuration)"
32 Contents: "*.dacpac"
33 TargetFolder: "$(Build.ArtifactStagingDirectory)/drop"
34
35 # Published the contents of the drop folder into an artifact
36 - task: PublishBuildArtifacts@1
37 displayName: "Publish artifact"
38 inputs:
39 PathtoPublish: "$(Build.ArtifactStagingDirectory)/drop"
40 ArtifactName: # Artifact name goes here
41 publishLocation: container

Releasing to SQL Azure

Once the pipeline has run you should have an artifact coming out of it that contains the dacpac file.

To deploy the dacpac to SQL Azure you need to create a release pipeline. You can do this within the build pipeline, but personally I think builds and releases are different things and should therefore be kept separate. Particularly as releases should be promoted through environments.

Go to the releases section in Azure Devops and click New and then New release pipeline.

There is no template for this kind of release, so choose Empty job on the next screen that appears.

On the left you will be able to select the artifact getting built from your pipeline.

Then from the Tasks drop down select Stage 1. Stages can represent the different environments your build will be deployed to, so you may want to rename this something like Dev or Production.

On Agent Job click the plus button to add a task to the agent job. Search for dacpac and click the Add button on Azure SQL Database deployment.

Complete the fields to configure which DB it will be deployed to (as shown in the picture but with your details).

And that's it. You can now run the pipelines and your SQL Project will be deployed to SQL Azure.

Some other tips

On the Azure SQL Database deployment task there is a property called Additional SqlPackage.exe Arguments this can be used to specify things like should loss of data be allows. You can find the list of these at this url https://docs.microsoft.com/en-us/sql/tools/sqlpackage/sqlpackage?view=sql-server-ver15#properties

If you are deploying to multiple environments you will want to use variables for the server details rather than having them on the actual task. This will make it easier to clone the stages and have all connections details configured in one place.

Data Factory: How to upsert a record in SQL

Data Factory: How to upsert a record in SQL

When importing data to a database we want to do one of three things, insert the record if it doesn't already exist, update the record if it does or potentially delete the record.

For the first two, if your writing a stored procedure this often can lead to a bit of SQL that looks something like this:

1IF EXISTS(SELECT 1 FROM DestinationTable WHERE Foo = @keyValue)
2BEGIN
3 UPDATE DestinationTable
4 SET Baa = @otherValue
5 WHERE Foo = @keyValue
6END
7ELSE
8BEGIN
9 INSERT INTO DestinationTable(Foo, Baa)
10 VALUES (@keyValue, @otherValue)
11END

Essentially an IF statement to see if they record exists based on some matching criteria.

Data Factory - Mapping Data Flows

With a mapping data flow, data is inserted into a SQL DB using a Sink. The Sink let's you specify a dataset (which will specify the table to write to), along with mapping options to map the stream data to the destination fields. However the decision on if a row is an Insert/Update/Delete must already be specified!

Let's use an example of some data containing a persons First Name, Last Name and Age. Here's the table in my DB;

And here's a CSV I have to import;

1FirstName,LastName,Age
2John,Doe,10
3Jane,Doe,25
4James,Doe,50

As you can see in my import data Jane's age has changed, there's a new entry for James and Janet doesn't exist (but I do want to keep here in the DB). There's also no ID's in my source data as that's an identity created by SQL.

If I look at the Data preview on my source in the Data Flow, I can see the 3 rows from my CSV, but notice there is also a little green plus symbol next to each one.

This means that they are currently being treated as Inserts. Which while true for one of them is not for the others. If we were to connect this to the sink it would result in 3 new records being added to the DB, rather than two being updated.

To change the Insert to an update you need an alert row step. This allows us to define rules to state what should be an insert and what should be an update.

However to know if something should be an insert or an update requires knowledge of what is in the DB. To do that would mean a second source, followed by a join on First Name/Last Name and then conditions based on which rows have an ID from the DB or not. This all seems a bit needlessly complicated, and it is.

Upsert

When using a SQL sink there is a 4th option for what kind of method should be used and that is an Upsert. An upsert will result in a SQL merge being used. SQL Merges take a set of source data, compare it to the data already in the table based on some matching keys and then decide to either update or insert new records based on the result.

On the sink's Settings tab untick Allow insert and tick Allow upsert. When you tick Allow upsert properties for Key columns will appear which is where you specify which columns should be used as a key. For me this is FirstName and LastName.

If you don't already have an Alter Row step it will warn you that this is missing.

Even though we are only doing what equates to a SQL merge, you still need to alter the rows to say they should be an upsert rather than an insert.

As we are upserting everything our condition can just be set to return true rather than analysing any row data.

And there we have it, all rows will be treated as an upsert. If we look at the Data preview we can now see the upsert icon on each row.

And if we look at the table after running the pipeline, we can see that Janes age has been update, James has been added and John and Janet stayed the same.

Bulk Inserting data using Entity Framework

Bulk Inserting data using Entity Framework

Using tools like Entity Framework makes life far easier for a developer. Recently I blogged about how using them is what makes .Net Core one of the best platforms for prototype development, but the benefits don’t end there. They are also great from a security perspective by cutting a lot of risk around SQL injection attacks just by avoiding easy mistakes when using regular ADO.NET.

However, they do have some downsides, a main one being that they are particularly slow when it comes to doing bulk inserts to a database.

For example, assume you have an application which regularly receives an xml import file consisting of 200,000 records and each one either needs to be an insert of an update into the db. You’ll quickly learn that looping through the whole lot and then calling save changes results in a process taking an extremely long time to run, it may even just timeout. You then decide to get rid of that long save changes line by breaking it up into blocks of 500 and call save changes for each of those. That may save the timeout issue, but it still results in a process potentially lasting around an hour.

The problem is that this is a scenario Entity Framework or EF.Core just weren’t designed to handle. As a solution you could opt to drop Entity Framework altogether and revert to something like a native SQL Bulk Insert command, but what if you need to be doing some processing in code on the record before the import happens? What if you have one of those classic not quite always valid XML, XML files which would cause SQLs Bulk Insert to fail.

The solution is to use an open source extension called EFCore.BulkExtensions.

EFCore.BulkExtensions

EFCore.BulkExtensions is a set of extension methods to Entity Framework that provide the functionality to do bulk inserts. You can add it to your project using NuGet and you’ll find the project on GitHub here https://github.com/borisdj/EFCore.BulkExtensions

Usage is also very simple to do. Let’s assume you have some existing tradition EF code that loops through a collection and for each one create a new db item and adds it to the db:

1public void DoImport(List<foo> collection)
2{
3 foreach (var item in collection)
4 {
5 Jobs job = new Jobs();
6
7 job.DateAdded = DateTime.UtcNow;
8 job.Name = item.Name;
9 job.Location = item.Location;
10
11 await dbContext.Jobs.AddAsync(job);
12 }
13
14 await dbContext.SaveChangesAsync();
15}

Rather than adding each item to the Entity Framework db context, you instead create a list of those objects and then call a BulkInsert function with them on your db context.

1public void DoImport(List<foo> collection)
2{
3 List<Jobs> importJobs
4 foreach (var item in collection)
5 {
6 Jobs job = new Jobs();
7
8 job.DateAdded = DateTime.UtcNow;
9 job.Name = item.Name;
10 job.Location = item.Location;
11
12 importJobs.Add(job);
13 }
14
15 await dbContext.BulkInsert(importJobs);
16}

If also works for updates, but rather than creating a new item, first retrieve it form the db and then at the end call BulkInsertOrUpdate with the list.

1await dbContext.BulkInsertOrUpdate(importJobs);

From my experience doing this took my import process that would run for over an hour down to something which would complete in a few minutes.

Top reasons .Net is amazing for prototyping

Top reasons .Net is amazing for prototyping

The other day someone told me .net was slow to get something built, and to be fair to the person I can see why he would have thought that. Most of his interaction with .net projects have been on complex with large enterprise applications that often have integrated multiple other applications.

However, I would maintain that .net is a framework that is actually really fast to develop on and that what he had perceived as being slow was the complexities of a project rather than the actual coding time.

In fact, I would say it's so fast to get something built in it, it actually becomes the fastest thing to develop a prototype in. Here are my top reasons why.

ASP.NET Core

ASP.NET Core inherits all the best bits from the ASP.NET Framework that came before it, giving the framework almost 20 years of refinement since its original release in 2002. The days of WebForms in the original ASP.NET are now long behind us and we now have the choice of building web applications with either MVC or Razor Pages.

Razor provides the perfect combination of a view language providing helpers to render your html without limiting what can be done on the front end. How you code your HTML is still completely up to you, the helpers just provide features like binding that make it even faster to do.

Another great thing about .Net core over that which came before it, is its platform independent. Rather than being confined to just Windows, you can run it on Mac or Linux too.

Great starter templates

What kicks of a great prototype project is starting with great templates, and ASP.NET Core has a bunch.

As already mentioned, you can build a Web Application with either Razor Pages or MVC, but the templates also provide you with the base for building an API, Angular App, React.js or React.js and Redux or you can simply create an Empty application.

My preference is to go for MVC as it's what I'm the most familiar with and a key thing for rapidly building a prototype is that you develop rapidly. The idea is to focus on creating something new and unique, not learn how to develop in a new framework.

The MVC Web Application gives you a base site to work with a few pages already set up, bootstrap and jQuery are already included so you start right at the point of working on your logic rather than spending time doing setup.

SQL Server and EF Core

I've always been a bit of a database guy. I'm not sure why, but its a topic that has always just made sense to me, and despite being a topic that can get quite complex, the reasons behind it being complex always feel logical.

When it comes to building a prototype though there are two aspects which make storage with .net core super simple.

Firstly, Entity Framework Core (EF Core) means you don't really need to know any SQL or spend any time writing it. It helps if you do, but at a minimum all you need to be doing is creating a model in your code, adding a few lines for a DB context that tells EF.Core that a model is a table and how they relate. Then turn on migrations and you're done. When you run the application, the DB gets created for you and each time you change your model, you just add another migration and the next time the application runs the application the DB schema gets updated.

Querying your DB is done by writing LINQ queries against your entity framework model, allowing you to have next to no understanding of SQL and how the DB works. Everything is just done by magic for you.

The second part is SQL Server and its different versions. Often when you think of SQL Server you think of the big DB engine with its many many components that you install on a server or your local machine but there's two others which are even more important. LocalDB and Azure SQL.

LocalDB is an option that can be installed as part of Visual Studio. No separate application is needed or services to be running in the background. It is essentially the minimum required to start the DB engine to be used for development purposes. In practical terms this means when you start your application EF.Core can run off a LocalDB which didn't require any setup, but as far as your application in concerned it is no different than working with any other version of SQL Server.

Azure SQL as the name implies is SQL Server on Azure. The only thing I really need to say about this is that you can swap LocalDB and Azure SQL with ease. They may be different but as far as your prototype is concerned, they are the same.

Scaffolding

The only thing quicker than writing code is having someone else do it for you. So we've created our application from a template, added a model which generated our database and now its time to create some pages. Well the good news is it's still not time to write much code because Visual Studio can scaffold out pages based on our model for us!

Adding a controller to our project in Visual Studio gives us some options on what should be generated for us, one of which is MVC Controller with views, using Entity Framework. What that means is given a model it will create controllers and views for listing items, creating them, editing them and deleting them. No coding by us required!

Now it's unlikely that is exactly what you're after, but it's generally a good starting place and deleting code you don't need is far quicker then writing it.

Azure

Lastly there is Azure. You may have spotted a theme to all these points and that is they all remove any effort required to do any setup and instead focus on building your own logic, and this point is no different.

I remember a time, when if I wanted a server to put an application on, I had to request it, and then wait a while. What I would get back would either be a server that already had resources running on it, or a blank server that would need applications installed on it. e.g. SQL Server or .Net Framework. IIS wouldn't have been configured and it would be a number of hours before my application would be running.

With Azure you don't even really need to leave Visual Studio. From the publish dialog box you can create a new App Service and DB, and then publish. All the connection strings are sorted out for you. There are service plans which cost next to nothing, a domain is configured for you and at the end of the publish the website opens and is working. The whole process has taken less than 10 minutes.

SQL Server – Selecting Top 1 in a Left Join

This scenario doesn't come up too often, but the other day I had a requirement to do a left join through a one to many relationship but only get 1 result from the right side of the join. This kind of scenario can often be accomplished using sub selects, but in this case I needed access to multiple columns so a sub select would be out of the question.

The solution was to do an OUTER APPLY instead of a LEFT JOIN. An outer apply allows you to write a sub query referencing the ID from the original table just like a sub select. However as this is effectively a kind of join you have access to multiple columns.

Example Scenario

Imagine you have a table of customers and a table of addresses and each customer can have multiple addresses.

Our tables will look like this:

Customer (CustomerID, FirstName, LastName)

Address (AddressID, CustomerID, Line1, Line2, Town, County, Country, DateAdded)

The task is to get a list of customers and their most recent address.

Solution

By using an OUTER APPLY we can join the 2 tables and get the most recent address like this:

1SELECT c.*, la.*
2FROM Customer c
3OUTER APPLY
4 (SELECT TOP 1 *
5 FROM Address a
6 WHERE a.CustomerID = c.CustomerID
7 ORDER BY a.DateAdded DESC
8 ) AS la

LINQ to SQL Inserts and Deletes

Inserting and Deleting records in a database using LINQ to SQL is just as easy as selecting information. What's not so easy is actually finding out how to do it. There are lots of excellent blog posts around such as this one by Scott Guthrie http://weblogs.asp.net/scottgu/archive/2007/07/11/linq-to-sql-part-4-updating-our-database.aspx, however most of them we're all written for the Beta version of LINQ to SQL which let you do a .Add() or .Remove() on your table, which was  changed on the final release. 

So to insert do something like this: 

1DataClassesDataContext dataContext = new DataClassesDataContext();&nbsp;
2
3//Create my new Movie record
4Movie movie = new Movie();
5movie.Name = "Tim's movie";&nbsp;
6
7//Insert the movie into the data context
8dataContext.Movies.InsertOnSubmit(movie);&nbsp;
9
10//Submit the change to the database
11dataContext.SubmitChanges();

And to delete do something like this:

1DataClassesDataContext dataContext = new DataClassesDataContext();
2
3var movies = from m in dataContext.Movies
4 where m.Name == "Tim's movie"
5 select m;
6
7dataContext.Movies.DeleteAllOnSubmit(movies);
8
9dataContext.SubmitChanges();

LINQ to SQL Connection Strings

LINQ to SQL is great but like all great things at some point it does something that you don't expect and gives you a headache. An example of this happened to me this week with the differences between how connection strings are handled when you LINQ to SQL model is in a class library rather than a Website or Web Application.

What makes this issue particularly annoying is that it only appears when you try and change the database server that your code is looking at which could end up being when it's going live or moving to a staging server.

So we all know about connection strings, their quite simple and you just store them in your web.config file, which is how LINQ to SQL works when your using them in a Website. But as soon as you move them to a class library things change. First your connection string name is no longer that simple name you gave it e.g. ConnectionString, now it is prefixed with the namespace which is annoying but not the end of the world. Second discovery though is no matter what you do, it just doesn't seem to pick up the connection string from the web.config file. Reason being your original connection string has now compiled itself in the class library's dll and that is what it is using.

The Solution

Depending when you discovered this the solution is not to bad as you either have a lot of code to change or only a small amount. You can always pass a connection string to the constructor when you are creating an instance of the data context e.g.

1DataClasses1DataContext da = new DataClasses1DataContext(connectionstring);

You can also set the connection string on your LINQ to SQL model to be blank, this will remove the default constructor and force you to pass a connection string. This way you web application has the choice of what connection string to use and you can keep re-using your class library in different projects.

How to search inside Stored Procedures?

A common problem faced by many developers when it comes to databases and SQL Server is how to search the text inside a stored procedure.

In many systems particularly older Classic ASP solutions, functional code has been moved from the actual application to stored procedures inside the database. This is usually because it will either run faster here, or because it was just a lot easier to perform the necessary task using TSQL. Following this though comes the problem of how you can search what's in all those stored procedures, especially when you're getting into the hundreds of them. Let's say there was a Users table that contained fields for an address, but that now needs to be moved to a table of its own, you would need to search all the code for things accessing those table columns but SQL Server Management Studio certainly doesn't provide any search box's with the power to do this.

Never fear though syscomments is here. Syscomments contains the original text from amongst other things all the Stored Procedures in the DB s all you need to do is search that for what you're looking for:

1Select OBJECT_NAME(id), [text]
2From syscomments
3Where [text] like '%Create%'

The function OBJECT_NAME will also help you by converting the id number in the result set into the actual name of the stored procedure (or view, function etc). If you wanted to limit the result to just stored procedures you can add the following line to the where clause:

1AND OBJECTPROPERTY(id, 'IsProcedure') = 1