Tag: Devops
How to setup CI with Azure App Service using GitHub Actions and deployment slots

How to setup CI with Azure App Service using GitHub Actions and deployment slots

Today I'm going to go through how you can setup automatic deployments when using a combination of Azure App Service (e.g. a Web App), deployment slots on the App Service and GitHub Actions. This is a setup to achieve zero downtime.

What are GitHub Actions?

GitHub Actions are the continuous integration and continuous delivery (CI/CD) platform from GitHub. If you're working with the Microsoft tech stack you may have used tools such as Team City or Azure Dev Opps in the past and this is just GitHubs version. Like the newer Azure Devops pipelines GitHub Actions define the pipeline in yaml files and while they are not the same they are very similar.

What are App Service Deployment Slots?

Deployment slots solve two issues; Firstly they allow zero downtime deployments by deploying the application to a separate instance to production, warming up that instance and then swapping it. Secondly, they can also be used as separate environments to preview changes without affecting the production code.

One thing to note is that although they are separate from the production code, they do share the same resources. So if your change has a processor-hungry bug, then that will have an affect your live environment. For this reason its also best to not leave them running all the time.

Configure App Service Deployment Slows

As a pre-requisite you need an App Service configured in Azure. Once you have this head to the Deployment slots section in the left nav.
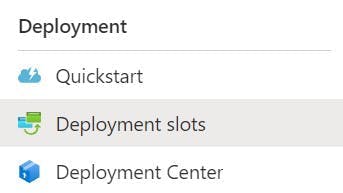
Click the Add Slot button, and create a slot named staging.
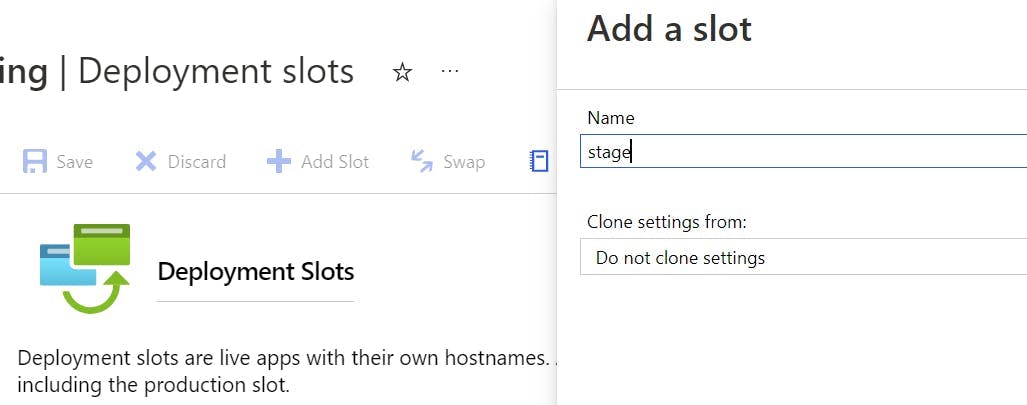
Create Azure Deployment Slot

Auto Swap Slots

At this point you could setup a deployment pipeline that deploys to the staging slot and then performs a slot swap, to change which one is in production. However Azure has a nifty setting that will do this all for you.

Click into the Deployment slot you just created and then go to Configuration, in the left-hand nav.

Switch to the General settings tab.
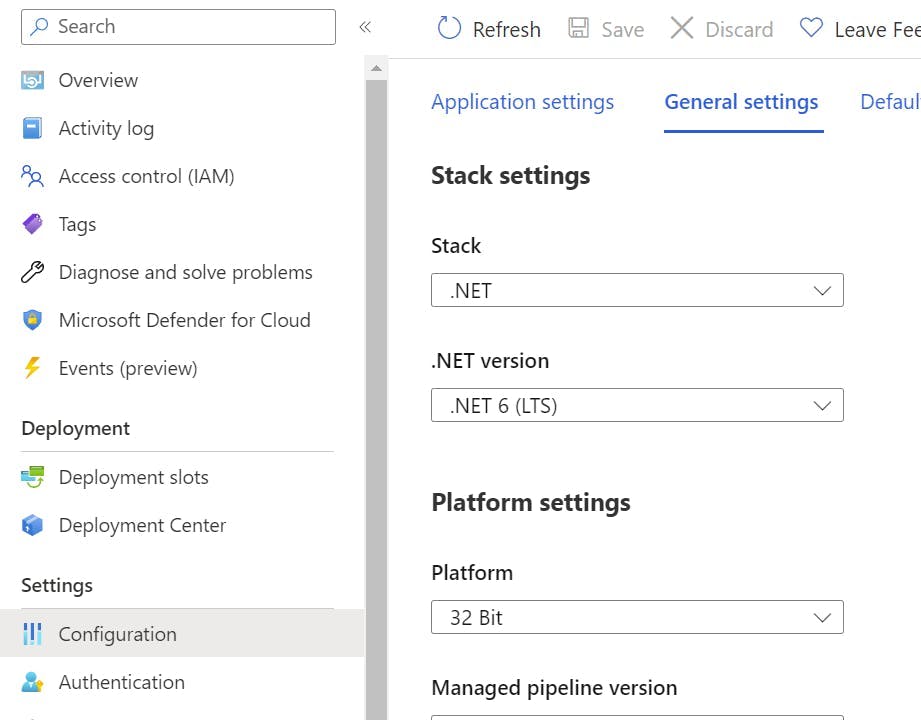
App Service - Configuration (General Settings tab)

Scroll down to a section called Deployment Slot, and turn on auto swap. Within the drop-down select production.
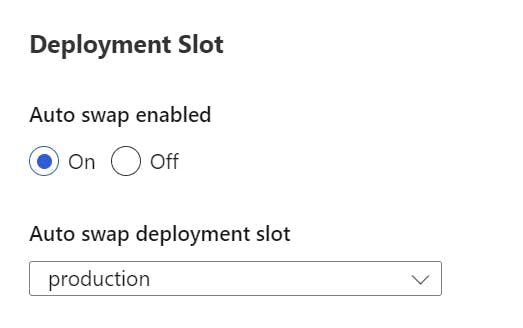
Auto Deployment Swap setting

Now when a deployment is made to the staging slot it will warm up and then automatically swap with the production slot.

Configure GitHub Action

To configure the GitHub Action first make sure you are still in the staging deployment slot and select Deployment Center in the left nav.

From the source drop-down select GitHub.
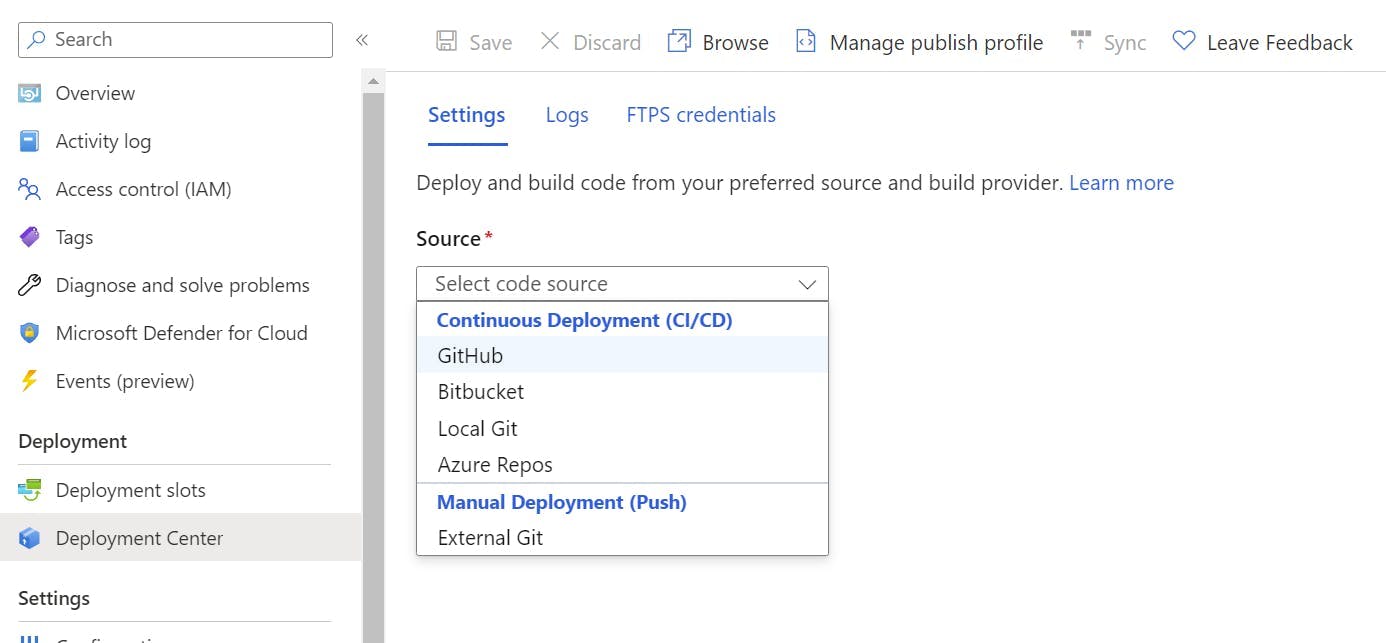
Deployment Center - Selecting Source

Next select the Organization, Repository and branch to deploy for. This will give you the option to add a workflow. You may need to edit this file to get the build to work as needed but, this will provide the basics for building a .NET application and configuring the publish profile to get it into Azure.
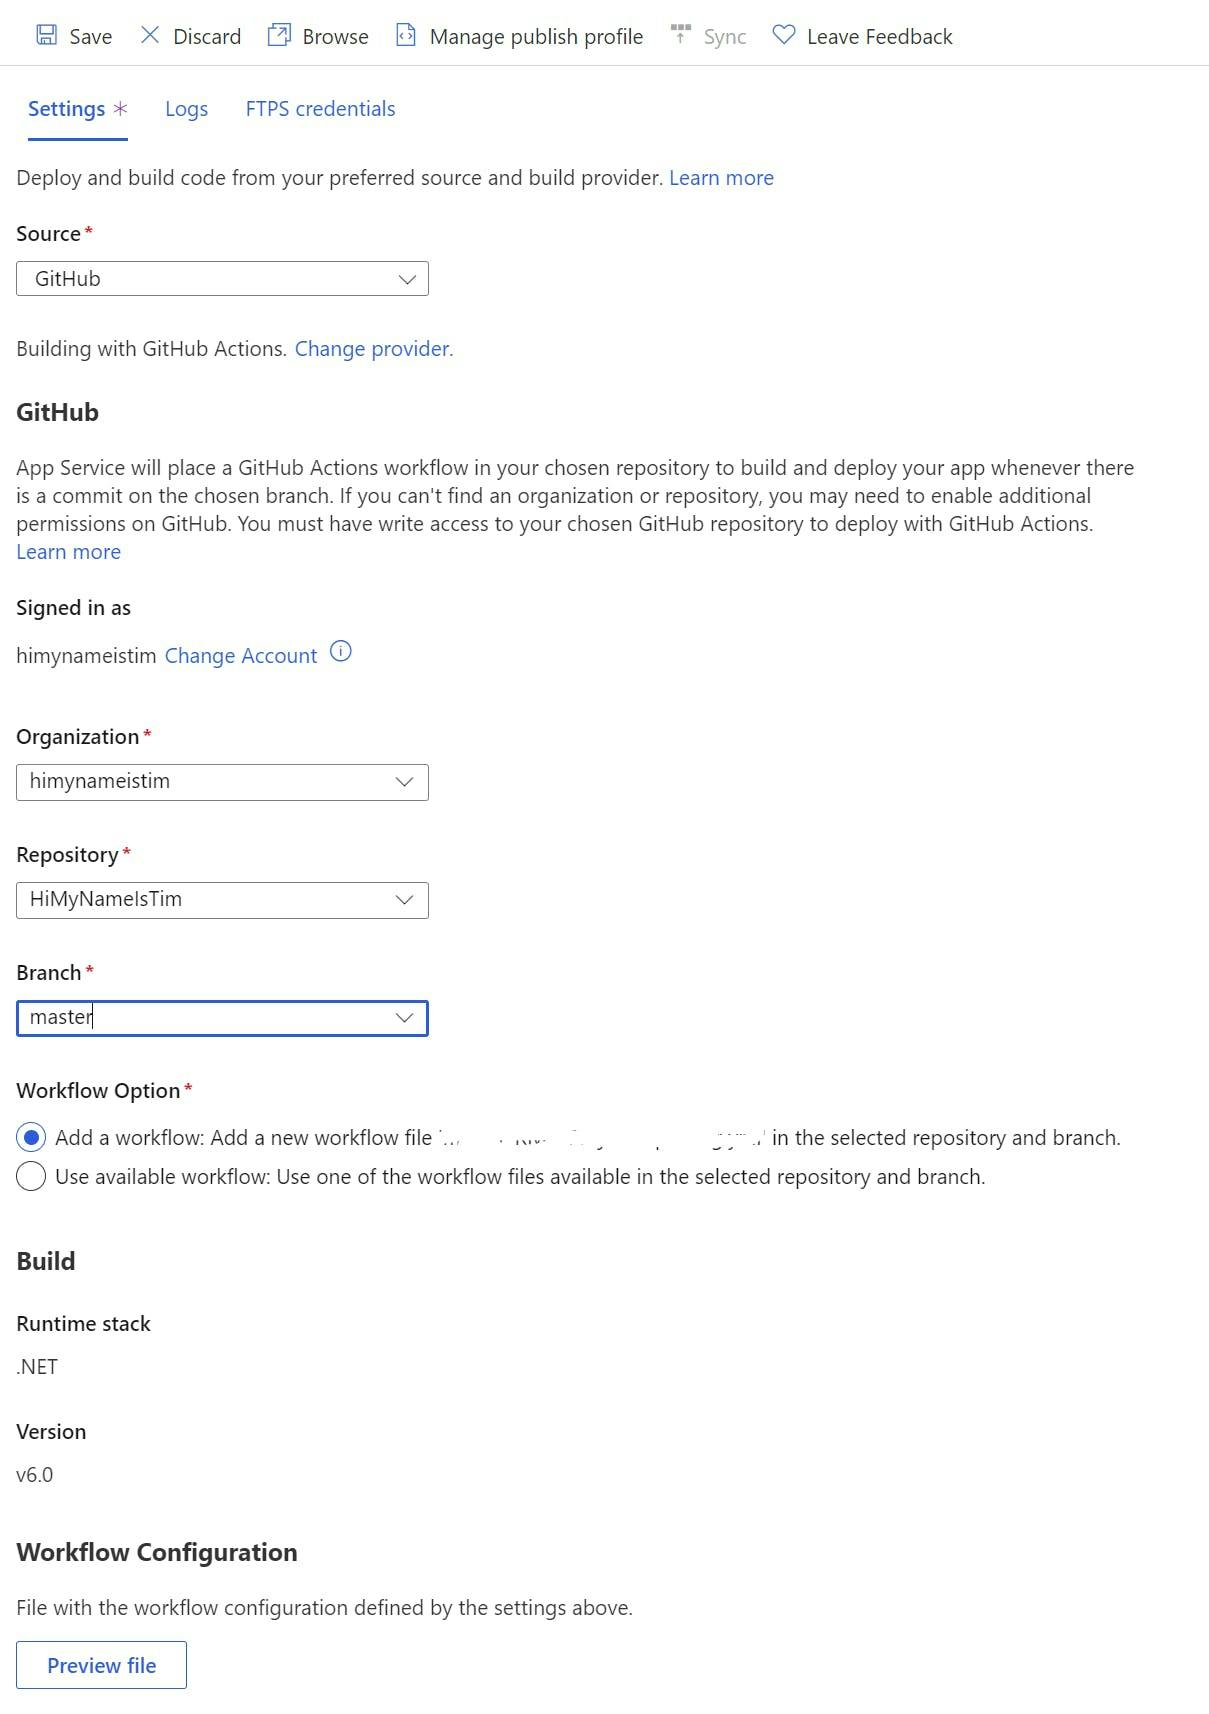
Deployment Center - configure GitHub Action
Deploying a SQL DB with Azure Pipelines

Deploying a SQL DB with Azure Pipelines

Normally when I work with SQL Azure I handle DB schema changes with Entity Framework migrations. However if you using Azure Functions rather than Web Jobs it seems there's a number of issues with this and I could not find a decent guide which resulted in a working solution.

Migrations isn't the only way to release a DB change though. SQL Server Database projects have existed for a long time and are a perfectly good way of automating a DB change. My preference to use EF Migrations really comes from a place of not wanting to have an EF model and a separate table scheme when they're essentially a duplicate of each other.

Trying to find out how to deploy this through Azure Devops Pipelines however was far harder than I expected (my expectation was about 5 mins). A lot of guides weren't very good and virtually all of them start with Click new pipeline, then select Use the classic editor. WAIT Classic Editor on an article written 3 months ago!?!?! Excuse me while I search for a solution slightly more up to date.

Creating a dacpac file

High level the solution solution is to have a SQL Server Database project, use an Azure Pipeline to compile that to a dacpac file. Then use a release pipeline to deploy that to the SQL Azure DB.

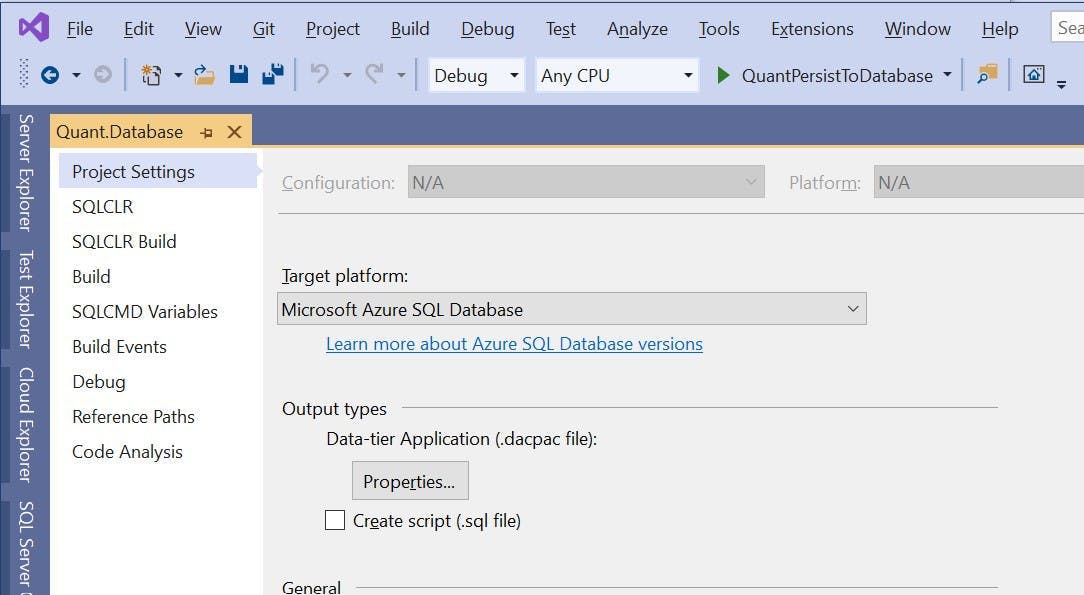
I'm not going to go into any details about how you create a SQL Server Database project, its relatively straightforward, but the one thing to be aware of is the project needs to have a target platform of Microsoft Azure SQL Database otherwise you'll get a compatibility error when you try to deploy.

Building a SQL Server Database project in Azure Devops

To build a dacpac file create a new pipeline in Azure Devops (the yaml kind), select your repo and get yourself a blank configuration file. Also at this point make sure your code is actually in the repo!

The configuration I used looks like this; I've included notes in the code to explain what's going on.

1# The branch you want to trigger a build
2trigger:
3- master
4
5pool:
6 vmImage: "windows-latest"
7
8variables:
9 configuration: release
10 platform: "any cpu"
11 solutionPath: # Add the path to your Visual Studio solution file here
12
13steps:
14 # Doing a Visual Studio build of your solution will trigger the dacpac file to be created
15 # if you have more projects in your solution (which you probably will) you may get an error here
16 # as we haven't restored any nuget packages etc. For just a SQL DB project, this should work
17 - task: VSBuild@1
18 displayName: Build solution
19 inputs:
20 solution: $(solutionPath)
21 platform: $(platform)
22 configuration: $(configuration)
23 clean: true
24
25 # When the dacpac is built it will be in the projects bin/configuation folder
26 # to get into an artifact (probably with some other things you want to publish like an Azure function)
27 # we need to move it somewhere else. This will move it to a folder called drop
28 - task: CopyFiles@2
29 displayName: Copy DACPAC
30 inputs:
31 SourceFolder: "$(Build.SourcesDirectory)/MyProject.Database/bin/$(configuration)"
32 Contents: "*.dacpac"
33 TargetFolder: "$(Build.ArtifactStagingDirectory)/drop"
34
35 # Published the contents of the drop folder into an artifact
36 - task: PublishBuildArtifacts@1
37 displayName: "Publish artifact"
38 inputs:
39 PathtoPublish: "$(Build.ArtifactStagingDirectory)/drop"
40 ArtifactName: # Artifact name goes here
41 publishLocation: container

Releasing to SQL Azure

Once the pipeline has run you should have an artifact coming out of it that contains the dacpac file.

To deploy the dacpac to SQL Azure you need to create a release pipeline. You can do this within the build pipeline, but personally I think builds and releases are different things and should therefore be kept separate. Particularly as releases should be promoted through environments.

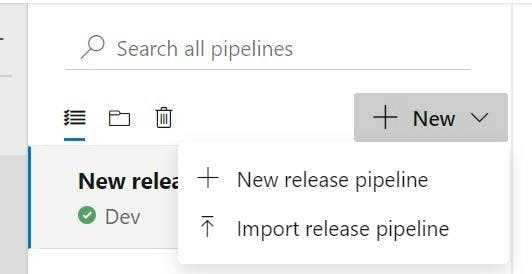
Go to the releases section in Azure Devops and click New and then New release pipeline.

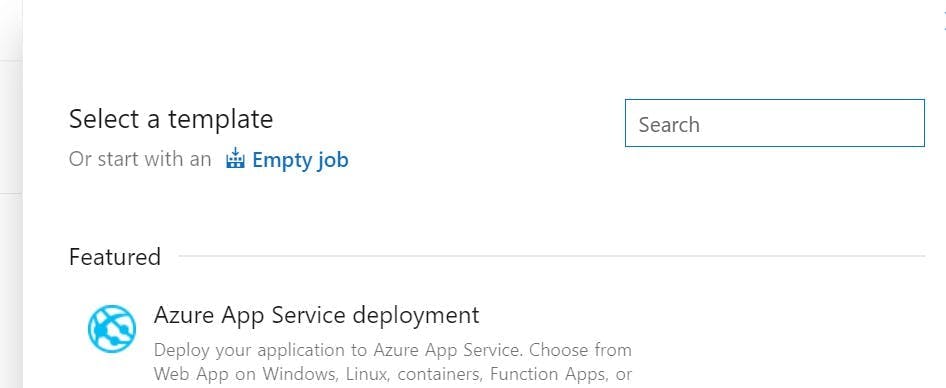
There is no template for this kind of release, so choose Empty job on the next screen that appears.

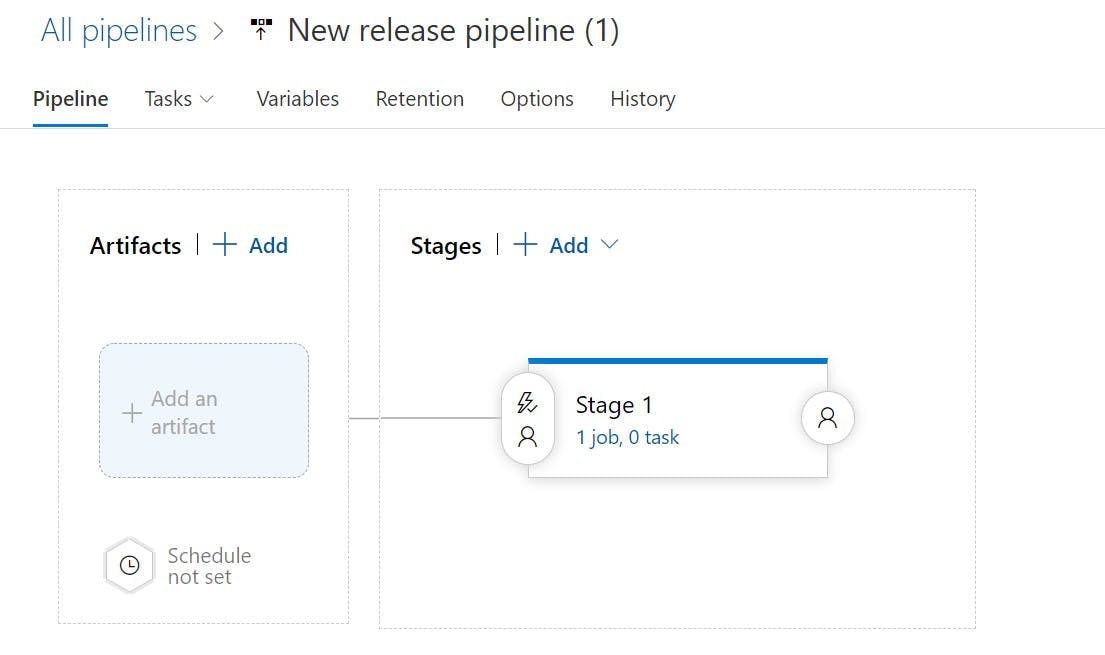
On the left you will be able to select the artifact getting built from your pipeline.

Then from the Tasks drop down select Stage 1. Stages can represent the different environments your build will be deployed to, so you may want to rename this something like Dev or Production.

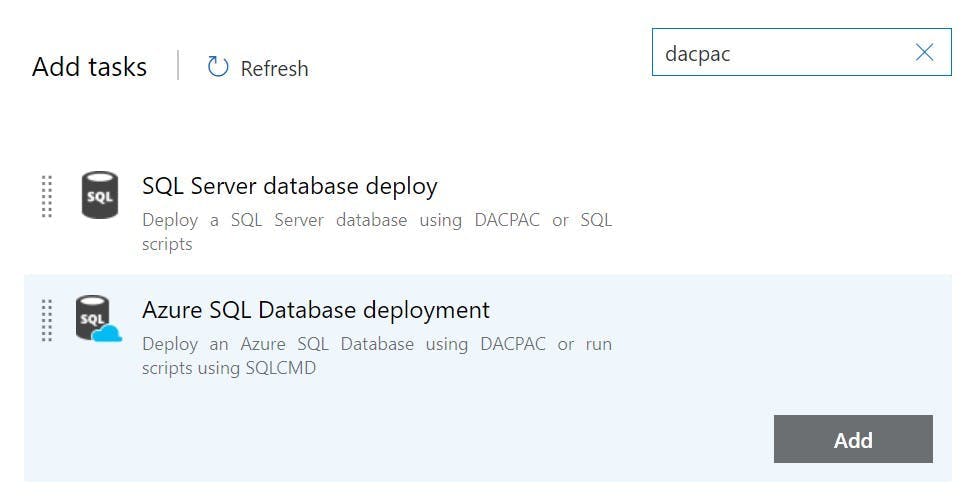
On Agent Job click the plus button to add a task to the agent job. Search for dacpac and click the Add button on Azure SQL Database deployment.

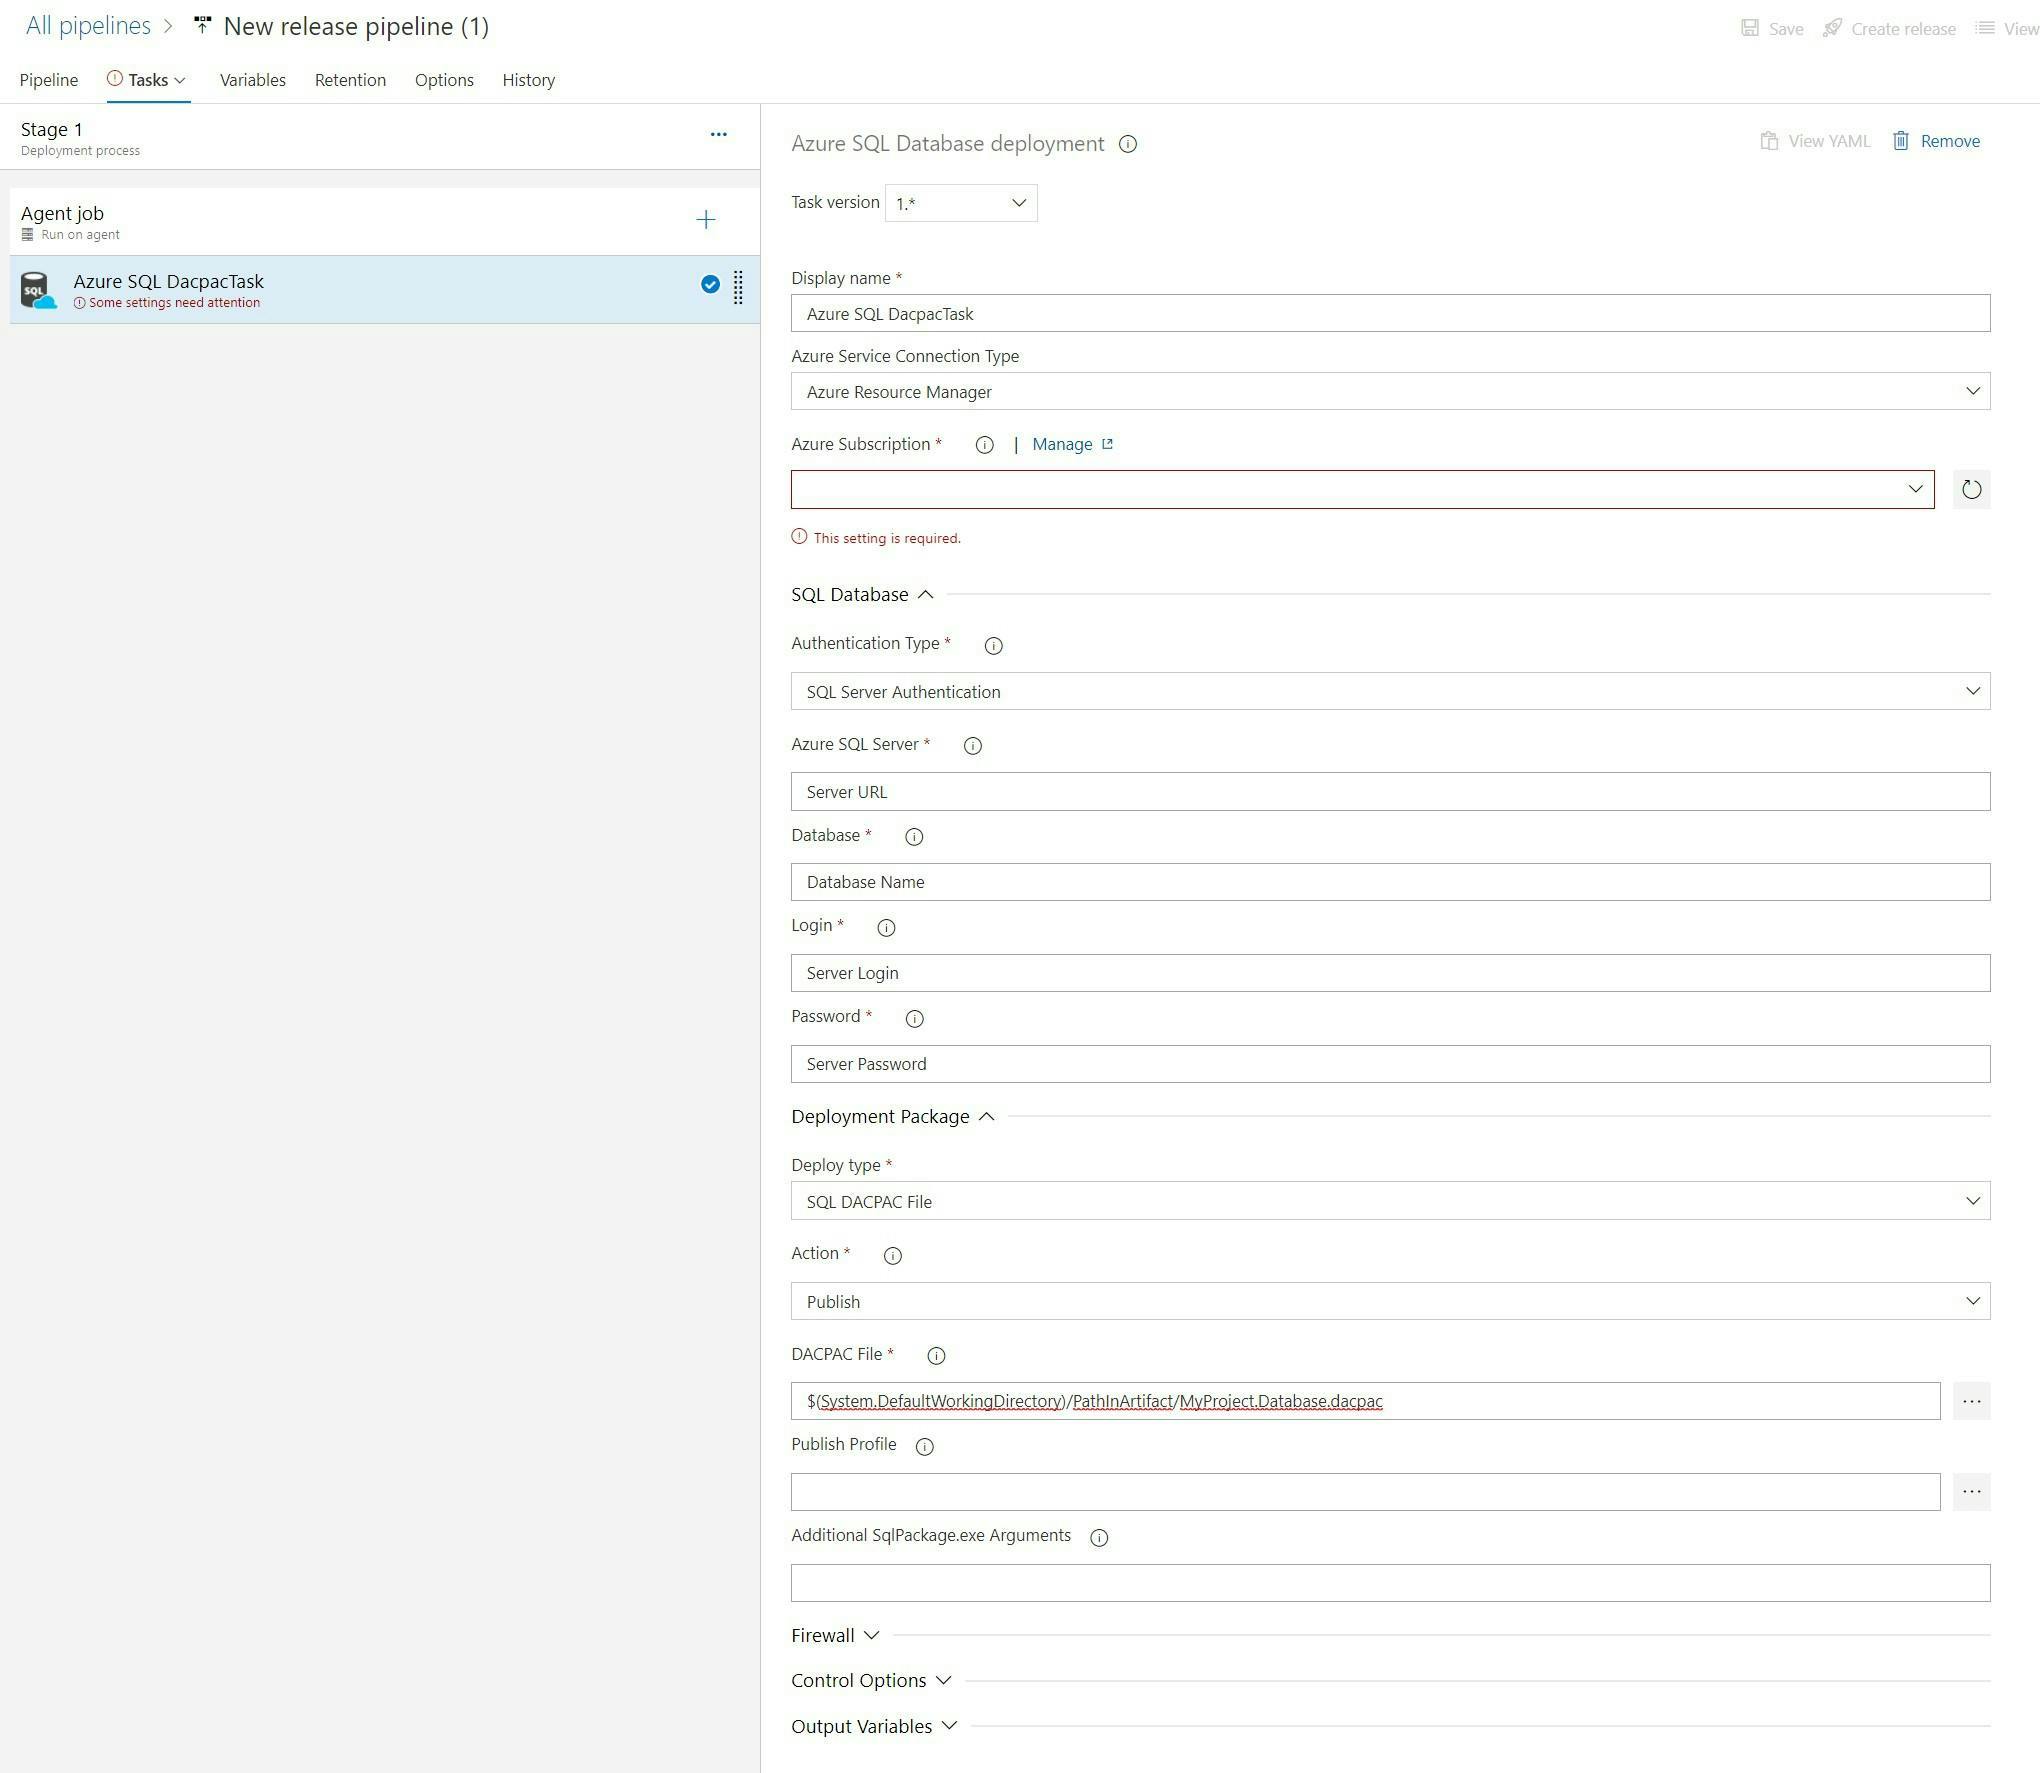
Complete the fields to configure which DB it will be deployed to (as shown in the picture but with your details).

And that's it. You can now run the pipelines and your SQL Project will be deployed to SQL Azure.
Some other tips

On the Azure SQL Database deployment task there is a property called Additional SqlPackage.exe Arguments this can be used to specify things like should loss of data be allows. You can find the list of these at this url https://docs.microsoft.com/en-us/sql/tools/sqlpackage/sqlpackage?view=sql-server-ver15#properties

If you are deploying to multiple environments you will want to use variables for the server details rather than having them on the actual task. This will make it easier to clone the stages and have all connections details configured in one place.

Moving the Media Cache folder in Sitecore

Moving the Media Cache folder in Sitecore

One of the cache’s that Sitecore has is the Media Cache. Whenever you use an image from Sitecore’s media library, Sitecore will retrieve the image from the database, scale it to the size you requested and then store it to disk in the media cache folder. On any subsequent request the image will now be retrieved from the media cache rather than the database.

By default each content management and content delivery server will locate the media cache in /App_Data/MediaCache

This is a relatively logical place to store a cache for images that wont cause you many issues. However, if you have automated deployments setup then you are likely wiping the whole of your website folder each time you do a deploy to ensure that your deploy remains the same on all environments. As the App_Data folder is in the website, your Media Cache will be deleted too.

Depending on your site then deleting the media cache potentially isn’t much of an issue. After all it’s a cache so all that will happen is the images will get cached the next time they are requested. But depending how many images get retrieved at the same time this could slow down performance, particularly if your content editors decided to put every image they ever uploaded into the same folder. Opening the that folder in the admin will create a nice amount of load on your server, particularly if you also have some extra image optimization logic installed.

Like most things in Sitecore though, you can change the location through a config setting.

In Sitecore.config you will find a property called Media.CacheFolder. Change this to somewhere outside of your website folder and Sitecore will now start storing the Media Cache in this location and it will be safe your all your deploys.

1<!-- MEDIA - CACHE FOLDER
2 The folder under which media files are cached by the system.
3 Default value: /App_Data/MediaCache
4 -->
5 <setting name="Media.CacheFolder" value="/App_Data/MediaCache"/>
Azure devops and custom NuGet feeds

Azure devops and custom NuGet feeds

If your setting up a CI pipleline on Azure Devops for a site which uses a NuGet feed from a source that isn't on nuget.org you may see the error:

"The nuget command failed with exit code(1) and error(Errors in packages.config projects Unable to find version..."

On your local dev machine you will have added extra an extra NuGet feed source through visual studio which will update a global file on you machine. However as Azure Pipelines is a serverless solution you don't have the same global file to update to include the sources.

Instead of this you need to add a NuGet.config file to the root of your repository.

Here is an example of one set to include Sitecores NuGet package feed.

1<?xml version="1.0" encoding="utf-8"?>
2<configuration>
3 <packageSources>
4 <add key="nuget.org" value="https://www.nuget.org/api/v2/" />
5 <add key="Sitecore NuGet v2 Feed" value="https://sitecore.myget.org/F/sc-packages/" />
6 </packageSources>
7</configuration>

Next you will need to update your pipeline to tell the NuGet step to use this config file

1- task: NuGetCommand@2
2 inputs:
3 restoreSolution: '$(solution)'
4 feedsToUse: 'config'
5 nugetConfigPath: 'NuGet.config'

And that's it. As long as all the sources are correct the NuGet command should now find your packages.

Bundling with Gulp in TeamCity

Bundling with Gulp in TeamCity

Like most, our front end developers write CSS in LESS or SASS and then use Gulp to compile the result. This is great but up until recently both the compiled and source style files would end up in our source control repository.

While this isn't a major issue it was more of an annoyance factor when doing a merge that the compiled file would need to be merged as well as the source files. Any conflicts in bundled/minified files also can become problematic to solve. As well as this it also just seems wrong to have both files in a repo, effectively duplicating the file. After all we wouldn't put compiled dll's into a repo with their source.

Our solution was to get the build server to start running the gulp tasks to produce the bundled files.

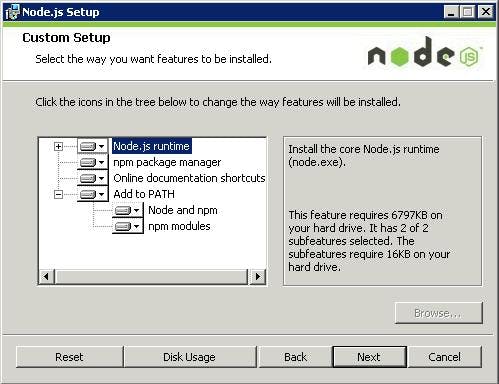
Step 1 - Install Node on the build server

To start we need NodeJS installed on the build server. This allows extensions to be installed via NPM (Node Package Manager), it's a similar thing to NuGet,

Step 2 - Install the TeamCity plugin for NodeJS

To add built steps for Node and Gulp we need to install a plugin to make them available. Lucking there is one that does such a thing here https://github.com/jonnyzzz/TeamCity.Node

The actual build of the plugin you can download from Jetbrains team city here https://teamcity.jetbrains.com/viewType.html?buildTypeId=bt434. Just login as guest and then download the latest zip from the artifacts of the last build.

To install the plug you need to copy the zip to Team City's plugin folder. For me this was C:\ProgramData\JetBrains\TeamCity\plugins, if your having trouble finding your's just go to Administration > Global Settings in Team City and it will tell you the data directory. The plugin folder will be in there.

Restart the TeamCity server and the plugin should now show under Administration > Plugins List

Step 3 - Add a NPM Setup build step

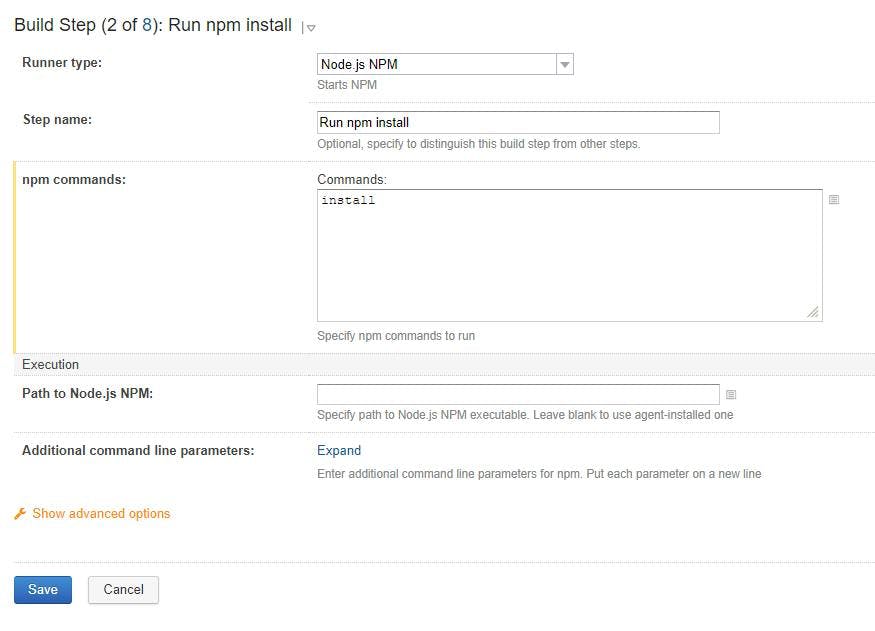
The NPM step with a command of install will pick up dependencies and get the files.

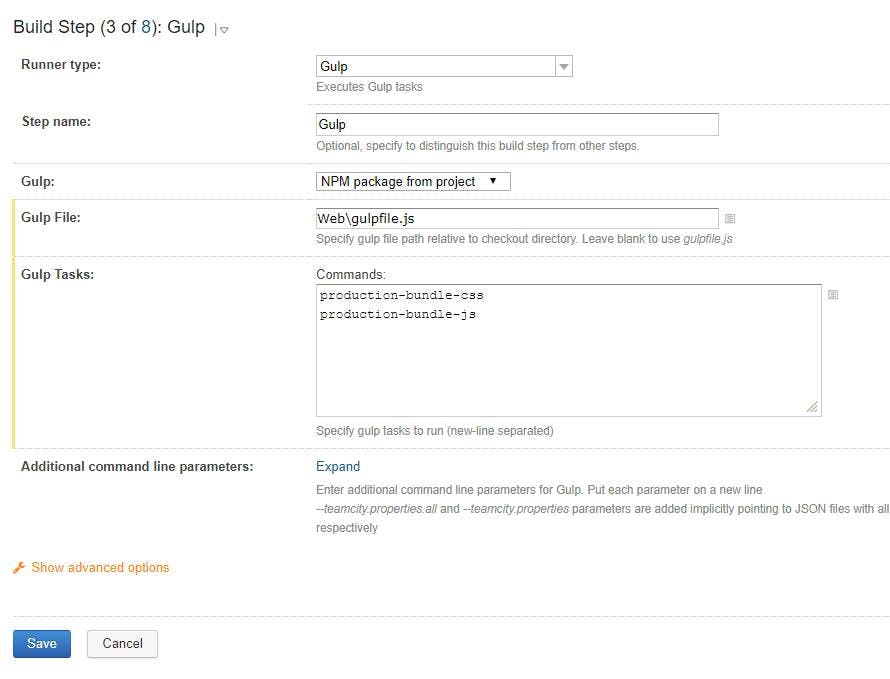
Step 4 - Add a Gulp build step


In your gulp step add the path to the gulp file and the tasks in your gulp file that need to be run. I'm using a gulp file that our front end devs had already created for the solution that contained as task for bundling css and another for bundling js.

Step 5 - Including bundled files in a MSBuild

As the bundled files are no longer included in our Visual Studio solution it also means that they arn't included in the set of files which will be included in a publish when MSBuild runs.

To overcome this update the .csproj file with a Target with BeforeTargets set to BeforeBuild and list your bundled files as content. In my example I'm included the whole Content\bundles folder

1<Target Name="BundlesBeforeBuild" BeforeTargets="BeforeBuild">
2<ItemGroup>
3<Content Include="Content\bundles\**" />
4</ItemGroup>
5</Target&gt;
Using compile options for version compatibility

Using compile options for version compatibility

Here's the scenario; Your building a module and it needs to be compatible with different versions of a platform. e.g. Sitecore, and everything's great up until the day you need to call different methods in different versions of the platform. You'd rather not drop support for the old versions, and nor do you want to start maintaining two code bases. So what do you do?

C# Preprocessor Directives

Preprocessor directives provide a way to give the compiler instructions to follow while its compiling a project. By using this we can give the compiler conditions to compile different versions in different ways. Thereby allowing us to maintain one codebase, but produce compilations for different versions of the platform. e.g. One for Sitecore 8.0 and another for Sitecore 9.0.

#if, #else and #endif

When the compiler encounters an #if followed by an #endif, it will only compile the code between the two if the specified symbol had been defined.

1#if DEBUG
2 Console.WriteLine("Debug version");
3#else
4 Console.WriteLine("Non Debug version");
5#endif
6

Defining a preprocessor symbol

For the if statement to work, your going to need to define your symbol which is being evaluate.

This can be included in code as follows

1#define YOURSYMBOL

A more useful was of defining this however is to include it in your call to MSBuild (this is particularly useful when using a build server).

1-define:name[;name2]

If your compiling from Visual Studio an easier solution is to set up a new build configuration with a conditional compilation symbol.

  • Right click your solution item in Solution Explorer and select Properties
  • Click Configuration Properties on the left and then Configuration Manager on the right
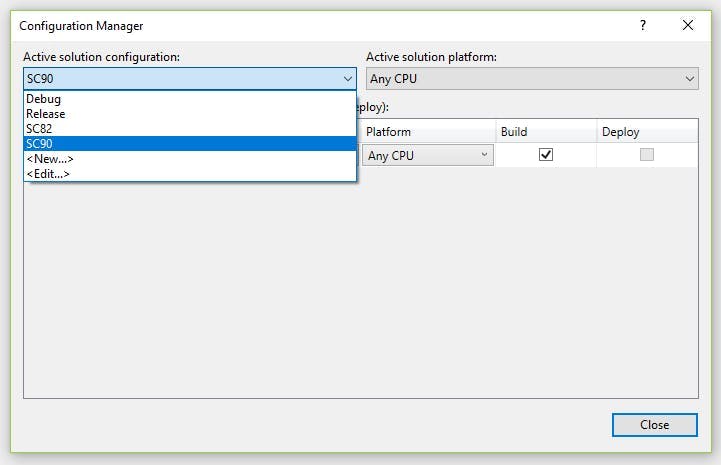
  • In the pop up window click the Active solution configuration drop down and then click New
  • Enter the name of the build config. In my example above I have SC82 for Sitecore 8.2 and SC90 for Sitecore 9.0.
  • Click Ok and close all the windows you just opened
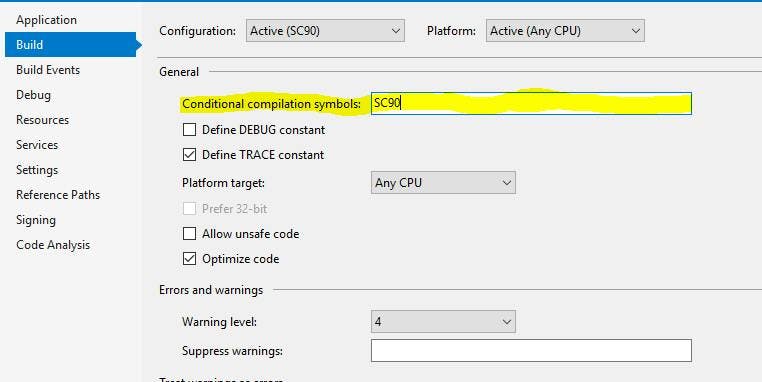
  • Right click the project that your going to build and select Properties
  • Select the Build tab
  • Select your build configuration from the configuration at the top
  • Enter the symbol your using for the #if directives

Reference different versions of an assembly

Adding conditions to our code is good, but for this to fully work we also need to reference different versions of the assemblies that are causing the issue in the first place.

There's no way of doing this through Visual Studio but by editing the .csproj file manually we can update the hint path on a reference to include the configuration name as a variable.

1..\libraries\$(Configuration)\Sitecore.Kernel.dll False

This example shows how different versions of the Sitecore Kernel can be referenced by keeping each version in a subfolder that corresponds with the build configuration name.

As well as different versions of assemblies, it may also be needed to target different versions of the .NET framework. This can be done in the .csproj file by including additional property groups that have a condition on the configuration name.

1bin\SC82\
2TRACE;SC82
3true
4v4.5.2
5
6bin\SC90\
7TRACE;SC90
8true
9v4.6.2

In this example I'm targeting .net 4.5.2 for my Sitecore 8.2 configuration and 4.6.2 for my Sitecore 9 configuration.

Useful Links

C# preprocessor directives
-define (C# Compiler Options)

Adding Build Statuses to Pull Requests with TeamCity and GitHub

Adding Build Statuses to Pull Requests with TeamCity and GitHub

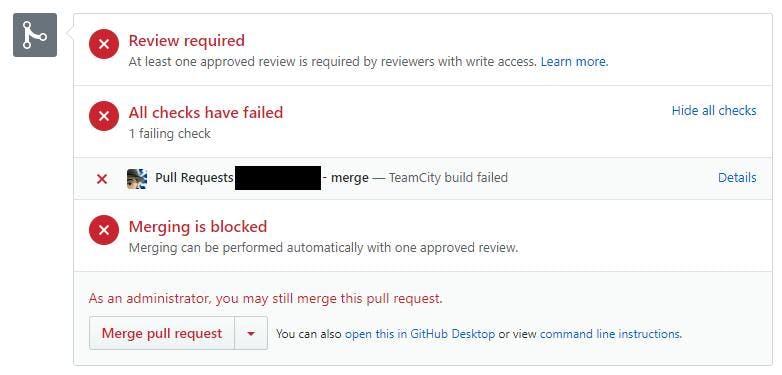
I'm always looking for ways to improve our build server setup and improve our overall efficiency. So a recent change I've made is to get Team City to start building pull requests and pushing the resulting status back to GitHub.

This improves our dev flow by eliminating the need to do any testing on a pull request if we can already see it will fail a build. Previously someone doing a code review would only find out once they've checked out the change and built it locally, or even worse after approving the request and then breaking the build.

What's particularly good with this setup, is it's testing the resulting merge rather than just the branch being merged in.

Team City Setup

As this is covering a different scenario to our normal build processes which are focused on preparing a build version to be deployed, I set this up as a second build configuration on our projects.

Version Control Settings Root (VCS Root)

The VCS Root needs to be configured to fetch each pull request that is creating in GitHub. To do this, you will need to add a Branch specification which will tell Team City to monitor additional branches rather than just the default branch specified.

I'm using the branch specification +:refs/pull/(*/merge) .

This syntax is telling Team City to monitor references to pull for pull request, the * refers to any pull request, and the merge indicates that we only want to resulting merge of the pull request.

When you create a pull request in GitHub, this merge reference is automatically created for what the resulting merge would look like.

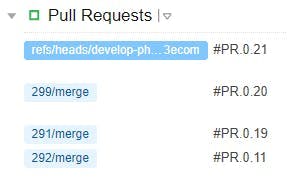
In the projects list, builds will now get labels indicating what they were for:

Build Steps

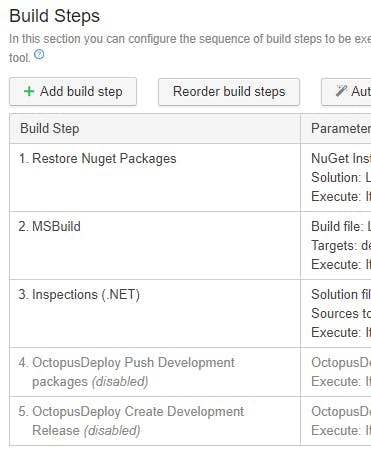
I created my build configurations by duplicating the existing ones we have that take care of creating builds to be passed onto Octopus Deploy for release. If you do this, it's important to remember to disable all the steps you no longer need.

The less steps you have the quicker your build will run and the quicker the pull request will be updated with a status. Ideally you want the process to finish before someone starts doing a code review! Steps like running Inspections may prove counter productive if the builds are never finished on time.

Triggers

Having a build running automatically for your releases can be a drain on server resources, particularly if you never have any intention of actually doing a deploy for most of them. For this reason our builds are set to manual.

However for statuses to be of any use, they're going to need to be running automatically so that the status is ready for the code reviewer, so we need to add a VCS Trigger.

Build Features

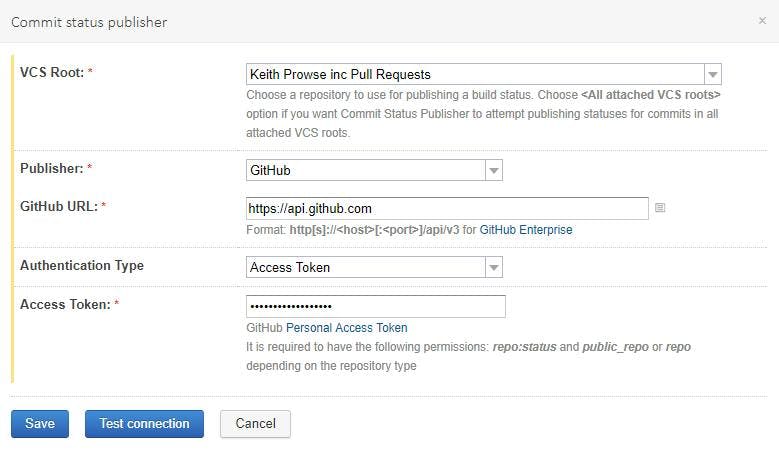
To get Team City to start posting status updates back to GitHub we need to add a build feature. If your on a version of TeamCity prior between 7.1 and 10 then there is a plugin you can grab here https://github.com/jonnyzzz/TeamCity.GitHub. If your on a newer version of TeamCity. i.e. 10+ then the build feature is now built in and is called Commit status publisher. The built in version also has support for Bitbucket, Gerrit, GitLab, JetBrains Upsource and Visual Studio Team Services.

Add the build feature and fill in the config settings.

And that's it. Your pull requests will now automatically build and have the status sent back to GitHub.

Not only will you be able to see this status in GitHub, you'll also be able to click a details link to see the build. Useful in the event that it's failed and you want to see why.

The importance of build numbers

The importance of build numbers

If I were to make a prediction, I would say that build numbers are something that are rarely treated as being important in the agency world of web development. That's not to say milestone releases aren't given names like "Phase 2", "August Release" or a major feature name, but every build / release of a project in between, I'd sense largely have build numbers either ignored or never created.

It's also easy to see why, after all it's not like we're producing software that's going out to the masses to be installed. The solution is essentially just ending up having 1 install on a set of servers. When a new version is built, that replaces everything that came before it and if a bug is found we generally roll forward and fix the bug rather than ever reverting back.

Why use build numbers?

So when we're constantly coding and improving applications in an agile world why should we care about and use build numbers?

To put it quite simply its just an easy way to identify a snapshot of code that could have actually have been built and then released to a server. This becomes hugely useful in scenarios such as:

  • A bug being reported by an end user
  • An issue being identified by some performance monitoring
  • An issue being picked up in some functionality further on from the site. e.g. in an integration

Without build numbers the only way to react to these scenarios is to look at commit dates in source control or manual release notes that may have been created to try and work out where an issue may have been created and what changed at that time. If the issue had subsequently been fixed you also can't really give a version description when it was fixed other than a rough date.

Other advantages of build numbers can include:

  • Being able to reference a specific version that has been pen tested
  • Referencing a version that's been tested with integrations
  • Having approval to release a specific version rather than just the latest on master
  • Anywhere you want to have a conversation referencing releases

Build numbers for deploys

The first step to use build numbers and with the rise in CI, possibly the one thing most people are doing is to start creating build numbers via a build server. By using any type of build server you will end up with build numbers. This instantly gives you a way to know when a build was created and what commits were new within the build.

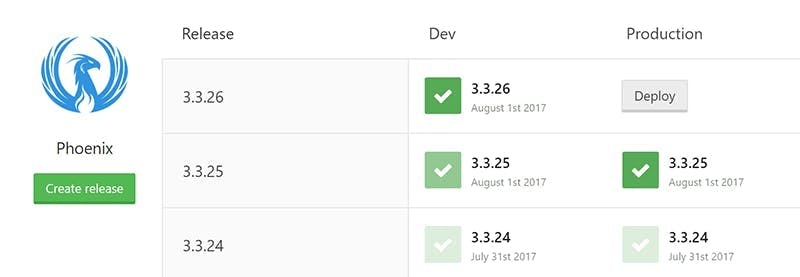
Start involving an automated deployment setup either using your build server or with other tools like Octopus Deploy and you will now start to get a record of when each build was deployed to each server.

Now you have an easy way to not only reference what build was on each environment and when through the deploy history, but also a way to see what went into a build through the build servers change log.

Tag builds in source control

Being able to see the changes that went into each build on your build server is all very good, but it's still not an ideal situation for finding the exact code version a build relates to.

Thankfully if your using Team City it's really easy to set it up to create a tag in your source control with each build number. Simply go to the build features section of your projects configuration and add a feature called "VCS Labeling". This is a step that happens post build in the background and will create a tag in source control including the build number. It has lots of other configuration options, so if you need different tag formats for different branches its got you covered.

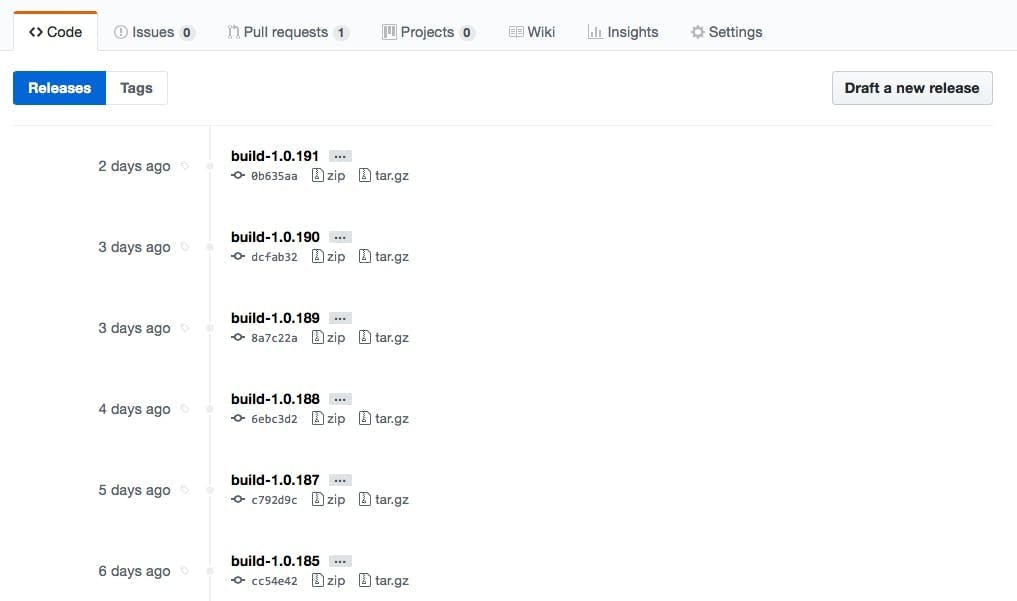
If your using GitHub once this is turned on you will be able to see a list of all the tags in the releases section.

Update Assembly info

Being able to identify a build in source control and view a history of what should have been on a server at a particular time is all very good, but its also a good idea to be able to easily identify a build for a published version of code. That way just by looking at the code on a server you can tell which build version it is, and not rely on your deployment tool to be correct.

If your using Team City this also also made super simple through a build feature called "Assembly info patcher". When using this the build number will automatically get patched in without having to edit AssemblyInfo.cs.

Conclusion

By following these tips you will now be able to identify a version by looking at the published code, see a history of when each version was not only built but also released to each environment and also have an easy way to find the exact source for that build.

The build number can then be used in any conversations around when a bug was introduced and also be referenced in release notes so everyone can keep track of what versions included what fix's in a simple to understand format.

Sitecore: Setting up Mongo with Authentication

One of the new features in Sitecore 7.5 was the xDB, a new analytics database that rather than using SQL Server was Mongo based. If your main job is as a Sitecore dev, like me this may be the first time you've ever had to use Mongo, or a least the first time you've ever had to commercially use it.

Installing Mongo DB is a relatively painless experience, Mongo provide a decent enough guide to installing on Windows. Half way through you may be wondering why its running in a console window, but eventually you get to instructions for setting it up as a service.

However there are a couple of gotchas:

  1. Sitecore doesn't work with the latest version of Mongo. At time of writing the latest version of Sitecore is 8.0 rev. 150427 and Mongo is 3.0. Sitecore however only supports version 2.6.x of Mongo though.
  2. None of the installation instructions include any details on authentication. Which while this is fine for your local dev machine is not so great for a live site.

So here's my guide for getting up and running with Mongo DB and Sitecore.

Installing Mongo

First off get Mongo DB installed as a service on your machine. I'm not going to include instructions here for this bit, just follow the guide on the Mongo DB website.

One thing to note though, the Windows installer for Mongo 2.6 will by default install Mongo to C:\Program Files\MongoDB 2.6 Standard\. However the instructions for setting up Mongo include example commands expecting it to be installed in C:\mongodb\

Setting Up Authentication

Once you've got Mongo up and running you'll need to create a user.

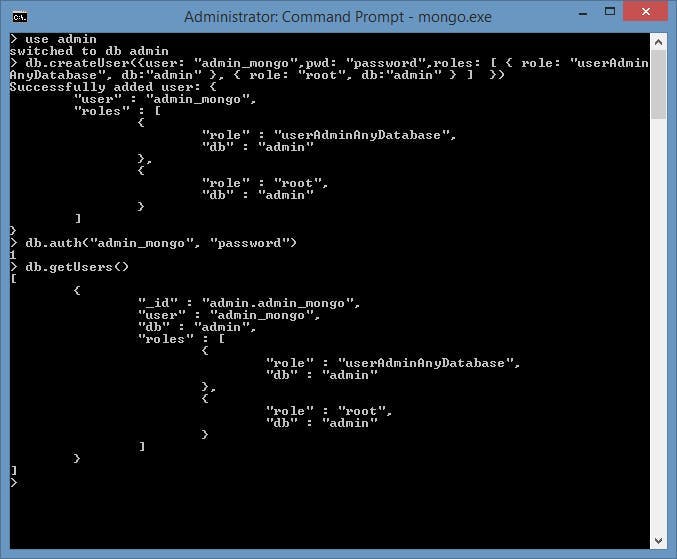
  1. Open a command prompt and connect to MongoDB

    C:\Program Files\MongoDB 2.6 Standard\bin\mongo.exe
  2. Switch to the admin db by doing

    use admin
  3. Create the user using

    db.createUser({user: "admin_mongo",pwd: "your password",roles: [ { role: "userAdminAnyDatabase", db:"admin" }, { role: "root", db:"admin" } ] })
  4. To verify the user has been created you can use the following commands

    db.auth("admin_mongo", "your password")
    db.getUsers()

Next update your config file to require authentication by adding auth=true. You will also need to restart the service for the change to take effect.

logpath=c:\data\log\mongod.log
dbpath=c:\data\db
auth=true

Sitecore uses 4 db's in Mongo; Analytics, tracking_live, tracking_history and tracking_contact. We need to create a user in each of them.

Open a mongo shell again, switch to the admin db and connect with your admin login.

Now create each of the users as follows:

use analytics
db.createUser({user: "mongo_user",pwd: "your password",roles: [ { role: "readWrite", db:"analytics" } ]  })

use tracking_live
db.createUser({user: "mongo_user",pwd: "your password",roles: [ { role: "readWrite", db:"tracking_live" } ]  })

use tracking_history
db.createUser({user: "mongo_user",pwd: "your password",roles: [ { role: "readWrite", db:"tracking_history" } ]  })

use tracking_contact
db.createUser({user: "mongo_user",pwd: "your password",roles: [ { role: "readWrite", db:"tracking_contact" } ]  })

Sitecore Connection Strings

All that's left now is to update the connection strings in Sitecore.

The default connection strings Sitecore give you look like this:

The format for a connection string with authentication is

mongodb://[username:password@]host1[:port1]/database

Setting IP restrictions in IIS

It's a frequent scenario that a website your in the process of building needs to be accessible over the internet before it should actually be publicly available over the internet. This can come in the form of clients needing to review staging sites before there live, test sites needing to be accessible to testers who may not be in a location that can access private servers, or working jointly with other suppliers.

This scenario presents a lot of dangers such as, the URL of a site could get leaked early ruining a marketing strategy, or the site could end up in Google destroying the SEO value on the clients current site and even worse, actually get real customers visiting it.

There are only 2 real methods of protecting test/staging sites. One is adding authentication to the site restricting access to people with a valid username and password. The other is IP white-listing so only people from a valid IP can access the site.

In the past I've seen people suggest using a robots.txt to tell search engines to ignore the site. This is guaranteed to fail, Google will index a site with a robots file saying not to. Your robot's file may say don't crawl, but that auto generated Sitemap will be obeyed an the files indexed. There will also come a time the robots file gets copied live de-indexing the live site, or someone forgets the file on staging and the staging site is indexed.

Using IIS to set up IP restrictions

Using IIS to set up IP restrictions is quick and easy, and what's best about it is you can set it at the server level and not worry about people forgetting to add it to new sites. Better still you can also easily add configuration at a website level to allow certain people to see certain sites rather than the whole box.

Installing the Feature

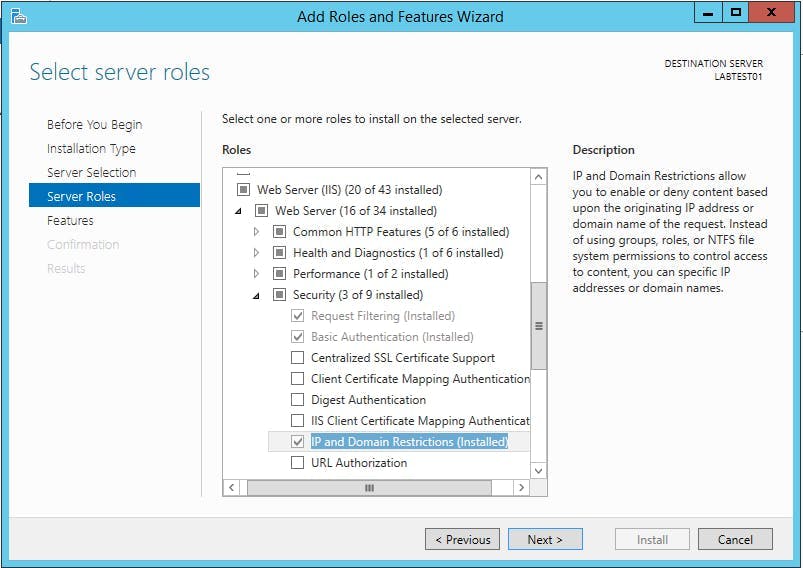
First you need to make sure you have the feature installed on IIS. To do this on Windows Server 2012:

  1. Go to Server Manager and click "Add roles and features"
  2. Click next to take you from the Before you begin page to Installation Type
  3. Leave Role-based selected and click next
  4. On the Server Selection screen the server your on should be auto selected. Click next
  5. On the Server Roles screen scroll down to "Web Server (IIS)". IP and Domain Restrictions is located under Web Server (IIS) > Web Server > Security
  6. Click the check box on IP and Domain Restrictions if its not already selected and complete the wizard to install the features.

Configuring IIS

The set up an IP restriction in IIS do the following:

Open IIS and select your server in the left hand treeview. Alternatively if you wanted to add the restrictions to an individual site, select that site.

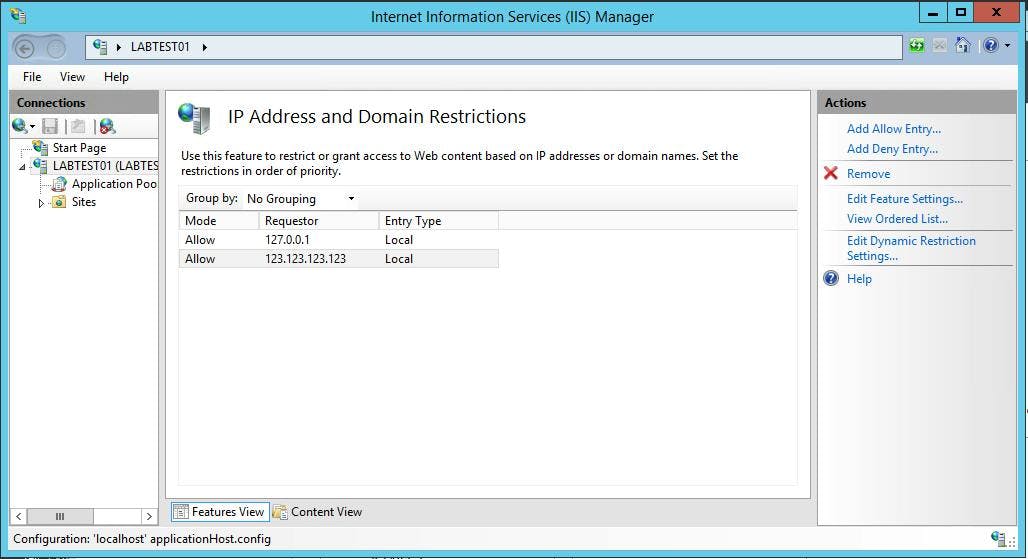
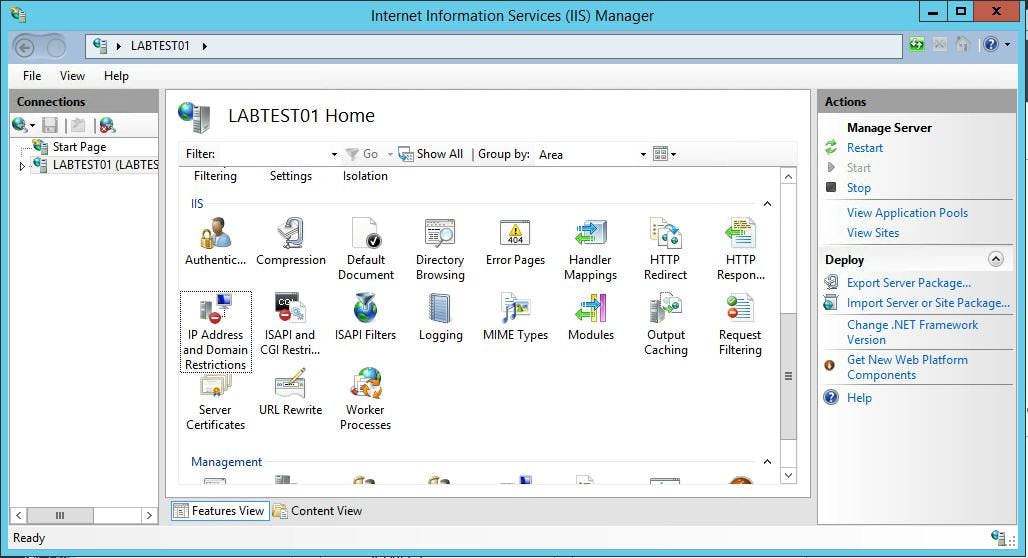
Within the IIS section you should have an item titled IP Address and Domain Restrictions

The configured IP address will be listed out. To add a new one click the "Add Allow Entry" action on the right.

This screen allows you to set up allow and deny lists, but the restrictions don't actually have an effect until you edit the feature settings.

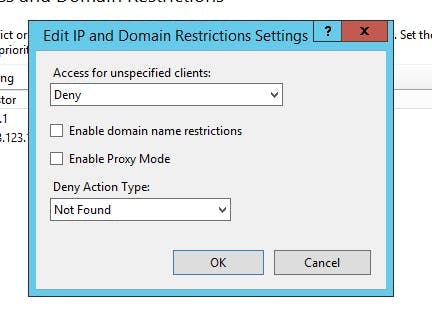
On this screen you need to set the access for unspecified clients to deny. You can also specify a deny action type which alters the status code between unauthorized, forbidden, not found and abort.

What this doesn't do

What this won't do is block all traffic not in the allow list to your server. It will only cover IIS, so if you have other services running on your box like SQL Server, Mongo, Apache etc this will all still be publicly available.