Tag: Web Development
Force clients to refresh JS/CSS files

Force clients to refresh JS/CSS files

It's a common problem with an easy solution. You make some changes to a JavaScript of CSS file, but your users still report an issue due to the old version being cached.

You could wait for the browsers cache to expire, but that isn't a great solution. Worse if they have the old version of one file and the new version of another, there could be compatibility issues.

The solution is simple, just add a querystring value so that it looks like a different path and the browser downloads the new version.

Manually updating that path is a bit annoying though so we use modified time from the actual file to add the number of ticks to the querystring.

UrlHelperExtensions.cs

1using Utilities;
2using UrlHelper = System.Web.Mvc.UrlHelper;
3
4namespace Web.Mvc.Utils
5{
6 public static class UrlHelperExtensions
7 {
8 public static string FingerprintedContent(this UrlHelper helper, string contentPath)
9 {
10 return FileUtils.Fingerprint(helper.Content(contentPath));
11 }
12 }
13}

FileUtils.cs

1using System;
2using System.IO;
3using System.Web;
4using System.Web.Caching;
5using System.Web.Hosting;
6
7namespace Utilities
8{
9 public class FileUtils
10 {
11 public static string Fingerprint(string contentPath)
12 {
13 if (HttpRuntime.Cache[contentPath] == null)
14 {
15 string filePath = HostingEnvironment.MapPath(contentPath);
16
17 DateTime date = File.GetLastWriteTime(filePath);
18
19 string result = (contentPath += "?v=" + date.Ticks).TrimEnd('0');
20 HttpRuntime.Cache.Insert(contentPath, result, new CacheDependency(filePath));
21 }
22
23 return HttpRuntime.Cache[contentPath] as string;
24 }
25 }
26}
Bundling with Gulp in TeamCity

Bundling with Gulp in TeamCity

Like most, our front end developers write CSS in LESS or SASS and then use Gulp to compile the result. This is great but up until recently both the compiled and source style files would end up in our source control repository.

While this isn't a major issue it was more of an annoyance factor when doing a merge that the compiled file would need to be merged as well as the source files. Any conflicts in bundled/minified files also can become problematic to solve. As well as this it also just seems wrong to have both files in a repo, effectively duplicating the file. After all we wouldn't put compiled dll's into a repo with their source.

Our solution was to get the build server to start running the gulp tasks to produce the bundled files.

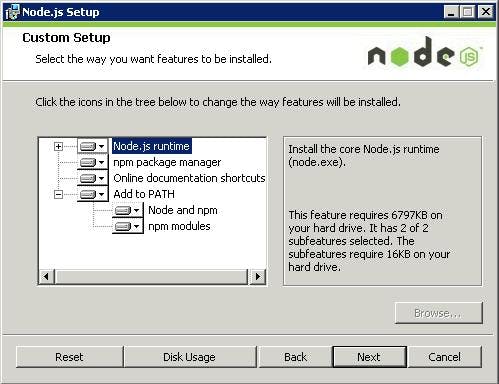
Step 1 - Install Node on the build server

To start we need NodeJS installed on the build server. This allows extensions to be installed via NPM (Node Package Manager), it's a similar thing to NuGet,

Step 2 - Install the TeamCity plugin for NodeJS

To add built steps for Node and Gulp we need to install a plugin to make them available. Lucking there is one that does such a thing here https://github.com/jonnyzzz/TeamCity.Node

The actual build of the plugin you can download from Jetbrains team city here https://teamcity.jetbrains.com/viewType.html?buildTypeId=bt434. Just login as guest and then download the latest zip from the artifacts of the last build.

To install the plug you need to copy the zip to Team City's plugin folder. For me this was C:\ProgramData\JetBrains\TeamCity\plugins, if your having trouble finding your's just go to Administration > Global Settings in Team City and it will tell you the data directory. The plugin folder will be in there.

Restart the TeamCity server and the plugin should now show under Administration > Plugins List

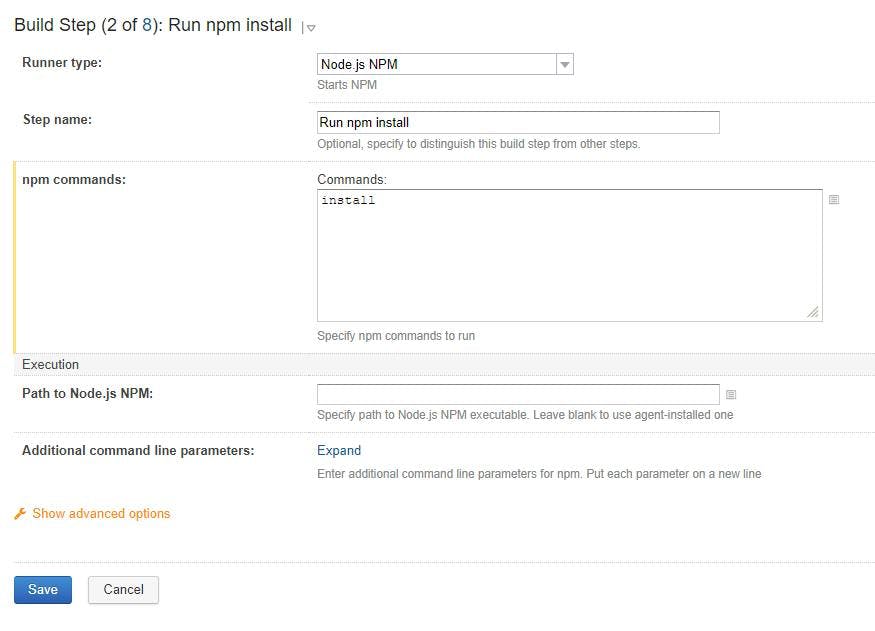
Step 3 - Add a NPM Setup build step

The NPM step with a command of install will pick up dependencies and get the files.

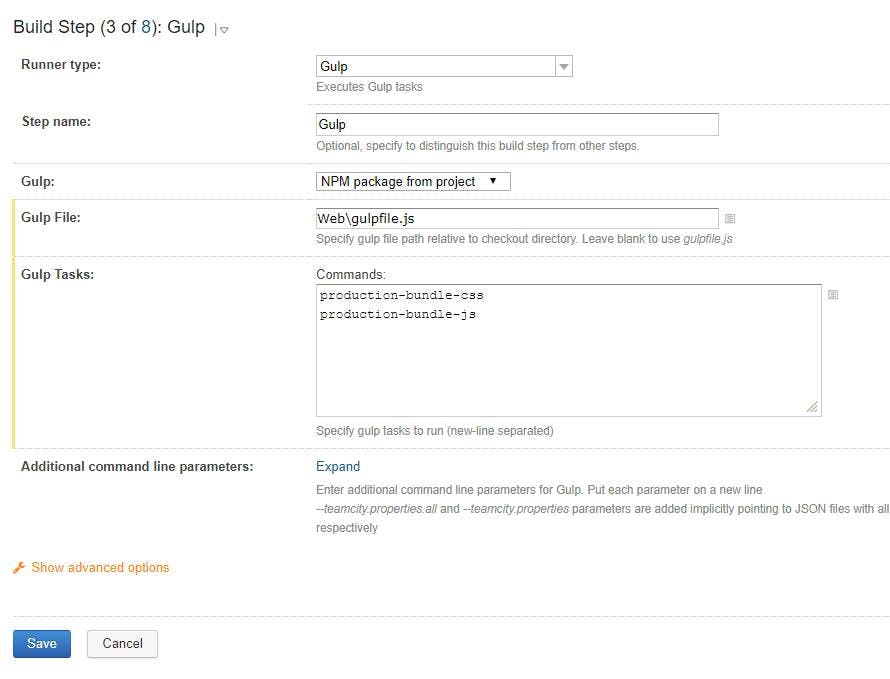
Step 4 - Add a Gulp build step


In your gulp step add the path to the gulp file and the tasks in your gulp file that need to be run. I'm using a gulp file that our front end devs had already created for the solution that contained as task for bundling css and another for bundling js.

Step 5 - Including bundled files in a MSBuild

As the bundled files are no longer included in our Visual Studio solution it also means that they arn't included in the set of files which will be included in a publish when MSBuild runs.

To overcome this update the .csproj file with a Target with BeforeTargets set to BeforeBuild and list your bundled files as content. In my example I'm included the whole Content\bundles folder

1<Target Name="BundlesBeforeBuild" BeforeTargets="BeforeBuild">
2<ItemGroup>
3<Content Include="Content\bundles\**" />
4</ItemGroup>
5</Target&gt;
Redirect to https using URL Rewrite

Redirect to https using URL Rewrite

There's always been reasons for pages to be served using https rather than http, such as login pages, payment screens etc. Now more than ever it's become advisable to have entire sites running in https. Server speeds have increased to a level where the extra processing involved in encrypting page content is less of a concern, and Google now also gives a boost to a pages page ranking in Google (not necessarily significant, but every little helps).

If all your pages work in https and http you'll also need to make sure one does a redirect to the other, otherwise rather than getting the tiny page rank boost from Google, you'll be suffering from having duplicate pages on your site.

Redirecting to https with URL Rewrite

To set up a rule to redirect all pages from is relatively simple, just add the following to your IIS URL Rewrite rules.

1<rule name="Redirect to HTTPS" stopProcessing="true">
2 <conditions>
3 <add input="{HTTPS}" pattern="^OFF$" />
4 </conditions>
5 <action type="Redirect" url="https://{HTTP_HOST}{REQUEST_URI}" appendQueryString="false" />
6</rule>

The conditions will ensure any page not on https will be caught and the redirect will do a 301 to the same page but on https.

301 Moved Permanently or 303 See Other

I've seen some posts/examples and discussions surrounding if the redirect type should be a 301 or a 303 when you redirect to https.

Personally I would choose 301 Moved Permanently as you want search engines etc to all update and point to the new url. You've decided that your url from now on should be https, it's not a temporary redirection and you want any link ranking to be transfered to the new url.

Excluding some URL's

There's every chance you don't actually want every url to redirect to https. You may have a specific folder that can be accessed on either for compatibility with some other "thing". This can be accomplished by adding a match rule that is negated. e.g.

1<rule name="Redirect to HTTPS" stopProcessing="true">
2 <match url="images" negate="true" />
3 <conditions>
4 <add input="{HTTPS}" pattern="^OFF$" />
5 </conditions>
6 <action type="Redirect" url="https://{HTTP_HOST}{REQUEST_URI}" appendQueryString="false" />
7</rule>

In this example any url with the word images in would be excluded from the rewrite rule.

Bundling and Minification with Sitecore

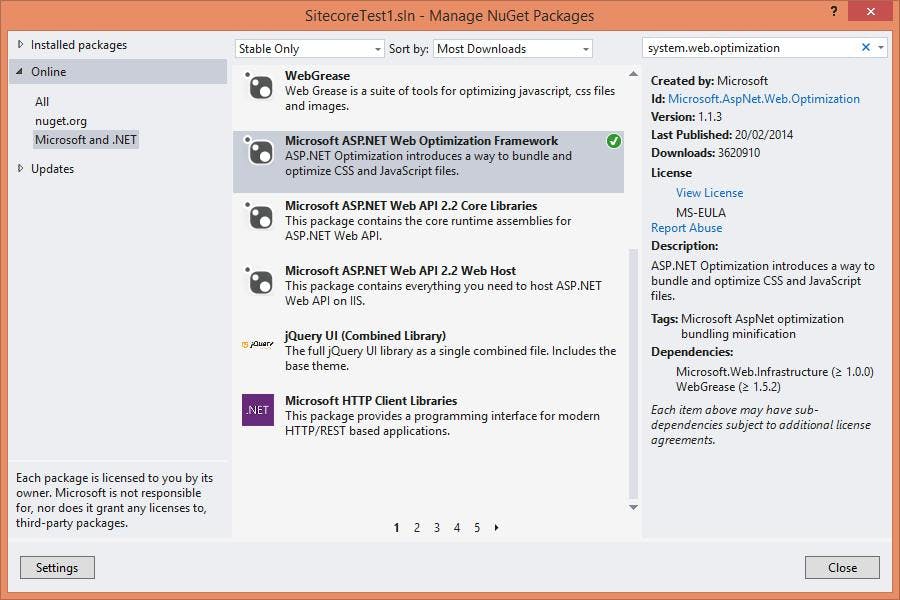
There's various ways to add bundling and minification to a site, but one of the easiest is to use Microsoft's support from the Microsoft.AspNet.Web.Optimization package. This implementation has some great features including:

  • Automatically create the bundles and minify them as files are changed
  • Create unique urls to each version of a bundle to force browser refreshing of the file
  • Debug mode which outputs links to the raw files rather than the bundled minified version

The functionality is also fully compatible with Sitecore. To use it in your Sitecore solution follow these steps:

1. Add Microsoft.AspNet.Web.Optimization to your project from NuGet. This is the package from Microsoft that contains the functionality to do bundling and minification


2. Create your CSS and Javascript bundles. Where you put the logic for this is up to you but it will need to run when the application starts. Outside of Sitecore my main development is on bespoke ASP.NET MVC and Web API projects so I like to organise startup scripts into an App_Start folder and reference it from the Application_Start event in the global ascx file.

If you are running a Sitecore instance with multiple sites or if you do not have direct access to the production config files, it may be better to keep the logic separate and use a pipeline to create the bundles.

My bundle definitions would look something like this

1using System;
2using System.Collections.Generic;
3using System.Linq;
4using System.Web;
5using System.Web.Optimization;
6
7public class BundleConfig
8{
9 public static void RegisterBundles(BundleCollection bundles)
10 {
11 bundles.Add(new ScriptBundle("~/bundles/scripts").Include(
12 "~/Scripts/jquery-{version}.js",
13 "~/Scripts/bootstrap.js"));
14
15 bundles.Add(new StyleBundle("~/bundles/css").Include(
16 "~/Content/bootstrap.css",
17 "~/css/site.css"));
18 }
19}

And in my Global.asax.cs file I would have some logic like this to call the other function

1protected void Application_Start(object sender, EventArgs e)
2{
3 BundleConfig.RegisterBundles(System.Web.Optimization.BundleTable.Bundles);
4}

3. Replace your Javascript/CSS references in your layout or rendering files with a call to render the bundle

Webforms

1<%: System.Web.Optimization.Scripts.Render("~/bundles/scripts") %>
2<%: System.Web.Optimization.Styles.Render("~/bundles/css") %>

MVC

1@Scripts.Render("~/bundles/scripts")
2@Styles.Render("~/bundles/css")

4. In your web.config file there are a couple of changes needed to get things to work.

First you need to set an ignore url prefix to stop Sitecore trying to resolve the URL to the bundle. In this example mine is called bundles (note: you should add the prefix the what is already in your config file. e.g. |/bundles)

1<!-- IGNORE URLS
2 Set IgnoreUrlPrefixes to a '|' separated list of url prefixes that should not be
3 regarded and processed as friendly urls (ie. forms etc.)
4-->
5<setting name="IgnoreUrlPrefixes" value="/sitecore/default.aspx|/trace.axd|/webresource.axd|/sitecore/shell/Controls/Rich Text Editor/Telerik.Web.UI.DialogHandler.aspx|/sitecore/shell/applications/content manager/telerik.web.ui.dialoghandler.aspx|/sitecore/shell/Controls/Rich Text Editor/Telerik.Web.UI.SpellCheckHandler.axd|/Telerik.Web.UI.WebResource.axd|/sitecore/admin/upgrade/|/layouts/testing|/bundles" />
6

Next a dependant assembly binding needs to be set up for Web Grease. Without it you will see an error about the Web Grease version number

1<dependentAssembly>
2 <assemblyIdentity name="WebGrease" publicKeyToken="31bf3856ad364e35" />
3 <bindingRedirect oldVersion="0.0.0.0-1.5.2.14234" newVersion="1.5.2.14234" />
4</dependentAssembly>

If you have done this and are still getting a version number error check the assembly binding tag. Older versions of Sitecore have the applies to property set which may be only applying the bindings to .Net 2 and you may be using .Net 4.

1<assemblyBinding xmlns="urn:schemas-microsoft-com:asm.v1" appliesTo="v2.0.50727">

5. If you are using IIS7 you will also need to make a change in your web.config file

1<system.webServer>
2 <modules runAllManagedModulesForAllRequests="true">
3 </modules>
4</system.webServer>

6. Publish your changes into your Sitecore site. Depending if you have compilation mode set to debug or not you will now either have a bundle reference for all your JavaScript and CSS or the individual file references.

Bundling and Minification error with IIS7

.NETs standard tools for bundling and minification are a great asset to the platform solving a lot of problems with only a few lines of code.

However if using IIS 7.0 you may run into a strange issue where the path to your bundles gets created but a 404 is returned whenever there accessed. The functionality is obviously installed and working otherwise the URL wouldn't be created, but a 404 clearly isn't what you want.

The solution lies in your web.config file by setting runAllManagedModulesForAllRequests to true

1<system.webServer>
2 <modules runAllManagedModulesForAllRequests="true">
3 </modules>
4</system.webServer>
Two Google Maps Tips

Two Google Maps Tips

Centre a map on a collection of pins

The basic way to centre a Google Map is to give it co-ordinates of where you want the map to centre. But what if you have a collection of pin/markers and you want to show all of them but don't know beforehand where they will be.

The solution is to create a LatLngBounds object and for each of your pins call the extend method of your bounds object. Once this is done call fitBounds on your map.

1var bounds = new google.maps.LatLngBounds();
2
3$.each(mapMarkers(), function(index, value) {
4 bounds.extend(value.marker.position);
5});
6
7map.fitBounds(bounds);

Loading a map in a hidden div

The reason for doing this could be that you have a set of tabs and a non-visible one contains the Google Map. If you instantiate a Google Map when it isn't visible you end up with the smallest map size possible.

One popular solution for this is to only create the map when the tab is being displayed, which is a good option as it means the map is only loaded when it's viewed. However if your using something like Knockout to bind you've views to a model it may not be possible to attach an event to the tab change.

Google Maps actually have an event handler for just this scenario called resize. You simply need to trigger it at the point in which you can size the map.

1google.maps.event.trigger(map, 'resize')

IIS Where are my log files?

This is one of those things that once you know is very very simple, but finding out can be very very annoying.

IIS by default will store a log file for each site that it runs. This gives you valuable details on each request to the site that can help when errors are being reported by users.

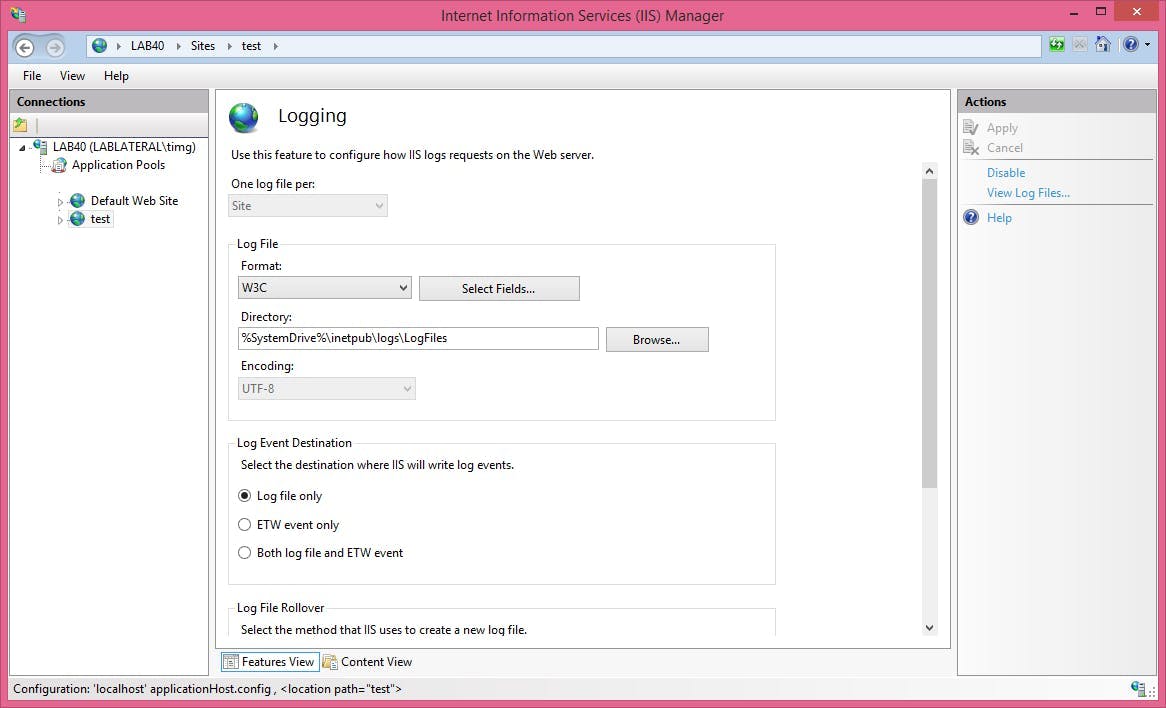
When you go searching for them your initial thought may be to go to IIS and look at the site you want the files for. There you will see an item called logging. Excellent you think, this will tell you all you need to know.

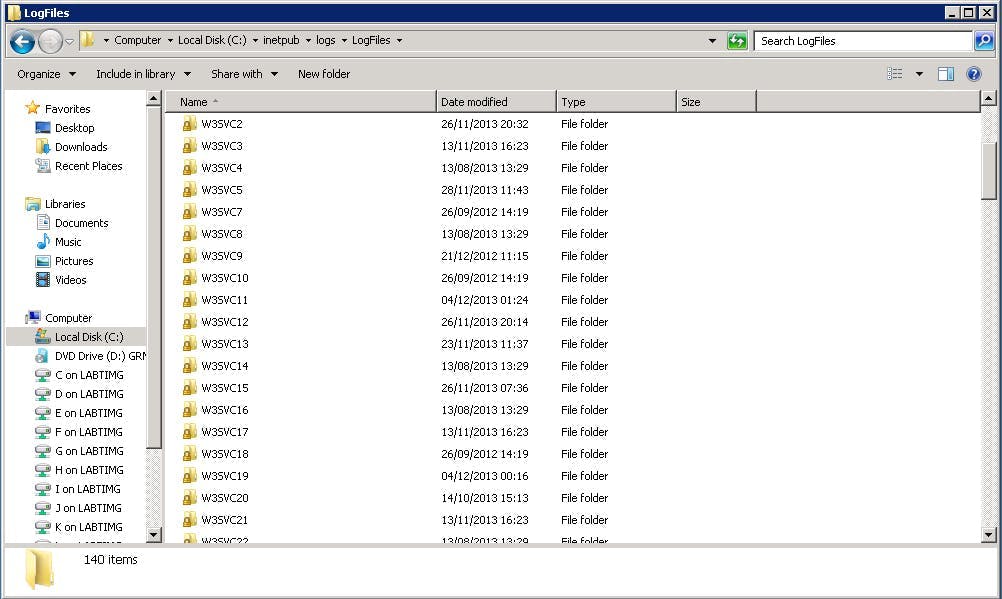
There's even a button saying "View Log File...", but once you click it you realise things aren't so simple. The link and folder path on the logging page both take you to a folder, containing more folders. In those folders are the logs, but there's a folder for each site in IIS and they've all got a weird name. How do you know which folder has the log files for the site you want?

Back on the IIS logging screen there's nothing to say which folder the files will be in. There isn't any indication anywhere.

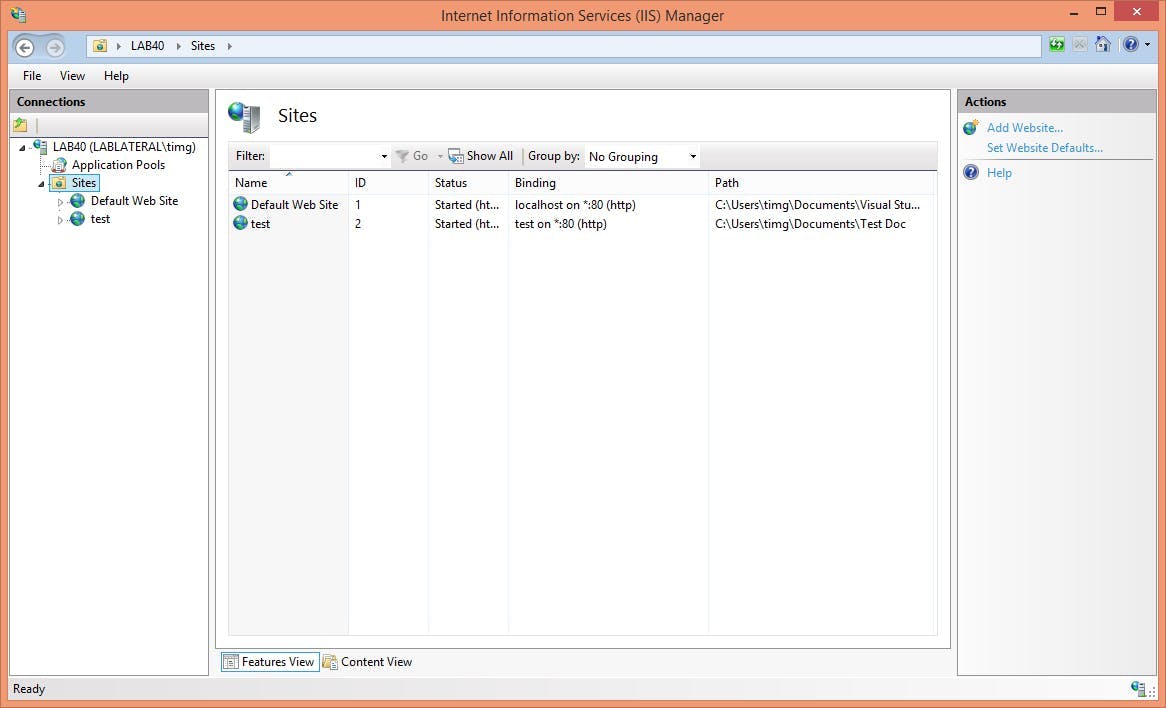
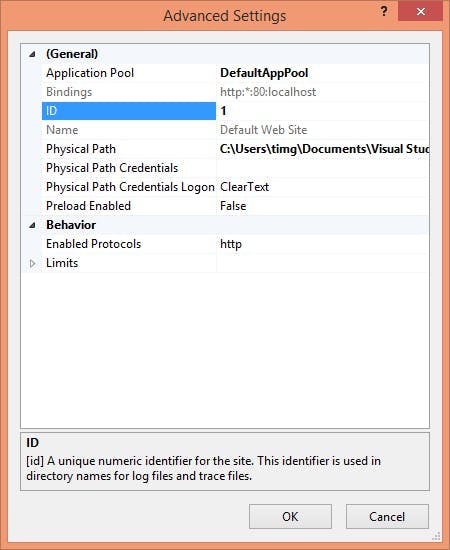
The answer however is very easy. Each folder has the Site ID in its name. You can find the Site ID for your site in IIS either by looking at the sites list

or clicking on a site and clicking advanced settings

Creating 301 redirects in web.config

For various reasons at times you may need to create a 301 redirect to another URL. This could be as a result of a page moving or you just need to create some friendly URLS.

As a developer you may be tempted to do something like this in code...

1private void Page_Load(object sender, System.EventArgs e)
2{
3 Response.Status = "301 Moved Permanently";
4 Response.AddHeader("Location","http://www.new-url.com");
5}

But do you really want your project cluttered up with files who's only purpose is to redirect to another page!

You may also be tempted to try doing something with .NET's RouteCollection. This would certainly solve an issue on creating a redirect for anything without a file extension, but there is a better way.

In your web.config file under the configuration node create something like this

1<location path="twitter">
2 <system.webServer>
3 <httpRedirect enabled="true" destination="http://twitter.com/TwitterName" httpResponseStatus="Permanent" />
4 </system.webServer>
5</location>

The location path specifies that path on your site that this redirect will apply to. The destination value in the httpRedirect is where the redirect will go to. As well as setting Permanent for the httpResponseStatus you can also specify Found or Temporary depending on your needs.

HTML5 Series - Array

If your going to do any sort of JavaScript programming it's not going to be long until you have to work with an array, so there's a few array functions you need to know about.

Push and Pop
Push and Pop are functions that add and remove items from an array. The easiest way to understand what they are doing is to imagine your array as a stack of paper. When you push and item onto the array it's the same as putting it on the top of your pile. When you Pop an item off it's the same as taking the top item from the pile.

1var myArray = [] // Declare a new array
2myArray.push("Red");
3myArray.push("Blue");
4
5var value1 = myArray.pop();
6var value2 = myArray.pop();
7
8alert(value1); // should alert the value Blue
9alert(value2); // should alert the value Red

Foreach loop
Probably one of the most useful functions for an array is the for each loop. A for each loop is essentially calling a function for each item in the array (hence for each). This is particularly useful in all kinds of scenarios.

1var myArray = ["blue", "red", "green"];
2
3myArray.forEach(function (x) {
4 alert(x);
5});

Filter
As the name suggests filtering is a way to find items in your array. If you know C# then it works in a similar way to a lambda expression. The filter function takes a parameter of a function. Like the forEach loop the function is called on each item in the array, the function must then returns either true or false depending on if the filter criteria matched.

In this example notice that the result of myArray.filter is being assigned to another variable. This is because applying the filter wont actually remove items from the myArray array.

1var myArray = ["blue", "red", "green"];
2
3var results = myArray.filter(function(x) {
4 if (x == "blue")
5 return true;
6 else
7 return false;
8})
9
10results.forEach(function (x) {
11 alert(x);
12});

Some, Every
The some and every functions can be used to see if some items in the array match a criteria of if all of them do. They return either true or false.

Like the filter function, a function is passed as the criteria and returns either true or false.

1var myArray = ["blue", "red", "green"];
2
3alert(myArray.some(function (x) {
4 if (x == "blue")
5 return true;
6 else
7 return false;
8})); // Alerts true as 1 item in the array is blue
9
10alert(myArray.every(function (x) {
11 if (x == "blue")
12 return true;
13 else
14 return false;
15})); // Alerts false as not every item in the array is blue

Concat
Concat is used to combine 2 arrays into 2 new array.

1var myArray = ["blue", "red", "green"];
2var myArray2 = ["yellow", "orange"];
3
4var myArray3 = myArray.concat(myArray2);

Slice
Slice lets you create a new array from an existing by letting you specify the start and end item. Those items and the others between then form the new array.

1var myArray = ["blue", "red", "green"];
2var myArray2 = myArray.slice(2, 3); // selects red and green
3

Splice
Splice can be used to add and remove items in an array. The function has the syntax:

arrayName.splice(index, how many, items to add);

Note: the index value starts at 0.

For example in our colour array we could add yellow and orange in between red and green with the following:

1var myArray = ["blue", "red", "green"];
2myArray.splice(2, 0, "yellow", "orange");
3
4myArray.forEach(function (x) {
5 alert(x);
6});

Alternatively we could replace red and green with yellow and orange.

1var myArray = ["blue", "red", "green"];
2myArray.splice(1, 2, "yellow", "orange");
3
4myArray.forEach(function (x) {
5 alert(x);
6});

A couple of others

Sort - Sorts the array into alphabetical order

Reverse - Reverses the order of the array

jQuery ajax

If you want to dynamically load content into your page chances are your going to need to do some sort of request to a server in the background. The simplest way of doing this is to use jQuery's ajax function.

Here's an example of a GET request and a POST request:

1$.ajax({
2 type: "POST", // Set the HTTP type to POST
3 url: "/serviceurl.aspx", // URL of the service
4 data: "{data: [{"Field1": 1}] }", // Data to be posted to the service
5 processData: false, // If set to true the data will be processed and turned into a query string
6 success: (function (result) {
7 // Result of the service call
8 }),
9 error: (function (jqXHR, textStatus, errorThrown) {
10 alert(errorThrown);
11 })
12});
13
14$.ajax({
15 type: "GET", // Set the HTTP type to GET
16 url: "/serviceurl.aspx", // URL of the service
17 dataType: "jsonp", // Set what type of data you want back
18 success: (function (result) {
19 // Function that will be called on success
20 })
21});