Tag: .NET
Auto Format C# Code

Auto Format C# Code

When you're reading code there are a few things which make the process a lot easier, particularly when it was code written by other people.

  1. It's commented well.
  2. It's written in a logical way.
  3. Lines of text aren't really really long meaning you have to side-scroll.
  4. The formatting is consistent.

There's not a lot we can do about the first two other than having a good team, but the second two are something that can be automated and enforced.

In many languages (particularly front-end code) there's a tool named prettier that can configure everything from tab spacing, line length and even if you end a line with a semi-colon or not. I've used it for years and it's brilliant. Unfortunately, it doesn't support C#.

A tool I have found though is CSharpier (https://csharpier.com/), and like Prettier it is an opinionated code formatter.

Add CSharpier to your project

To get started with CSharpier first create a tool-manifest file in the root of your project and then run the install command.

You can do this with the following terminal commands.

1# if you don't yet have a .config/dotnet-tools.json file
2dotnet new tool-manifest
3
4dotnet tool install csharpier

Next add a configuration file to your project so that all team members will produce the same results.

To do this add a JSON file named .csharpierrc.json to the root of the solution.

1{
2 "printWidth": 100,
3 "useTabs": false,
4 "tabWidth": 4,
5 "endOfLine": "auto"
6}

After you add CSharpier you will want to reformat every file in one go, otherwise your going to spend a year going through PRs mostly containing format changes as every file gradually gets reformated.

Do this with the following command.

1dotnet csharpier .

Configure Visual Studio to auto format on save

There's lots of options for triggering the format; You can do it manually, on Pre-commit hooks, or within CI tools, but I find the best is to have a file format on save. This way not only is it making your code readable to everyone else, it also makes it easier to read as your working on it. Plus when tab spacing doesn't fix itself correctly its a good indication there's something wrong with your code.

To do this you will need to install the Visual Studio extension https://marketplace.visualstudio.com/items?itemName=csharpier.CSharpier

Once installed you then need to configure it to format on save. This is located under Tools | Options | CSharpier | General and can either be configured at a global and project level.

CSharpier Visual Studio Config Dialog

And that's it. Now whenever you save a file it will automatically get reformated.

Knowing what type your object is in C# 8

Knowing what type your object is in C# 8

If your familiar with object oriented programming then you'll know one of the advantages is classes can be designed to inherit from base classes to avoid duplication in your code. In fact in C# all classes ultimately inherit from the base class object. So if you had a list of objects, it would be valid that any object could be added to the list.

Lets look at a scenario of a library where people can borrow Books, DVDs and Games. All will have a Title and Barcode, but each type will also have some more specific properties.

1public class BaseClass
2{
3 public string Name { get; set; }
4 public string Barcode { get; set; }
5}
6
7public class Book : BaseClass
8{
9 public int Pages { get; set; }
10}
11
12public class DVD : BaseClass
13{
14 public int RunningTime { get; set; }
15}
16
17public enum GameConsole
18{
19 Playstation,
20 Xbox
21}
22
23public class Game : BaseClass
24{
25 public GameConsole Format { get; set; }
26}

Those are some classes. Some example data for a members borrowings could be like this.

1List<BaseClass> membersLoans = new List<BaseClass>();
2membersLoans.Add(new Book() { Name = "A Christmas Carol", Barcode = "123", Pages = 210 });
3membersLoans.Add(new DVD() { Name = "Wonka", Barcode = "124", RunningTime = 180 });
4membersLoans.Add(new Game() { Name = "Alan Wake 2", Barcode = "125", Format = GameConsole.Xbox });

Now we have a list of what a member has borrowed we can output the list using a foreach loop.

1foreach (var item in membersLoans)
2{
3 Console.WriteLine(item.Name);
4}
5
6/*
7Ouput
8------------------------
9A Christmas Carol
10Wonka
11Alan Wake 2
12 */

That's a list of the titles, but what if we want to add more info such as the type and some of the details from that type. These are outside the properties of BaseClass so we will need some way of knowing what type of object item is and then cast to that object.

Type checking in C# using 'is'

The is keyword can be used to determine if an instance of an object matches a pattern, such as an object type or null. We can use some if else statements check what are type is.

1foreach (var item in membersLoans)
2{
3 if (item is Book)
4 {
5 Console.WriteLine($"{item.Name}, {((Book)item).Pages} pages");
6 }
7 else if (item is DVD)
8 {
9 Console.WriteLine($"{item.Name}, {((DVD)item).RunningTime}mins");
10 }
11 else if (item is Game)
12 {
13 Console.WriteLine($"{item.Name}, {((Game)item).Format}");
14 }
15}
16
17/*
18Ouput
19------------------------
20A Christmas Carol, 210 pages
21Wonka, 180mins
22Alan Wake 2, Xbox
23 */

Type checking using switch

With C# 7 switch expressions become more lightweight and now also support patterns, so rather than all those if else statements, we can combine them all into one simple switch.

Unlike a traditional switch statement the switch returns a result, the case keyword is removed, colons are replaced with =>, and the default keyword is replaced with an underscore.

1foreach (var item in membersLoans)
2{
3 var result = item switch
4 {
5 Book => $"{item.Name}, {((Book)item).Pages} pages",
6 DVD => $"{item.Name}, {((DVD)item).RunningTime}mins",
7 Game => $"{item.Name}, {((Game)item).Format}",
8 _ => item.Name,
9 };
10 Console.WriteLine(result);
11}
12
13/*
14Ouput
15------------------------
16A Christmas Carol, 210 pages
17Wonka, 180mins
18Alan Wake 2, Xbox
19 */

That's all there is to it. We can now mix our objects together and work out what's what as simply as checking the value of a property.

Turning flat data into a hierarchy using C#

Turning flat data into a hierarchy using C#

Sometimes you have flat data and what you really want is a hierarchy. This can often happen when data is stored in a relational database that you want to return as JSON in an API. One SQL call will return a flat structure, but as JSON can give a complete hierarchy it makes more sense to convert it.

Let's assume we have the following as our source data:

1{
2 Country: "UK",
3 City: "London",
4 Population: 8800000
5}, {
6 Country: "UK",
7 City: "Edinburgh",
8 Population: 495400
9}, {
10 Country: "France",
11 City: "Paris",
12 Population: 2244000
13}

What we want to create is a structure like this:

1{
2 Country: "UK",
3 Cities: [
4 {
5 City: "London",
6 Population: 8800000
7 }, {
8 City: "Edinburgh",
9 Population: 495400
10 }]
11}, {
12 Country: "France",
13 Cities: [
14 {
15 City: "Paris",
16 Population: 2244000
17 }]
18}

To make the conversion of flat data to a hierarchy using C# we can use a LInq expression.

First I need two models to represent the final structure. One to represent the Country and the other to represent the City. The Country class contains a list of cities.

1public class Country {
2 public string Country { get; set; }
3 public List<City> Cities{ get; set; }
4}
5
6public class City {
7 public string City { get; set; }
8 public int Population { get; set; }
9}

The following Linq query will then create a list of Countries populating the City list by doing a sub-select on the original dataset.

1// flatData contains our flat data
2var groupedByCountry = flatData.ToList()
3 .GroupBy(x => new { x.Country })
4 .Select(y => new Country() {
5 Country = y.Key.Country,
6 Cities = y.Select(c => new City() {
7 City = c.City,
8 Population = c.Population }).ToList()
9 });
How to create a Graph QL API on Azure Functions

How to create a Graph QL API on Azure Functions

REST APIs are great, but they can result in either your application making an excessive number of requests to multiple endpoints, then only using a small percentage of the data returned. Or you end up making a large number of endpoints for specific purposes and now have maintenance hell to deal with.

If that's your situation then one option is to look at replacing some of that functionality with a Graph QL API. I'm not going to dig into what Graph QL APIs are (that's been covered by many people before me), but what I will do is show you how to make one in an Azure Function.

Your starting point is to use Hot Chocolate by Chilli Cream, not only does it have a fun meaningless name, but it also offers some great simple-to-use functionality. However, despite stating it works with Azure Functions, the documentation is all for ASP.NET Core, which is not the same thing.

Another issue I have with the documentation is that it doesn't explain particularly well how you configure it to work with a data access layer. Examples either have methods that return a dataset containing all related data, or they use Entity Framework, which as you generally wouldn't use your DB schema as an API schema feels like cheating.

So here is my guide from file new project to a working Graph QL API in an Azure Function.

File New Project

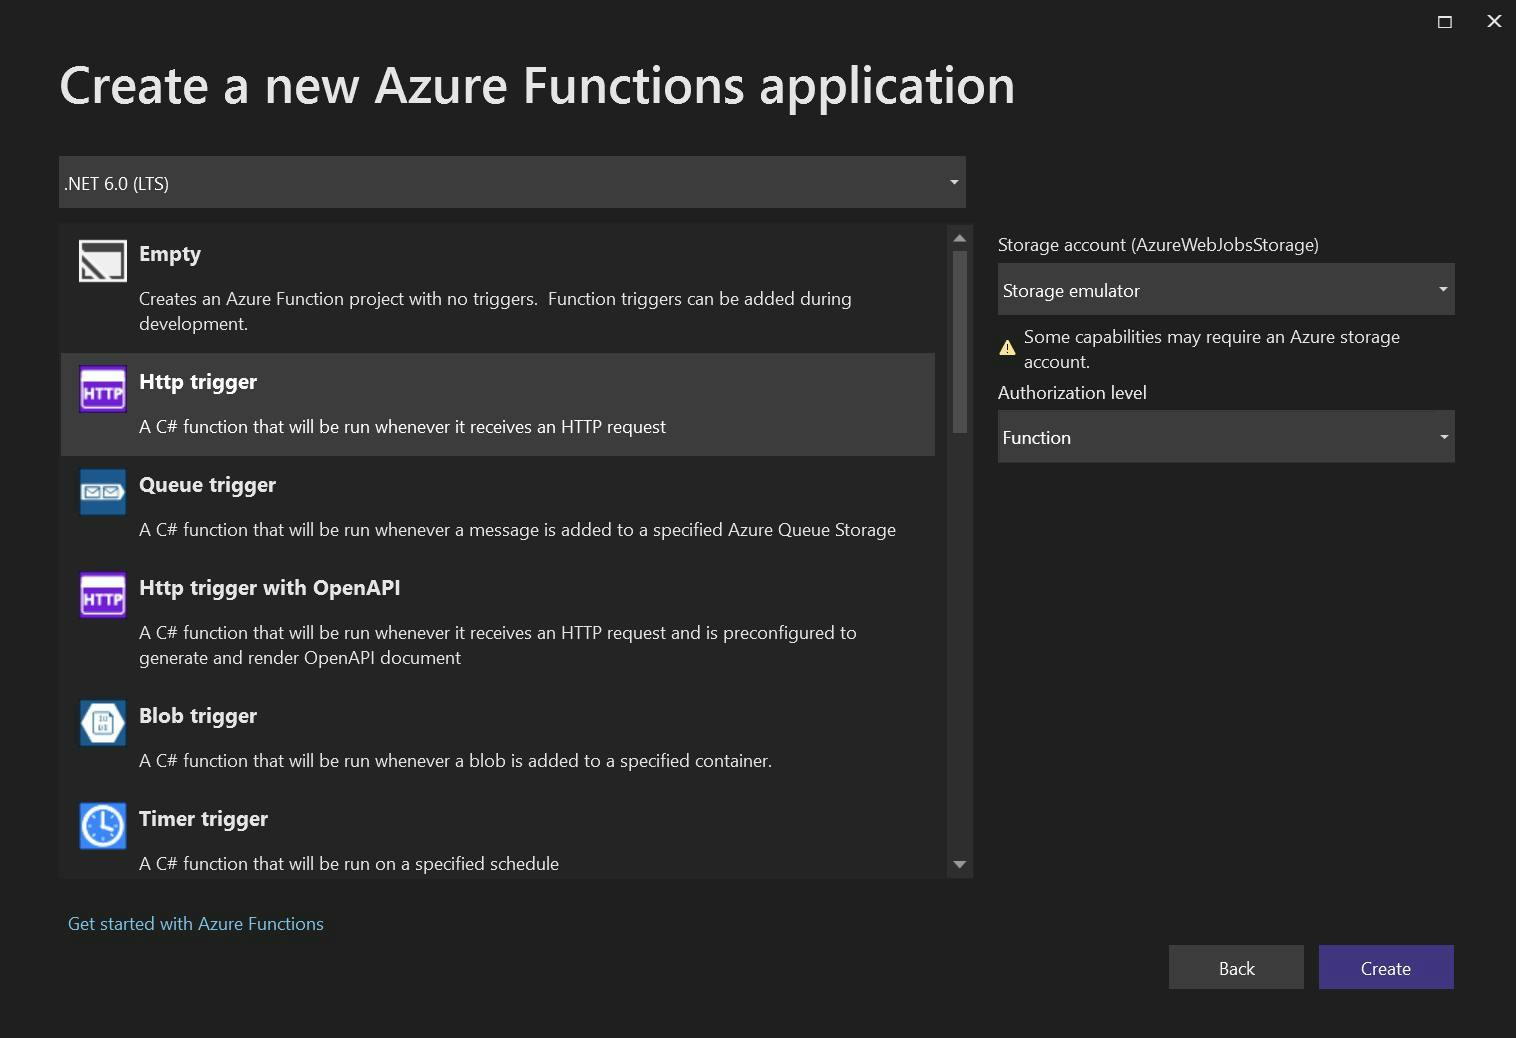
Starting right at the beginning, open Visual Studio and create a new Azure Function. For this demo, I'm using .NET 6 as that's the latest at the time of writing, and am going to create an HTTP trigger.

Create new Azure Function screen

For a data source, I've created a hard-coded repository containing Schools, Classes, and Students. Schools contain multiple classes and classes contain multiple students. Each repository contains functions to get all, get by id or get by the thing it's related to. e.g. Get Students by Class. Here's my code for it.

1using AzureFunctionWithGraphApi.Models;
2using System.Collections.Generic;
3using System.Linq;
4
5namespace AzureFunctionWithGraphApi.DataAccess
6{
7 public interface ISchoolRepository
8 {
9 List<School> All();
10 School GetById(int id);
11 }
12
13 public interface IClassRepository
14 {
15 List<Class> All();
16 Class GetById(int id);
17 List<Class> GetBySchool(int schoolId);
18 }
19
20 public interface IStudentRepository {
21 List<Student> All();
22 Student GetById(int id);
23 List<Student> GetByClass(int classId);
24 }
25
26 public static class DemoData
27 {
28 public static List<School> Schools = new List<School>()
29 {
30 new School() {Id = 1, Name = "Foo School"},
31 new School() {Id = 2 , Name = "Boo School"},
32 };
33
34 public static List<Class> ClassList = new List<Class>()
35 {
36 new Class() {Id = 3, SchoolId = 1, Name = "Red Class", YearGroup = 1},
37 new Class() {Id = 4, SchoolId = 1, Name = "Blue Class", YearGroup = 2},
38 new Class() {Id =5, SchoolId = 2, Name = "Yellow Class", YearGroup = 1},
39 new Class(){Id = 6, SchoolId = 2, Name = "Green Class", YearGroup = 2}
40 };
41
42 public static List<Student> Students = new List<Student>()
43 {
44 new Student() {Id = 1, ClassId = 3, FirstName = "John", Surname = "Smith"},
45 new Student() {Id = 2, ClassId = 3, FirstName = "Sam", Surname = "Smith"},
46 new Student() {Id = 3, ClassId = 4, FirstName = "Eric", Surname = "Smith"},
47 new Student() {Id = 4, ClassId = 4, FirstName = "Rachel", Surname = "Smith"},
48 new Student() {Id = 5, ClassId = 5, FirstName = "Tom", Surname = "Smith"},
49 new Student() {Id = 6, ClassId = 5, FirstName = "Sally", Surname = "Smith"},
50 new Student() {Id = 7, ClassId = 6, FirstName = "Sharon", Surname = "Smith"},
51 new Student() {Id = 8, ClassId = 6, FirstName = "Kate", Surname = "Smith"}
52 };
53 }
54
55 public class SchoolRepository : ISchoolRepository
56 {
57 public List<School> All()
58 {
59 return DemoData.Schools;
60 }
61
62 public School GetById(int id)
63 {
64 return DemoData.Schools.Where(x => x.Id == id).FirstOrDefault();
65 }
66 }
67
68 public class ClassRepository : IClassRepository
69 {
70 public List<Class> All()
71 {
72 return DemoData.ClassList;
73 }
74
75 public Class GetById(int id)
76 {
77 return DemoData.ClassList.Where(x => x.Id == id).FirstOrDefault();
78 }
79
80 public List<Class> GetBySchool(int schoolId)
81 {
82 return DemoData.ClassList.Where((x) => x.SchoolId == schoolId).ToList();
83 }
84 }
85
86 public class StudentRepository : IStudentRepository
87 {
88 public List<Student> All()
89 {
90 return DemoData.Students;
91 }
92
93 public List<Student> GetByClass(int classId)
94 {
95 return DemoData.Students.Where((x) => x.ClassId == classId).ToList();
96 }
97
98 public Student GetById(int id)
99 {
100 return DemoData.Students.Where(x => x.Id == id).FirstOrDefault();
101 }
102 }
103}
104

If you want to use it, you'll also need the related models.

1public class School
2 {
3 public int Id { get; set; }
4 public string Name { get; set; }
5 }
6
7public class Class
8 {
9 public int Id { get; set; }
10 public int SchoolId { get; set; }
11 public int YearGroup { get; set; }
12 public string Name { get; set; }
13 }
14
15public class Student
16 {
17 public int Id { get; set; }
18 public int ClassId { get; set; }
19 public string FirstName { get; set; }
20 public string Surname { get; set; }
21 }

Create a Graph QL API

With our project and data access layer created, lets get on with how to create a Graph QL in a .NET Azure Function.

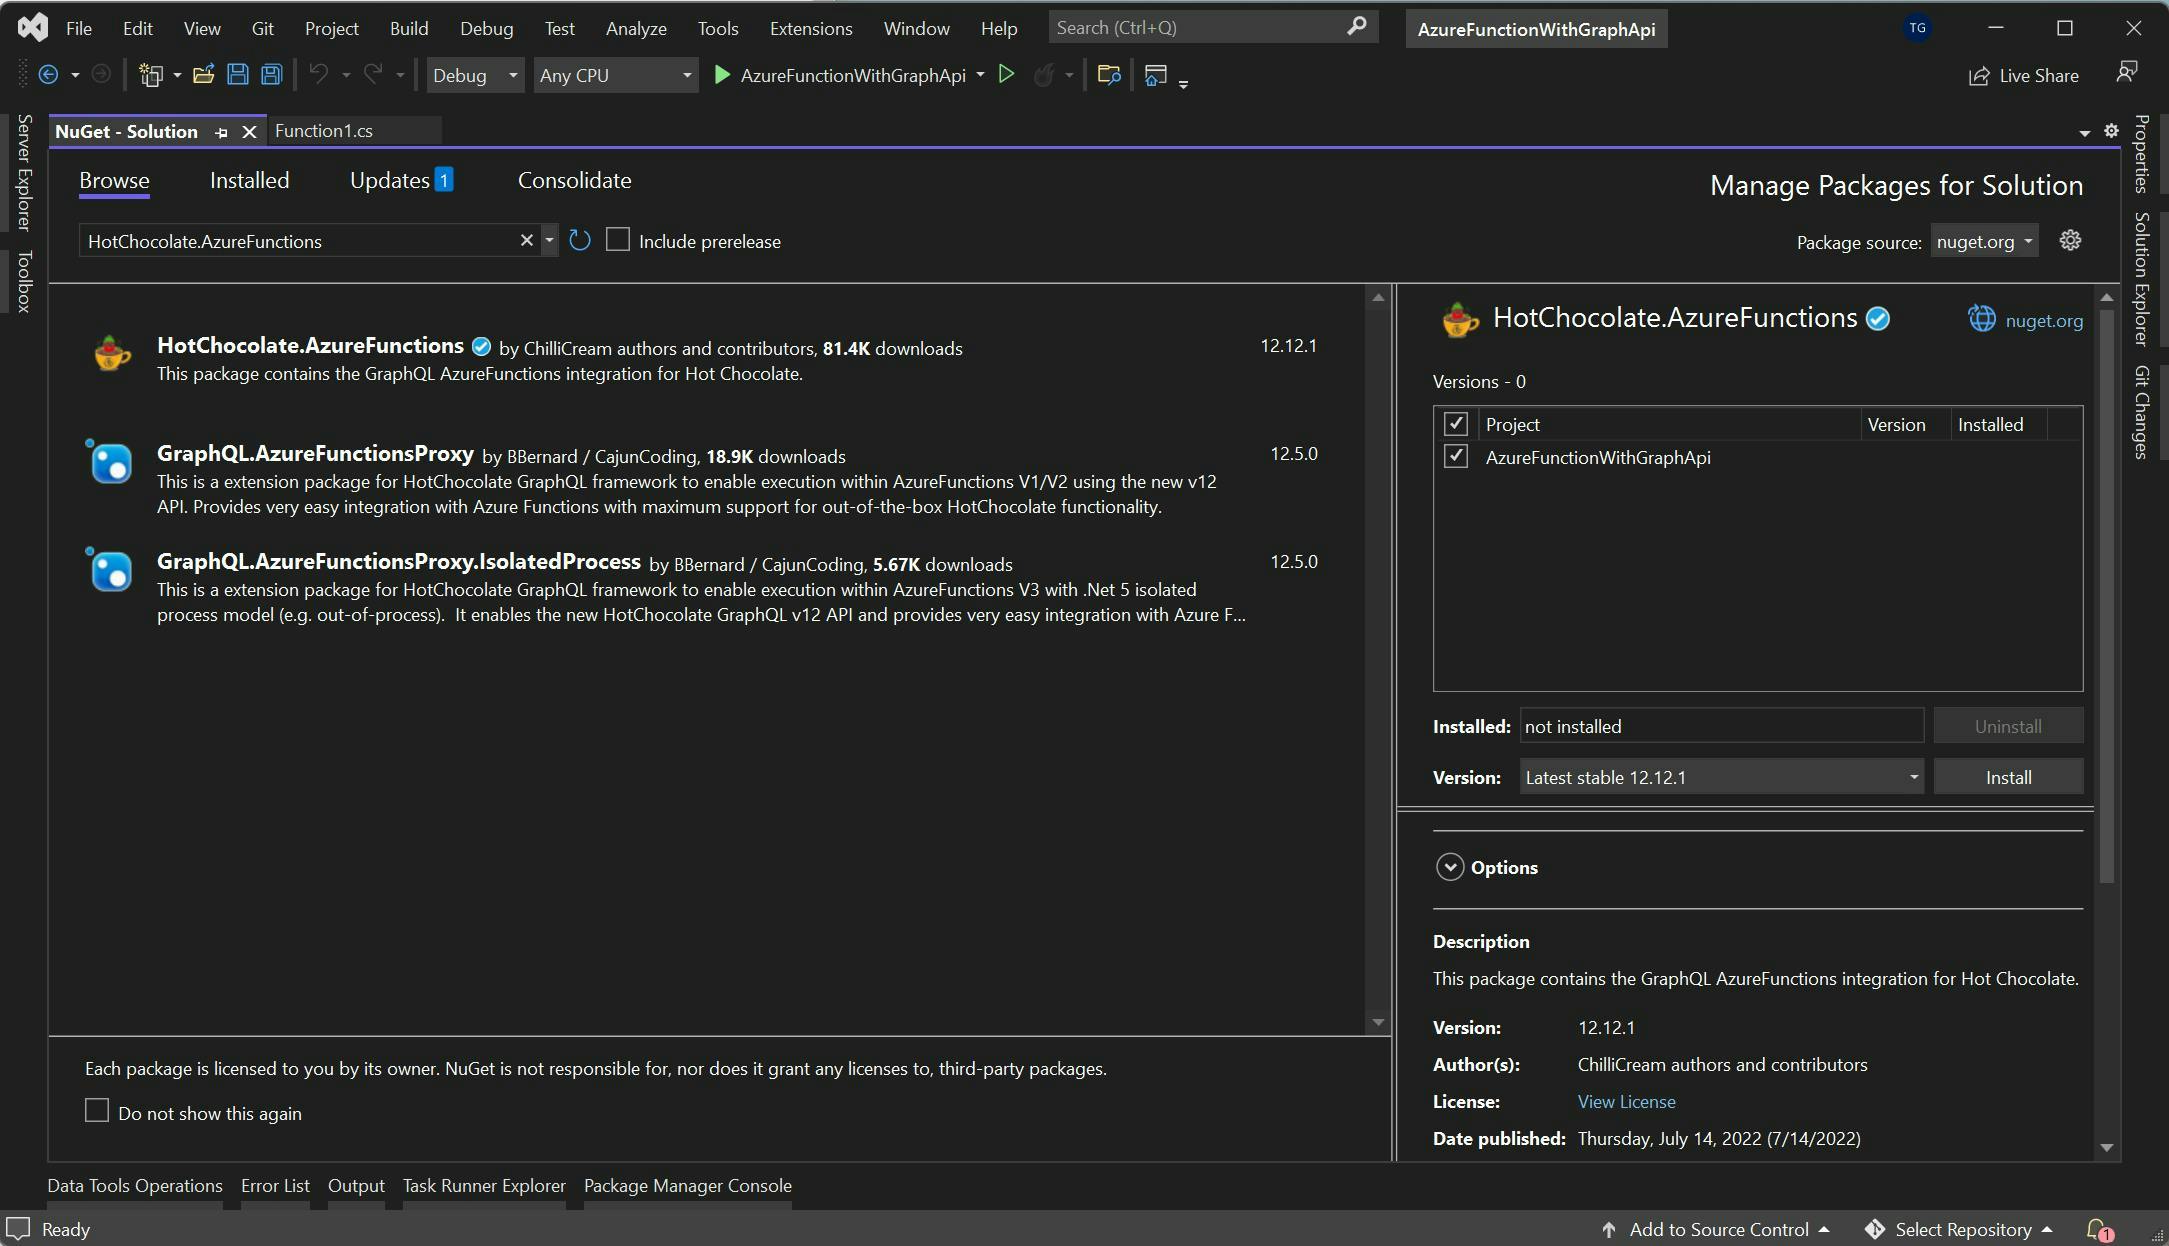
Hot chocolate will provide all the functionality and can be added to your solution via Nuget. Just search for Hot Chocolate and make sure you pick the Azure Function version.

Hot Chocolate NuGet package

The HTTP Endpoint we created when creating the function needs updating to provide the route for the graph API.

1using System.Threading.Tasks;
2using Microsoft.AspNetCore.Mvc;
3using Microsoft.Azure.WebJobs;
4using Microsoft.Azure.WebJobs.Extensions.Http;
5using Microsoft.AspNetCore.Http;
6using Microsoft.Extensions.Logging;
7using HotChocolate.AzureFunctions;
8
9namespace AzureFunctionWithGraphApi
10{
11 public class GraphQlApi
12 {
13 [FunctionName("HttpExample")]
14 public async Task<IActionResult> Run(
15 [HttpTrigger(AuthorizationLevel.Anonymous, "get", "post", Route = "graphql/{**slug}")] HttpRequest req,
16 [GraphQL] IGraphQLRequestExecutor executor,
17 ILogger log)
18 {
19 log.LogInformation("C# HTTP trigger function processed a request.");
20
21 return await executor.ExecuteAsync(req);
22 }
23 }
24}
25

Next we need to configure what queries can be performed on the graph. For my example, I'm replicating the Get All and Get By Id methods from my data access layer.

One thing to note here is although I'm using dependency injection for my repositories they are using resolver injection on the methods rather than constructor injection. You can read more about why this is on the Chilli Cream site here, but essentially constructor injector won't work.

1using AzureFunctionWithGraphApi.DataAccess;
2using AzureFunctionWithGraphApi.Models;
3using HotChocolate;
4using System.Collections.Generic;
5
6namespace AzureFunctionWithGraphApi
7{
8 public class Query
9 {
10 public List<School> GetSchools([Service] ISchoolRepository schoolRepository)
11 {
12 return schoolRepository.All();
13 }
14 public School GetSchoolById([Service] ISchoolRepository schoolRepository, int schoolId)
15 {
16 return schoolRepository.GetById(schoolId);
17 }
18
19 public List<Class> GetClasses([Service] IClassRepository classRepository)
20 {
21 return classRepository.All();
22 }
23 public Class GetClassById([Service] IClassRepository classRepository, int classId)
24 {
25 return classRepository.GetById(classId);
26 }
27
28 public List<Class> GetClassesBySchoolId([Service] IClassRepository classRepository, int schoolId)
29 {
30 return classRepository.GetBySchool(schoolId);
31 }
32
33 public List<Student> GetStudents([Service] IStudentRepository studentRepository)
34 {
35 return studentRepository.All();
36 }
37 public Student GetStudentById([Service] IStudentRepository studentRepository, int studentId)
38 {
39 return studentRepository.GetById(studentId);
40 }
41
42 public List<Student> GetStudentsBySchoolId([Service] IStudentRepository studentRepository, int classId)
43 {
44 return studentRepository.GetByClass(classId);
45 }
46 }
47}
48

At this point (apart from the fact we haven't configured the startup file with our DI) you will now have a Graph QL API but it won't be able to load any related items. You will however be able to pick which fields you want from the datasets.

To add the related data we need to create extension methods for our models. These inject the instance of the item using Hot Chocolates Parent attribute, and the repository we're going to use to get the data.

1using AzureFunctionWithGraphApi.DataAccess;
2using AzureFunctionWithGraphApi.Models;
3using HotChocolate;
4using HotChocolate.Types;
5using System.Collections.Generic;
6
7namespace AzureFunctionWithGraphApi
8{
9 [ExtendObjectType(typeof(School))]
10 public class SchoolExtensions
11 {
12 public List<Class> GetClasses([Parent] School school, [Service] IClassRepository classRepository)
13 {
14 return classRepository.GetBySchool(school.Id);
15 }
16 }
17
18 [ExtendObjectType(typeof(Class))]
19 public class ClassExtensions
20 {
21 public School GetSchool([Parent] Class schoolClass, [Service] ISchoolRepository schoolRepository)
22 {
23 return schoolRepository.GetById(schoolClass.SchoolId);
24 }
25 public List<Student> GetStudents([Parent] Class schoolClass, [Service] IStudentRepository studentRepository)
26 {
27 return studentRepository.GetByClass(schoolClass.Id);
28 }
29 }
30
31 [ExtendObjectType(typeof(Student))]
32 public class StudentExtensions
33 {
34 public Class GetClass([Parent] Student student, [Service] IClassRepository classRepository)
35 {
36 return classRepository.GetById(student.ClassId);
37 }
38 }
39}
40

Now all that's left is to configure our startup file. This file no longer gets created when you create the Azure Function so you'll need to add it yourself.

Here's mine. As you can see I'm registering the dependency injection for my repositories, and also configuring the GraphQL. This needs to include the query class we made and any extension classes.

1using AzureFunctionWithGraphApi.DataAccess;
2using Microsoft.Azure.Functions.Extensions.DependencyInjection;
3using Microsoft.Extensions.DependencyInjection;
4
5[assembly: FunctionsStartup(typeof(AzureFunctionWithGraphApi.Startup))]
6namespace AzureFunctionWithGraphApi
7{
8 public class Startup : FunctionsStartup
9 {
10 public override void Configure(IFunctionsHostBuilder builder)
11 {
12 builder.Services.AddScoped<ISchoolRepository, SchoolRepository>();
13 builder.Services.AddScoped<IClassRepository, ClassRepository>();
14 builder.Services.AddScoped<IStudentRepository, StudentRepository>();
15
16 builder.AddGraphQLFunction()
17 .AddQueryType<Query>()
18 .AddTypeExtension<SchoolExtensions>()
19 .AddTypeExtension<ClassExtensions>()
20 .AddTypeExtension<StudentExtensions>();
21 }
22 }
23}
24

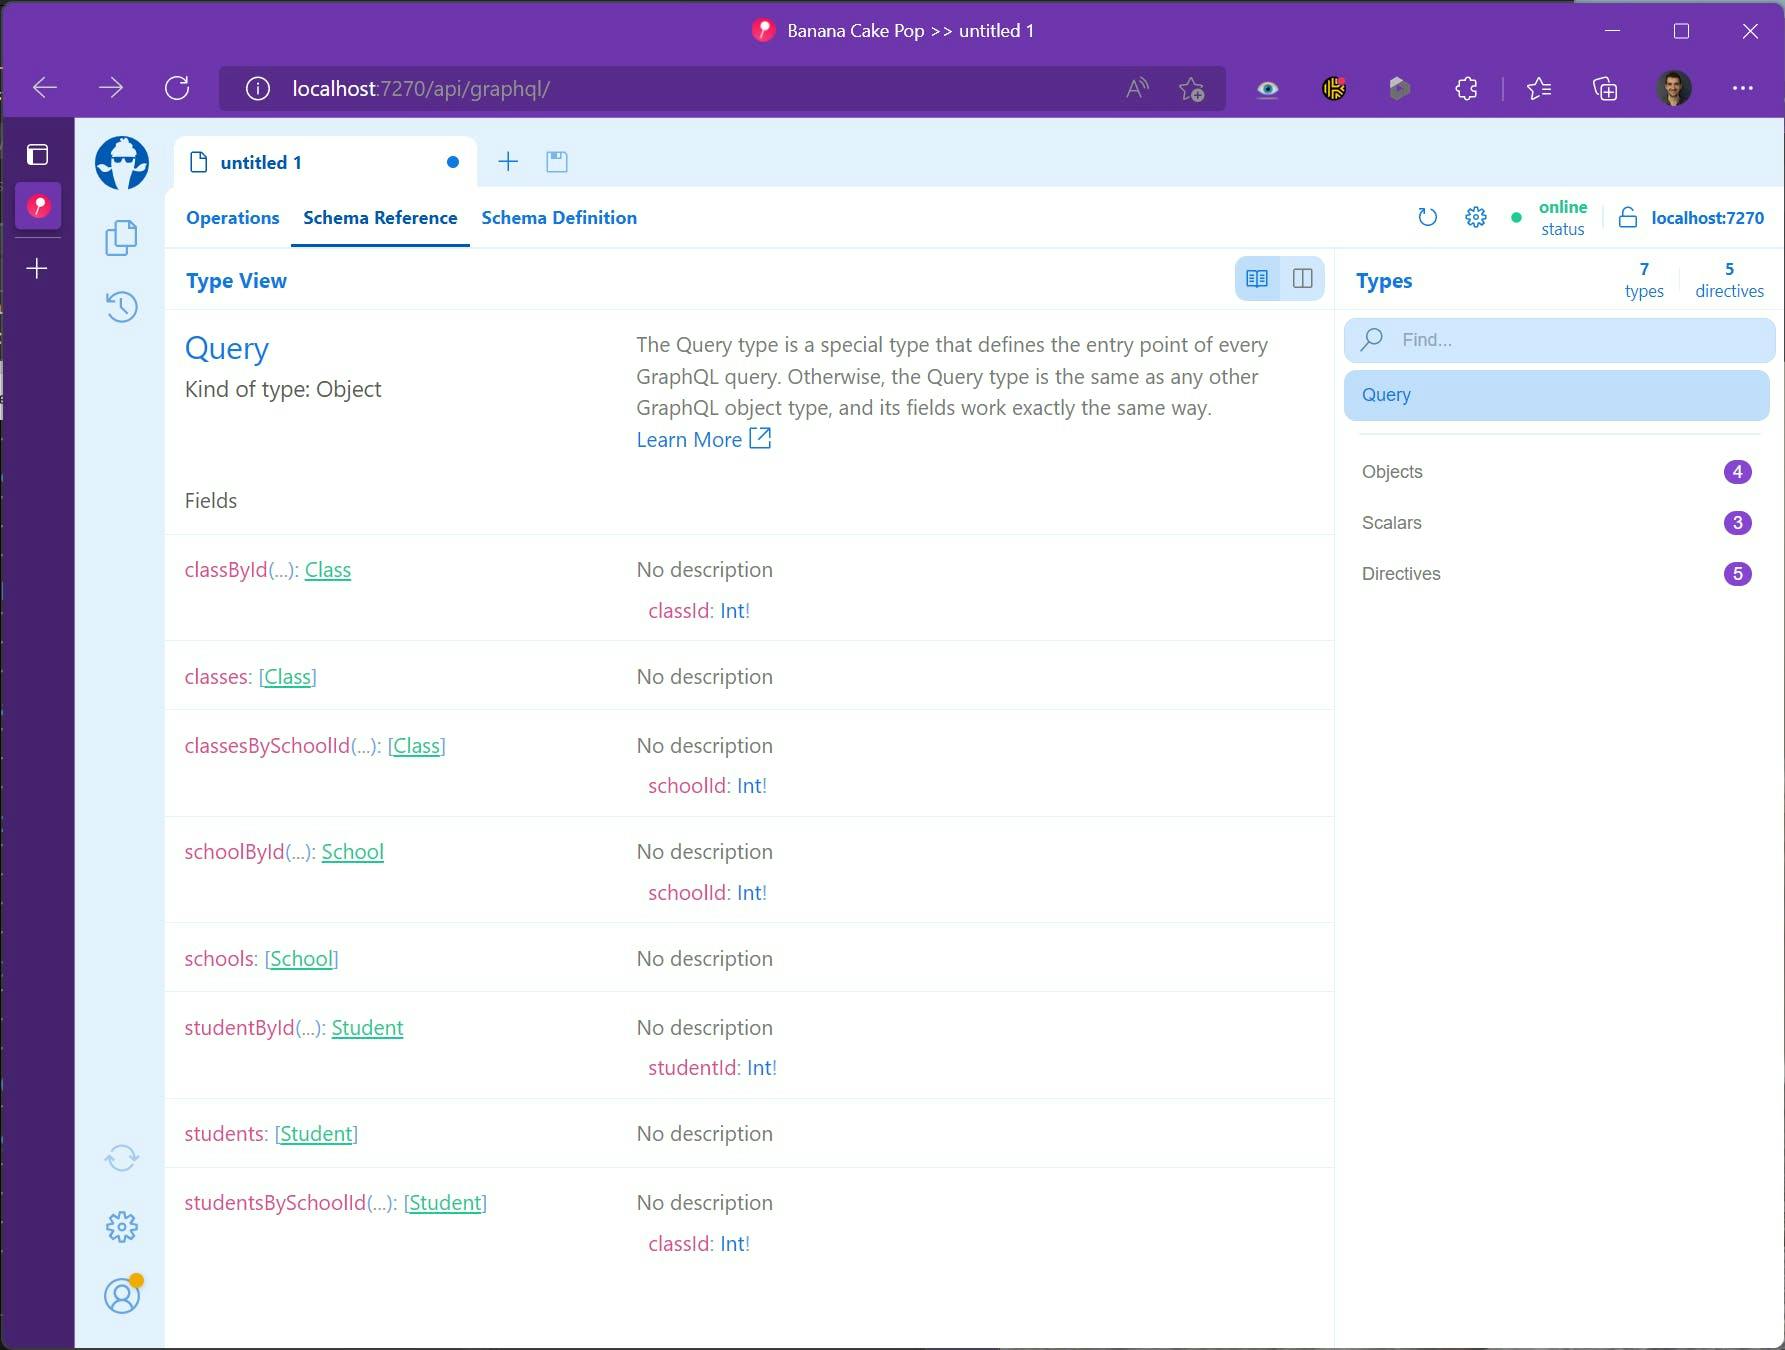
Run the Application and navigate in a browser to it's one route and you should get see the Banana Cake Pop UI to be able to view your schema.

Banana Cake Pop UI showing Scheme Reference

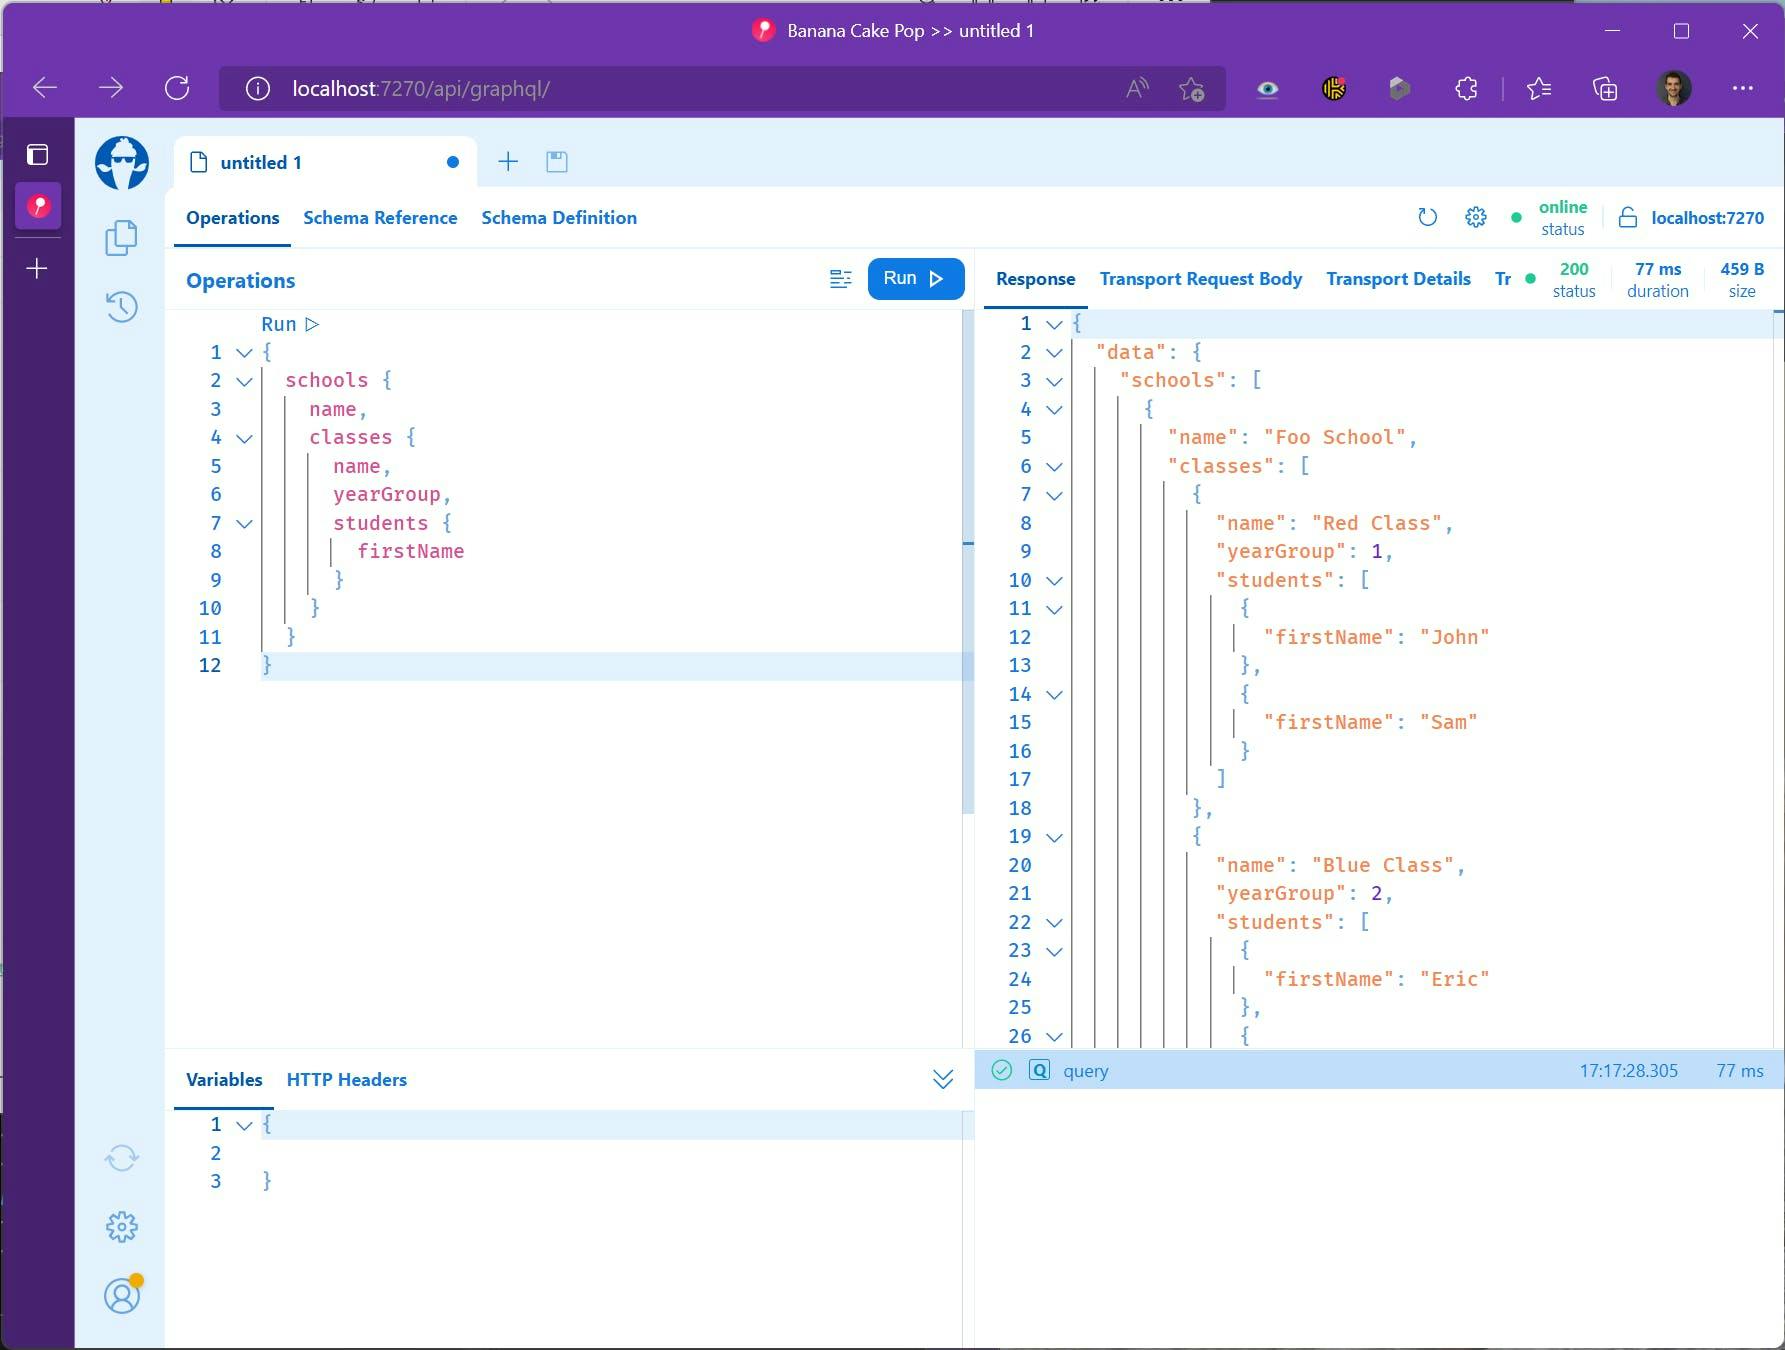
You can also test out queries selecting just the data you want even on related items.

Banana Cake Pop UI showing Query

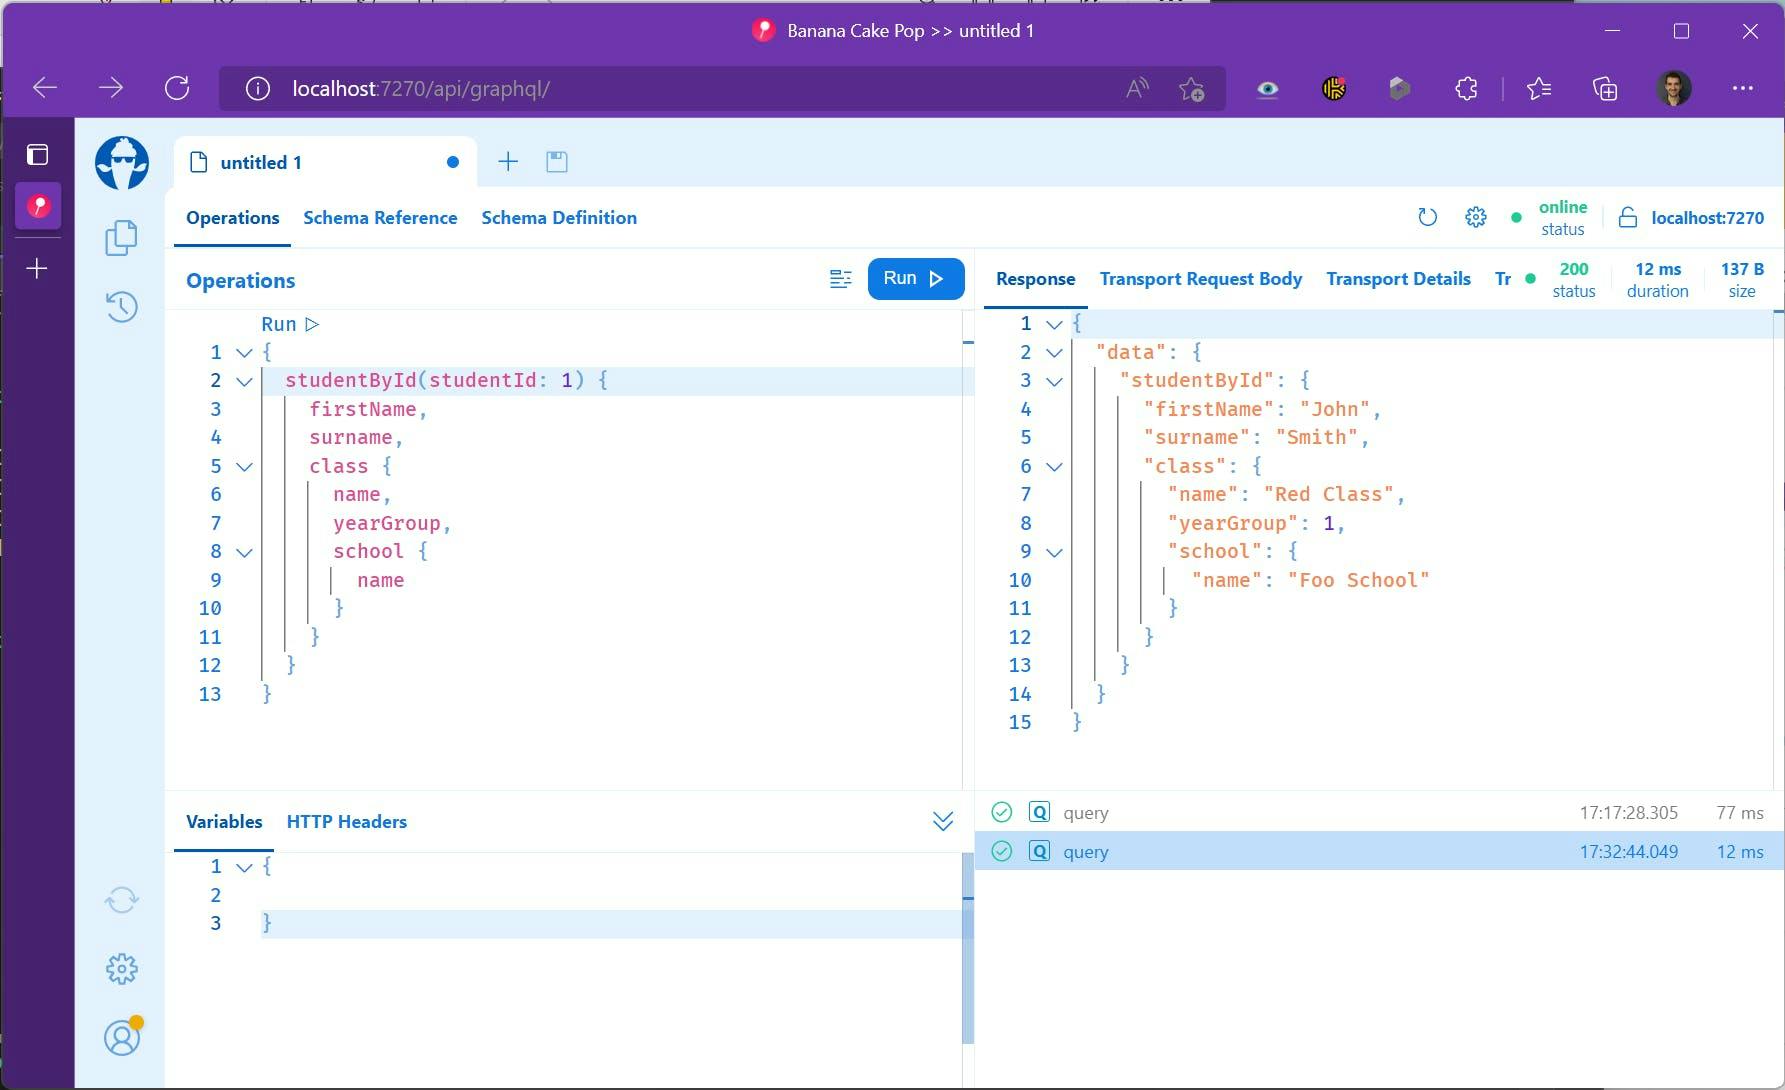
We could even start with selecting a specific student and pull in their related class and school info.

Banana Cake Pop Graph QL Query

The Bad News

All of this is great and in fact, even more, functionality is available to be added, but there is some bad news. Not all of Hot Chocolates functionality actually works in an Azure Function, specifically authentication.

You can read about Hot Chocolates implementation of Authentication and Authorization here however it uses ASP.NET Core authentication middleware and Authorize attributes which do not work in Azure Functions. So unless you want your Graph QL API to be fully public you may be out of luck with this being a solution.

Code for this Demo

Now for the good news, if you want to try this without typing all the code, you can get a copy of it from my GitHub here.

https://github.com/timgriff84/AzureFunctionWithGraphApi

JavaScript frameworks explained to an ASP.NET dev

JavaScript frameworks explained to an ASP.NET dev

For most of my career I've been an ASP.NET dev and a JavaScript dev. If I was going to say I was more of an expert in one of them it would be the .NET side of things but I've never really lost touch with JavaScript.

Right now I think it's fair to say technologies in the world are starting to shift how we build websites, with JavaScript frameworks reaching a point with features like static site generation where they actually now offer a decent performance incentive to use them. At some point Blazor may get to a point where it reverses this, but right now there's a compelling argument to move.

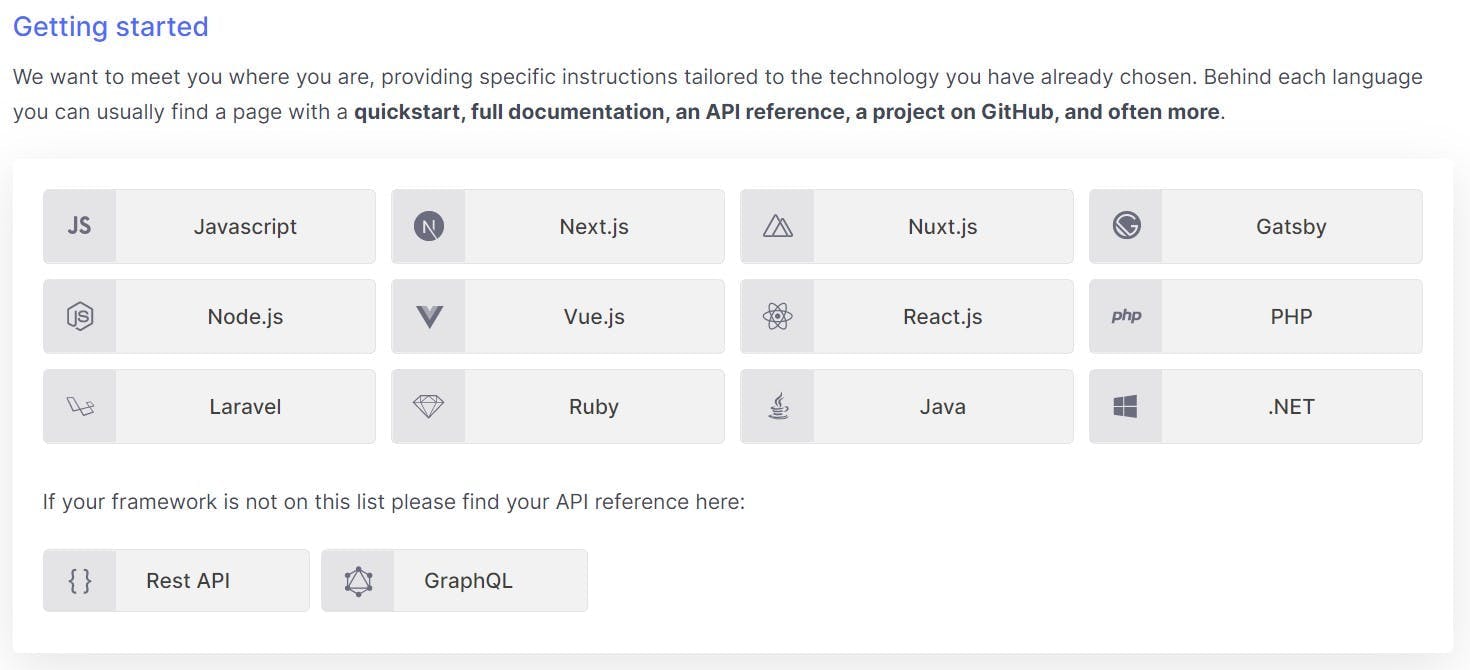
For a ASP.NET dev this can be a daunting task. You might be thinking of trying out a headless CMS with a JavaScript front end, but just take a look at this screen grab from Prismic's sdk list.

There's 7 different JavaScript based SDK's listed there! Over half of the total and none of them are that Angular thing you had heard about. Where do you start?

Lets compare to .NET

Well recently I've been updating my JS skills again trying out some of the frameworks I hadn't used before, so I thought I'd share some learnings. The good news is as always it's not really as different as it first seems. To take some of the pain out of understanding what all these frameworks are I thought it would be good to try and relate them back to .NET and what the almost equivalent is.

Assembly Code

No not actual assembler but what does our code actually compile to. In the .NET world we have CIL (Common Intermediate Language), previously known as MSIL (Microsoft Intermediate Language) that our C#, F#, VB etc all compile down to before then being converted to the correct machine code for where they run.

In the front end world think of JavaScript being a bit like this (apart from the fact you actually write JavaScript and we don't write CIL).

View Engine

To render views into HTML, in the ASP.NET world we have Razor, but not just Razor. We also have WebForm, Brail, Bellevue, NDjango (see more here), it just happens that we mostly just use Razor.

I see the equivalents of these being ReactJS, VueJS and Angular. Its not an exact match as they also aren't exact equivalents or each other, but they're largely your functionality that will take a model and turn it into HTML.

Web Application Framework

The problem with the name framework is it applies to basically anything, but this is what I'm going with for describing ASP.NET MVC/ASP.NET Razor Pages/Web Forms, you know all those things built on-top of .NET that make it a website rather than a desktop app. They do things like routing, organising our files into controller and view folders, know how to respond to http requests etc.

Here we have Next.js, Nuxt.js and maybe Gatsby. The link between these and View Engine is a bit stronger than the ASP.NET MVC world as you essentially have a one to one mapping Next.js -> React, Nuxt.js -> Vue but they are what adds routing, static site generation and organization to your code.

Lower Level Framework

Now this one could be wrong :)

In .NET we have different version of the framework. e.g. .NET Framework /3.5/4, .NET Core, .NET 5, Mono. On the front end side they have Node.

Languages

In .NET we have choices including C#, F#, VB among other.

JavaScript has JavaScript (which I know I said was assembly), TypeScript, Coffee Script maybe more.

Not so daunting

There's probably a bunch of flaws with my comparison list and reasons people can point out why things I've said are the same are in fact different, but my point was really to show that while .NET may appear as one button on a SDK list alongside 7 JavaScript based SDK's its not that different. Out of the 7 Node is based on JavaScript. Vue and React are based on Node, and Next/Gatsby/Nuxt are based on Vue/React. There just isn't the same concept of all of it being built by one company or one particular combination being dominant in the same way that ASP.NET MVC + C# + Razor has been for the last generation of .NET websites.

Why is my Session ID changing on 3D Secure payments?

Why is my Session ID changing on 3D Secure payments?

If you have a website where you are implementing 3D Secure payments, you may find that you have an issue where on receipt of the payment setup confirmation the users Session ID has changed with no apparent cause.

Lets have a quick run through of the payment process in this scenario (this is roughly how SagePay and WorldPay both work):

  1. User completes payment details on your site (some wizardry normally happens at this point with an iFrame for the card number to maintain PCI compliance) and the form is submitted to your server
  2. You server call's an API from the payment gateway to setup a 3D Secure payment. It passes the users Session ID along with all the payment details.
  3. Payment gateway responds with a URL for you to redirect the user too by posting a form to it. You do this, likely in an iFrame so that the page still looks like your website (otherwise it's a very ugly page).
  4. User may or may not get prompted by some sort of authentication by the bank. This could be something like receiving a text message with a code to enter.
  5. When authenticated the user is sent back to your website (in the iFrame) with a post request.
  6. Your server picks out the form details from the request and then calls an API to complete the transaction. In this API call you send the Session ID so that the payment gateway can validate it is the same as the one at the start of the process.
  7. Confirmation shown to the user.

Introducing the Same Site Cookie Policy

In 2020 a change made to how cookies function in browsers to defend against cross site scripting. Troy Hunt has a brilliant explanation of the issue with how cookies used to work and how this has changed here. I'm going to try a much shorter explanation;

When a request is made from a browser, as part of the request all the cookie values for that domain are sent with the request. This will include one for the Session ID. The theory here is that because the cookies are only being sent to the domain which set them in the first place, then information is only being shared back with the place that set it to begin with, which is therefor safe.

However the workings of the internet and what domain a button click might call isn't overly obvious to most people. So what if clicking a link on one site causes the user to be redirected to another site? Answer: all the cookies are still sent. The same thing happens if a form is posted from one site to another site. The problem here is that if you are authenticated on the other website, then its possible for a cross site scripting attack to be using your session via your browser without you even realising you were on the site again. This is why it's always a good idea to log out of websites!

The introduction of the same site policy changes how cookies work with three options:

  1. None: which is what the browsers used to do. i.e. send all the cookies with cross-origin request
  2. Lax: some limits on sending cookies with cross-origin request
  3. Strict: tight limits on sending cookies with cross-origin request

None is sending everything and a strict policy will basically stop cookies from being sent when they have a cross-origin request.

A Lax policy is slightly more interesting though, because it depends if the request is a GET or a POST. If it is a GET then the cookies will still be sent, which means that if you follow a link from another site or a search engine your cookies will still be sent to the site. However a POST (like what the 3D Secure page is doing) will no longer send the cookies.

If the policy isn't set, then Lax is used as the default.

So why is my Session ID changing?

The problem is that post request back to your site, unless the Session ID had a cookie policy of None then the Session ID cookie won't be sent. The server will then see that there is no Session ID and treat the users as if they are new on the site and as a result start a new session. From this point on the user has lost the old session and you can't complete the payment. Worse still they've probably just been logged out and anything else using session data has also been lost.

In .Net 4.7.2 and up, Microsoft has implemented the ability to set the cookie policy of the session ID. You can do this in your web.config file like this:

1<configuration>
2 <system.web>
3 <anonymousIdentification cookieRequireSSL="false" /> <!-- No config attribute for SameSite -->
4 <authentication>
5 <forms cookieSameSite="None" requireSSL="false" />
6 </authentication>
7 <sessionState cookieSameSite="None" /> <!-- No config attribute for Secure -->
8 <roleManager cookieRequireSSL="false" /> <!-- No config attribute for SameSite -->
9 <system.web>
10<configuration>

You can find more about this here. In everything older the policy wont be set and will default to Lax.

However just because you can set the cookie policy to None, it doesn't mean you should. After all, that just re-opens the vulnerability the browser was trying to protect against.

The solution I went with was to have a page that the users is redirected back to from the payment gateway that does nothing other than re-submit the values from the payment gateway to the site again. This way I can be sure of what form data is being posted to the site, and when I re-post it, it is a same site post and not a cross-origin which means the Session ID cookie will be sent.

To stop my initial page setting a new session cookie (which it will try to do because it won't recieve one), I use the IIS URL Rewrite module to strip out the set cookie response headers from the page.

You can do this with an outbound rule as follows:

1<rewrite>
2 <rules>
3 </rules>
4 <outboundRules>
5 <rule name="Remove SetCookie Header" preCondition="Match Payment Page">
6 <match serverVariable="RESPONSE_Set-Cookie" pattern=".*" />
7 <action type="Rewrite" value="" />
8 </rule>
9 <preConditions>
10 <preCondition name="Match Payment Page" logicalGrouping="MatchAny">
11 <add input="{REQUEST_URI}" pattern="PAGE NAME GOES HERE" />
12 </preCondition>
13 </preConditions>
14 </outboundRules>
15 </rewrite>

With this solution the cookies are still secure as the policy is set to Lax and I can take payments using 3D Secure which will soon become a requirement.

Two ways to import an XML file with .Net Core or .Net Framework

Two ways to import an XML file with .Net Core or .Net Framework

It's always the simple stuff you forget how you do. For years I've mainly been working with JSON files, so when faced with that task of reading an XML file my brain went "I can do that" followed by "actually how did I used to do that?".

So here's two different methods. They work on .Net Core and theoretically .Net Framework (my project is .Net Core and haven't checked that they do actually work on framework).

My examples are using an XML in the following format:

1<?xml version="1.0" encoding="utf-8"?>
2<jobs>
3 <job>
4 <company>Construction Co</company>
5 <sector>Construction</sector>
6 <salary>£50,000 - £60,000</salary>
7 <active>true</active>
8 <title>Recruitment Consultant - Construction Management</title>
9 </job>
10 <job>
11 <company>Medical Co</company>
12 <sector>Healthcare</sector>
13 <salary>£60,000 - £70,000</salary>
14 <active>false</active>
15 <title>Junior Doctor</title>
16 </job>
17</jobs>

Method 1: Reading an XML file as a dynamic object

The first method is to load the XML file into a dynamic object. This is cheating slightly by first using Json Convert to convert the XML document into a JSON string and then deserializing that into a dynamic object.

1using Newtonsoft.Json;
2using System;
3using System.Collections.Generic;
4using System.Dynamic;
5using System.IO;
6using System.Text;
7using System.Xml;
8using System.Xml.Linq;
9
10namespace XMLExportExample
11{
12 class Program
13 {
14 static void Main(string[] args)
15 {
16 string jobsxml = "<?xml version=\"1.0\" encoding=\"utf-8\"?><jobs> <job><company>Construction Co</company><sector>Construction</sector><salary>£50,000 - £60,000</salary><active>true</active><title>Recruitment Consultant - Construction Management</title></job><job><company>Medical Co</company><sector>Healthcare</sector><salary>£60,000 - £70,000</salary><active>false</active><title>Junior Doctor</title></job></jobs>";
17
18 byte[] byteArray = Encoding.UTF8.GetBytes(jobsxml);
19 MemoryStream stream = new MemoryStream(byteArray);
20 XDocument xdoc = XDocument.Load(stream);
21
22 string jsonText = JsonConvert.SerializeXNode(xdoc);
23 dynamic dyn = JsonConvert.DeserializeObject<ExpandoObject>(jsonText);
24
25 foreach (dynamic job in dyn.jobs.job)
26 {
27 string company;
28 if (IsPropertyExist(job, "company"))
29 company = job.company;
30
31 string sector;
32 if (IsPropertyExist(job, "sector"))
33 company = job.sector;
34
35 string salary;
36 if (IsPropertyExist(job, "salary"))
37 company = job.salary;
38
39 string active;
40 if (IsPropertyExist(job, "active"))
41 company = job.active;
42
43 string title;
44 if (IsPropertyExist(job, "title"))
45 company = job.title;
46
47 // A property that doesn't exist
48 string foop;
49 if (IsPropertyExist(job, "foop"))
50 foop = job.foop;
51 }
52
53 Console.ReadLine();
54 }
55
56 public static bool IsPropertyExist(dynamic settings, string name)
57 {
58 if (settings is ExpandoObject)
59 return ((IDictionary<string, object>)settings).ContainsKey(name);
60
61 return settings.GetType().GetProperty(name) != null;
62 }
63 }
64}
65

A foreach loop then goes through each of the jobs, and a helper function IsPropertyExist checks for the existence of a value before trying to read it.

Method 2: Deserializing with XmlSerializer

My second approach is to turn the XML file into classes and then deserialize the XML file into it.

This approch requires more code, but most of it can be auto generated by visual studio for us, and we end up with strongly typed objects.

Creating the XML classes from XML

To create the classes for the XML structure:

1. Create a new class file and remove the class that gets created. i.e. Your just left with this

1using System;
2using System.Collections.Generic;
3using System.Text;
4
5namespace XMLExportExample
6{
7
8}

2. Copy the content of the XML file to your clipboard
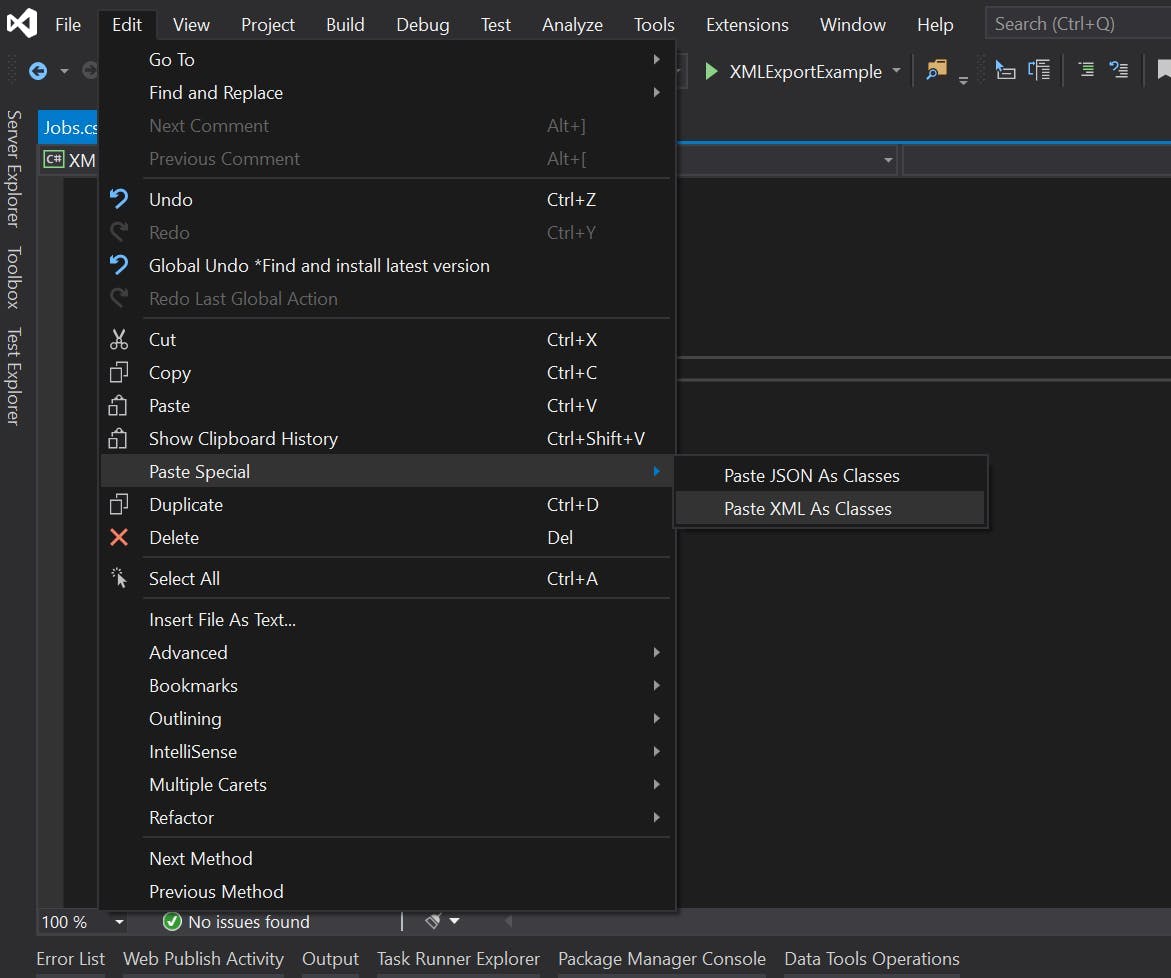
3. Select the position in the file you want to the classes to go and then go to Edit > Paste Special > Paste XML as Classes

If your using my XML you will now have a class file that looks like this:

1using System;
2using System.Collections.Generic;
3using System.Text;
4
5namespace XMLExportExample
6{
7
8 // NOTE: Generated code may require at least .NET Framework 4.5 or .NET Core/Standard 2.0.
9 /// <remarks/>
10 [System.SerializableAttribute()]
11 [System.ComponentModel.DesignerCategoryAttribute("code")]
12 [System.Xml.Serialization.XmlTypeAttribute(AnonymousType = true)]
13 [System.Xml.Serialization.XmlRootAttribute(Namespace = "", IsNullable = false)]
14 public partial class jobs
15 {
16
17 private jobsJob[] jobField;
18
19 /// <remarks/>
20 [System.Xml.Serialization.XmlElementAttribute("job")]
21 public jobsJob[] job
22 {
23 get
24 {
25 return this.jobField;
26 }
27 set
28 {
29 this.jobField = value;
30 }
31 }
32 }
33
34 /// <remarks/>
35 [System.SerializableAttribute()]
36 [System.ComponentModel.DesignerCategoryAttribute("code")]
37 [System.Xml.Serialization.XmlTypeAttribute(AnonymousType = true)]
38 public partial class jobsJob
39 {
40
41 private string companyField;
42
43 private string sectorField;
44
45 private string salaryField;
46
47 private bool activeField;
48
49 private string titleField;
50
51 /// <remarks/>
52 public string company
53 {
54 get
55 {
56 return this.companyField;
57 }
58 set
59 {
60 this.companyField = value;
61 }
62 }
63
64 /// <remarks/>
65 public string sector
66 {
67 get
68 {
69 return this.sectorField;
70 }
71 set
72 {
73 this.sectorField = value;
74 }
75 }
76
77 /// <remarks/>
78 public string salary
79 {
80 get
81 {
82 return this.salaryField;
83 }
84 set
85 {
86 this.salaryField = value;
87 }
88 }
89
90 /// <remarks/>
91 public bool active
92 {
93 get
94 {
95 return this.activeField;
96 }
97 set
98 {
99 this.activeField = value;
100 }
101 }
102
103 /// <remarks/>
104 public string title
105 {
106 get
107 {
108 return this.titleField;
109 }
110 set
111 {
112 this.titleField = value;
113 }
114 }
115 }
116
117}

Notice that the active field was even picked up as being a bool.

Doing the Deserialization

To do the deserialization, first create an instance of XmlSerializer for the type of the object we want to deserialize too. In my case this is jobs.

1 var s = new System.Xml.Serialization.XmlSerializer(typeof(jobs));

Then call Deserialize passing in a XML Reader. I'm creating and XML reader on the stream I used in the dynamic example.

1 jobs o = (jobs)s.Deserialize(XmlReader.Create(stream));

The complete file now looks like this:

1using System;
2using System.IO;
3using System.Text;
4using System.Xml;
5
6namespace XMLExportExample
7{
8 class Program
9 {
10 static void Main(string[] args)
11 {
12 string jobsxml = "<?xml version=\"1.0\" encoding=\"utf-8\"?><jobs> <job><company>Construction Co</company><sector>Construction</sector><salary>£50,000 - £60,000</salary><active>true</active><title>Recruitment Consultant - Construction Management</title></job><job><company>Medical Co</company><sector>Healthcare</sector><salary>£60,000 - £70,000</salary><active>false</active><title>Junior Doctor</title></job></jobs>";
13
14 byte[] byteArray = Encoding.UTF8.GetBytes(jobsxml);
15 MemoryStream stream = new MemoryStream(byteArray);
16
17 var s = new System.Xml.Serialization.XmlSerializer(typeof(jobs));
18 jobs o = (jobs)s.Deserialize(XmlReader.Create(stream));
19
20 Console.ReadLine();
21 }
22 }
23}

And thats it. Any missing nodes in your XML will just be blank rather than causing an error.

ASP.NET Core Platforms for a Blog

ASP.NET Core Platforms for a Blog

Like a lot of Sitecore developers my blog (at time of writing) is hosted on Wordpress. The reason for it not being in Sitecore is simple. Sitecore is an enterprise level platform, which isn't really needed for a personal blog.

For a .net dev to have there blog on a php platform however just seems plain wrong, but again there's a logical reason. Wordpress is actually really good as a blogging platform, and it doesn't cost me anything.

Despite this I would much rather take control of my site and use it to play with all the cool features in Azure. It would also be nice to have the ability to do something about the Google PageSpeed result which is currently sitting at 24%. So in aid of this I've started looking into .net core based platforms and thought I'd share what I've found.

Miniblog.core

https://github.com/madskristensen/Miniblog.Core

As the name suggests Miniblog.core is both very small and based on .net core. Developed by Mads Kristensen its an extremely lightweight bare bones implementation, which if your after something you can help build upon is ideal. The code is straightforward to understand and very simple to adapt. Additionally if your after a 100% page speed score, then this achieves just that.

If on the other hand your after a deluxe admin experience full of functionality then this probably isn't for you.

Piranha CMS

http://piranhacms.org/

Piranha CMS is built as a lightweight CMS platform rather than specifically as a blog, however it also contains a blog module which for me put's it at a big advantage over the other CMS platforms I've listed below.

On the back end you get a choice of SQL Server, SQLite or MySQL. The documentation isn't exactly complete, but on the day I tried it out, I found the team building it very responsive on GitHub. They even updated the documentation with one of my suggestions the very next day.

Another aspect I particularly liked about Piranha CMS was it's block editor, which from the brief look I've had so far reminds me of the block editor Umbraco has. Whereas other platforms in this list were restricted to a large rich text field.

Orchard Core

https://github.com/OrchardCMS/OrchardCore

Orchard Core is the dot net core version of the Orchard CMS. It's currently in beta, but I'm not sure that put's it at much of a disadvantage over the others on this list.

My initial impressions of Orchard Core however weren't as high as Piranha CMS. The admin interface wasn't quite as nice and as far as I could tell, it didn't have anything like Piranha's block editor. The solution itself also seemed far more complex and I wasn't certain what I got for this. I expect Orchard Core is likely better in some ways that I have yet to discover, but for my needs as a blog this is probably not the case. It also didn't have a blog module out of the box.

Squidex

https://squidex.io/

I have't had much of a chance to play with Squidex yet, but it does offer an interesting difference to the others mentioned so far.

For a start Squidex is an entirely headless cms, and is built around the concept of CQRS and Event Sourcing. Unlike the others it also uses MongoDB rather than a SQL based database.

Where MongoDB is concerned, I often get the impression people are using it because as developers we tend to have a preference to using something new rather than something adequate. However when it comes to Azure pricing, there is potentially a saving to be made by using Mongo rather than Azure SQL.

Redirecting to login page with AngularJs and .net WebAPI

Redirecting to login page with AngularJs and .net WebAPI

So here's the scenario, you have a web application which people log into and some of the pages (like a dashboard) contain ajax functionality. Inevitably the users session expires, they return to the window change a filter and nothing happens. In the background, your JavaScript is making http calls to the server which triggers an unauthorised response. The front end has no way to handle this and some errors appear in the JS console.

A few things are actually combining to make life hard for you here. Lets take a look at each in more detail.

WebAPI and the 301 Response

To protect your API's from public access a good solution is to use the Authorize attribute. i.e.

1public ActionResult GetDashboardData(int foo)
2{
3 // Your api logic here
4
5}

However chances are your solution also has a login page configured in your web.config so that your regular page controller automatically trigger a 301 response to the login page.

1 <authentication mode="Forms">
2 <forms timeout="30" loginUrl="/account/sign-in/" />
3 </authentication>

So now what happens, is instead or responding with a 401 Unauthorised response, what's actually returned is a 301 to the login page.

With an AJAX request from a browser you now hit a second issue. The browser is making an XMLHttpRequest. However if that request returns a 301, rather than returning it your JavaScript code to handle, it "helpfully" follows the redirect and returns that to your JavaScript. Which means rather than receiving a 301 redirect status back, your code is getting a 200 Ok.

So to summarise your API was set up to return a 401 Unauthorised, that got turned into a 301 Redirect, which was then followed and turned into a 200 Ok before it gets back to where it was requested from.

To fix this the easiest method is to create are own version of the AuthorizedAttribute which returns a 403 Forbidden for Ajax requests and the regular logic for anything else.

1using System;
2using System.Web.Mvc;
3
4namespace FooApp
5{
6 [AttributeUsage(AttributeTargets.Method)]
7 public class CustomAuthorizeAttribute : AuthorizeAttribute
8 {
9 protected override void HandleUnauthorizedRequest(AuthorizationContext filterContext)
10 {
11 if (filterContext.HttpContext.Request.IsAjaxRequest())
12 {
13 filterContext.Result = new HttpStatusCodeResult(403, "Forbidden");
14 }
15 else
16 {
17 base.HandleUnauthorizedRequest(filterContext);
18 }
19 }
20 }
21}

Now for any Ajax requests a 403 is returned, for everything else the 301 to the login page is returned.

Redirect 403 Responses in AngularJs to the login page

As our Ajax request is being informed about the unauthorised response, it's up to our JavaScript code trigger the redirect in the browser to the login page. What would be really helpful would be to define the redirect logic in one place, rather than adding this logic to every api call in our code.

To do this we can use add an interceptor onto the http provider in angular js. The interceptor will inspect the response error coming back from the XmlHttpRequest and if it has a status of 401, use a window.locator to redirect the user to the login page.

1app.factory('httpForbiddenInterceptor', ['$q', 'loginUrl', function ($q, loginUrl) {
2 return {
3 'responseError': function (rejection) {
4 if (rejection.status == 403) {
5 window.location = loginUrl;
6 }
7 return $q.reject(rejection);
8 }
9 };
10}]);
11
12app.config(['$httpProvider', function ($httpProvider) {
13 $httpProvider.defaults.headers.common['X-Requested-With'] = 'XMLHttpRequest';
14 $httpProvider.interceptors.push('httpForbiddenInterceptor');
15}]);

You'll notice a line updating the headers. This is to make the IsAjaxRequest() method on the api recognise the request as being Ajax.

Finally you'll also notice the loginUrl being passed into the interceptor. As it's not a great idea to have strings like urls littered around your code, this is using a value recipe to store the url. The code to do this is follows:

1app.value('loginUrl', '/account/sign-in?returnurl=/dashboard/');
Force clients to refresh JS/CSS files

Force clients to refresh JS/CSS files

It's a common problem with an easy solution. You make some changes to a JavaScript of CSS file, but your users still report an issue due to the old version being cached.

You could wait for the browsers cache to expire, but that isn't a great solution. Worse if they have the old version of one file and the new version of another, there could be compatibility issues.

The solution is simple, just add a querystring value so that it looks like a different path and the browser downloads the new version.

Manually updating that path is a bit annoying though so we use modified time from the actual file to add the number of ticks to the querystring.

UrlHelperExtensions.cs

1using Utilities;
2using UrlHelper = System.Web.Mvc.UrlHelper;
3
4namespace Web.Mvc.Utils
5{
6 public static class UrlHelperExtensions
7 {
8 public static string FingerprintedContent(this UrlHelper helper, string contentPath)
9 {
10 return FileUtils.Fingerprint(helper.Content(contentPath));
11 }
12 }
13}

FileUtils.cs

1using System;
2using System.IO;
3using System.Web;
4using System.Web.Caching;
5using System.Web.Hosting;
6
7namespace Utilities
8{
9 public class FileUtils
10 {
11 public static string Fingerprint(string contentPath)
12 {
13 if (HttpRuntime.Cache[contentPath] == null)
14 {
15 string filePath = HostingEnvironment.MapPath(contentPath);
16
17 DateTime date = File.GetLastWriteTime(filePath);
18
19 string result = (contentPath += "?v=" + date.Ticks).TrimEnd('0');
20 HttpRuntime.Cache.Insert(contentPath, result, new CacheDependency(filePath));
21 }
22
23 return HttpRuntime.Cache[contentPath] as string;
24 }
25 }
26}