Tag: SSL
Creating a SSL for your local Sitecore Site

Creating a SSL for your local Sitecore Site

When you install Sitecore, the installer will quite handily setup some SSL certificates for you. That way when you test locally your site will correctly run under https. However for various reasons you may not have used the installer to setup your local instance, in which case you need to do it yourself.

Creating a self signed SSL certificate however is one of those things that's always been far harder than is should. Previously I've written about how you can do it using mkcert, but recently I've found another way.

Creating a new self-signed SSL certificate with PowerShell

First open a PowerShell window or if you use the new Windows Terminal then one of those will do. Make sure you run it as an administrator or you'll run into permissions errors.

Then run the following command filling in your site URL and a friendly name.

1New-SelfSignedCertificate -CertStoreLocation Cert:\LocalMachine\My -DnsName "my-site.local" -FriendlyName "MySiteName" -NotAfter (Get-Date).AddYears(5)

This will create a cert with the expiry date set in 5 years time.

Next, it needs moving to the Trusted Root Certification Authorities store.

Click Start and type:

1certlm.msc

Find the certificate you just created in your personal certificates, and copy it into the trusted root certificates.

IIS HTTPS Site Bindings

To instruct your site to use the new certificate you need to update the IIS bindings for your site.

Go to IIS > selects site > Bindings... and then choose the https bindings.

You should have something like this.

In the SSL certificate drop down, pick your newly created certificate.

At this point you should have an SSL certificate which browsers actually like!

Other Sitecore Settings

Despite the newly working certificate you may still run into issues with Sitecore which could either be due to SSL thumbprints in config files or config settings for URLs not including https. e.g. In {IDENTITYSERVER_ROOT}/Config/production/Sitecore.IdentityServer.Host.xml there is a setting for AllowedCorsOrigins which will need the https version of the url.

Removing port 443 from urls generated by Sitecore

Removing port 443 from urls generated by Sitecore

For as long as I've been working on Sitecore there has been this really annoying issue where setting the link manager to include server url and running under https will cause urls to be generated with the port number included. e.g. https://www.himynameistim.com:443/ which naturally you don't actually want.

To overcome this there are a few methods you can take.

Method 1 - Set the Scheme and Port on you site defenition

This is possibly the smallest change you can make as it's just 2 settings in a config file.

Setting the external port on site node to 80 (yes 80) tricks the link manager code into not appending the port number as it does it for everything other than port 80.

1<configuration xmlns:patch="http://www.sitecore.net/xmlconfig/" xmlns:xdt="http://schemas.microsoft.com/XML-Document-Transform">
2 <sitecore>
3 <sites xdt:Transform="Insert">
4 <site name="website">
5 <patch:attribute name="hostName">www.MySite.com</patch:attribute>
6 <patch:attribute name="rootPath">/sitecore/content/MySite</patch:attribute>
7 <patch:attribute name="scheme">https</patch:attribute>
8 <patch:attribute name="externalPort">80</patch:attribute>
9 </site>
10 </sites>
11 </sitecore>
12</configuration>

What I don't like about this method though, is your setting something to be wrong to get something else to come out right. It's all a bit wrong.

Method 2 - Write your own link provider

The second method which I have generally done is to write your own provider which strips the port number off the generated URL.

For this you will need:

1. A patch file to add the provider:

1<configuration xmlns:patch="http://www.sitecore.net/xmlconfig/">
2 <sitecore>
3 <linkManager defaultProvider="sitecore">
4 <patch:attribute
5 name="defaultProvider"
6 value="CustomLinkProvider" />
7 <providers>
8 <add name="CustomLinkProvider"
9 type="MySite.Services.CustomLinkProvider,
10 MySite"
11 languageEmbedding="never"
12 lowercaseUrls="true"
13 useDisplayName="true"
14 alwaysIncludeServerUrl="true"
15 />
16 </providers>
17 </linkManager>
18 <mediaLibrary>
19 <mediaProvider>
20 <patch:attribute name="type">
21 MySite.Services.NoSslPortMediaProvider, MySite
22 </patch:attribute>
23 </mediaProvider>
24 </mediaLibrary>
25 </sitecore>
26</configuration>

2. A helper method that removes the SSL port

1namespace MySite
2{
3 /// <summary>
4 /// Link Helper is used to remove SSL Port
5 /// </summary>
6 public static class LinkHelper
7 {
8 /// <summary>
9 /// This method removes the 443 port number from url
10 /// </summary>
11 /// <param name="url">The url string being evaluated</param>
12 /// <returns>An updated URL minus 443 port number</returns>
13 public static string RemoveSslPort(string url)
14 {
15 if (string.IsNullOrWhiteSpace(url))
16 {
17 return url;
18 }
19
20 if (url.Contains(":443"))
21 {
22 url = url.Replace(":443", string.Empty);
23 }
24
25 return url;
26 }
27 }
28}

3. The custom link provider which first gets the item URL the regular way and then strips the SSL port

1using Sitecore.Data.Items;
2using Sitecore.Links;
3
4namespace MySite
5{
6 /// <summary>Provide links for resources.</summary>
7 public class CustomLinkProvider : LinkProvider
8 {
9 public override string GetItemUrl(Item item, UrlOptions options)
10 {
11 // Some code which manipulates and exams the item...
12
13 return LinkHelper.RemoveSslPort(base.GetItemUrl(item, options));
14 }
15 }
16}
17

4. The same provider for media

1using Sitecore.Data.Items;
2using Sitecore.Resources.Media;
3
4namespace MySite
5{
6 /// <summary>
7 /// This method removes SSL port number from Media Item URLs
8 /// </summary>
9 public class NoSslPortMediaProvider : MediaProvider
10 {
11 /// <summary>
12 /// Overrides Url mechanism for Media Items
13 /// </summary>
14 /// <param name="item">Sitecore Media Item</param>
15 /// <param name="options">Sitecore Media Url Options object</param>
16 /// <returns>Updated Media Item URL minus 443 port</returns>
17
18 public override string GetMediaUrl(MediaItem item, MediaUrlOptions options)
19 {
20 var mediaUrl = base.GetMediaUrl(item, options);
21 return LinkHelper.RemoveSslPort(mediaUrl);
22 }
23 }
24}

What I don't like about this method is it's messy in the opposite way. The port number is still being added, and we're just adding code to try and fix it after.

Credit to Sabo413 for the code in this example

Method 3 - Official Sitecore Patch

Given that it's Sitecore's bug, it does actually make sense that they fix it. After all people are paying a license fee for support! This simplifies your solution down to 1 extra patch file and a dll. What's better is as it's Sitecores code they have the responsibility of fixing it, if it ever breaks something, and you have less custom code in your repo.

You can get the fix here for Sitecore version 8.1 - 9.0.

So this may leave you wondering how did Sitecore fix it? Well having a look inside the dll reveals they wen't for method 2.

Setting up local https with IIS in 10 minutes

Setting up local https with IIS in 10 minutes

For very good reasons websites now nearly always run under https rather than http. As dev's though this gives us a complication of either removing any local redirect to https rules and "hoping" things work ok when we get to a server, or setting local IIS up to have an https binding.

Having https setup locally is obviously a lot more favourable and what has traditionally been done is to create a self signed certificate however while this works as far as IIS is concerned, it still leaves an annoying browser warning as the browser will recognise it as un-secure. This can then create additional problems in client side code when certain things will hit the error when calling an api.

mkcert

The solution is to have a certificate added to your trusted root certificates rather than a self signed one. Fortunately there is a tool called mkcert that makes the process a lot simpler to do.

https://github.com/FiloSottile/mkcert#windows

Create a local cert step by step

1. If you haven't already. Install chocolatey ( https://chocolatey.org/install ). Chocolatey is a package manager for windows which makes it super simple to install applications. The name is inspired from NuGet. i.e. Chocolatey Nuget

2. Install mkcert, to do this from a admin command window run

1choco install mkcert

3. Create a local certificate authority (ca)

1mkcert -install

4. Create a certificate

1mkcert -pkcs12 example.com

Remember to change example.com to the domain you would like to create a certificate for.

5. Rename the .p12 file that was created to .pfx (this is what IIS requires). The certificate will now be created in the folder you have the command window open at.

You can now import the certificate into IIS as normal. When asked for a password this have been set to changeit

Sitecore 9 installation tips

Sitecore 9 installation tips

Sitecore 9 released this week and with it comes a whole new installation process. Gone are the days you could just download the web root and restore some dbs or just run the installation gui and enter a db connection string. Sitecore 9 has some fairly fundamental architectural changes with multiple IIS entries and and some windows services to go with it. Server roles are now also being properly configured rather than updating config files to match what it says in an excel doc.

Along with these changes, the installation process has moved to be based on powershell scripts, which on one hand has made things a bit harder, but it also brings great positives that the process can now be customized with scripts that are repeatable without the risk of mistakes.

Here's my tips for a smooth local installation (production installs are different to a local install).

Tip #1 - Check the Prerequisites and Requirements

It sounds obvious but when presented with a new toy you want to play with it as fast as possible, and with a 49 page document the urge is there to skip to the installation and hope for the best.

Skipping however is likely to result in install failures as the installer relies on modules such as Web Deploy and the right version of SQL Server which were not needed for the version you may already have installed.

Tip #2 - Make sure you have the right versions

You may have SQL and Solr but are they the right version?

SQL Express 2016

Sitecore 9 supports SQL Server 2014 SP2 and SQL Server 2016. Now that SQL Server 2017 is out, actually finding the link for 2016 express has become a challenge, but here it is.

Download SQL Server 2016 Express

Solr 6.6.1

Sirecore 9 supports Solr version 6.6.1. I typically use Bitnami Solr as it's a lot easier to install than doing Solr on it's own. Like SQL though the latest version is newer than what Sitecore supports and finding the link to the older one can be a bit of a challenge.

Download Bitnami Solr 6.6.1

Tip #3 - Solr requires SSL

By default Solr does not install with SSL turned on, but without it your install will fail. More specifically it will fail trying to start an xConnect service.

Enabling SSL for Solr

To create a self-signed certificate for Solr we can use the JDK Keytool which if you've installed Solr you should already have installed.

Note: These instructions are based on this guide from Apache and this blog post from Jason St-Cyr.

  1. Open command prompt
  2. Change to the Solr ‘etc’ directory
1cd "{SOLR_HOME}\server\etc"

3. Execute the keygentool command

1"{JAVA_HOME}\bin\keytool.exe" -genkeypair -alias solr-ssl -keyalg RSA -keysize 2048 -keypass secret -storepass secret -validity 9999 -keystore solr-ssl.keystore.jks -ext SAN=DNS:localhost,IP:127.0.0.1 -dname "CN=localhost, OU=Organizational Unit, O=Organization, L=Location, ST=State, C=Country"

This will generate the keystore with a password of ‘secret’ as valid for localhost and 127.0.0.1. You can add other DNS and IPs as desired, or skip hostname verification.

4. Convert generated JKS to PKCS12

1 "{JAVA_HOME}\bin\keytool.exe" -importkeystore -srckeystore solr-ssl.keystore.jks -destkeystore solr-ssl.keystore.p12 -srcstoretype jks -deststoretype pkcs12

5. Enter password when prompted. The password ‘secret’ was used in the previous step. Remember to use your password instead if you changed it in the keygen command parameters.

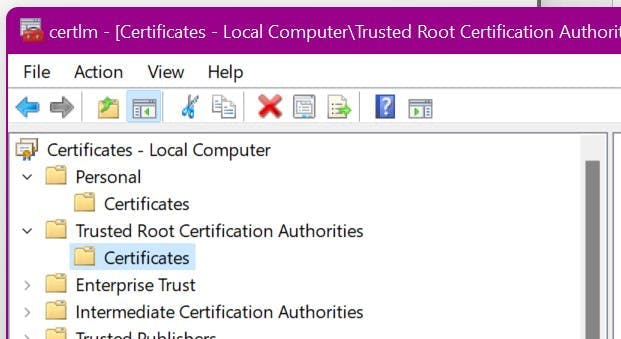
6. Open Windows Explorer and navigate to the ‘etc’ directory (“{SOLR_HOME}\server\etc”)

7. Double-click on the generated ‘p12’ file (solr-ssl.keystore.p12 if you used the default parameters from the previous steps)

8. In the wizard, specify the following values (there will be some extras you can ignore):

Store Location: Local Machine

File name: Leave as provided

Password: secret

Certificate Store: Trusted Root Certification Authorities

Remember to use your password instead if you changed it during the previous steps.

9. Open the solr.in.cmd file for editing (e.g. {SOLR_HOME}\bin\solr.in.cmd)

10. Un-comment the SSL settings:

1set SOLR_SSL_KEY_STORE=etc/solr-ssl.keystore.jks
2set SOLR_SSL_KEY_STORE_PASSWORD=secret
3set SOLR_SSL_TRUST_STORE=etc/solr-ssl.keystore.jks
4set SOLR_SSL_TRUST_STORE_PASSWORD=secret
5set SOLR_SSL_NEED_CLIENT_AUTH=false
6set SOLR_SSL_WANT_CLIENT_AUTH=false

11. Restart SOLR to pick up the changes.

Tip #4 - Close management studio

I'm not sure if this was a one off thing, but with management studio open my installation failed with a single user access issue.

Tip #5 - Check the logs

The installation script will output logs to the folder it runs in. If your installation fails it will reference a log file. To find out why the installation failed or get some more info go and check the log referenced.

Redirect to https using URL Rewrite

Redirect to https using URL Rewrite

There's always been reasons for pages to be served using https rather than http, such as login pages, payment screens etc. Now more than ever it's become advisable to have entire sites running in https. Server speeds have increased to a level where the extra processing involved in encrypting page content is less of a concern, and Google now also gives a boost to a pages page ranking in Google (not necessarily significant, but every little helps).

If all your pages work in https and http you'll also need to make sure one does a redirect to the other, otherwise rather than getting the tiny page rank boost from Google, you'll be suffering from having duplicate pages on your site.

Redirecting to https with URL Rewrite

To set up a rule to redirect all pages from is relatively simple, just add the following to your IIS URL Rewrite rules.

1<rule name="Redirect to HTTPS" stopProcessing="true">
2 <conditions>
3 <add input="{HTTPS}" pattern="^OFF$" />
4 </conditions>
5 <action type="Redirect" url="https://{HTTP_HOST}{REQUEST_URI}" appendQueryString="false" />
6</rule>

The conditions will ensure any page not on https will be caught and the redirect will do a 301 to the same page but on https.

301 Moved Permanently or 303 See Other

I've seen some posts/examples and discussions surrounding if the redirect type should be a 301 or a 303 when you redirect to https.

Personally I would choose 301 Moved Permanently as you want search engines etc to all update and point to the new url. You've decided that your url from now on should be https, it's not a temporary redirection and you want any link ranking to be transfered to the new url.

Excluding some URL's

There's every chance you don't actually want every url to redirect to https. You may have a specific folder that can be accessed on either for compatibility with some other "thing". This can be accomplished by adding a match rule that is negated. e.g.

1<rule name="Redirect to HTTPS" stopProcessing="true">
2 <match url="images" negate="true" />
3 <conditions>
4 <add input="{HTTPS}" pattern="^OFF$" />
5 </conditions>
6 <action type="Redirect" url="https://{HTTP_HOST}{REQUEST_URI}" appendQueryString="false" />
7</rule>

In this example any url with the word images in would be excluded from the rewrite rule.