Tag: Sitecore 9
Managing Redirects in Sitecore

Managing Redirects in Sitecore

One of the most important aspects if not the most important aspect to managing a website is SEO. It doesn’t matter how good your website is, it doesn’t really matter if nobody can find it. Creating good SEO is a lot about having pages match what users are searching for, which then results in a high ranking for those pages. However, a second part to this formula is what happens with a page when it no longer exists. For instance, one day this blog post may no longer be relevant to have on our site, but up until that point search engines will have crawled it, people will have posted links to it and all of this adds to its value which we would to lose should it be removed. An even simpler scenario could be that we rename the blog section to something else and the page still exists under a different URL, but links to it no longer work.

Fortunately, the internet has a way of dealing with this and it’s in the form of a 301 redirect. 301 redirect are an instruction to anyone visiting the URL that the page has permanently moved to a different URL. When you set up a 301 redirect it achieves two things. Firstly, users following a link to your site end up on a relevant page rather a generic page not found message. Secondly search engines recrawling your site update their index with the new page and transfer all the associated value. So, to avoid losing any value associated with a page, whenever you move, rename or remove a page you should also set up a redirect.

Sitecore

Given how important redirects are it’s then surprising that an enterprise CMS platform like Sitecore doesn’t come with a universal way to set redirects up out of the box.

Typically, when we’ve taken over a site one of the support requests we will eventually receive is a question surrounding setting up a redirect from a marketer who’s ended up on Sitecore’s documentation site and is confused why they can’t find any of the things in this article https://doc.sitecore.com/users/sxa/17/sitecore-experience-accelerator/en/map-a-url-redirect.html.

The article appears to suggest that creating redirects is a feature that is supported, however it’s only available to sites built using Sitecore Experience Accelerator rather than the traditional approach.

More often that not, the developers who created the site will have added 301 redirect functionalities but will have done it using the IIS Redirect module, which while serves the purpose of creating redirects does not provide a Sitecore interface for doing so.

301 Redirect Module

Fortunately, there are some open source modules available which add the missing feature to Sitecore. The one we typically work with is neatly named 301 Redirect Module.
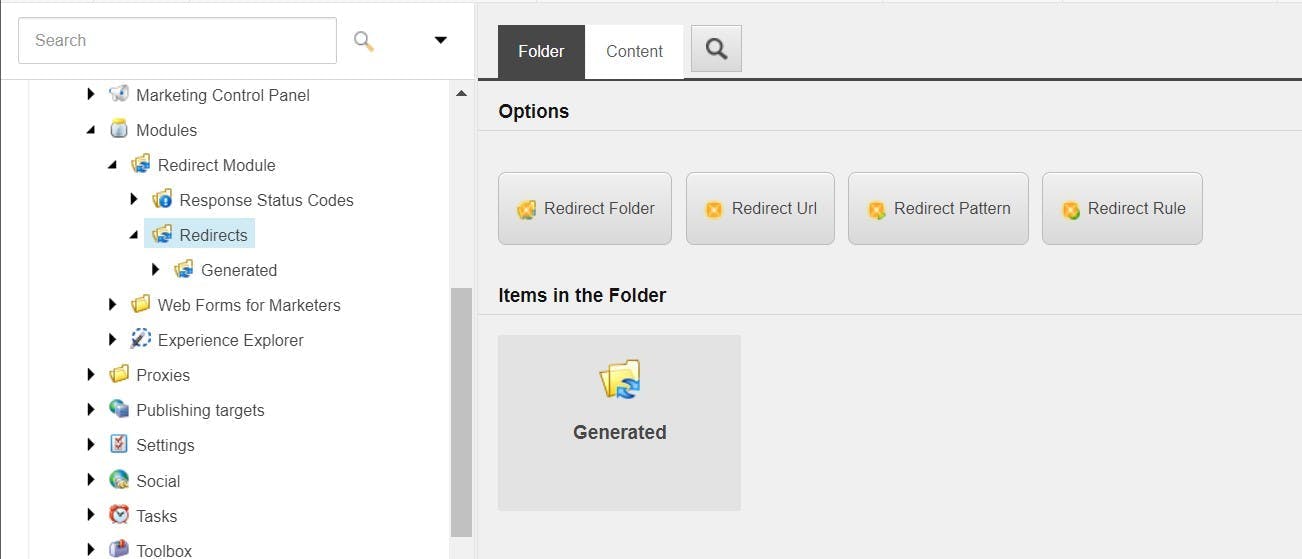
Once installed the module can be found in the System > Modules folder. Clicking on the Redirects folder will give you the option to either create another Redirect Folder to help group your redirect into more manageable folders, Redirect URL, Redirect Pattern or Redirect Rule.
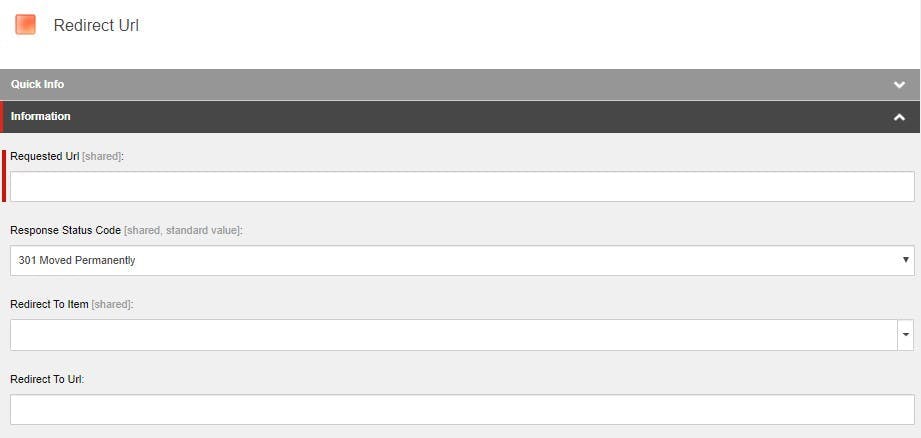
This is by far the most common redirect to be set up. You specify an exact URL that is to be redirected and set the destination as either another exact URL or a Sitecore item. There’s even an option to choose if it should be a permanent or temporary redirect.
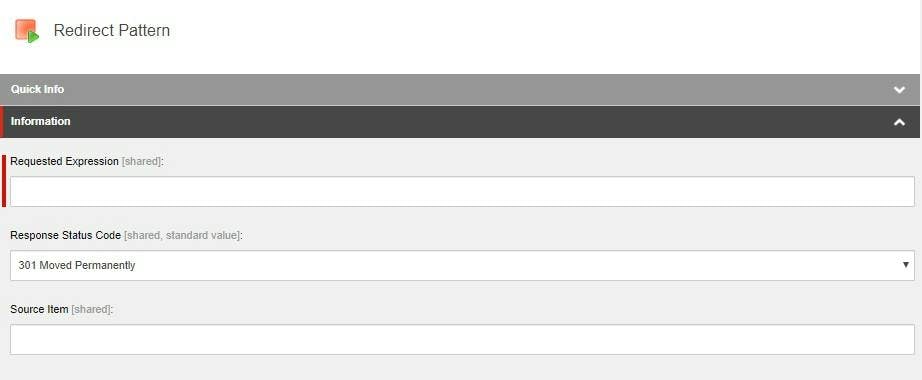
Redirect patterns are slightly more complex and require some knowledge of being able to write regular expressions. However, these are most useful if you ever want to move an entire section of your site. Rather than creating rules for each of the pages under a particular page, one rule can redirect all of them. Not only does this save time when creating the redirects, but it also makes your list of redirects far more manageable.

Auto Generated Rules

One of my favourite features of the 301 Redirect Module is that it can auto generate rules for any pages you move. For instance, if you decide a sub-page should become a top-level page moving it will result in a rule automatically being generated without you having to do a thing.

Summary

A marketer’s ability to manage 301 Redirect is as important as them being able to edit the content on the site and while traditional Sitecore sites may be missing this functionality it can easily be added using 3rd party modules, best of all they’re free!

Debugging Sitecore 9 Analytics Issues

Debugging Sitecore 9 Analytics Issues

With Sitecore 9 the way analytics is recorded and processed changed. Rather than everything being done by the IIS application, the architecture changed to include:

  1. A second IIS application called xconnect
  2. A windows services called Sitecore XConnect Search Indexer

As well as this Mongo was replaced by:

  1. SQL Server databases
  2. A SOLR XDB Core

Sitecore 9 also introduced data being secure in transit as well as at rest which means all traffic is encrypted using certificates.

While all these peices can be considered good, it does also create more points of failure that becomes harder to debug. So after spending a decent amount of time debugging why no analytic reports were loading and then why no data was appearing in the reports, I've made a checklist to go through.

Debugging Sitecore Analytics Checklist

1. XConnect Connection String

The main Sitecore application has connection strings for where it will find the XConnect service. They will look like this:

1 <add name="xconnect.collection" connectionString="https://mysite.xconnect" />
2 <add name="xconnect.collection.certificate" connectionString="StoreName=My;StoreLocation=LocalMachine;FindType=FindByThumbprint;FindValue=EF7F38B623E6664359110F2C6EB6DA00D567950F" />

One gives the path to the XConnect service and the other gives the path to find the certificate.

Firstly check that the XConnect path is correct and that you can access it and secondly check that the thumbprint corresponds with a certificate in the certificate store.

You can see what certificates are on your machine using this PowerShell script:

1Get-ChildItem -Path "cert:\LocalMachine\Root" | Format-Table Subject, FriendlyName, Thumbprint
2Get-ChildItem -Path "cert:\LocalMachine\My" | Format-Table Subject, FriendlyName, Thumbprint
3Get-ChildItem -Path "cert:\CurrentUser\My" | Format-Table Subject, FriendlyName, Thumbprint

2. Check certificate expiry date

Having a certificate is a good start, but it could still have expired.

Find the certificate in the certificate store by hitting start > manage computer certificates and find it in one of the folders.

Check the expiration date. If it's in the past then it's not going to work. This is common because the installation script for Sitecore 9 will set the expiration date to a year after install by default.

If it has expired you will need a new cert, you can create this by using the same script that you used to install sitcore origionally (Just the certificate bit).

1#Switch to correct vesion of SIF
2Remove-Module -Name SitecoreInstallFramework
3Import-Module -Name SitecoreInstallFramework -RequiredVersion 1.2.1
4
5#define parameters
6$prefix = "SitePrefix"
7$PSScriptRoot = "C:\resourcefiles9.0"
8$XConnectCollectionService = "$prefix.xconnect"
9$sitecoreSiteName = "$prefix.sc"
10
11#install client certificate for xconnect
12$certParams = @{
13 Path = "$PSScriptRoot\xconnect-createcert.json"
14 CertificateName = "$prefix.xconnect_client"
15 RootCertFileName = "SIF121Root"
16}

3. Check security permissons on the certificate

If you have a certificate and it's still valid then it could be that the app pool the site is running in doesn't have access to read the certificate.

To check this:

  1. Right click the certificate
  2. All Tasks
  3. Manage Private Keys
  4. Check that the app pool user for your site is listed in the list of users and that it has read permission. If it's not there add it using the name
    IIS APPPOOL\app pool name

4. Check License Files

Partner licenses only last for a year so if your using one of those it may have expired.

We're all used to checking the license file in the Sitecore application but XConnect has a license too.

These will be in:
sitename.xconnect\App_data\
sitename.xconnect\App_data\jobs\continuous\IndexWorker\App_data
sitename.xconnect\App_data\jobs\continuous\AutomationEngine\App_Data

Only the first will be used when your viewing the site, but it's worth knowing about the others to, incase you ever run a job manually.

5. Check manual rebuild of indexes

You can trigger a manual rebuild of the xDB index by following these instructions:

https://doc.sitecore.com/developers/90/sitecore-experience-platform/en/rebuild-the-xdb-index-in-solr.html

Remember in point 4 that it has it's own license file. It also has it's own connection strings.

6. Check XConnect site works in a browser

If you open XConnect in a browser you should recieve no certificate errors and a timestamp saying how long XConnect had been running for.

7. Check certificates are in the right store

This stack overflow post was a big help for me (https://stackoverflow.com/questions/26247462/http-error-403-16-client-certificate-trust-issue ). I was at the point where everything seemed right, but moving the certificates as shown here got it to the point of the analytics reports loading.

Windows 2012 introduced stricter certificate store validations. According to KB 2795828: Lync Server 2013 Front-End service cannot start in Windows Server 2012, the Trusted Root Certification Authorities (i.e. Root) store can only have certificates that are self-signed. If that store contains non-self-signed certificates, client certificate authentication under IIS returns with a 403.16 error code.

To solve the problem, you have to remove all non-self-signed certificates from the root store. This PowerShell command will identify non-self-signed certificates:

1Get-Childitem cert:\LocalMachine\root -Recurse |
2 Where-Object {$_.Issuer -ne $_.Subject}

In my situation, we moved these non-self-signed certificates into the Intermediate Certification Authorities (i.e. CA) store:

1Get-Childitem cert:\LocalMachine\root -Recurse |
2 Where-Object {$_.Issuer -ne $_.Subject} |
3 Move-Item -Destination Cert:\LocalMachine\CA

Checklist for data not going into Analytics

If you've got to the point of the analytics reports working, but not showing any data, this is my checklist for making sure data goes in. In my case I was trying to log site searches as per my article from a few years ago https://himynameistim.com/2017/09/13/populating-the-internal-search-report-in-sitecore/ there wern't any errors, but no data ever showed.

1. Enable Analytics Debugging

In Sitecore.Analytics.Tracking.config there is a setting to set the analytics logging level to debug. You will also need to set the log level on log4net root in Sitecore.config to debug.

2. Disable Robot Detection

In my case Sitecore thought I was a robot. Changing these settings will disable that:

1<setting name="Analytics.AutoDetectBots" set:value="false" />
2<setting name="Analytics.Robots.IgnoreRobots" set:value="false" />

3. Test analytics is tracking something

One of the hardest parts about analytics is it's not instant. The initial tracking only goes into the DB at the end of the users session and that's only for collection. It won't appear in the reports until processing has happened. So to speed this up:

Create a page called kill.aspx as follows. This will end the users session and trigger the data to be fed into the DB.

1<%@ Page language="c#" %>
2
3<!DOCTYPE html>
4<html>
5 <head>
6
7 </head>
8 <body>
9
10<div>Session Abandoned</div>
11<% Session.Abandon(); %>
12
13 </body>
14</html>

Next do something on the site that will cause some tracking to get added to the DB. In my case it was the search. Then go to kill.aspx to force session abondon.

Check the logs. You should see something like this...

125016 11:19:13 DEBUG [Analytics]: The CommitSession pipeline, ProcessSubscriptions is skipped - there is no subscriptions for location id: 4ebd0208-8328-5d69-8c44-ec50939c0967

Check the DB an entry should have gone into a shard db for [xdb_collection].[Interactions] table

To speed up processing, restart the main sitecore application.

Removing port 443 from urls generated by Sitecore

Removing port 443 from urls generated by Sitecore

For as long as I've been working on Sitecore there has been this really annoying issue where setting the link manager to include server url and running under https will cause urls to be generated with the port number included. e.g. https://www.himynameistim.com:443/ which naturally you don't actually want.

To overcome this there are a few methods you can take.

Method 1 - Set the Scheme and Port on you site defenition

This is possibly the smallest change you can make as it's just 2 settings in a config file.

Setting the external port on site node to 80 (yes 80) tricks the link manager code into not appending the port number as it does it for everything other than port 80.

1<configuration xmlns:patch="http://www.sitecore.net/xmlconfig/" xmlns:xdt="http://schemas.microsoft.com/XML-Document-Transform">
2 <sitecore>
3 <sites xdt:Transform="Insert">
4 <site name="website">
5 <patch:attribute name="hostName">www.MySite.com</patch:attribute>
6 <patch:attribute name="rootPath">/sitecore/content/MySite</patch:attribute>
7 <patch:attribute name="scheme">https</patch:attribute>
8 <patch:attribute name="externalPort">80</patch:attribute>
9 </site>
10 </sites>
11 </sitecore>
12</configuration>

What I don't like about this method though, is your setting something to be wrong to get something else to come out right. It's all a bit wrong.

Method 2 - Write your own link provider

The second method which I have generally done is to write your own provider which strips the port number off the generated URL.

For this you will need:

1. A patch file to add the provider:

1<configuration xmlns:patch="http://www.sitecore.net/xmlconfig/">
2 <sitecore>
3 <linkManager defaultProvider="sitecore">
4 <patch:attribute
5 name="defaultProvider"
6 value="CustomLinkProvider" />
7 <providers>
8 <add name="CustomLinkProvider"
9 type="MySite.Services.CustomLinkProvider,
10 MySite"
11 languageEmbedding="never"
12 lowercaseUrls="true"
13 useDisplayName="true"
14 alwaysIncludeServerUrl="true"
15 />
16 </providers>
17 </linkManager>
18 <mediaLibrary>
19 <mediaProvider>
20 <patch:attribute name="type">
21 MySite.Services.NoSslPortMediaProvider, MySite
22 </patch:attribute>
23 </mediaProvider>
24 </mediaLibrary>
25 </sitecore>
26</configuration>

2. A helper method that removes the SSL port

1namespace MySite
2{
3 /// <summary>
4 /// Link Helper is used to remove SSL Port
5 /// </summary>
6 public static class LinkHelper
7 {
8 /// <summary>
9 /// This method removes the 443 port number from url
10 /// </summary>
11 /// <param name="url">The url string being evaluated</param>
12 /// <returns>An updated URL minus 443 port number</returns>
13 public static string RemoveSslPort(string url)
14 {
15 if (string.IsNullOrWhiteSpace(url))
16 {
17 return url;
18 }
19
20 if (url.Contains(":443"))
21 {
22 url = url.Replace(":443", string.Empty);
23 }
24
25 return url;
26 }
27 }
28}

3. The custom link provider which first gets the item URL the regular way and then strips the SSL port

1using Sitecore.Data.Items;
2using Sitecore.Links;
3
4namespace MySite
5{
6 /// <summary>Provide links for resources.</summary>
7 public class CustomLinkProvider : LinkProvider
8 {
9 public override string GetItemUrl(Item item, UrlOptions options)
10 {
11 // Some code which manipulates and exams the item...
12
13 return LinkHelper.RemoveSslPort(base.GetItemUrl(item, options));
14 }
15 }
16}
17

4. The same provider for media

1using Sitecore.Data.Items;
2using Sitecore.Resources.Media;
3
4namespace MySite
5{
6 /// <summary>
7 /// This method removes SSL port number from Media Item URLs
8 /// </summary>
9 public class NoSslPortMediaProvider : MediaProvider
10 {
11 /// <summary>
12 /// Overrides Url mechanism for Media Items
13 /// </summary>
14 /// <param name="item">Sitecore Media Item</param>
15 /// <param name="options">Sitecore Media Url Options object</param>
16 /// <returns>Updated Media Item URL minus 443 port</returns>
17
18 public override string GetMediaUrl(MediaItem item, MediaUrlOptions options)
19 {
20 var mediaUrl = base.GetMediaUrl(item, options);
21 return LinkHelper.RemoveSslPort(mediaUrl);
22 }
23 }
24}

What I don't like about this method is it's messy in the opposite way. The port number is still being added, and we're just adding code to try and fix it after.

Credit to Sabo413 for the code in this example

Method 3 - Official Sitecore Patch

Given that it's Sitecore's bug, it does actually make sense that they fix it. After all people are paying a license fee for support! This simplifies your solution down to 1 extra patch file and a dll. What's better is as it's Sitecores code they have the responsibility of fixing it, if it ever breaks something, and you have less custom code in your repo.

You can get the fix here for Sitecore version 8.1 - 9.0.

So this may leave you wondering how did Sitecore fix it? Well having a look inside the dll reveals they wen't for method 2.

Installing Sitecore 9 when you've installed 9.1

Installing Sitecore 9 when you've installed 9.1

Installing Sitecore 9 was never the easiest of things, particularly when you compare it to how relatively simple Sitecore 8 was. But if you install Sitecore 9.1 on the same machine and then try your trusty Sitecore 9.0 script you may find it's got even harder and there's a bunch of new issues to worry about.

Multiple version of SIF

The first issue your probably going to run into is an error saying a name parameter is missing. Your script hasn't change, but what has changed is the default version of SIF that's now running.

So the first change you need to make is to ensure your running the correct version of SIF. You can do this either by adding the command to your script or running this before calling you install script. It will take effect for the duration of your PowerShell session.

1#Switch to correct vesion of SIF
2Remove-Module -Name SitecoreInstallFramework
3Import-Module -Name SitecoreInstallFramework -RequiredVersion 1.2.1

If you want to check what the active version of SIF is you can do this in a PowerShell window using

1Get-Command -Module SitecoreInstallFramework | Select-Object -Property name, version

Certificates Error - Part 1

Now we're calling the right version of SIF, the next issue I encountered was to do with certs. Specifically I got this error:

1TerminatingError(New-SignedCertificate): "Cannot process argument transformation on parameter 'Signer'. Cannot convert the "System.Object[]" value of type "System.Object[]" to type "System.Security.Cryptography.X509Certificates.X509Certificate2"."
2Install-SitecoreConfiguration : Cannot process argument transformation on parameter 'Signer'. Cannot convert the "System.Object[]" value of type "System.Object[]" to type "System.Security.Cryptography.X509Certificates.X509Certificate2".

This is due to the certificate for Sitecore 9.1 that has been installed. You can remove the certificate but then your Sitecore 9.1 install will break instead.

Alternatively add a "RootCertFilename" to the certificate definition:

1# Install client certificate for xconnect
2$certParams = @{
3 Path = "$SCLocation\xconnect-createcert.json"
4 CertificateName = "$prefix.xconnect_client"
5 RootCertFileName = "SIF121Root"
6}
7Install-SitecoreConfiguration @certParams -Verbose

Certificate Error - Part 2

This error looks exactly the same as the error above but you've already added that Root Cert File Name, so what's happening now.

1Install-SitecoreConfiguration : Cannot process argument transformation on parameter 'Signer'. Cannot convert the
2"System.Object[]" value of type "System.Object[]" to type
3"System.Security.Cryptography.X509Certificates.X509Certificate2".
4At C:\resourceFiles9.0\install.ps1:47 char:1
5+ Install-SitecoreConfiguration @certParams -Verbose
6+ ~~~~~~~~~~~~~~~~~~~~~~~~~~~~~~~~~~~~~~~~~~~~~~~~~~
7 + CategoryInfo : NotSpecified: (:) [Write-Error], WriteErrorException
8 + FullyQualifiedErrorId : Microsoft.PowerShell.Commands.WriteErrorException,Install-SitecoreConfiguration

The error is saying that it expected to find 1 certificate but found many instead. Each time you run the script the number of thumbprints also keeps going up.

TBH I'm not overly certain what causes this as most of the time you get the one root cert and your done forever more. But somehow you get a second and then get you in a loop of repeatedly deleting certificates only to discover they still exist somewhere. You know it's also not the certificate for the 9.1 install as the certificate has the new name you added to it.

For me the issue was although I had deleted them from my personal certificates, trusted root certificates, and even the c:\certificates folder they were being added to, what I needed to do was run this in PowerShell.

1Get-ChildItem -Path "cert:\LocalMachine\Root" | Where-Object { $_.subject -like "*SIF121Root*" }
2 | Remove-Item

If your wanting to find out what certificates are installed on your machine you can run these

1Get-ChildItem -Path "cert:\LocalMachine\Root" | Format-Table Subject, FriendlyName, Thumbprint
2Get-ChildItem -Path "cert:\LocalMachine\My" | Format-Table Subject, FriendlyName, Thumbprint
3Get-ChildItem -Path "cert:\CurrentUser\My" | Format-Table Subject, FriendlyName, Thumbprint

Make sure your config is actually correct

This one is really just my mistake. Multiple versions of Siteocore have meant rather than just having one "C:\reousrcefiles\" folder on my machine (as per instructions), I now have a few with the version post-fixed to the end. It only becomes apparent that the path in the install.ps1 file is wrong part way through the install process.

What I learnt at Sugcon 2019

What I learnt at Sugcon 2019

This year Sugcon came to London which given that's where I'm based is awesome for me. In total it was a 3 day conference starting with Sitecore Experience aimed more at marketers than developers. As a developer I only went to the 2 developer days, so for your benefit here's a summary of everything I saw.

Day 1

Day 1 started with a keynote, sadly life got in the way and I missed the first few hours. I'm told it was good though.

After that the day was split into a mix of sessions in the big room for all and smaller break out sessions where you could pick 1 of 4 to attend.

JSS Immersion - Lessons learned and looking ahead with Anastasiya Flynn

To kick things off I went to a talk on JSS, mostly because JSS is a subject I know very little about. This was something that became even more apparent as the talk went on! At the end of it I came away with an appreciation that I need to invest some time in learning a lot more, but my other take away was a few links on things that will help me out if I ever try some React stuff.

https://www.styled-components.com

https://www.react-spring.io

PAAS It on: Learning's from a year on Sitecore with Criss Titschinger

Criss works as a dev opps person and over the last year went on the journey of having a Sitecore 8.2 install upgraded to 9 using a fully cloud architecture in Azure.

Overall his experience sounded positive but he did have a few warnings from pain he experienced:

  • Beware of cold start up times with web apps. These can be a real performance hit, especially when Azure decides its going to move your web app instance
  • Web app slots share processing usage so when your warming one up, your live one is taking a hit. If you run on the edge of capacity, this will be an issue
  • Azure search is easy to install but it has a field limitation of 1000 to watch out for
  • Data migration in an upgrade takes a long time the second time. It took 9 days to migrate a years data from mongo! Only do it once.
  • Run your upgrade on clean instances and do the code in visual studio.
  • Web apps need to be on the premium service plan. The others are to weak
  • Use elastic pools for your database to save money. The microservice architecture introduces a LOT of new dbs which are going to cost money in azure resources. Most of the time they also don't do that much so put them in a pool to share resources
  • Moving to 9 is going to increase hosting charges. Be honest with clients about it.

Day 2

On Day 2 I got to attend from the start so it was a much fuller day for me.

10x your Sitecore development with Mark Cassidy

The day started with a talk on questioning how long it should take to build a Sitecore site. It was a question that never really got answered but the main thing Mark really raised was, do we over engineer what we do and would simpler actually be enough? He went on to show a time lapse video of himself implementing a bootstrap template in Sitecore which took 15 hours.

To build this site he didn't install any modules (no glass) and used just the standard Sitecore api. As he pointed out, it was all stuff that could be done by a dev with only the basic Sitecore training, which as there's a short supply of devs in the world, we can potentially make better use of who does what.

Extending and implementing cloud architectures with Rob Habraken

After one talk on cloud the day before I almost gave this one a miss, but I'm glad I didn't.

Rob gave us some of his learning's and things to look out for. As the the previous session the theme of Sitecore 9 becoming far more complex came up and he had some interesting takes on it:

  • Use what you need, disable roles that you don't. I see plenty of Sitecore customers not making use of all the features, and when your in a microservice architecture it does raise the question of why even have this stuff turned on. If you don't use marketing automation then you don't need the role running. It's just costing money to do nothing.
  • Scale down when your not using resource. Unlike a VM web apps can not be turned off so they always cost money. You can delete and recreate, but that's a pain. Instead set up a pipeline to scale them to the lowest resource setting when not being used.
  • He went on to discuss and show how we can use azure functions and logic apps to implement our code rather than building into the main Sitecore project. However you should be careful overdoing it as it can become complex quickly and it's easy to end up with a massive unorganised list of individual azure functions.

Automated personalisation with Chris Nash and Niels Kuhnel

Chris and Niels pointed out the flaw in Sitecores reporting on personalised content. How do we know the rate each converts to a goal at? There's the A/B Test report's but that's not quite the same thing.

They went on to show how they had started measuring the display impressions and click through on personalised content. Then linking the results collected in the reporting db up to a Power BI dashboard.

Sitecore identity: A new Sitecore authentication mechanism with Himadri Chakrabarti

Himadri gave us a look at the new Identity Server framework in Sitecore 9.1:

  • Identity server 4 framework
  • Still uses old asp net membership provider underneath
  • Can work with sub providers like Azure

Measure if you want to go faster with Jeremy Davis

Jeremy was in the situation where a site they were developing would have TV adverts during one of the most watch programs on British TV. Naturally he got scared and went looking for tools to help with performance. He told us about two of them:

  • Sitecore debug tool in experience editor showing the time it takes for components to load.
  • Using Visual Studio debugger to monitor processor usage and memory usage.

Both of these tools are very good at pointing you in the direction of smelly code and the best part is you already have them.

Unfortunately it's the kind of demo that really doesn't convert to text to write here.

We released JSS, you'll never guess what happened next with Adam Weber & Kam Figy

Adam and Kam showed us JSS working with SXA and Sitecore Forms. As mentioned before I don't know much about JSS but after this talk I'm convinced I definitely need to.

Right now it doesn't sound like I would make a site using it, but it could definitely be the future of how we build sites.

The stand out thing is being able to keep your Sitecore install unmodified which would essentially lead us to a real SAAS solution where a Sitecore instance could be spun up from the marketplace and then all other functionality added through server-less functions and a headless front end.

API Routes stopped working in Sitecore 9

API Routes stopped working in Sitecore 9

We recently undertook a Sitecore 9 upgrade and one issue we encountered was controllers we had set up for API routes stopped working on content delivery servers. Content management and single server setups were unaffected.

Our routes had been set up by the controllers inheriting from SitecoreController and then using the default route which Sitecore would create. e.g. /api/sitecore/foo/getFoo

1public class FooController : SitecoreController
2{
3 ...
4 [System.Web.Http.HttpPost]
5 public ActionResult GetFoo(FooModel queryModel)
6 {
7 ...
8 }
9}

MVC.LegalRoutes

After a bit of investigation we found a new setting in Sitecore 9 called MVC.LegalRoutes. From the documentation:

MVC: Pipe separated list of route URL's that are not valid for use with Sitecore.Mvc.
For instance, the default ASP.NET route ({controller}/{action}/{id}) catches most requests that are actually meant to be handled by the default Sitecore route.
Default: "{controller}/{action}/{id}"

If we added our route to the list everything started to work ok.

1<setting name="Mvc.LegalRoutes" value="|Sitecore.Mvc:sitecore/shell/api/sitecore/{controller}/{action}|Sitecore.Mvc.Api:/api/sitecore/{controller}/{action}|" />

A different approach

Not wanting to just change random settings we stumble across we contacted Sitecore support to see what they thought.

The route 'api/sitecore/{controller}/{action}' is a pre-defined Sitecore SPEAK route for Sitecore Client usage. So when trying to access on a content delivery server where the Sitecore Client is disabled, it no longer works.

So to get around the issue we can start registering the route on content delivery servers through the Global.asax file.

1public override void Application_Start(object sender, EventArgs args)
2{
3 base.Application_Start(sender, args);
4
5 if (System.Configuration.ConfigurationManager.AppSettings["role:define"] == "ContentDelivery")
6 {
7 System.Web.Routing.RouteTable.Routes.MapRoute("Sitecore.Speak.Commands", "api/sitecore/{controller}/{action}");
8 }
9}
Sitecore - Creating an admin menu item

Sitecore - Creating an admin menu item

If your building a Sitecore admin application, your going to need to link to them from the Sitecore start screen/launch pad.

To create a menu item on Sitecores start screen:

  • Log into Sitecore and switch to the core db
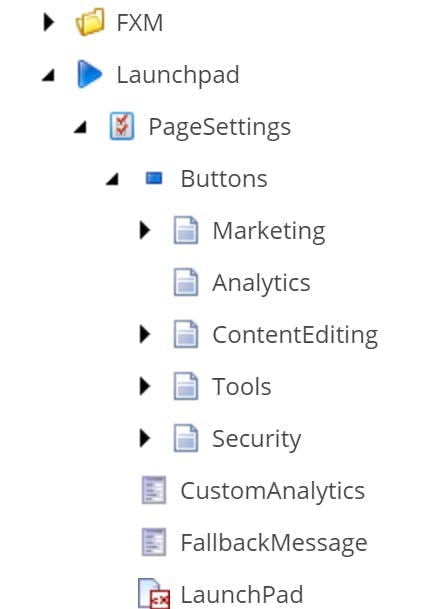
  • Open content editor and navigate to /sitecore/client/Applications/Launch Pad/PageSettings/Buttons
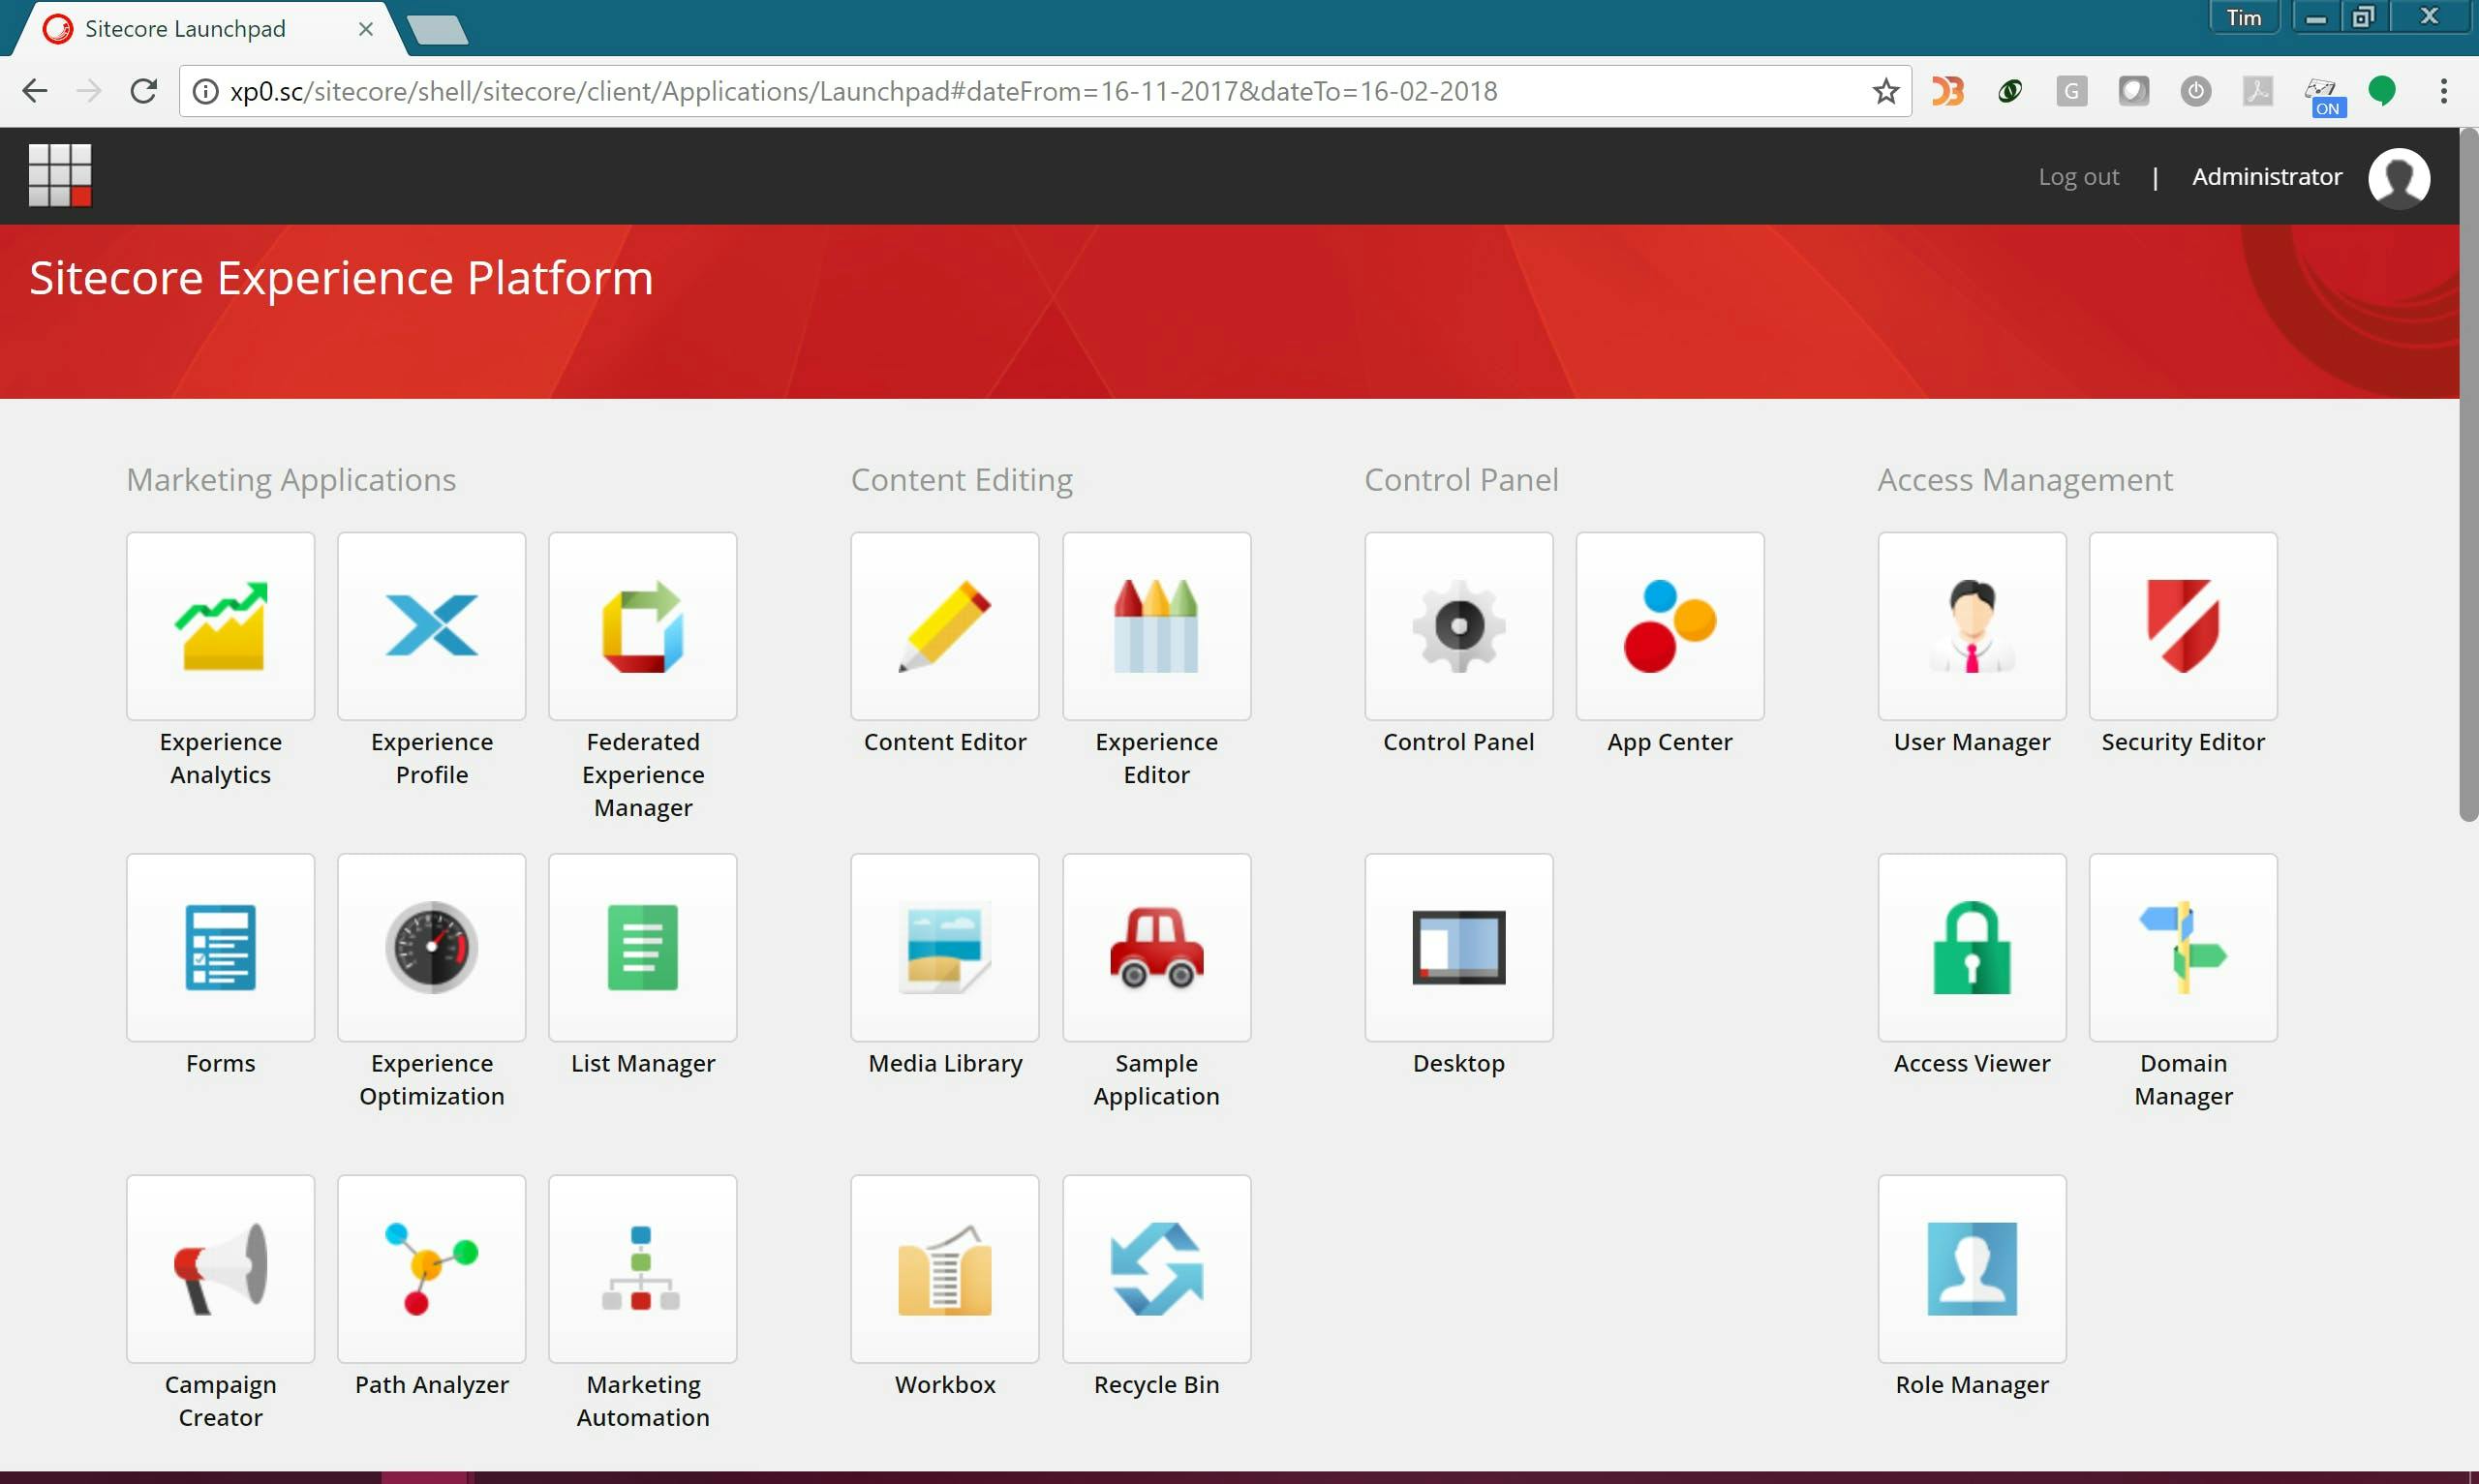
  • You will see groupings for each of the sections that appears on the start screen/launch pad
  • Add a new Launch Pad-Button item to the section you want it to appear in
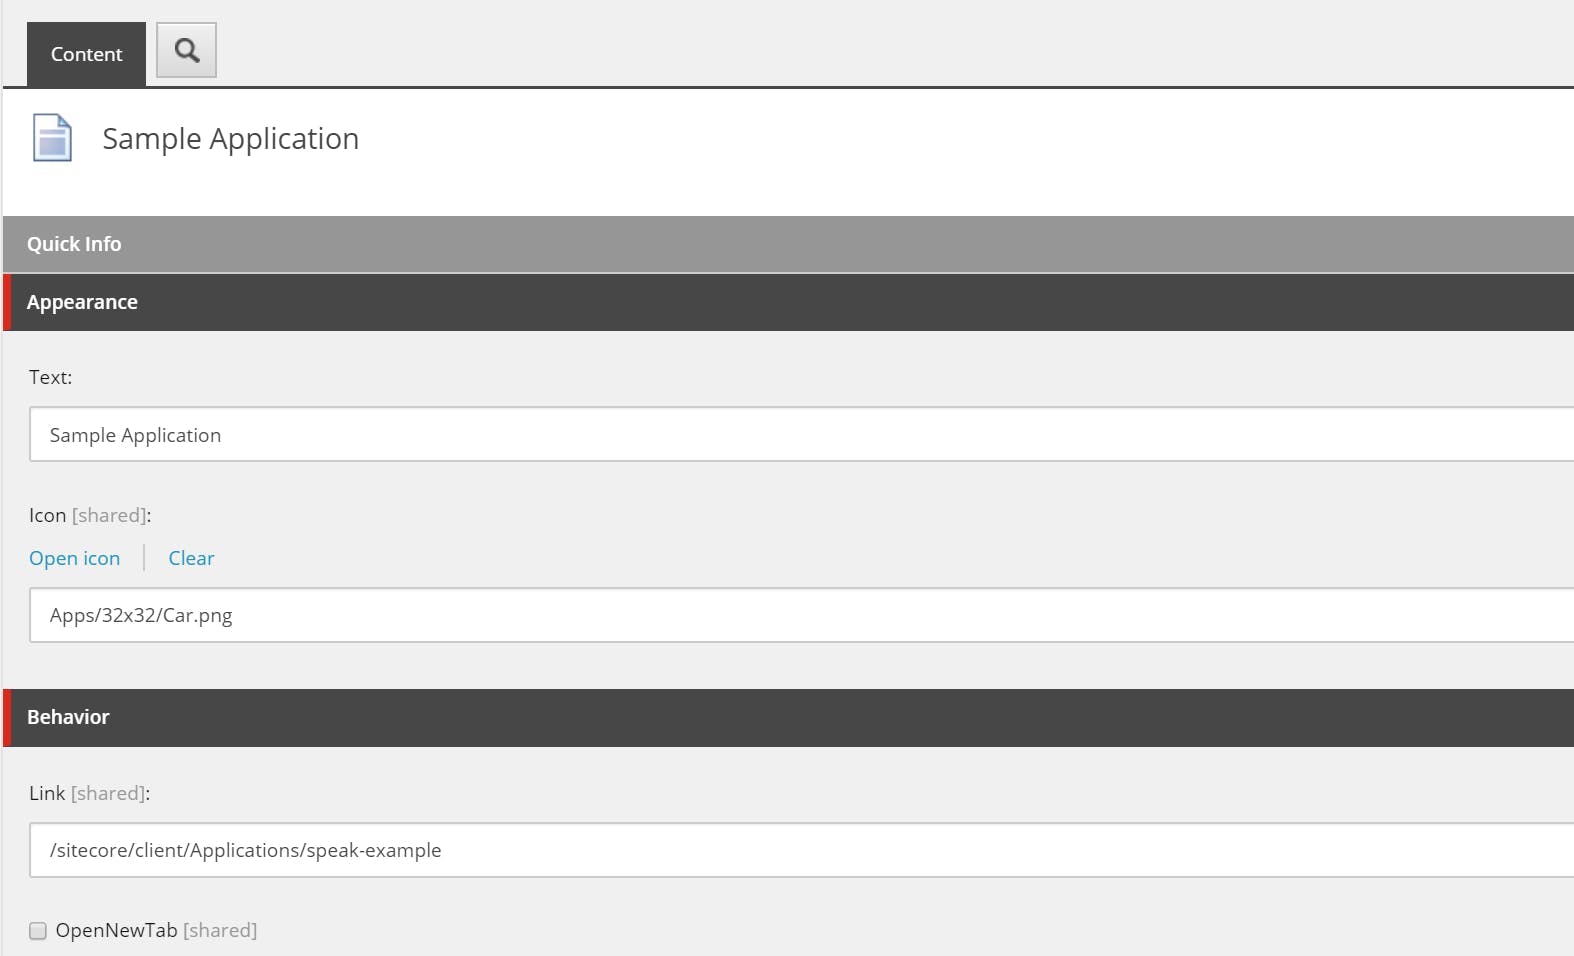
  • Give it a name, icon and link
  • Your button now appears on the start screen
A first look at Sitecore SPEAK 3

A first look at Sitecore SPEAK 3

SPEAK (Sitecore Process Enablement and Accelerator Kit) is the framework for constructing admin interfaces in Sitecore. It was introduced to the platform prior to Sitecore 8, but really became the way to do things after Sitecore 8's UI refresh which introduced the start page and made accessing full page SPEAK applications logical.

SPEAK 1 and 2

The goals of SPEAK were to:

  • Provide a streamlined approach to application development.
  • Enable reuse of UI elements.
  • Enforce a consistent look and feel.

In order to achieve this SPEAK 1 and 2 provides a component library of controls that can be used to construct pages. This ensures that the UI retains a consistent look and feel, and also minimizes the amount of work on a Sitecore developer. Logic is then added to an application using JavaScript for the front end and C# for server side code.

While this all sounds great many developers find SPEAK hard to use. In order to construct a UI out of the re-usable components, Sitecore lent on it's existing functionality to be able to construct pages out of presentation items, however there is no WYSIWYG editor and the only real way to construct the layout is through Sitecore Rocks. This in itself isn't awful, but when combined with the fact the average Sitecore developer doesn't need to build an admin application that often, it presents a steep learning curve using a tool they may not use to put together components they're not familiar with.

SPEAK 3

SPEAK 3 aims to address complaints in previous versions by introducing a completely new framework based on Angular.

Since SPEAKs initial incarnation, client side application development has moved on a long way, so rather than continuing to construct their own framework, Sitecore has chosen Angular as the the platform to use going forward.

Begin Angular, SPEAK 3 applications can run independently of Sitecore, however the purpose of SPEAK 3 is still to make it simple to integrate Sitecore-branded applications into the content manager.

My First Look

Before being a Sitecore back-end developer I worked on bespoke web based applications using client side frameworks such as Knockout, so the news that Sitecore was going to adopt Angular was great. Digging into Angular again however has given me a first hand experience of how fast the JavaScript world is changing. Gone is the promotion of MVC on the client being replaced with service/controller patterns. Whereas with Knockout and AngularJS (what Angular 1.x is now known as) we could add data binding to just an aspect of a page, Angular is really for running an entire application, routing and all.

Building an SPEAK 3 application really means building an Angular application with some modules provided by Sitecore. These modules will provide integration features such as:

  • Sitecore context
  • Translations for applications
  • Translations for the SPEAK 3 component library
  • Component user access authorization
  • Preventing cross-site request forgery (Anti-CSRF)

In addition to this the SPEAK 3 components will also sort out compatibility issues such as modifying the routing so that the application no longer needs to be in the route of the site and can be in a sub-folder of Sitecore.

Angular for a Sitecore dev

To start it's good to know an outline of what developing Angular involves.

Angular 2+ is built using TypeScript. You don't need to use TypeScript, but as most of the examples are you probably will want to too. TypeScript is a superset of of JavaScript which adds strong typing support as well as other features of ECMAScript 2015 to backport it to older versions of JavaScript.

TypeScript needs to be compiled into JavaScript before it can run in the browser.

The easiest way to get started with Angular and TypeScript is using Node.js to install tools via NPM. Node is not a requirement for Angular and you won't need it in production, but for local dev using Node to host your application can make life a lot easier.

Angular has a CLI which makes things easy to create and run an Angular application.

Visual Studio can be used as an IDE for TypeScript and Angular, but you might find life easier using Visual Studio Code.

It's better than it sounds :)

All this might sound a bit daunting to the average C# developer. Technologies like Node and NPM traditionally are more at home in the open source community.

There is however a lot to be positive about. If your the type of dev that prefers writing c# to JavaScript, then the inclusion of TypeScript is going to please you, as it brings the type checking structure and class organisation that we're used too.

The angular cli (command line interface) is also a reason to be pleased. One large difference between the .net and open source world has been the ability to click a button and get going. Open source typically comes with the setup of many components to get a solution working. At times when you try to learn something it can feel like your spending more effort doing setup that actual dev on the platform. Angular still needs to have all these components put together, but the cli takes care of all this for you, effectively recreating a file new project experience, just through a command line.

Top features in Sitecore 9

Top features in Sitecore 9

Sitecore 9 is out and with it comes cool new whizzy stuff. Here's my top features from the new version of the platform.

#1 - New Forms module

I think everyone would agree that Web Forms for Marketers was starting to show it's age and the UI was getting a bit dated compared to the rest of Sitecore.

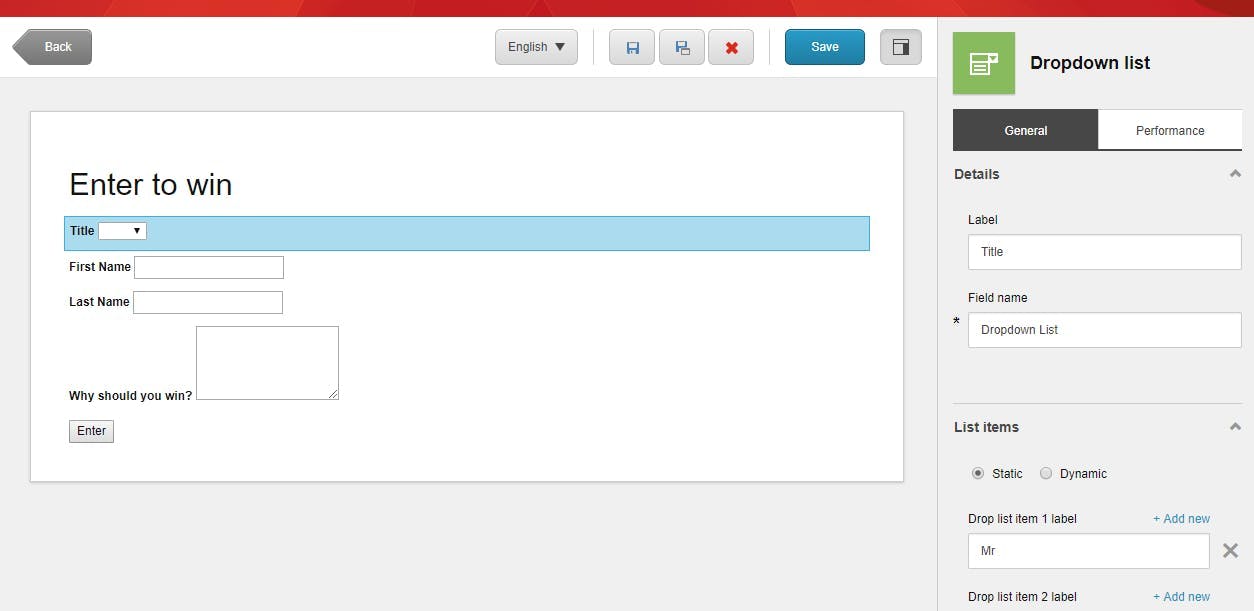
The new Forms module, which is just called forms is completely new from the ground up. It has a new drag and drop UI with long awaited support for multiple page forms.

Like WFFM, the module is extendable through custom save actions and comes with a number of useful default ones out of the box.

There is no upgrade option for moving a WFFM form to the new module but WFFM will continue to work on Sitecore 9 and is being dropped in Sitecore 9.1.

I think more than anything the UX improvements will make a real difference for users by being much simpler to understand and will drive to much more use.

#2 - Marketing Automation

In Sitecore 9 Engagement Plans are being replaced with Marketing Automation. Like the forms module, this is completely new from the group up rather than an UI update to the existing Engagement Plans.

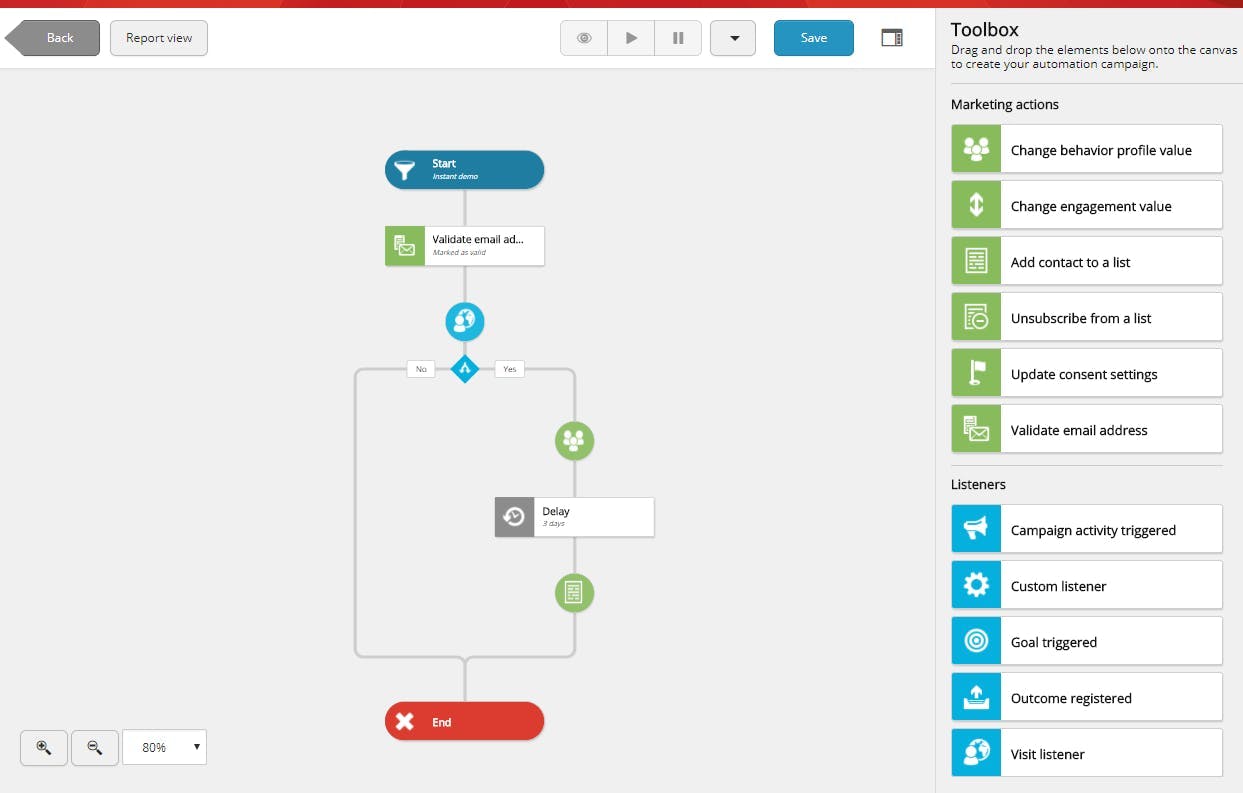
The new Marketing Automation module has a really easy to use drag and drop ui which is a vast improvement over the old Silverlight implementation engagement plans had. It's also directly accessible from the dashboard rather than being hidden in the Marketing Control Centre.

One of the biggest changes (aside from the UI) is there is now no need to enrol users in a plan at a specific state either by code or a wffm save action. I found this one of the most confusing aspects to end users who were expecting creating states with a trigger to automatically add people once they had triggered a goal, so this is great to see fixed.

Plans now have very clear start and end points with a number of options on the start node (goals, events), which can be combined to trigger who should be added to the plan.

Overall for the moment you try creating a plan just to see what it can do, the whole process is so much simpler that I think this will have a significant aspect on users. Engagement Plans were something that needed to be learn 't in order to get anything out of them, and wernt intuitive enough leading to frustration. With Marketing Automation I think a lot of people that were put off before will now benefit from this module.

#3 - xConnect

xConnect is a new service layer that sits between xDB and the client. That could be the CMS, a device or some other custom server side process that needs to read or write xDB data.

With xConnect as the service layer this means that no system has direct access to the collection database or search indexes. Any system wanting to access this data will go through xConnect which also helps with support for things like GDPR.

xConnect is installed separately from Sitecore itself and does not have any dependencies on the Sitecore kernel. When you install Sitecore locally you will see two IIS entries, one for Sitecore and one for xConnect. Communication with xConnect is done via a set of RESTful API's over HTTPS, making integrating with it extremely simple to do.

What xConnect really brings to the table is the ability to scale an combine many more systems rather than just the CMS. e.g. Phone Apps.

#4 - Sitecore Installation Framework (SIF)

Installing Sitecore 9 is very different to previous versions (see my Sitecore 9 installation tips here), gone are the days of copying a web-root and restoring some db's. The entire installation is now done with a new framework based on PowerShell scripts.

While this is going to create a pain point in the amount of time it takes to get started. It will almost certainly vastly improve DevOps tasks as it opens up numerous options to put the installation scripts in deployment pipelines.

Sitecore 9 installation tips

Sitecore 9 installation tips

Sitecore 9 released this week and with it comes a whole new installation process. Gone are the days you could just download the web root and restore some dbs or just run the installation gui and enter a db connection string. Sitecore 9 has some fairly fundamental architectural changes with multiple IIS entries and and some windows services to go with it. Server roles are now also being properly configured rather than updating config files to match what it says in an excel doc.

Along with these changes, the installation process has moved to be based on powershell scripts, which on one hand has made things a bit harder, but it also brings great positives that the process can now be customized with scripts that are repeatable without the risk of mistakes.

Here's my tips for a smooth local installation (production installs are different to a local install).

Tip #1 - Check the Prerequisites and Requirements

It sounds obvious but when presented with a new toy you want to play with it as fast as possible, and with a 49 page document the urge is there to skip to the installation and hope for the best.

Skipping however is likely to result in install failures as the installer relies on modules such as Web Deploy and the right version of SQL Server which were not needed for the version you may already have installed.

Tip #2 - Make sure you have the right versions

You may have SQL and Solr but are they the right version?

SQL Express 2016

Sitecore 9 supports SQL Server 2014 SP2 and SQL Server 2016. Now that SQL Server 2017 is out, actually finding the link for 2016 express has become a challenge, but here it is.

Download SQL Server 2016 Express

Solr 6.6.1

Sirecore 9 supports Solr version 6.6.1. I typically use Bitnami Solr as it's a lot easier to install than doing Solr on it's own. Like SQL though the latest version is newer than what Sitecore supports and finding the link to the older one can be a bit of a challenge.

Download Bitnami Solr 6.6.1

Tip #3 - Solr requires SSL

By default Solr does not install with SSL turned on, but without it your install will fail. More specifically it will fail trying to start an xConnect service.

Enabling SSL for Solr

To create a self-signed certificate for Solr we can use the JDK Keytool which if you've installed Solr you should already have installed.

Note: These instructions are based on this guide from Apache and this blog post from Jason St-Cyr.

  1. Open command prompt
  2. Change to the Solr ‘etc’ directory
1cd "{SOLR_HOME}\server\etc"

3. Execute the keygentool command

1"{JAVA_HOME}\bin\keytool.exe" -genkeypair -alias solr-ssl -keyalg RSA -keysize 2048 -keypass secret -storepass secret -validity 9999 -keystore solr-ssl.keystore.jks -ext SAN=DNS:localhost,IP:127.0.0.1 -dname "CN=localhost, OU=Organizational Unit, O=Organization, L=Location, ST=State, C=Country"

This will generate the keystore with a password of ‘secret’ as valid for localhost and 127.0.0.1. You can add other DNS and IPs as desired, or skip hostname verification.

4. Convert generated JKS to PKCS12

1 "{JAVA_HOME}\bin\keytool.exe" -importkeystore -srckeystore solr-ssl.keystore.jks -destkeystore solr-ssl.keystore.p12 -srcstoretype jks -deststoretype pkcs12

5. Enter password when prompted. The password ‘secret’ was used in the previous step. Remember to use your password instead if you changed it in the keygen command parameters.

6. Open Windows Explorer and navigate to the ‘etc’ directory (“{SOLR_HOME}\server\etc”)

7. Double-click on the generated ‘p12’ file (solr-ssl.keystore.p12 if you used the default parameters from the previous steps)

8. In the wizard, specify the following values (there will be some extras you can ignore):

Store Location: Local Machine

File name: Leave as provided

Password: secret

Certificate Store: Trusted Root Certification Authorities

Remember to use your password instead if you changed it during the previous steps.

9. Open the solr.in.cmd file for editing (e.g. {SOLR_HOME}\bin\solr.in.cmd)

10. Un-comment the SSL settings:

1set SOLR_SSL_KEY_STORE=etc/solr-ssl.keystore.jks
2set SOLR_SSL_KEY_STORE_PASSWORD=secret
3set SOLR_SSL_TRUST_STORE=etc/solr-ssl.keystore.jks
4set SOLR_SSL_TRUST_STORE_PASSWORD=secret
5set SOLR_SSL_NEED_CLIENT_AUTH=false
6set SOLR_SSL_WANT_CLIENT_AUTH=false

11. Restart SOLR to pick up the changes.

Tip #4 - Close management studio

I'm not sure if this was a one off thing, but with management studio open my installation failed with a single user access issue.

Tip #5 - Check the logs

The installation script will output logs to the folder it runs in. If your installation fails it will reference a log file. To find out why the installation failed or get some more info go and check the log referenced.