Tag: SEO
Managing Redirects in Sitecore

Managing Redirects in Sitecore

One of the most important aspects if not the most important aspect to managing a website is SEO. It doesn’t matter how good your website is, it doesn’t really matter if nobody can find it. Creating good SEO is a lot about having pages match what users are searching for, which then results in a high ranking for those pages. However, a second part to this formula is what happens with a page when it no longer exists. For instance, one day this blog post may no longer be relevant to have on our site, but up until that point search engines will have crawled it, people will have posted links to it and all of this adds to its value which we would to lose should it be removed. An even simpler scenario could be that we rename the blog section to something else and the page still exists under a different URL, but links to it no longer work.

Fortunately, the internet has a way of dealing with this and it’s in the form of a 301 redirect. 301 redirect are an instruction to anyone visiting the URL that the page has permanently moved to a different URL. When you set up a 301 redirect it achieves two things. Firstly, users following a link to your site end up on a relevant page rather a generic page not found message. Secondly search engines recrawling your site update their index with the new page and transfer all the associated value. So, to avoid losing any value associated with a page, whenever you move, rename or remove a page you should also set up a redirect.

Sitecore

Given how important redirects are it’s then surprising that an enterprise CMS platform like Sitecore doesn’t come with a universal way to set redirects up out of the box.

Typically, when we’ve taken over a site one of the support requests we will eventually receive is a question surrounding setting up a redirect from a marketer who’s ended up on Sitecore’s documentation site and is confused why they can’t find any of the things in this article https://doc.sitecore.com/users/sxa/17/sitecore-experience-accelerator/en/map-a-url-redirect.html.

The article appears to suggest that creating redirects is a feature that is supported, however it’s only available to sites built using Sitecore Experience Accelerator rather than the traditional approach.

More often that not, the developers who created the site will have added 301 redirect functionalities but will have done it using the IIS Redirect module, which while serves the purpose of creating redirects does not provide a Sitecore interface for doing so.

301 Redirect Module

Fortunately, there are some open source modules available which add the missing feature to Sitecore. The one we typically work with is neatly named 301 Redirect Module.
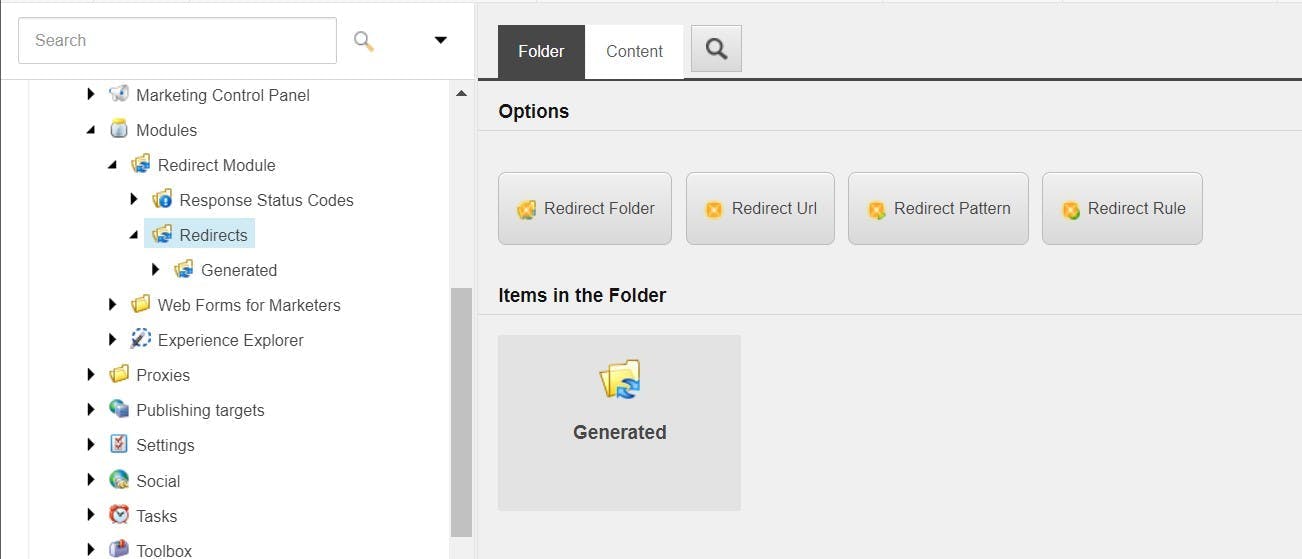
Once installed the module can be found in the System > Modules folder. Clicking on the Redirects folder will give you the option to either create another Redirect Folder to help group your redirect into more manageable folders, Redirect URL, Redirect Pattern or Redirect Rule.
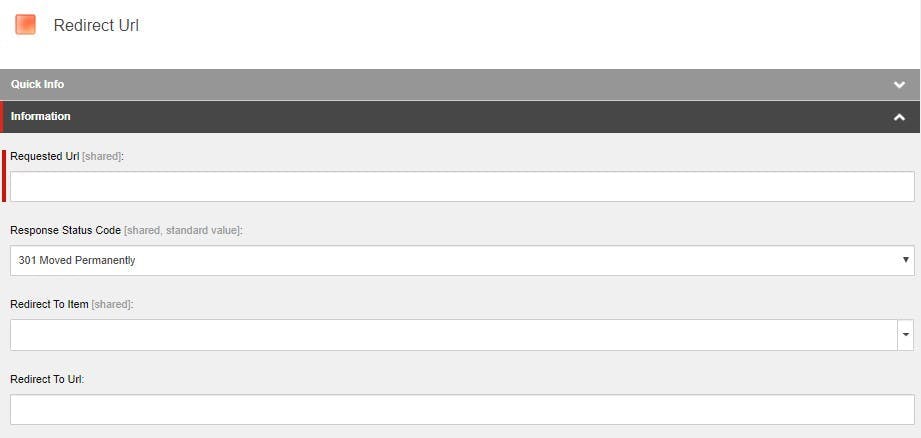
This is by far the most common redirect to be set up. You specify an exact URL that is to be redirected and set the destination as either another exact URL or a Sitecore item. There’s even an option to choose if it should be a permanent or temporary redirect.
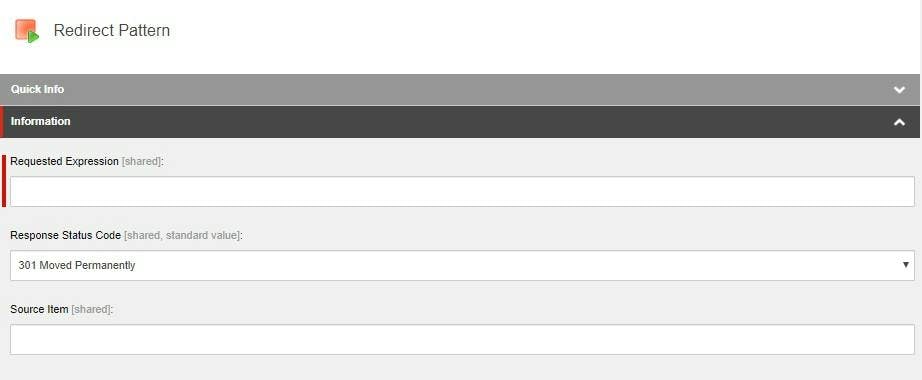
Redirect patterns are slightly more complex and require some knowledge of being able to write regular expressions. However, these are most useful if you ever want to move an entire section of your site. Rather than creating rules for each of the pages under a particular page, one rule can redirect all of them. Not only does this save time when creating the redirects, but it also makes your list of redirects far more manageable.

Auto Generated Rules

One of my favourite features of the 301 Redirect Module is that it can auto generate rules for any pages you move. For instance, if you decide a sub-page should become a top-level page moving it will result in a rule automatically being generated without you having to do a thing.

Summary

A marketer’s ability to manage 301 Redirect is as important as them being able to edit the content on the site and while traditional Sitecore sites may be missing this functionality it can easily be added using 3rd party modules, best of all they’re free!

Removing port 443 from urls generated by Sitecore

Removing port 443 from urls generated by Sitecore

For as long as I've been working on Sitecore there has been this really annoying issue where setting the link manager to include server url and running under https will cause urls to be generated with the port number included. e.g. https://www.himynameistim.com:443/ which naturally you don't actually want.

To overcome this there are a few methods you can take.

Method 1 - Set the Scheme and Port on you site defenition

This is possibly the smallest change you can make as it's just 2 settings in a config file.

Setting the external port on site node to 80 (yes 80) tricks the link manager code into not appending the port number as it does it for everything other than port 80.

1<configuration xmlns:patch="http://www.sitecore.net/xmlconfig/" xmlns:xdt="http://schemas.microsoft.com/XML-Document-Transform">
2 <sitecore>
3 <sites xdt:Transform="Insert">
4 <site name="website">
5 <patch:attribute name="hostName">www.MySite.com</patch:attribute>
6 <patch:attribute name="rootPath">/sitecore/content/MySite</patch:attribute>
7 <patch:attribute name="scheme">https</patch:attribute>
8 <patch:attribute name="externalPort">80</patch:attribute>
9 </site>
10 </sites>
11 </sitecore>
12</configuration>

What I don't like about this method though, is your setting something to be wrong to get something else to come out right. It's all a bit wrong.

Method 2 - Write your own link provider

The second method which I have generally done is to write your own provider which strips the port number off the generated URL.

For this you will need:

1. A patch file to add the provider:

1<configuration xmlns:patch="http://www.sitecore.net/xmlconfig/">
2 <sitecore>
3 <linkManager defaultProvider="sitecore">
4 <patch:attribute
5 name="defaultProvider"
6 value="CustomLinkProvider" />
7 <providers>
8 <add name="CustomLinkProvider"
9 type="MySite.Services.CustomLinkProvider,
10 MySite"
11 languageEmbedding="never"
12 lowercaseUrls="true"
13 useDisplayName="true"
14 alwaysIncludeServerUrl="true"
15 />
16 </providers>
17 </linkManager>
18 <mediaLibrary>
19 <mediaProvider>
20 <patch:attribute name="type">
21 MySite.Services.NoSslPortMediaProvider, MySite
22 </patch:attribute>
23 </mediaProvider>
24 </mediaLibrary>
25 </sitecore>
26</configuration>

2. A helper method that removes the SSL port

1namespace MySite
2{
3 /// <summary>
4 /// Link Helper is used to remove SSL Port
5 /// </summary>
6 public static class LinkHelper
7 {
8 /// <summary>
9 /// This method removes the 443 port number from url
10 /// </summary>
11 /// <param name="url">The url string being evaluated</param>
12 /// <returns>An updated URL minus 443 port number</returns>
13 public static string RemoveSslPort(string url)
14 {
15 if (string.IsNullOrWhiteSpace(url))
16 {
17 return url;
18 }
19
20 if (url.Contains(":443"))
21 {
22 url = url.Replace(":443", string.Empty);
23 }
24
25 return url;
26 }
27 }
28}

3. The custom link provider which first gets the item URL the regular way and then strips the SSL port

1using Sitecore.Data.Items;
2using Sitecore.Links;
3
4namespace MySite
5{
6 /// <summary>Provide links for resources.</summary>
7 public class CustomLinkProvider : LinkProvider
8 {
9 public override string GetItemUrl(Item item, UrlOptions options)
10 {
11 // Some code which manipulates and exams the item...
12
13 return LinkHelper.RemoveSslPort(base.GetItemUrl(item, options));
14 }
15 }
16}
17

4. The same provider for media

1using Sitecore.Data.Items;
2using Sitecore.Resources.Media;
3
4namespace MySite
5{
6 /// <summary>
7 /// This method removes SSL port number from Media Item URLs
8 /// </summary>
9 public class NoSslPortMediaProvider : MediaProvider
10 {
11 /// <summary>
12 /// Overrides Url mechanism for Media Items
13 /// </summary>
14 /// <param name="item">Sitecore Media Item</param>
15 /// <param name="options">Sitecore Media Url Options object</param>
16 /// <returns>Updated Media Item URL minus 443 port</returns>
17
18 public override string GetMediaUrl(MediaItem item, MediaUrlOptions options)
19 {
20 var mediaUrl = base.GetMediaUrl(item, options);
21 return LinkHelper.RemoveSslPort(mediaUrl);
22 }
23 }
24}

What I don't like about this method is it's messy in the opposite way. The port number is still being added, and we're just adding code to try and fix it after.

Credit to Sabo413 for the code in this example

Method 3 - Official Sitecore Patch

Given that it's Sitecore's bug, it does actually make sense that they fix it. After all people are paying a license fee for support! This simplifies your solution down to 1 extra patch file and a dll. What's better is as it's Sitecores code they have the responsibility of fixing it, if it ever breaks something, and you have less custom code in your repo.

You can get the fix here for Sitecore version 8.1 - 9.0.

So this may leave you wondering how did Sitecore fix it? Well having a look inside the dll reveals they wen't for method 2.

Sitecore: Returning a 404 response on the page requested rather than redirecting to a 404 page

Sitecore: Returning a 404 response on the page requested rather than redirecting to a 404 page

Previously I've blogged about:

but while looking through the posts today, I realised I had never written about how you stop Sitecore from issuing 302 redirects to your 404 page and instead return a 404 on the URL requested with the contents of the 404 page.

While search engines will recognise a 302 response to a 404 as a 404 (in fact they're intelligent enough to work out that a 404 page without a correct response status code is a 404) it's considered SEO best practice for the URL to stay the same and to issue the correct status code.

Creating a NotFoundResolver class

When Sitecore processes a request it will run the httpRequestBegin pipeline, and within that pipeline is a Item Resolver processor that will attempt to find the requested item. If after this the context item is still null then the logic to redirect to the ItemNotFoundUrl will kick in. To stop this happening we can simply add our own process to the pipeline after ItemResolver and set the item.

Our class looks like this:

1using Sitecore;
2using Sitecore.Configuration;
3using Sitecore.Data;
4using Sitecore.Diagnostics;
5using Sitecore.Pipelines.HttpRequest;
6
7namespace Pipelines.HttpRequest
8{
9 public class NotFoundResolver : HttpRequestProcessor
10 {
11 private static readonly string PageNotFoundID = Settings.GetSetting("PageNotFound");
12
13 public override void Process(HttpRequestArgs args)
14 {
15 Assert.ArgumentNotNull(args, nameof(args));
16
17 if ((Context.Item != null) || (Context.Database == null))
18 return;
19
20 if (args.Url.FilePath.StartsWith("/~/"))
21 return;
22
23 var notFoundPage = Context.Database.GetItem(new ID(PageNotFoundID));
24 if (notFoundPage == null)
25 return;
26
27 args.ProcessorItem = notFoundPage;
28 Context.Item = notFoundPage;
29 }
30 }
31}

To add our process to the pipeline we can use a patch file like this:

1<configuration xmlns:patch="http://www.sitecore.net/xmlconfig/">
2 <sitecore>
3 <pipelines>
4 <httpRequestBegin>
5 <processor
6 patch:after="processor[@type='Sitecore.Pipelines.HttpRequest.ItemResolver, Sitecore.Kernel']"
7 type="LabSitecore.Core.Pipelines.NotFoundResolver, LabSitecore.Core" />
8 </httpRequestBegin>
9 </pipelines>
10 <settings>
11 <!-- Page Not Found Item Id -->
12 <setting name="PageNotFound" value="ID OF YOUR 404 PAGE" />
13 </settings>
14 </sitecore>
15</configuration>

Notice the setting for the ID of your 404 page to be loaded as the content.

Remember if you do do this make sure you also follow one of the methods to return a 404 status code, otherwise you will have just made every URL a valid 200 response on your site.

Sitecore Alias as Redirect

Sitecore Alias as Redirect

One feature of Sitecore that I have always disliked is Alias's. On each page of a site, content editors have the ability to click an alias button on the presentation tab and add alternative urls for the page.

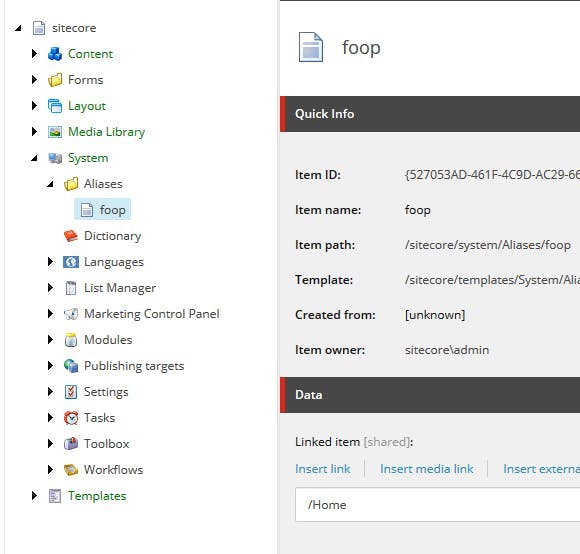
Once added these will appear in the Aliases folder under system.

However all this accomplishes is multiple URLs existing for one page which is a big SEO no no.

Content editors like to do this in order to create simple URLs for things like landing pages. e.g. himynameistim.com/Sitecore but search engines hate it as they see multiple pages with the exact same content. As a result the value of each page gets lowered and appears lower in search engine results. What Content editors really want is to set up a 301 redirect so that they can have the simple URL but redirect users to the actual page on the site.

Aliases as Redirects

One solution is to updated the aliases functionality to cause a redirect to it's linked item rather than resolve the page.

To do this we need to create a pipeline processor that inherits from AliasResolver.

1using Sitecore; using Sitecore.Configuration; using Sitecore.Diagnostics; using Sitecore.Pipelines.HttpRequest; using System.Net; using System.Web; using AliasResolver = Sitecore.Pipelines.HttpRequest.AliasResolver; namespace HiMyNameIsTim.Pipelines { public class AliasAsRedirectResolver : AliasResolver { public override void Process(HttpRequestArgs args) { if (!Settings.AliasesActive) { return; // if aliases aren't active, we really shouldn't confuse whoever turned them off } var database = Context.Database; if (database == null) { return; // similarly, if we don't have a database, we probably shouldn't try to do anything } if (!Context.Database.Aliases.Exists(args.LocalPath)) { return; // alias doesn't exist } var targetID = Context.Database.Aliases.GetTargetID(args.LocalPath); // sanity checks for the item if (targetID.IsNull) { Tracer.Error("An alias for \"" + args.LocalPath + "\" exists, but points to a non-existing item."); return; } var item = args.GetItem(targetID); if (database.Aliases.Exists(args.LocalPath) &amp;&amp; item != null) { if (Context.Item == null) { Context.Item = item; Tracer.Info(string.Concat("Using alias for \"", args.LocalPath, "\" which points to \"", item.ID, "\"")); } HttpContext.Current.Response.RedirectLocation = item.Paths.FullPath.ToLower() .Replace(Context.Site.StartPath.ToLower(), string.Empty); HttpContext.Current.Response.StatusCode = (int)HttpStatusCode.MovedPermanently; HttpContext.Current.Response.StatusDescription = "301 Moved Permanently"; HttpContext.Current.Response.End(); } } } }

And patch in in place of the regular Alias Resolver.

1<configuration xmlns:patch="http://www.sitecore.net/xmlconfig/">
2<sitecore> <pipelines>
3<httpRequestBegin> <processor type="HiMyNameIsTim.Core.Pipelines.AliasAsRedirectResolver, LabSitecore.Core" patch:instead="*[@type='Sitecore.Pipelines.HttpRequest.AliasResolver, Sitecore.Kernel']"/> </httpRequestBegin>
4</pipelines> </sitecore>
5</configuration>

The above code is adapted from a solution given by Jordan Robinson but with a bug fixed to stop every valid URL without an alias writing an error to the log file.

Updating the response headers on your 404 Page in Sitecore

A few weeks ago I blogged about how to create a custom 404 Page in Sitecore. Following on from that, one thing you may notice in the response header of your 404 Page is the status code is 200 Ok, rather than 404 Page not found.

When Sitecore can't find a page what actually happens is a 302 redirect is issued to the page not found page, which as its an ordinary page will return a 200 Ok. Thankfully Google is actually quite good at detecting pages a being 404's even when they return the wrong status code, but it would be better if our sites issues the correct headers.

Method 1

The simplest solution is to create a view rendering with the following logic and place it somewhere on your page not found page. This will update the response headers with the correct values.

1@{
2 Response.TrySkipIisCustomErrors = true;
3 Response.StatusCode = 404;
4 Response.StatusDescription = "Page not found";
5}

However personally I don't think this a particularly neat solution. The contents of a view should really be left for what's going in a page rather than interfering with its headers, even if it does have access to the Response object.

Method 2

Rather than using a view my solution is to add some code to the httpRequestEnd pipeline that will check the context items Id against a setting where we will store the Id of the 404 page item in Sitecore and if the two match then update the response header.

The solution will look like this

Pipeline logic

1using Sitecore.Configuration;
2using Sitecore.Data;
3using Sitecore.Pipelines.HttpRequest;
4
5namespace Pipelines.HttpRequest
6{
7 public class PageNotFoundResponseHeader : HttpRequestProcessor
8 {
9 private static readonly string PageNotFoundID = Settings.GetSetting("PageNotFound");
10
11 public override void Process(HttpRequestArgs args)
12 {
13 if (Sitecore.Context.Item != null &amp;&amp; Sitecore.Context.Item.ID == new ID(PageNotFoundID))
14 {
15 args.Context.Response.TrySkipIisCustomErrors = true;
16 args.Context.Response.StatusCode = 404;
17 args.Context.Response.StatusDescription = "Page not found";
18 }
19 }
20 }
21}

Patch config file

1<configuration xmlns:patch="http://www.sitecore.net/xmlconfig/">
2 <sitecore>
3 <pipelines>
4 <httpRequestEnd>
5 <processor
6 patch:after="processor[@type='Sitecore.Pipelines.PreprocessRequest.CheckIgnoreFlag, Sitecore.Kernel']"
7 type="Pipelines.HttpRequest.PageNotFoundResponseHeader, MyProjectName" />
8 </httpRequestEnd>
9 </pipelines>
10 <settings>
11 <!-- Page Not Found Item Id -->
12 <setting name="PageNotFound" value="ID of 404 Page" />
13 </settings>
14 </sitecore>
15</configuration>

What's the TrySkipIisCustomErrors property

Quite simply this stops a scenario where you end up on IIS's 404 page rather than your own. If you don't set this, when you update the header status code to 404, IIS likes to return the page from it's settings rather than continuing with your own.

SEO Friendly URL's in Sitecore

As silly as it seams to the average developer, URL's are an important factor when it comes to SEO. As ridiculous as some of the requirements are (like not having spaces in a URL) they are unfortunately requirements that we have to live with. Here's how to deal with not having upper case letters in a URL, replacing spaces with hyphens and getting rid of that pesky aspx extension.

Removing Spaces from a URL

A space in a URL actually gets translated to %20, which for the average user isn't very readable. I would argue that as well as doing the translation, browsers could actually just hide this fact from users, and Google could also hide it as well. But alas that hasn't happened and the accepted solution is to replace spaces with a hyphen.

Within a patch config file add the following:

1<encodeNameReplacements>
2 <replace mode="on" find=" " replaceWith="-" />
3</encodeNameReplacements>

What this will do is replace every space in an items name with a hyphen as links are rendered. When a request comes into Sitecore it will also replace all hyphens with a space, so that the URL's still resolve.

However this does cause a problem for any items you have that already had a hyphen in them. Sadly the best we can do for this is to stop content editors including hyphens in item names with the following config patch:

1<settings>
2 <setting name="InvalidItemNameChars">
3 <patch:attribute name="value">\/:?&amp;quot;&amp;lt;&amp;gt;|[]-</patch:attribute>
4 </setting>
5</settings>

Make URLs all lower case

Believe it or not URL's are actually case sensitive. Maybe not in the Windows / IIS world, but with Linux and the rest of the web they are. So the simplest solution is to make all the URL's on the site lower case.

Sitecore 6.6 and above

If your using Sitecore 6.6 or above then you in luck, there's a config setting on the linkManager to set all urls to lower case

1<linkManager defaultProvider="sitecore">
2 <providers>
3 <add name="sitecore">
4 <patch:attribute name="lowercaseUrls">true</patch:attribute>
5 </add>
6 </providers>
7</linkManager>

Sitecore 6.5 and below

If you using 6.5 or below you need to do a little more work.

One way is using the same encodeNameReplacements config as we used before and replace every upper case letter in the alphabet with the lower case equivalent.

1<encodeNameReplacements>
2 <replace mode="on" find="A" replaceWith="a" />
3 <replace mode="on" find="B" replaceWith="b" />
4 <replace mode="on" find="C" replaceWith="c" />
5 <replace mode="on" find="D" replaceWith="d" />
6</encodeNameReplacements>

Personally this doesn't seen the nicest solution and I expect will lead to a lot of replace functions being called.

Another solution is to create a class that overrides the Sitecores LinkProvider and simply makes the result of GetItemUrl lowercase

1namespace YourNamespace.Providers
2{
3 public class LinkProvider : Sitecore.Links.LinkProvider
4 {
5 public override string GetItemUrl(Sitecore.Data.Items.Item item, Sitecore.Links.UrlOptions urlOptions)
6 {
7 return base.GetItemUrl(item, urlOptions).ToLower();
8 }
9 }
10}

And then add a patch config to tell Sitecore to use your LinkManager rather than the default.

1<linkManager defaultProvider="sitecore">
2 <providers>
3 <add name="sitecore">
4 <patch:attribute name="type">YourNamespace.Providers.LinkProvider, YourProjectName</patch:attribute>
5 </add>
6 </providers>
7</linkManager>

Getting rid of the aspx extension

By default Sitecore puts a .aspx extension on the end of a url. Changing it is just a config setting:

1<linkManager defaultProvider="sitecore">
2 <providers>
3 <add name="sitecore">
4 <patch:attribute name="addAspxExtension">false</patch:attribute>
5 </add>
6 </providers>
7</linkManager>

Creating a custom 404 Page in Sitecore

Nobody wants to see the standard Sitecore 404 page. Thankfully it's really easy to change the error pages a user is redirected to through some config settings.

Your error pages can be pages in Sitecore or static HTML files. For 404 pages I would normally use a Sitecore page, that way content authors can still manage its content. For an Error Page I would recommend a static html file to avoid issues with the Error page potentially error-ing.

Add these to a patch file and update the urls accordingly:

1<configuration xmlns:patch="http://www.sitecore.net/xmlconfig/">
2 <sitecore>
3 <settings>
4 <!-- ITEM NOT FOUND HANDLER
5 Url of page handling 'Item not found' errors
6 -->
7 <setting name="ItemNotFoundUrl">
8 <patch:attribute name="value">/ErrorPages/404.html</patch:attribute>
9 </setting>
10 <!-- LINK ITEM NOT FOUND HANDLER
11 Url of page handling 'Link item not found' errors
12 -->
13 <setting name="LinkItemNotFoundUrl">
14 <patch:attribute name="value">/ErrorPages/404.html</patch:attribute>
15 </setting>
16 <!-- LAYOUT NOT FOUND HANDLER
17 Url of page handling 'Layout not found' errors
18 -->
19 <setting name="LayoutNotFoundUrl">
20 <patch:attribute name="value">/ErrorPages/404.html</patch:attribute>
21 </setting>
22 <!-- ERROR HANDLER
23 Url of page handling generic errors
24 -->
25 <setting name="ErrorPage">
26 <patch:attribute name="value">/ErrorPages/Error.html</patch:attribute>
27 </setting>
28 </settings>
29 </sitecore>
30</configuration>

These settings are already defined in the web.config file and changing them here will have the same effect, but I recommend adding patch config files as it will make your solution easier to update in the future.

Getting the URL of a Sitecore Item

You may expect a Sitecore Item to contain a property for its URL, however to actually get the URL of an item you need to use the LinkManager class.

There are also a few different options when getting an items URL, such as if you include the language code or not.

The following example gets the URL for an item with no language code and has a path relative to the site it is in. This is useful when your Sitecore instance may have multiple sites running and your home node isn't at the root of the content tree.

1Sitecore.Links.UrlOptions urlOptions = new Sitecore.Links.UrlOptions(); urlOptions.SiteResolving = true; urlOptions.LanguageEmbedding = Sitecore.Links.LanguageEmbedding.Never; string url = Sitecore.Links.LinkManager.GetItemUrl(item, urlOptions);

Bundling and Minification with Sitecore

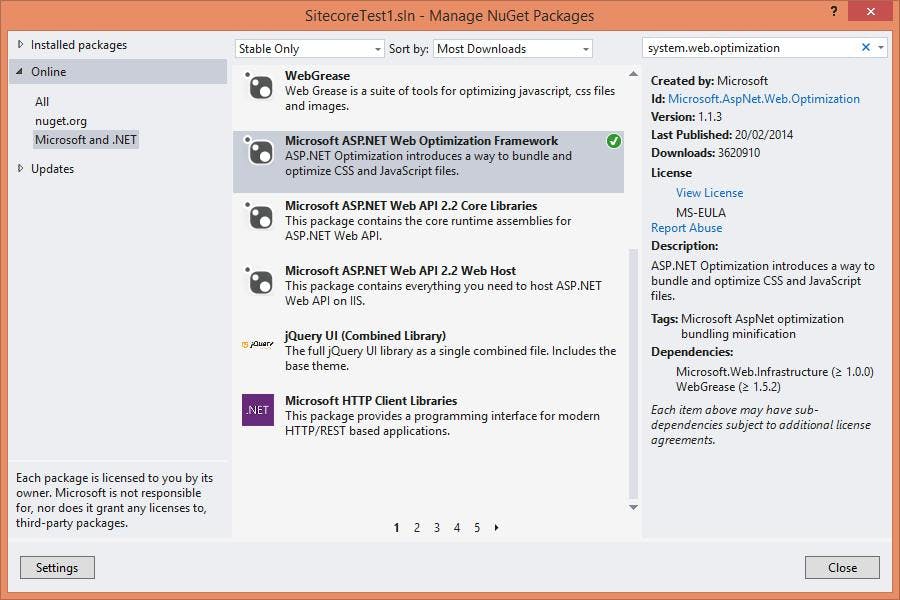
There's various ways to add bundling and minification to a site, but one of the easiest is to use Microsoft's support from the Microsoft.AspNet.Web.Optimization package. This implementation has some great features including:

  • Automatically create the bundles and minify them as files are changed
  • Create unique urls to each version of a bundle to force browser refreshing of the file
  • Debug mode which outputs links to the raw files rather than the bundled minified version

The functionality is also fully compatible with Sitecore. To use it in your Sitecore solution follow these steps:

1. Add Microsoft.AspNet.Web.Optimization to your project from NuGet. This is the package from Microsoft that contains the functionality to do bundling and minification


2. Create your CSS and Javascript bundles. Where you put the logic for this is up to you but it will need to run when the application starts. Outside of Sitecore my main development is on bespoke ASP.NET MVC and Web API projects so I like to organise startup scripts into an App_Start folder and reference it from the Application_Start event in the global ascx file.

If you are running a Sitecore instance with multiple sites or if you do not have direct access to the production config files, it may be better to keep the logic separate and use a pipeline to create the bundles.

My bundle definitions would look something like this

1using System;
2using System.Collections.Generic;
3using System.Linq;
4using System.Web;
5using System.Web.Optimization;
6
7public class BundleConfig
8{
9 public static void RegisterBundles(BundleCollection bundles)
10 {
11 bundles.Add(new ScriptBundle("~/bundles/scripts").Include(
12 "~/Scripts/jquery-{version}.js",
13 "~/Scripts/bootstrap.js"));
14
15 bundles.Add(new StyleBundle("~/bundles/css").Include(
16 "~/Content/bootstrap.css",
17 "~/css/site.css"));
18 }
19}

And in my Global.asax.cs file I would have some logic like this to call the other function

1protected void Application_Start(object sender, EventArgs e)
2{
3 BundleConfig.RegisterBundles(System.Web.Optimization.BundleTable.Bundles);
4}

3. Replace your Javascript/CSS references in your layout or rendering files with a call to render the bundle

Webforms

1<%: System.Web.Optimization.Scripts.Render("~/bundles/scripts") %>
2<%: System.Web.Optimization.Styles.Render("~/bundles/css") %>

MVC

1@Scripts.Render("~/bundles/scripts")
2@Styles.Render("~/bundles/css")

4. In your web.config file there are a couple of changes needed to get things to work.

First you need to set an ignore url prefix to stop Sitecore trying to resolve the URL to the bundle. In this example mine is called bundles (note: you should add the prefix the what is already in your config file. e.g. |/bundles)

1<!-- IGNORE URLS
2 Set IgnoreUrlPrefixes to a '|' separated list of url prefixes that should not be
3 regarded and processed as friendly urls (ie. forms etc.)
4-->
5<setting name="IgnoreUrlPrefixes" value="/sitecore/default.aspx|/trace.axd|/webresource.axd|/sitecore/shell/Controls/Rich Text Editor/Telerik.Web.UI.DialogHandler.aspx|/sitecore/shell/applications/content manager/telerik.web.ui.dialoghandler.aspx|/sitecore/shell/Controls/Rich Text Editor/Telerik.Web.UI.SpellCheckHandler.axd|/Telerik.Web.UI.WebResource.axd|/sitecore/admin/upgrade/|/layouts/testing|/bundles" />
6

Next a dependant assembly binding needs to be set up for Web Grease. Without it you will see an error about the Web Grease version number

1<dependentAssembly>
2 <assemblyIdentity name="WebGrease" publicKeyToken="31bf3856ad364e35" />
3 <bindingRedirect oldVersion="0.0.0.0-1.5.2.14234" newVersion="1.5.2.14234" />
4</dependentAssembly>

If you have done this and are still getting a version number error check the assembly binding tag. Older versions of Sitecore have the applies to property set which may be only applying the bindings to .Net 2 and you may be using .Net 4.

1<assemblyBinding xmlns="urn:schemas-microsoft-com:asm.v1" appliesTo="v2.0.50727">

5. If you are using IIS7 you will also need to make a change in your web.config file

1<system.webServer>
2 <modules runAllManagedModulesForAllRequests="true">
3 </modules>
4</system.webServer>

6. Publish your changes into your Sitecore site. Depending if you have compilation mode set to debug or not you will now either have a bundle reference for all your JavaScript and CSS or the individual file references.

Sitemap XML for Sitecore

The simplest description of a Sitemap is a file that list all the URL’s on a site for a Search Engine to crawl. Traditionally web crawlers would follow links on pages within a site and rely on them to discover new pages and index them. Sitemaps add a layer of intelligence to this by providing a list of URL’s up front and also adding additional metadata such as when the page was last updates, how often it changes and how important the page is.

For more information on Sitemaps have a look at sitemaps.org

Introducing Sitemap XML for Sitecore

Out of the box Sitecore doesn’t provide any built in functionality for auto generating a sitemap, but a good module on the Sitecore Marketplace is Sitemap XML (https://marketplace.sitecore.net/en/Modules/Sitemap_XML.aspx). This module will generate a schema compliant sitemap file in the root of your site on each publish of the site.

There are a couple of issue you might experience when trying to use it:

Publishing Error

Once you’ve installed the module and attempted a full site publish you will likely get an error like this…

1Job started: Publish to 'web'|Items created: 0|Items deleted: 0|Items updated: 78|Items skipped: 15877|#Exception: System.Reflection.TargetInvocationException: Exception has been thrown by the target of an invocation. ---&gt; System.NullReferenceException: Object reference not set to an instance of an object.
2 at Sitecore.Modules.SitemapXML.SitemapManager.BuildSiteMap(String sitename, String sitemapUrlNew)
3 at Sitecore.Modules.SitemapXML.SitemapManager..ctor()
4 at Sitecore.Modules.SitemapXML.SitemapHandler.RefreshSitemap(Object sender, EventArgs args)
5 at Sitecore.Events.Event.EventSubscribers.RaiseEvent(String eventName, Object[] parameters, EventResult result)
6 at Sitecore.Events.Event.RaiseEvent(String eventName, Object[] parameters)
7 at Sitecore.Publishing.Publisher.NotifyEnd()
8 at Sitecore.Publishing.Publisher.Publish()
9 --- End of inner exception stack trace ---
10 at System.RuntimeMethodHandle.InvokeMethod(Object target, Object[] arguments, Signature sig, Boolean constructor)
11 at System.Reflection.RuntimeMethodInfo.UnsafeInvokeInternal(Object obj, Object[] parameters, Object[] arguments)
12 at System.Reflection.RuntimeMethodInfo.Invoke(Object obj, BindingFlags invokeAttr, Binder binder, Object[] parameters, CultureInfo culture)
13 at System.Reflection.MethodBase.Invoke(Object obj, Object[] parameters)
14 at (Object , Object[] )
15 at Sitecore.Pipelines.CorePipeline.Run(PipelineArgs args)
16 at Sitecore.Jobs.Job.ThreadEntry(Object state)

Going by the comments on the Sitecore marketplace this happens to quite a lot of people and unfortunately the limited documentation for the module doesn't explain the cause.

When you install the module it will create a config file called SitemapXML.config within App_Config\Include. By default that config will have the following 2 lines:

1<site name="website_1" filename="sitemap1.xml" serverUrl="www.site1domain.com" />
2<site name="website_2" filename="sitemap2.xml" serverUrl="www.site2domain.com"/>

These websites don't exist which is what causes the error. So to fix simply change the name of your website and the URL can be left blank. e.g.

1<site name="website" filename="sitemap.xml" serverUrl="" />

Multiple Server Setup

If you're Sitecore installation is using separate servers for content management and content delivery you'll notice that your only generating sitemaps on your content management server.

To set up your content delivery server to start generating the files update the event node in the config file from

1<event name="publish:end">

to

1<event name="publish:end:remote">

and also make sure you have both the SitemapXML.dll file and config file on your content deliver server.