Tag: Logging
Logging with .net core and Application Insights

Logging with .net core and Application Insights

When you start builing serverless applications like Azure functions or Azure web jobs, one of the first things you will need to contend with is logging.

Traditionally logging was simply achieved by appending rows to a text file that got stored on the same server your application was running on. Tools like log4net made this simpler by bringing some structure to the proces and providing functionality like automatic time stamps, log levels and the ability to configure what logs should actually get written out.

With a serverless application though, writing to the hard disk is a big no no. You have no guarantee how long that server will exist for and when your application moves, that data will be lost. In a world where you might want to scale up and down, having logs split between servers is also hard to retrieve when an error does happen.

.net core

The first bit of good news is that .net core supports a logging API. Here I am configuring it in a web job to output logs to the console and to Application insights. This is part of the host builder config in the program.cs file.

1//3. LOGGING function execution :
2//3 a) for LOCAL - Set up console logging for high-throughput production scenarios.
3hostBuilder.ConfigureLogging((context, b) =>
4{
5 b.AddConsole();
6
7 // If the key exists in appsettings.json, use it to enable Application Insights rather than console logging.
8 //3 b) PROD - When the project runs in Azure, you can't monitor function execution by viewing console output (3 a).
9 // -The recommended monitoring solution is Application Insights. For more information, see Monitor Azure Functions.
10 // -Make sure you have an App Service app and an Application Insights instance to work with.
11 //-Configure the App Service app to use the Application Insights instance and the storage account that you created earlier.
12 //-Set up the project for logging to Application Insights.
13 string instrumentationKey = context.Configuration["APPINSIGHTS_INSTRUMENTATIONKEY"];
14 if (!string.IsNullOrEmpty(instrumentationKey))
15 {
16 b.AddApplicationInsights(o => o.InstrumentationKey = instrumentationKey);
17 }
18});

Microsofts documentation on logging in .NET Core and ASP.NET can be found here.

Creating a log in your code is then as simple as using dependency injection on your classes to inject an instance of ILogger and then using it's functions to create a log.

1public class MyClass
2{
3 private readonly ILogger logger;
4
5 public MyClass(ILogger logger)
6 {
7 this.logger = logger;
8 }
9
10 public void Foo()
11 {
12 try
13 {
14 // Logging information
15 logger.LogInformation("Foo called");
16 }
17 catch (Exception ex)
18 {
19 // Logging an error
20 logger.LogError(ex, "Something went wrong");
21 }
22 }
23}

Application Insights

When your application is running in Azure, Application Insights is where all your logs will live.

What's great about App Insights is it will give you the ability to write queries against all your logs.

So for instance if I wanted to find all the logs for an import function starting, I can write a filter for messages containing "Import function started".

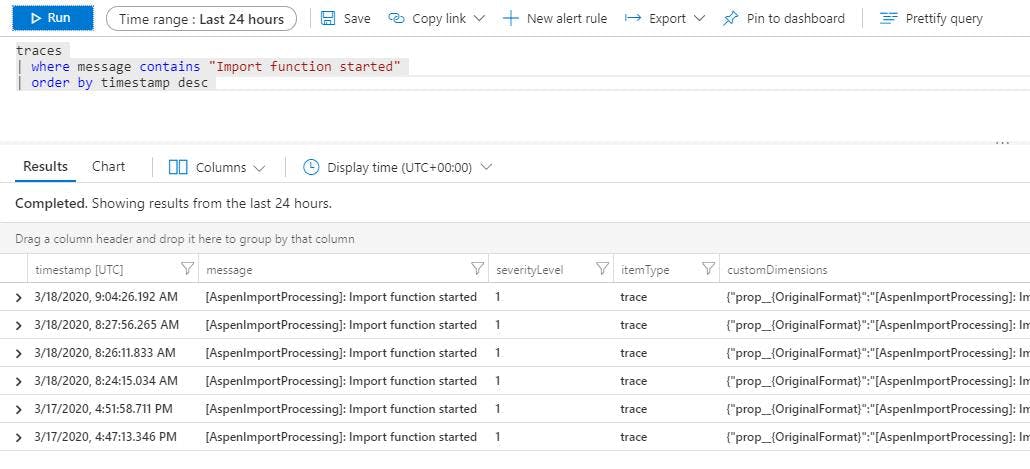
Queries can also be saved or pinned to a dashboard if they are a query you need to run frequently.

For all regular logs your application makes you need to query the traces. What can be confusing with this though is the errors.

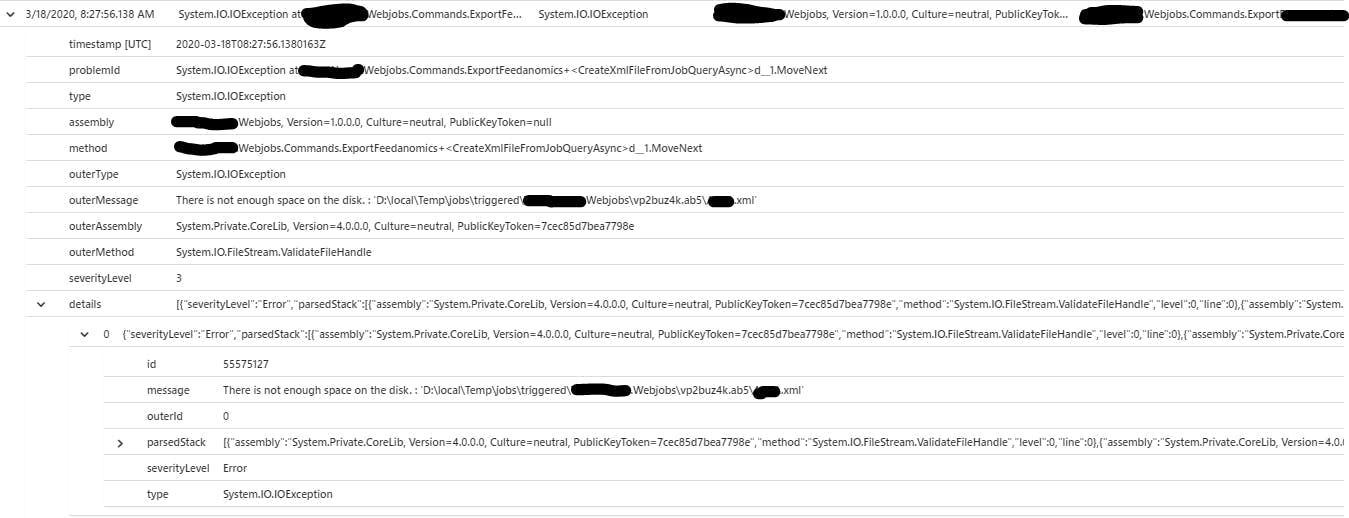
With the code above I had a try catch block and in the catch block I called logger.LogError(ex, "Something went wrong"); so in my logs I expect to see the message and as I passed an exception I also expect to see an exception. But if we look at this example from application insights you will see an error in the traces log but no strack trace or anything else from the exception.

This is just the start of the functionality that Application Insights provides, but if your just starting out, hopefully this is a good indication not only of how easy it is to add logging to your application, but also how much added value App Insights can offer over just having text files.

Sitecore Logging

Sitecore Logging

One of the advantages of using a platform like Sitecore over completely bespoke development, is the number of features that are built-in that day to day you completely take for granted. An important one of those is logging.

If you're building a bespoke application, adding some sort of support for generating log files can be a bit of a pain. Granted there are solutions that can be added to your project that do most of the lifting for you, but you still need to think about it, decide which to use and understand how to use it. With Sitecore the ability to write to a log file has been built in along with the logic that's going to delete old log files and stop your servers hard disk filling up. Under the hood Sitecore is using Log4Net to generate log files, a side effect of this is that config changes can not be made using patch files.

Logs are written to the logs folder within your data folder. If your on Sitecore 8.2 or below this will be adjacent to your website folder. If your on Sitecore 9 or using Sitecore PaaS this will be in the App_Data folder within your sites folder.

The different log files

Sitecore generates 6 different log files while it's running, these are:

Log - A general log file which you can write to
Crawling - Logs from the Sitecore Search Providers for crawling
Search - Logs from the Sitecore search providers for searches
Publishing - Logs generated during Sitecore publishes
FXM - Logs from federated experience manager
WebDAV - A log for WebDAV activity

Customizing the amount of detail

At different times you will likely want to see a different amount of detail in your log files. For instance on a production server you will want to keep logs to a minimum to maximise performance. However in a different environment where you are trying to debug an issue you would want all the logs you can get.

For this reason when writing a log a priority level is assigned and each log file can be configured to only write logs at a certain level or below to disk.

Priority levels are:

  1. DEBUG
  2. INFO
  3. WARN
  4. ERROR
  5. FATAL

To configure what level of logging should be output, configure the priority value in the log4net section of the web.config file.

1<log4net>
2 <appender name="LogFileAppender"
3 type="log4net.Appender.SitecoreLogFileAppender, Sitecore.Logging">
4 <file value="$(dataFolder)/logs/log.{date}.txt" />
5 <appendToFile value="true" />
6 <layout type="log4net.Layout.PatternLayout">
7 <conversionPattern value="%4t %d{ABSOLUTE} %-5p %m%n" />
8 </layout>
9 </appender>
10 <root>
11 <priority value="INFO" />
12 <appender-ref ref="LogFileAppender" />
13 </root>
14</log4net>

Writing to the log file

Writing to the log file is super easy to do from within your Sitecore application. The Sitecore.Diagnostics.Log class contains static functions to write to the general log file at different priority levels.

1// Writes a log at the error priority level
2Sitecore.Diagnostics.Log.Error("That wasn't meant to happen", this);

IIS Where are my log files?

This is one of those things that once you know is very very simple, but finding out can be very very annoying.

IIS by default will store a log file for each site that it runs. This gives you valuable details on each request to the site that can help when errors are being reported by users.

When you go searching for them your initial thought may be to go to IIS and look at the site you want the files for. There you will see an item called logging. Excellent you think, this will tell you all you need to know.

There's even a button saying "View Log File...", but once you click it you realise things aren't so simple. The link and folder path on the logging page both take you to a folder, containing more folders. In those folders are the logs, but there's a folder for each site in IIS and they've all got a weird name. How do you know which folder has the log files for the site you want?

Back on the IIS logging screen there's nothing to say which folder the files will be in. There isn't any indication anywhere.

The answer however is very easy. Each folder has the Site ID in its name. You can find the Site ID for your site in IIS either by looking at the sites list

or clicking on a site and clicking advanced settings