Tag: Team City
What are automated deployments and why do I need them?

What are automated deployments and why do I need them?

When your working on a new website build as either the marketer responsible for the site or the project manager overseeing it’s build, some of the most frustrating tasks to be using up your budget can originate from the IT team and come under the category of setup.

They can suck days even weeks from a project but offer no visible features or benefit to the end user, worse still they often need to come at the start of a project which for people wanting to see a design turn into a webpage just feels like a delay and lack of progress.

Manual Deployments

So, what are automated deployments and why are they worth it? Well first let’s examine what a deployment is to begin with.

When a change or new feature is ready to be built for a site, it will have been turned into a specification and handed over to a development team to build. The developers will then write some code and test it on their local machines, they may even demo it to someone else. At some point though, that work needs to get from their machine to the server(s) it runs on so that other people like QA can see it without using the devs machine. Typically, there will be 3 server environments set up for a website:

  1. Dev / Test – An environment used by the developers and QA to build, test and refactor new features and fixes.
  2. UAT / Staging – An environment used by the website owners / stakeholders that the features have been deployed to for review and approval before they are deployed into production.
  3. Production – The live website that is accessible over the internet.

In a manual deployment setup, the developer is responsible for copying the website into each of the environments. This will generally involve:

  1. Getting the version of code to be deployed from source control.
  2. Publishing a build of the site locally (some languages need to be compiled into machine code, and most modern websites will run a task on the CSS and JavaScript to obfuscate and reduce the file size).
  3. Login to databases and run any scripts to update the database.
  4. Login to the web servers using something like a remote desktop client.
  5. Copy and Paste the new files onto the server.
  6. Make some sort of record that the deployment has been done and what it included.

As you can probably guess each of these steps is prone to human error; What if the developer gets the wrong version from source control? What if they overwrite the wrong folder? What if they miss the database changes? What if they don’t record the deployment, how can we be sure what version is on an environment?

Not only that but it’s also a lengthy task for someone to do. Some parts are just waiting for a code publish to complete or a file copy to finish. For the odd production deploy with a decent checklist this might not be so bad, but for iterating work into QA this can not only make QA fails for minor things really costly to fix, but also result in bundling more and more changes together to cut down the number of releases which then reduces the flow of work feeding into QA and slows the pace at which features can be developed and released.

A Better Way

Now we understand the issues, we certainly don’t want that as a cost throughout the lifetime of our site, so how do we avoid it?

Well, automated deployments quite simply take all these manual steps, automated them with a few bonuses on top. By doing this we remove all the elements of human error and are left with consistent results each time.

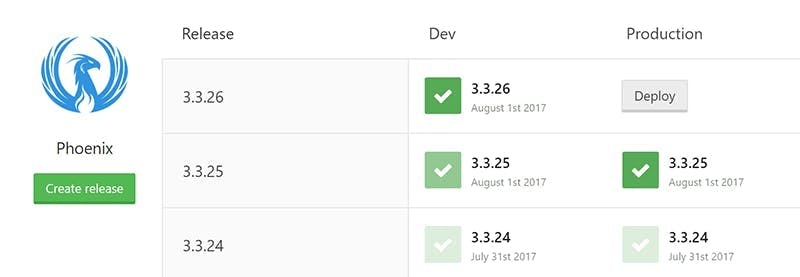
There’s two parts to an automated pipeline, the first is build and the second is release.

The build part relates to the first 2 steps of our manual process. We need to get the code from source control and then publish it. Once we’ve done this, we are left with a build that we can assign a release number to. By automating it we’ve also ensured that the build happens the same way each time rather than any differences between developers’ machines being. At this point we can also start detecting build failures and include some automated testing to pick up on errors before even involving QA.

The release part relates to the remaining steps of the manual process. First of all the process of copying files and running scripts now becomes one large script that won’t miss a step and in addition to that, now we have build numbers we can see which build is on each environment and only promote the one we want to the next environment. Because we’re promoting builds rather than doing the whole build process again, we’re also ensuring that the build going to production is the exact same thing that was tested on QA and then reviewed on UAT. With some clever integrations with things like GitHub and Jira we can also automated release notes to say what was included in each of the releases.

Degrees of Automation

It worth noting at this point that there are different degrees of automation and this will greatly affect the cost of setup.

As well as automating the deploy of code, we could also automate the entire server setup through the use or ARM templates in Azure. Different levels of automated testing can be implemented from very low code coverage to very high; a test could even be what the level of code coverage is.

Automation could also extend to include load balancers for green / blue deployments where zero downtime of the site is achieved by using multiple production servers and switching between them while files are being copied.

Is this the CI and CD thing I’ve heard about?

Two terms I deliberately haven’t used in this article is Continuous Integration (CI) and Continuous Delivery (CD) and that’s because although automated deployments forms part of achieving them they are not the same thing and it’s worth knowing how they differ.

Continuous Integration related to the build part of the automated setup and aims to deal with issues arising from multiple developers working on a project. When more than one developer works on a copy of a website locally, both sets are changing in different way to what is contained within source control. The longer this goes on for the bigger the differences get and the harder it will become to merge again. Continuous Integration advocates shortening the gaps between merges to as shorter time as possible, potentially multiple time per day. By having automated tools in place to run a build whenever this happens, issues can be identified as early as possible.

Continuous Delivery relates more to the release aspect of the automated setup and is an aim to be constantly delivering / deploying updates to a solution as fast as possible. By doing this, deployments become trivial and smaller updates are delivered at a much faster pace rather that being queued for one big release. Automation helps make this a reality by removing many of the manual time consuming tasks that are repetitive.

Bundling with Gulp in TeamCity

Bundling with Gulp in TeamCity

Like most, our front end developers write CSS in LESS or SASS and then use Gulp to compile the result. This is great but up until recently both the compiled and source style files would end up in our source control repository.

While this isn't a major issue it was more of an annoyance factor when doing a merge that the compiled file would need to be merged as well as the source files. Any conflicts in bundled/minified files also can become problematic to solve. As well as this it also just seems wrong to have both files in a repo, effectively duplicating the file. After all we wouldn't put compiled dll's into a repo with their source.

Our solution was to get the build server to start running the gulp tasks to produce the bundled files.

Step 1 - Install Node on the build server

To start we need NodeJS installed on the build server. This allows extensions to be installed via NPM (Node Package Manager), it's a similar thing to NuGet,

Step 2 - Install the TeamCity plugin for NodeJS

To add built steps for Node and Gulp we need to install a plugin to make them available. Lucking there is one that does such a thing here https://github.com/jonnyzzz/TeamCity.Node

The actual build of the plugin you can download from Jetbrains team city here https://teamcity.jetbrains.com/viewType.html?buildTypeId=bt434. Just login as guest and then download the latest zip from the artifacts of the last build.

To install the plug you need to copy the zip to Team City's plugin folder. For me this was C:\ProgramData\JetBrains\TeamCity\plugins, if your having trouble finding your's just go to Administration > Global Settings in Team City and it will tell you the data directory. The plugin folder will be in there.

Restart the TeamCity server and the plugin should now show under Administration > Plugins List

Step 3 - Add a NPM Setup build step

The NPM step with a command of install will pick up dependencies and get the files.

Step 4 - Add a Gulp build step


In your gulp step add the path to the gulp file and the tasks in your gulp file that need to be run. I'm using a gulp file that our front end devs had already created for the solution that contained as task for bundling css and another for bundling js.

Step 5 - Including bundled files in a MSBuild

As the bundled files are no longer included in our Visual Studio solution it also means that they arn't included in the set of files which will be included in a publish when MSBuild runs.

To overcome this update the .csproj file with a Target with BeforeTargets set to BeforeBuild and list your bundled files as content. In my example I'm included the whole Content\bundles folder

1<Target Name="BundlesBeforeBuild" BeforeTargets="BeforeBuild">
2<ItemGroup>
3<Content Include="Content\bundles\**" />
4</ItemGroup>
5</Target&gt;
The importance of build numbers

The importance of build numbers

If I were to make a prediction, I would say that build numbers are something that are rarely treated as being important in the agency world of web development. That's not to say milestone releases aren't given names like "Phase 2", "August Release" or a major feature name, but every build / release of a project in between, I'd sense largely have build numbers either ignored or never created.

It's also easy to see why, after all it's not like we're producing software that's going out to the masses to be installed. The solution is essentially just ending up having 1 install on a set of servers. When a new version is built, that replaces everything that came before it and if a bug is found we generally roll forward and fix the bug rather than ever reverting back.

Why use build numbers?

So when we're constantly coding and improving applications in an agile world why should we care about and use build numbers?

To put it quite simply its just an easy way to identify a snapshot of code that could have actually have been built and then released to a server. This becomes hugely useful in scenarios such as:

  • A bug being reported by an end user
  • An issue being identified by some performance monitoring
  • An issue being picked up in some functionality further on from the site. e.g. in an integration

Without build numbers the only way to react to these scenarios is to look at commit dates in source control or manual release notes that may have been created to try and work out where an issue may have been created and what changed at that time. If the issue had subsequently been fixed you also can't really give a version description when it was fixed other than a rough date.

Other advantages of build numbers can include:

  • Being able to reference a specific version that has been pen tested
  • Referencing a version that's been tested with integrations
  • Having approval to release a specific version rather than just the latest on master
  • Anywhere you want to have a conversation referencing releases

Build numbers for deploys

The first step to use build numbers and with the rise in CI, possibly the one thing most people are doing is to start creating build numbers via a build server. By using any type of build server you will end up with build numbers. This instantly gives you a way to know when a build was created and what commits were new within the build.

Start involving an automated deployment setup either using your build server or with other tools like Octopus Deploy and you will now start to get a record of when each build was deployed to each server.

Now you have an easy way to not only reference what build was on each environment and when through the deploy history, but also a way to see what went into a build through the build servers change log.

Tag builds in source control

Being able to see the changes that went into each build on your build server is all very good, but it's still not an ideal situation for finding the exact code version a build relates to.

Thankfully if your using Team City it's really easy to set it up to create a tag in your source control with each build number. Simply go to the build features section of your projects configuration and add a feature called "VCS Labeling". This is a step that happens post build in the background and will create a tag in source control including the build number. It has lots of other configuration options, so if you need different tag formats for different branches its got you covered.

If your using GitHub once this is turned on you will be able to see a list of all the tags in the releases section.

Update Assembly info

Being able to identify a build in source control and view a history of what should have been on a server at a particular time is all very good, but its also a good idea to be able to easily identify a build for a published version of code. That way just by looking at the code on a server you can tell which build version it is, and not rely on your deployment tool to be correct.

If your using Team City this also also made super simple through a build feature called "Assembly info patcher". When using this the build number will automatically get patched in without having to edit AssemblyInfo.cs.

Conclusion

By following these tips you will now be able to identify a version by looking at the published code, see a history of when each version was not only built but also released to each environment and also have an easy way to find the exact source for that build.

The build number can then be used in any conversations around when a bug was introduced and also be referenced in release notes so everyone can keep track of what versions included what fix's in a simple to understand format.

Sitecore Continuous Integration with Team City and TDS

There are a lot of articles around on how to do automated deployments / continuous integration with Sitecore, which if you're new to the tools will likely leave you slightly baffled. This article will hopefully show you exactly what you need to do and explain why.

Solution Overview

  1. TDS is used by developers to serialize their Sitecore item changes and push them into source control
  2. Team City is used to detect the changes and run a build script
  3. Team City uses Web Deploy to push the code changes to the web server
  4. Team City calls MSBuild which will trigger TDS which is installed on the server to deploy Sitecore items to the destination server

Prerequisites

  • You have a build server with Team City installed and know how to set it up to do a web deploy
  • You are already using TDS and have your Sitecore items serialized in source control
  • Essentially you know how to do the first 3 steps and just need help with Step 4

Step by Step

UNC Share

On your web server you need to set up a UNC Share on your website's folder. When TDS does a deploy it will install a web service on your website through this share, do the item deployment and then remove the web service again.

The share needs to give permission to the user that your Team City Build Agent runs as. To find out which user your Build Agent is using:

  1. open the list of services and find TeamCity Build Agent in the list
  2. right click and select "Properties"
  3. in the "Log On" tab you will be able to see which Windows User is being used

Team City Config

In your Team City's build configuration settings for your project, add a new build step with the following config:

Runner Type: MSBuild
Step Name: Publish TDS Items (or some other identifier)
Build file path: Path to your projects .sln file
Command line parameters:

  • SitecoreDeployFolder: TDS will use this file path to install a web-service on your site to publish the items through.
  • SitecoreWebUrl: This is the url of the site you are going to update. TDS will use this when it tries to call the web service it installed.
  • IsDesktopBuild: false
  • GeneratePackage: false
  • RecursiveDeployAction: Delete
1/p:IsDesktopBuild=false;GeneratePackage=false;RecursiveDeployAction=Delete;SitecoreWebUrl=URL OF SITE;SitecoreDeployFolder=&amp;quot;UNC PATH TO YOUR SITECORE SITE&amp;quot;

Setting the command line parameters here will take precedence over any that have been included in your TDS projects solution file (which are liable to be overwritten by a developer).

That's it!

It's that easy. If you run your build script now your items should all be published to Sitecore.

Alternatives

This certainly isn't the only way to setup automated deployments and nor is it without issues. The fact a share needs to be set up between the Web Server and the Build Server, could cause an issue with security and may just not be possible if you're using a cloud server.

Rather than using TDS to deploy the Sitecore items you could use TDS to create a .update package. These would normally be installed through an admin webpage (not great for CI) but there is an open source project called Sitecore Ship that will expose a REST endpoint for the package to be posted to. Brad Curtis has written an excellent guide to this setup here (http://www.bradcurtis.com/sitecore-automated-deployments-with-tds-web-deploy-and-sitecore-ship/), however at the time of writing Sitecore Ship isn't compatible with Sitecore 7.5 or 8.

Another alternative to installing the update package is to use the TDS Package Installer. This is a tool Hedgehog provide alongside TDS for installing the update package. In this scenario you would need the tool installed on your web server and some way to call it. Jason Bert has written a setup guide for this example (http://www.jasonbert.com/2013/11/03/continuous-integration-deployment-with-sitecore/) however as well as Team City, you will also need Octopus Deploy to call the package installer. Octopus Deploy works by having what it calls Tentacles on each server you deploy to, making it easy to set up scripts to call programs on that server.

Sticking with the example using just TDS, you could also use TDS to deploy the solutions files as well as Sitecore items rather than using Web Deploy. However the downside here is that TDS is unable to modify your Web.Config file, which is one reason to stick with Web Deploy.