Tag: Automated Deployments
Automated Deployments with Sitecore Managed Cloud

Automated Deployments with Sitecore Managed Cloud

I think it's fair to say automated deployments are a fairly standard practice at this point, long gone are the days when we would remote onto a server and copy some files over.

However when you get your shiny new Sitecore managed cloud environment, unlike other cloud offerings it doesn't come with any automated deployments setup for you. Which to be frank is a bit of a let down. Getting one setup though isn't the hardest thing in the world.

A few requirements we're after:

  1. Deployments should be a button click, no copying and pasting files.
  2. Deployments should get promoted through multiple environments. e.g. Test, Staging and Production.
  3. Deployments should be gated and approved to be released.
  4. There shouldn't be any downtime during the deployment.

So lets dive in.

Azure Devops

The first thing to note, is that Sitecore Managed Cloud is essentially vanilla Microsoft Azure with Sitecore setup on it. As a developer or devops engineer you get given a regular login to the Azure portal and as far as I've seen there's nothing specifically Sitecore about it.

This means however you would normally deploy other things to Azure will work perfectly well for Sitecore. My preference is to use Azure Devops as being from Microsoft it fits really well into the Azure ecosystem.

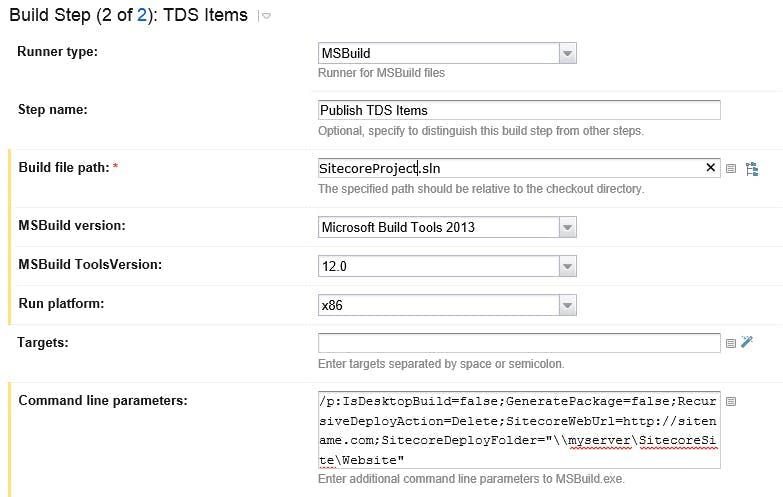
To do this, first off sign up for Azure Devops, get a pipeline created that compiles your solution and outputs it to an artifact. I'm going to skip past all the details on how you do this as it's not specific to managed cloud and at this point lots of people have written articles on how to do it, there's also a high chance your solution is already doing this. If not then go Google it :)

Release Pipeline

To do a release we need a release pipeline. Unlike build pipelines which control a build and are written in yaml, release pipelines control a release and are created through a UI. With these you can configure the different steps, add gates, configure variables, everything you need for a release.

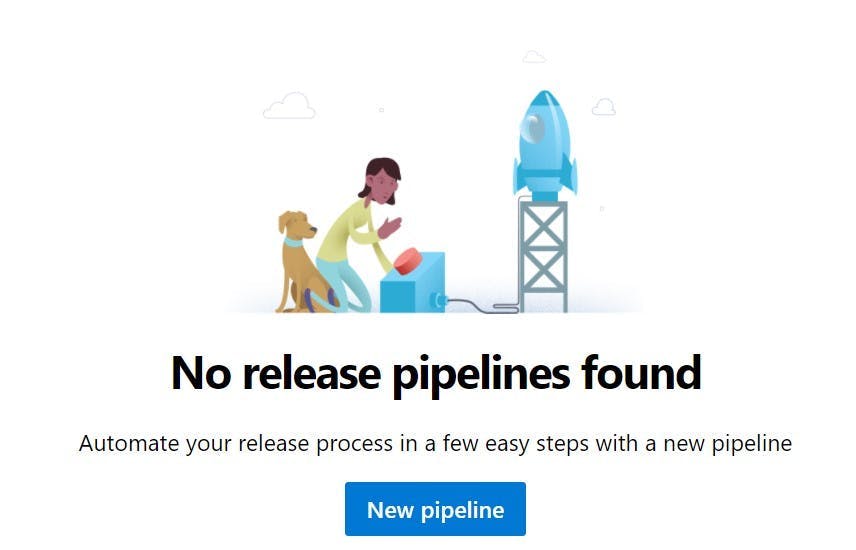
Once you've got a Devops project and your solution compiling, the next step is to create a release pipeline. So head onto the release pipeline section and click the big blue button to make your first pipeline.

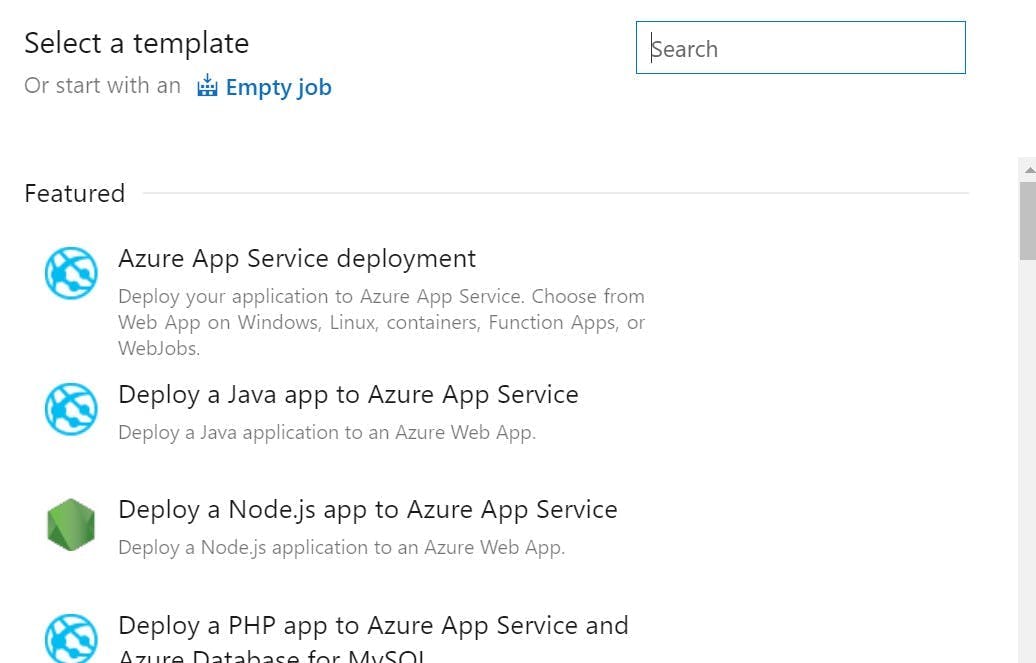
Sitecore Managed Cloud runs Sitecore as Azure App Services, so you will want to pick the Azure App Service deployment template.

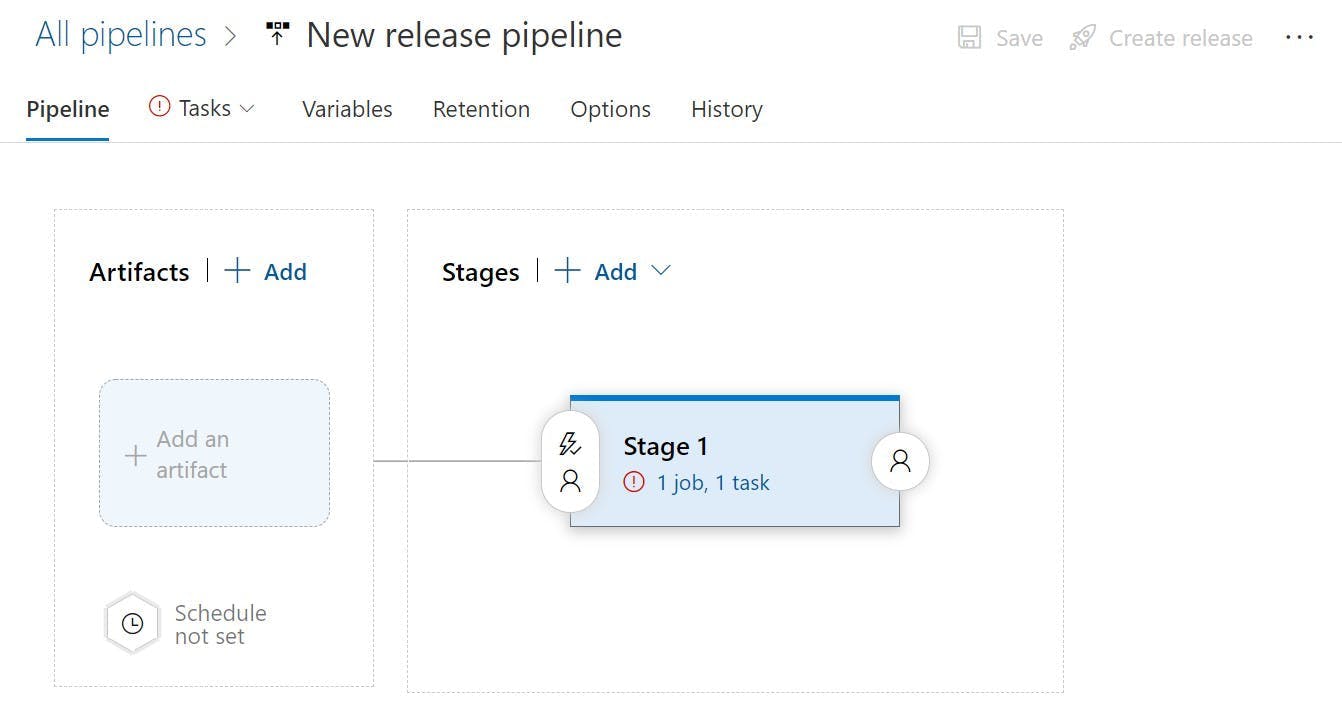
This template will create a stage with a job, but before it can release anything it needs an artifact to deploy.

Click the Add an Artifact button and pick the artifact from your build. On the artifact you can now click a lightening bolt icon to set up continuous deployment triggers. From here you can set the release to run whenever there is a new build on your master / main branch.

The deployment stage will also need some details completing so click into that next.

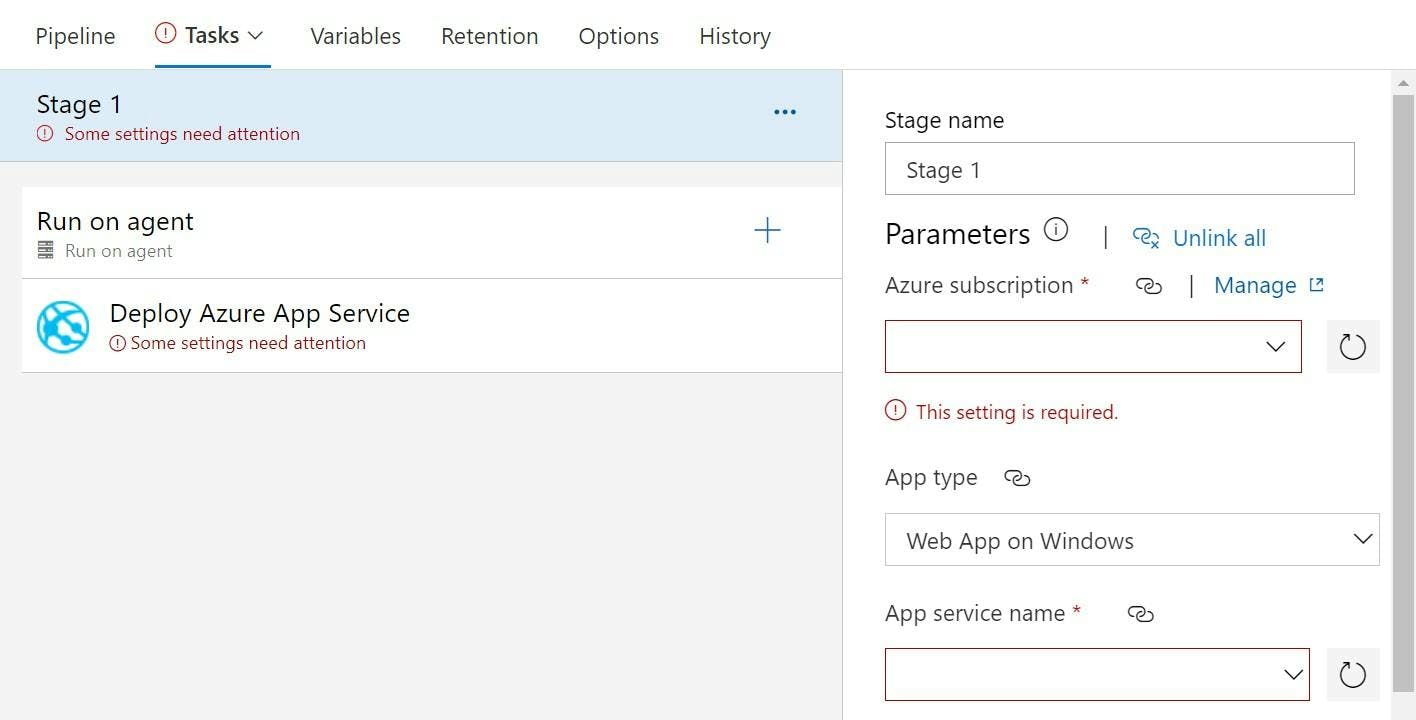
Now when you try to pick the Azure subscription for Sitecore Managed Cloud, you will likely get an error saying Failed to create an app in Azure Active Directory. Error: Insufficient privileges to complete the operation. Ensure that the user has permissions to create an Azure Active Directory Application.

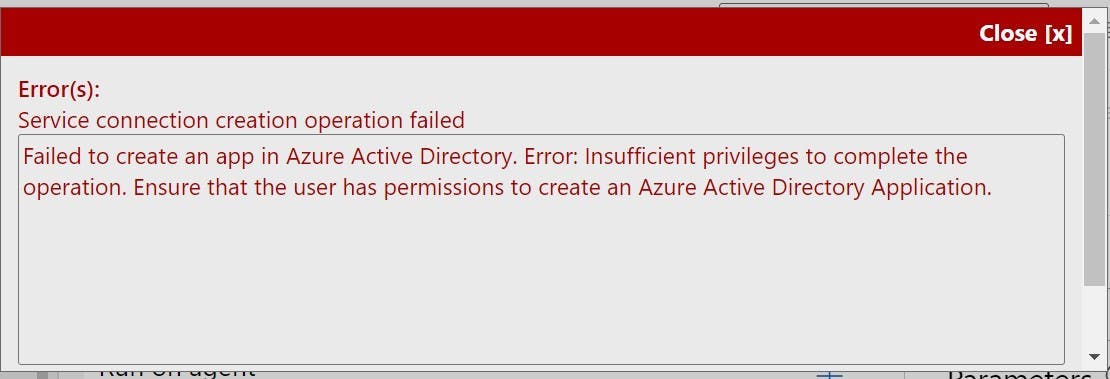
Don't worry, you can't solve this on your own, but Sitecore Support can fix it for you. To get Azure Devops connected to the azure subscription you need a service principal setup. They will know what you mean and send you a service principal id and key.

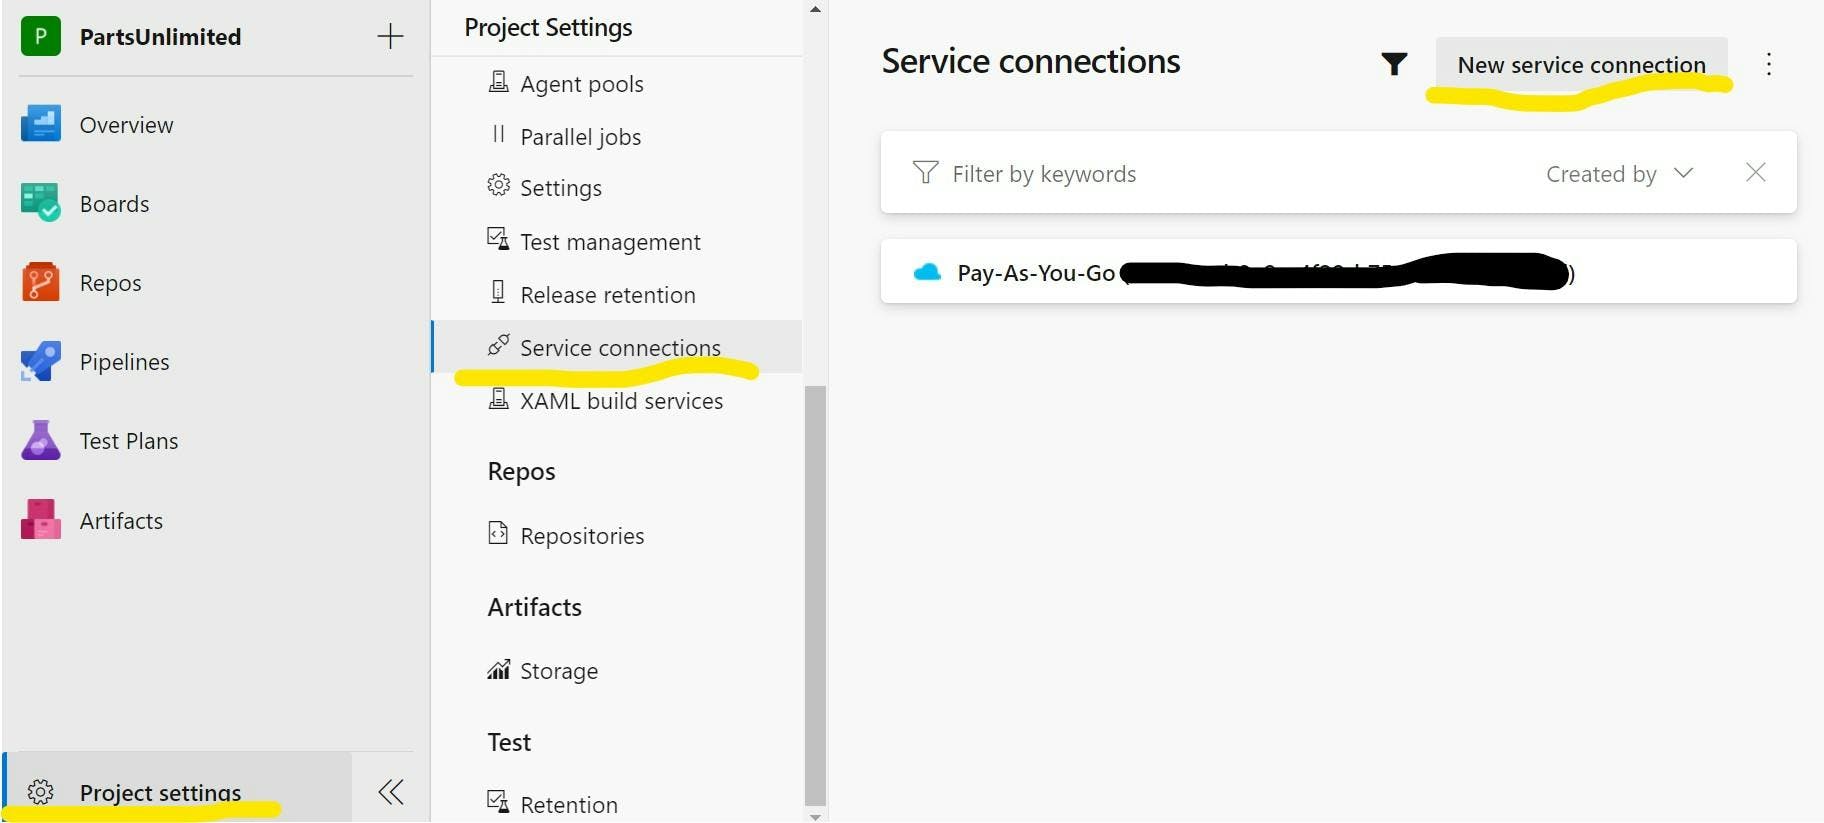
To setup the service principal go to, Project Settings > Service Connections > New Service Connection.

Pick Azure Resource Manager.

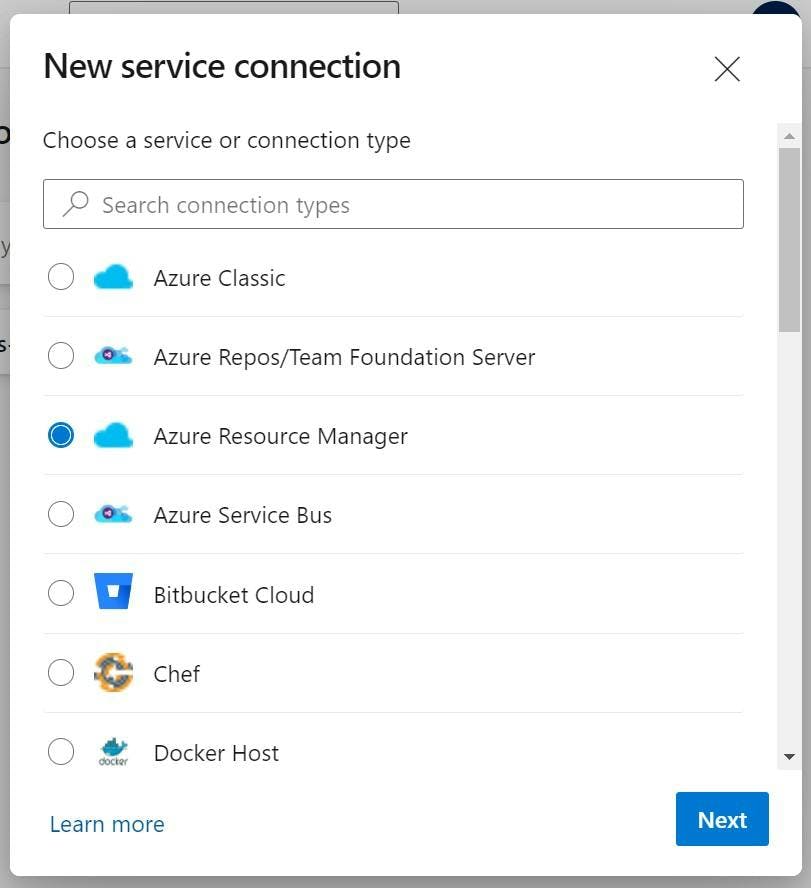
And Service Principal (manual).

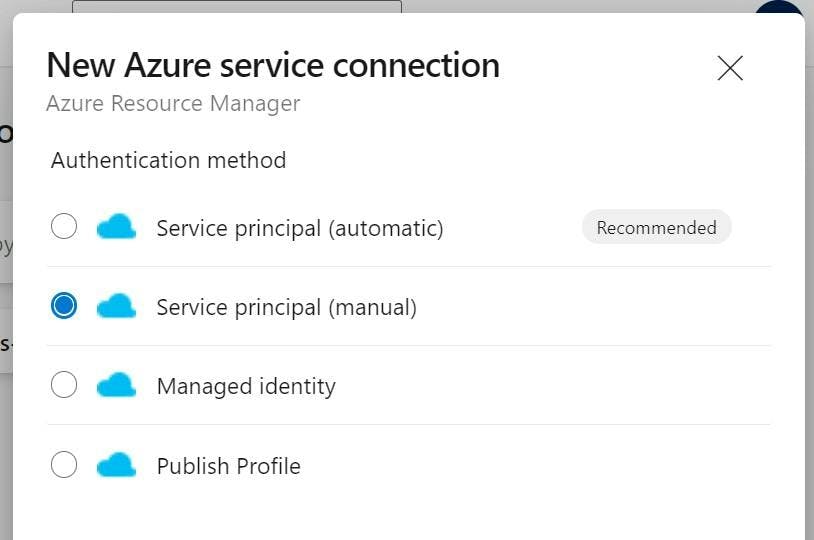
Enter the details and you'll have a connection into Sitecore Managed Cloud.

Back in the release pipeline you can now select the Azure subscription and App service name. Run the pipeline and your solution will deploy.

You now have a solution deploying to the Azure App Service. Some things to note:

1. This process does not delete any files already on the target machine. This is intentional as with managed cloud the files have a split responsibility. Sitecore installs Sitecore and manage the SSLs which include config file changes, none of which will be in your source control. You however are doing everything else.

2. Right now whenever you deploy the site will experience downtime as there no concept of green / blue deployments setup.

Blue / Green Deployments

One of the great things about using Azure App Services is all the infrastructure stuff like load balancers, multiple instances etc is done for you. If you want to scale horizontally and add instances, you just move a slider and all the deployments and load balancing is done for you.

If you want to do a blue / green deployment that can be done for you using slots.

Creating an App Service Deployment Slot

To create a slot navigate to the app service you are deploying to, and select Deployment Slots on the left nav.

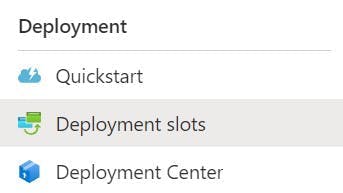
Click Add Slot, give it a name. e.g. staging and choose to clone the settings from the existing default slot.

You will now have a second slot that can be deployed to and then swapped to be the live one. When slots are swapped the application is warmed up first meaning no downtime when the slot happens.

However although you copied the settings from the original slot, your staging slot won't have an application on it yet and as your source control won't contain the whole of Sitecore, you will need to copy it from the existing slot.

Connecting to Deployment Slots with FTP

The easiest way to setup the slot with the base files is to copy them with FTP. To get the FTP details select one of the slots from the slots list and then select Deployment Center in the left nav.

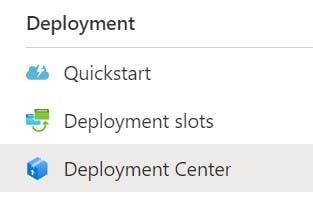
Now in the top nav, select Deployment Credentials.

A panel will now show giving you the FTP details.

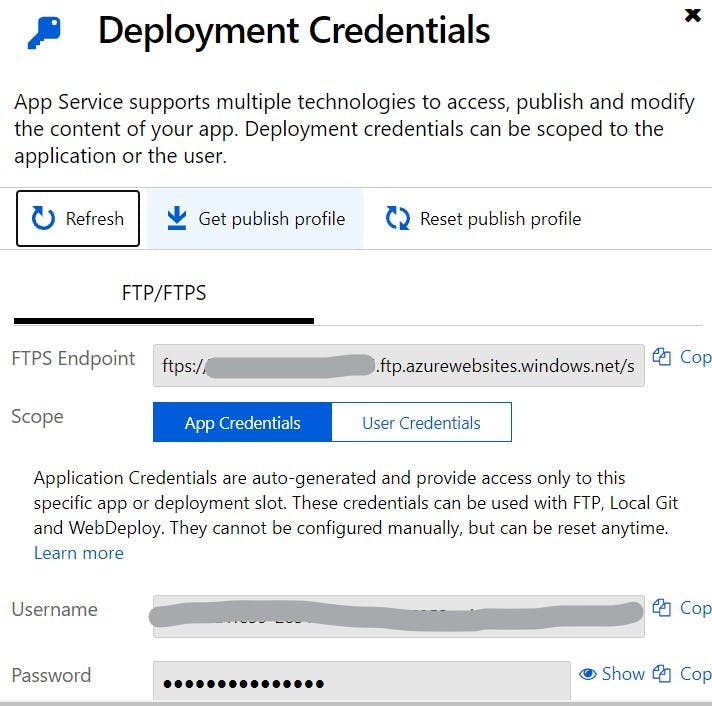
Repeat this with the other slot and you now have the details to be able to FTP to the different environments and copy the contents from one to the other.

Configuring Azure Pipelines to deploy to a slot

The last thing on our list is to start deploying to the slot and then swapping the slot to achieve no downtime.

Within Azure Devops navigate back to the release pipeline and edit the pipeline. Go into the job/task and select the Deploy Azure App Service task. Under the App Service Name setting you will see a checkbox to deploy to a slot. Select this and then complete the details for Resource Group and Slot.

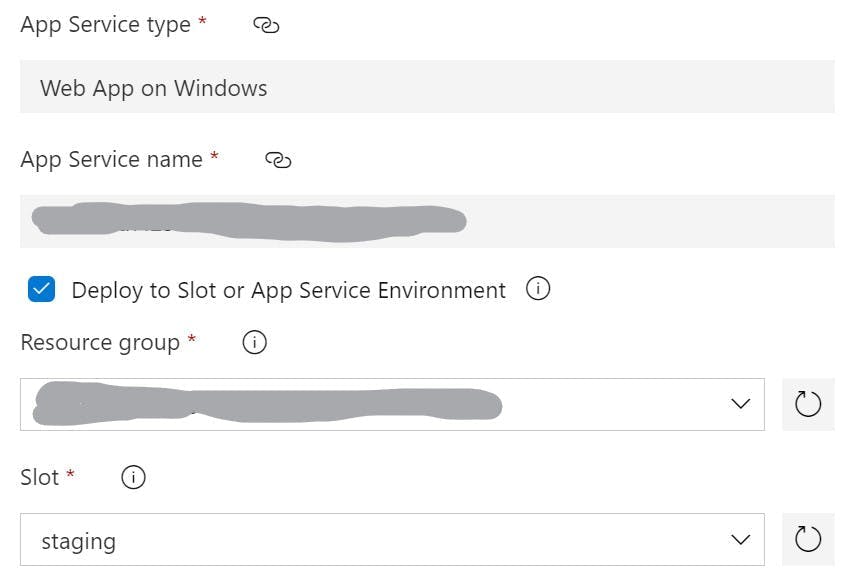
If you were to deploy now, your code would be deployed to the slot rather than the production instance. You could then preview the site running on the slot and manually swap the slots in the Deployment slots section of the portal.

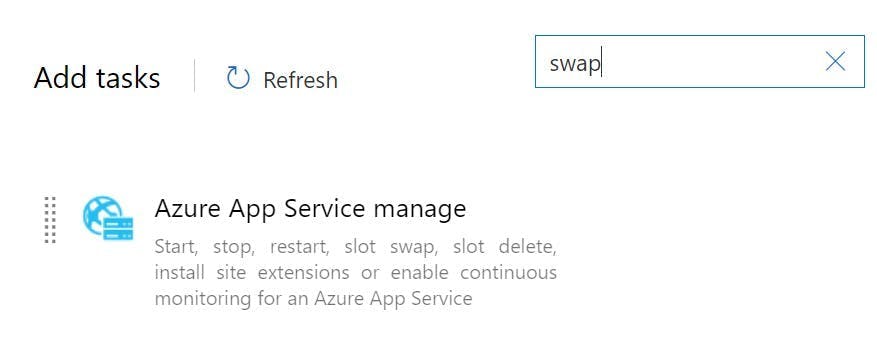
Alternatively you can configure the release pipeline to swap the slots for you.

Add a new task to the pipeline job called Azure App Service Manage. This will come up if you search for swap.

Complete the details for the task, setting Action to Swap Slots, and enter your App Service name, Resource group, and the Source Slot that it needs to swap with. Check the checkbox to Swap with Production.

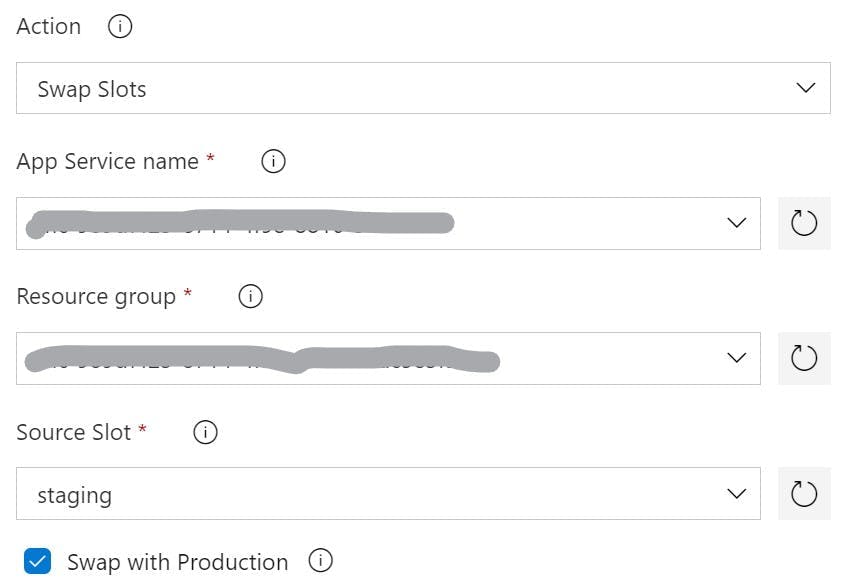
With this all configured you can now run your pipeline and have an automated deployment with no downtime. The solution will first be deployed to the slot and then the slot swap action will swap the two over. When it does this the staging slot will be warmed up first meaning that when the swap completes there will be no downtime as Sitecore will have already started.

What are automated deployments and why do I need them?

What are automated deployments and why do I need them?

When your working on a new website build as either the marketer responsible for the site or the project manager overseeing it’s build, some of the most frustrating tasks to be using up your budget can originate from the IT team and come under the category of setup.

They can suck days even weeks from a project but offer no visible features or benefit to the end user, worse still they often need to come at the start of a project which for people wanting to see a design turn into a webpage just feels like a delay and lack of progress.

Manual Deployments

So, what are automated deployments and why are they worth it? Well first let’s examine what a deployment is to begin with.

When a change or new feature is ready to be built for a site, it will have been turned into a specification and handed over to a development team to build. The developers will then write some code and test it on their local machines, they may even demo it to someone else. At some point though, that work needs to get from their machine to the server(s) it runs on so that other people like QA can see it without using the devs machine. Typically, there will be 3 server environments set up for a website:

  1. Dev / Test – An environment used by the developers and QA to build, test and refactor new features and fixes.
  2. UAT / Staging – An environment used by the website owners / stakeholders that the features have been deployed to for review and approval before they are deployed into production.
  3. Production – The live website that is accessible over the internet.

In a manual deployment setup, the developer is responsible for copying the website into each of the environments. This will generally involve:

  1. Getting the version of code to be deployed from source control.
  2. Publishing a build of the site locally (some languages need to be compiled into machine code, and most modern websites will run a task on the CSS and JavaScript to obfuscate and reduce the file size).
  3. Login to databases and run any scripts to update the database.
  4. Login to the web servers using something like a remote desktop client.
  5. Copy and Paste the new files onto the server.
  6. Make some sort of record that the deployment has been done and what it included.

As you can probably guess each of these steps is prone to human error; What if the developer gets the wrong version from source control? What if they overwrite the wrong folder? What if they miss the database changes? What if they don’t record the deployment, how can we be sure what version is on an environment?

Not only that but it’s also a lengthy task for someone to do. Some parts are just waiting for a code publish to complete or a file copy to finish. For the odd production deploy with a decent checklist this might not be so bad, but for iterating work into QA this can not only make QA fails for minor things really costly to fix, but also result in bundling more and more changes together to cut down the number of releases which then reduces the flow of work feeding into QA and slows the pace at which features can be developed and released.

A Better Way

Now we understand the issues, we certainly don’t want that as a cost throughout the lifetime of our site, so how do we avoid it?

Well, automated deployments quite simply take all these manual steps, automated them with a few bonuses on top. By doing this we remove all the elements of human error and are left with consistent results each time.

There’s two parts to an automated pipeline, the first is build and the second is release.

The build part relates to the first 2 steps of our manual process. We need to get the code from source control and then publish it. Once we’ve done this, we are left with a build that we can assign a release number to. By automating it we’ve also ensured that the build happens the same way each time rather than any differences between developers’ machines being. At this point we can also start detecting build failures and include some automated testing to pick up on errors before even involving QA.

The release part relates to the remaining steps of the manual process. First of all the process of copying files and running scripts now becomes one large script that won’t miss a step and in addition to that, now we have build numbers we can see which build is on each environment and only promote the one we want to the next environment. Because we’re promoting builds rather than doing the whole build process again, we’re also ensuring that the build going to production is the exact same thing that was tested on QA and then reviewed on UAT. With some clever integrations with things like GitHub and Jira we can also automated release notes to say what was included in each of the releases.

Degrees of Automation

It worth noting at this point that there are different degrees of automation and this will greatly affect the cost of setup.

As well as automating the deploy of code, we could also automate the entire server setup through the use or ARM templates in Azure. Different levels of automated testing can be implemented from very low code coverage to very high; a test could even be what the level of code coverage is.

Automation could also extend to include load balancers for green / blue deployments where zero downtime of the site is achieved by using multiple production servers and switching between them while files are being copied.

Is this the CI and CD thing I’ve heard about?

Two terms I deliberately haven’t used in this article is Continuous Integration (CI) and Continuous Delivery (CD) and that’s because although automated deployments forms part of achieving them they are not the same thing and it’s worth knowing how they differ.

Continuous Integration related to the build part of the automated setup and aims to deal with issues arising from multiple developers working on a project. When more than one developer works on a copy of a website locally, both sets are changing in different way to what is contained within source control. The longer this goes on for the bigger the differences get and the harder it will become to merge again. Continuous Integration advocates shortening the gaps between merges to as shorter time as possible, potentially multiple time per day. By having automated tools in place to run a build whenever this happens, issues can be identified as early as possible.

Continuous Delivery relates more to the release aspect of the automated setup and is an aim to be constantly delivering / deploying updates to a solution as fast as possible. By doing this, deployments become trivial and smaller updates are delivered at a much faster pace rather that being queued for one big release. Automation helps make this a reality by removing many of the manual time consuming tasks that are repetitive.

Moving the Media Cache folder in Sitecore

Moving the Media Cache folder in Sitecore

One of the cache’s that Sitecore has is the Media Cache. Whenever you use an image from Sitecore’s media library, Sitecore will retrieve the image from the database, scale it to the size you requested and then store it to disk in the media cache folder. On any subsequent request the image will now be retrieved from the media cache rather than the database.

By default each content management and content delivery server will locate the media cache in /App_Data/MediaCache

This is a relatively logical place to store a cache for images that wont cause you many issues. However, if you have automated deployments setup then you are likely wiping the whole of your website folder each time you do a deploy to ensure that your deploy remains the same on all environments. As the App_Data folder is in the website, your Media Cache will be deleted too.

Depending on your site then deleting the media cache potentially isn’t much of an issue. After all it’s a cache so all that will happen is the images will get cached the next time they are requested. But depending how many images get retrieved at the same time this could slow down performance, particularly if your content editors decided to put every image they ever uploaded into the same folder. Opening the that folder in the admin will create a nice amount of load on your server, particularly if you also have some extra image optimization logic installed.

Like most things in Sitecore though, you can change the location through a config setting.

In Sitecore.config you will find a property called Media.CacheFolder. Change this to somewhere outside of your website folder and Sitecore will now start storing the Media Cache in this location and it will be safe your all your deploys.

1<!-- MEDIA - CACHE FOLDER
2 The folder under which media files are cached by the system.
3 Default value: /App_Data/MediaCache
4 -->
5 <setting name="Media.CacheFolder" value="/App_Data/MediaCache"/>

Sitecore Continuous Integration with Team City and TDS

There are a lot of articles around on how to do automated deployments / continuous integration with Sitecore, which if you're new to the tools will likely leave you slightly baffled. This article will hopefully show you exactly what you need to do and explain why.

Solution Overview

  1. TDS is used by developers to serialize their Sitecore item changes and push them into source control
  2. Team City is used to detect the changes and run a build script
  3. Team City uses Web Deploy to push the code changes to the web server
  4. Team City calls MSBuild which will trigger TDS which is installed on the server to deploy Sitecore items to the destination server

Prerequisites

  • You have a build server with Team City installed and know how to set it up to do a web deploy
  • You are already using TDS and have your Sitecore items serialized in source control
  • Essentially you know how to do the first 3 steps and just need help with Step 4

Step by Step

UNC Share

On your web server you need to set up a UNC Share on your website's folder. When TDS does a deploy it will install a web service on your website through this share, do the item deployment and then remove the web service again.

The share needs to give permission to the user that your Team City Build Agent runs as. To find out which user your Build Agent is using:

  1. open the list of services and find TeamCity Build Agent in the list
  2. right click and select "Properties"
  3. in the "Log On" tab you will be able to see which Windows User is being used

Team City Config

In your Team City's build configuration settings for your project, add a new build step with the following config:

Runner Type: MSBuild
Step Name: Publish TDS Items (or some other identifier)
Build file path: Path to your projects .sln file
Command line parameters:

  • SitecoreDeployFolder: TDS will use this file path to install a web-service on your site to publish the items through.
  • SitecoreWebUrl: This is the url of the site you are going to update. TDS will use this when it tries to call the web service it installed.
  • IsDesktopBuild: false
  • GeneratePackage: false
  • RecursiveDeployAction: Delete
1/p:IsDesktopBuild=false;GeneratePackage=false;RecursiveDeployAction=Delete;SitecoreWebUrl=URL OF SITE;SitecoreDeployFolder=&amp;quot;UNC PATH TO YOUR SITECORE SITE&amp;quot;

Setting the command line parameters here will take precedence over any that have been included in your TDS projects solution file (which are liable to be overwritten by a developer).

That's it!

It's that easy. If you run your build script now your items should all be published to Sitecore.

Alternatives

This certainly isn't the only way to setup automated deployments and nor is it without issues. The fact a share needs to be set up between the Web Server and the Build Server, could cause an issue with security and may just not be possible if you're using a cloud server.

Rather than using TDS to deploy the Sitecore items you could use TDS to create a .update package. These would normally be installed through an admin webpage (not great for CI) but there is an open source project called Sitecore Ship that will expose a REST endpoint for the package to be posted to. Brad Curtis has written an excellent guide to this setup here (http://www.bradcurtis.com/sitecore-automated-deployments-with-tds-web-deploy-and-sitecore-ship/), however at the time of writing Sitecore Ship isn't compatible with Sitecore 7.5 or 8.

Another alternative to installing the update package is to use the TDS Package Installer. This is a tool Hedgehog provide alongside TDS for installing the update package. In this scenario you would need the tool installed on your web server and some way to call it. Jason Bert has written a setup guide for this example (http://www.jasonbert.com/2013/11/03/continuous-integration-deployment-with-sitecore/) however as well as Team City, you will also need Octopus Deploy to call the package installer. Octopus Deploy works by having what it calls Tentacles on each server you deploy to, making it easy to set up scripts to call programs on that server.

Sticking with the example using just TDS, you could also use TDS to deploy the solutions files as well as Sitecore items rather than using Web Deploy. However the downside here is that TDS is unable to modify your Web.Config file, which is one reason to stick with Web Deploy.