Tag: Security
Security Headers in Next.JS

Security Headers in Next.JS

To ensure your site is protecting its users. several security headers can be set to help prevent certain attacks against websites.

For Next.JS these are set in the next.config.js file. Typically I use the following config.

1/** @type {import('next').NextConfig} */
2const nextConfig = {
3 async headers() {
4 return [
5 {
6 source: '/:path*',
7 headers: [
8 {
9 key: 'X-Frame-Options',
10 value: 'SAMEORIGIN',
11 },
12 {
13 key: 'Content-Security-Policy',
14 value: "frame-ancestors 'none'",
15 },
16 {
17 key: 'Referrer-Policy',
18 value: 'same-origin',
19 },
20 {
21 key: 'Strict-Transport-Security',
22 value: 'max-age=15768000',
23 },
24 {
25 key: 'X-Content-Type-Options',
26 value: 'nosniff',
27 },
28 {
29 key: 'X-XSS-Protection',
30 value: '1; mode=block',
31 },
32 ],
33 },
34 ];
35 },
36};
37
38module.exports = nextConfig;
39

Content-Security-Policy

Setting frame-ancestors: none is similar to X-Frame-Options and will prevent a site loading in an ancestor frame, iframe. object or embed.

X-Frame-Options

Indicates whether a browser should be allowed to render a page in a frame, iframe, embed or object tag. By setting to SAMEORIGIN this ensures the site is only rendered in this way on itself and not on other sites.

Click-jacking attacks commonly use display other sites within themselves to fool a user as to what site they are on.

Referrer-Policy

Referrer Policy sets how much information is sent with the referrer header. By setting to same-orign, the referrer header is only sent on same origin requests.

Strict-Transport-Security

This header instructs the browser to only access the site over https. By setting the age it instructs the browser to remember this setting for the number of seconds given.

X-Content-Type-Options

Setting to nosniff will block a request if the destination is of type style and the MIME type is not text/css, or of type script and the MIME type is not a JavaScript MIME type.

X-XSS-Protection

This is a non-standard header and isn't supported in any current browsers but has history support with Chrome and Edge.

The header instructs the browser how to handle any cross-site scripting attacks it detects on the page. Setting to 1; mode-block will prevent the page from rendering if an attack is detected.

Handy default Netlify toml file settings

Handy default Netlify toml file settings

With Netlify it's quite easy to quickly spin up a new website with a lot of good default out the box, but there's a few options that are good to set for both security and seo reasons.

Firstly it's good practice to have some headers set to improve security. For example setting X-Content-Type-Options to nosniff will disable sniffing of mime types. Setting X-Frame-Options to DENY will prevent the website being rendered in a frame on another site and Referrer-Policy of same-origin will reduce the amount of referrer information sent to other websites.

It's also a good idea to setup a redirect on the Netlify subdomain that Netlify will have created for your site. If you don't, then you could find the wrong URL ending up in Google.

1[[headers]]
2 for = "/*"
3 [headers.values]
4 Referrer-Policy = "same-origin"
5 Strict-Transport-Security = "max-age=15768000"
6 X-Content-Type-Options = "nosniff"
7 X-Frame-Options = "DENY"
8 X-XSS-Protection = "1; mode=block"
9[[redirects]]
10 from = "https://example.netlify.app"
11 to = "https://example.com/"
12 status = 301
13 force = true
Protecting Azure Resources from Deletion

Protecting Azure Resources from Deletion

There's a lot we can do in Azure to protect our resources from harm.

First security permissions can be set up using active directory groups, so that access can be restrict to certain member to actually do anything with a resource. There's the fact that resources exist on more than one server so that if a server fails another already has a copy ready to switch to. We can even use ARM templates to have our entire infrastructure written as code that can be redeployed should the worst happen.

However what if we have some blob storage with some important data and we accidentally just go and delete it? Sometimes human error just happens, sure we can recreate it with our ARM template, but the contents will be gone.

Or maybe we're not using ARM templates and did everything through the portal so we'd really like to just make sure we didn't delete stuff by accident.

Azure Resource Locks

One thing we can do is to set up Azure Resource Locks. This isn't the same thing as setting up backups (you should absolutely do that to), but this is a nice extra thing you can do to prevent you from deleting something by accident. It's also really simple to do too.

In the Portal

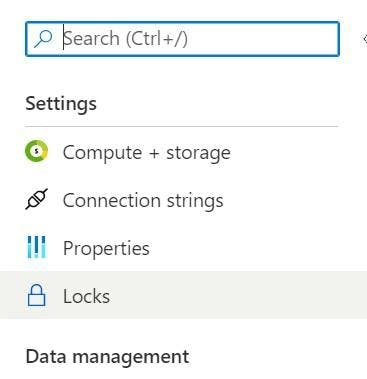
If your doing everything direct in the portal, open your resource and look for locks in the left nav.

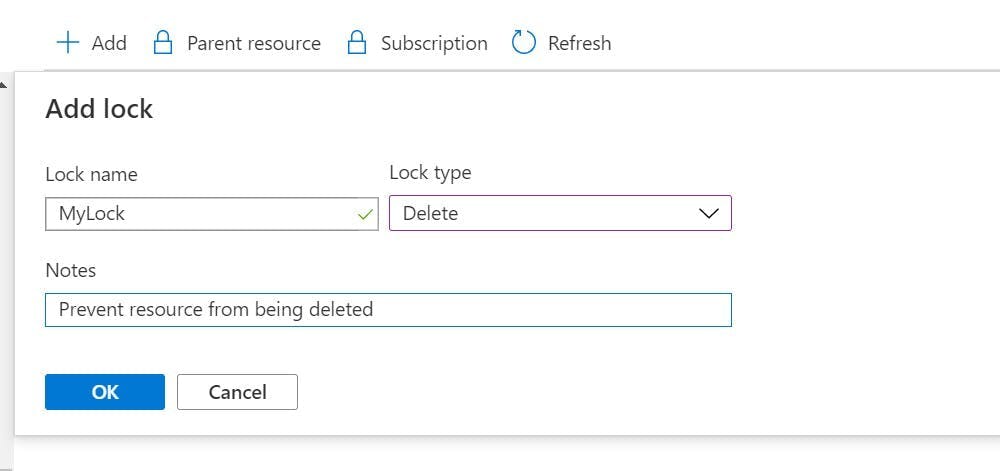
Now click the add button. Give it a name, lock type of delete and a note for what it does.

Now if you try and delete the resource you get a friendly error message saying you can't.

ARM Template

If your using ARM templates to manage your infrastructure, then you need this little snippet of code added to your template file.

1 {
2 "type": "Microsoft.Authorization/locks",
3 "apiVersion": "2016-09-01",
4 "name": "NAME OF LOCK GOES HERE",
5 "scope": "[concat('Microsoft.Sql/servers/databases/', parameters('database_name'))]",
6 "dependsOn": [
7 "[resourceId('Microsoft.Sql/servers/databases/', parameters('database_name'))]"
8 ],
9 "properties": {
10 "level": "CanNotDelete",
11 "notes": "DESCRIPTION SAYING IT SHOULDNT BE DELETED GOES HERE"
12 }
13 }

Notice the scope and depends on section. These need to reference the item you want to protect.

Managing SQL Azure Users in the Portal

Managing SQL Azure Users in the Portal

Managing users for a SQL Azure DB is something which I have found is more complex that you would expect. A lot of guides will also tell you it's something which can't be done through the admin portal and needs to be done using scripts in the DB.

This is true to some extent. If you want to set specific role permissions to a DB then you have to do it by assigning roles through SQL scripts. Also if you want to set usernames and passwords at a DB level rather than using Active Directory then this also needs to be done in the DB.

However if you want to give a bunch of active directory users admin access to all the DB's in a server or if you want to give a group of people the same access then this can be done through the azure portal.

Admin Permissions For All

When you create your DB instance an admin user will get created, and for some teams you could just share the password. However sharing passwords isn't that great and there is a better way.

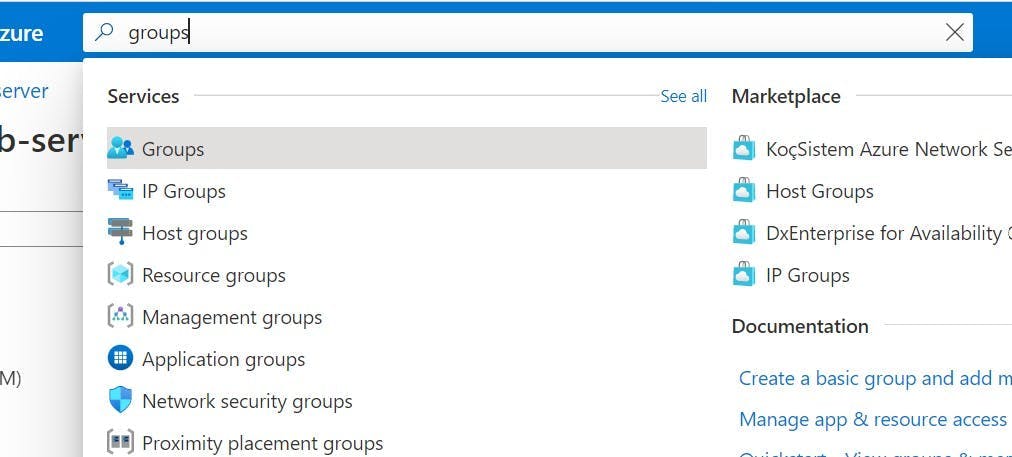
In the Azure Portal search for groups in the big search box at the top.

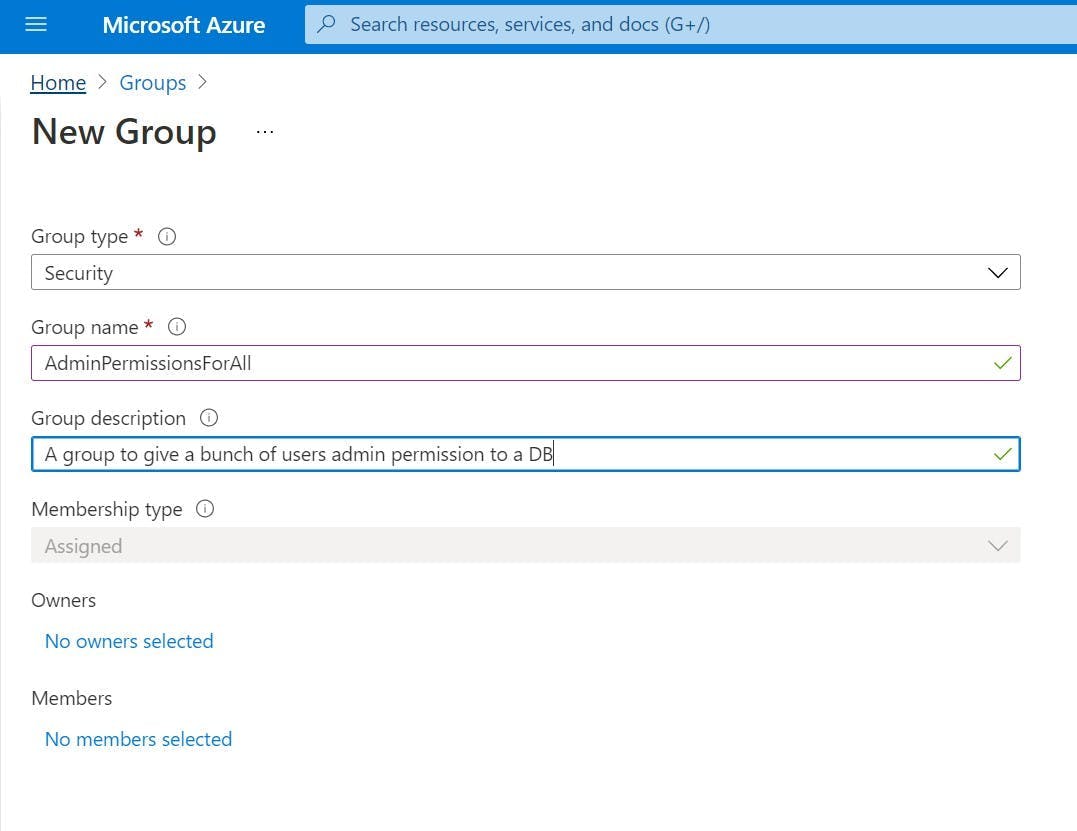
Create a security group with a sensible name, description and add all the members who you want to give admin permission to.

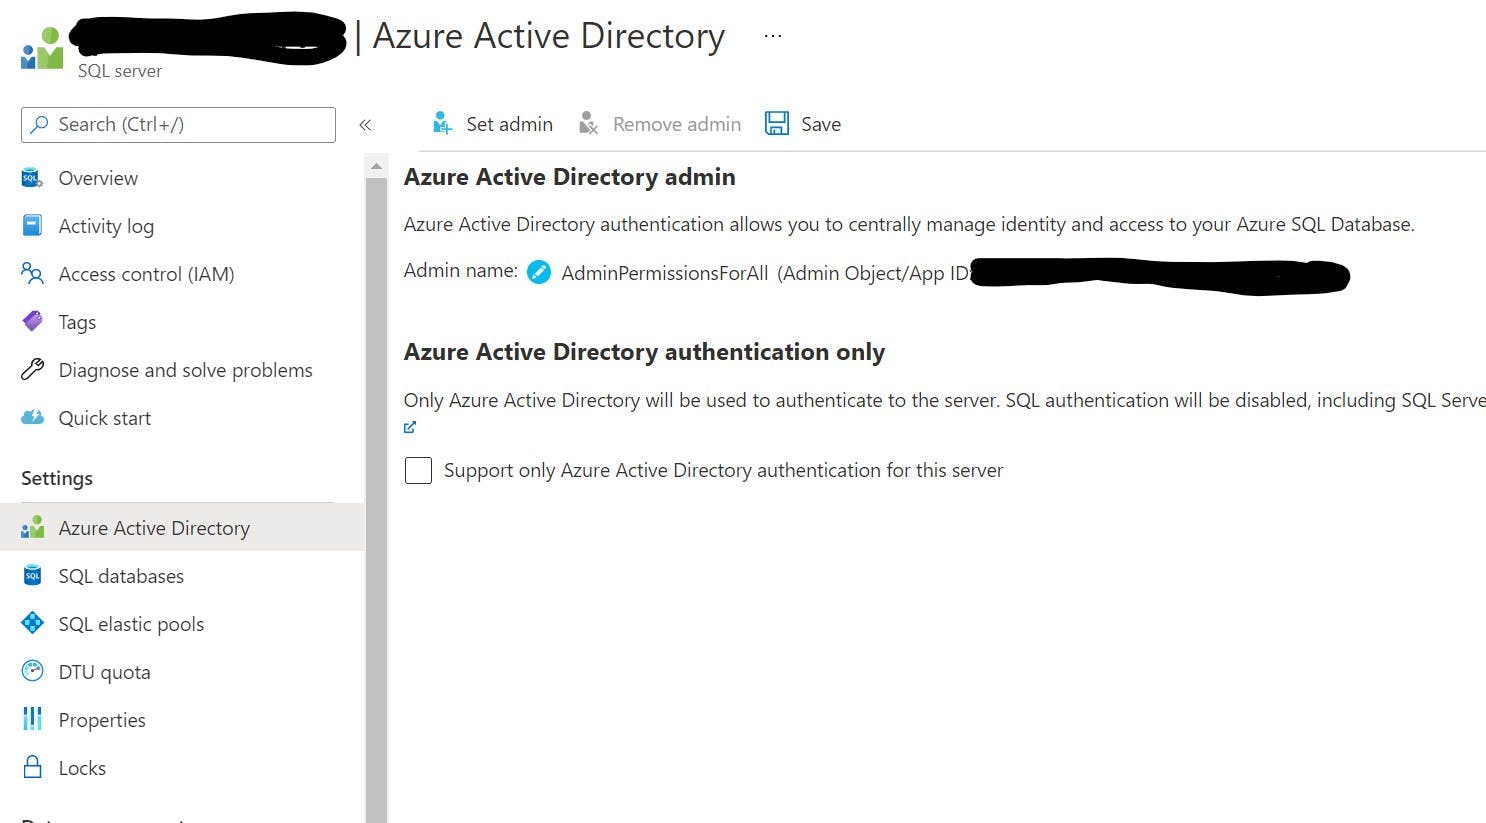
Go to your SQL server resource (this is the parent of the database), and got to the Azure Active Directory setting.

Click the top button to Set Admin, choose your new group and then click save. This will create the user with the correct permissions in the master DB of the server.

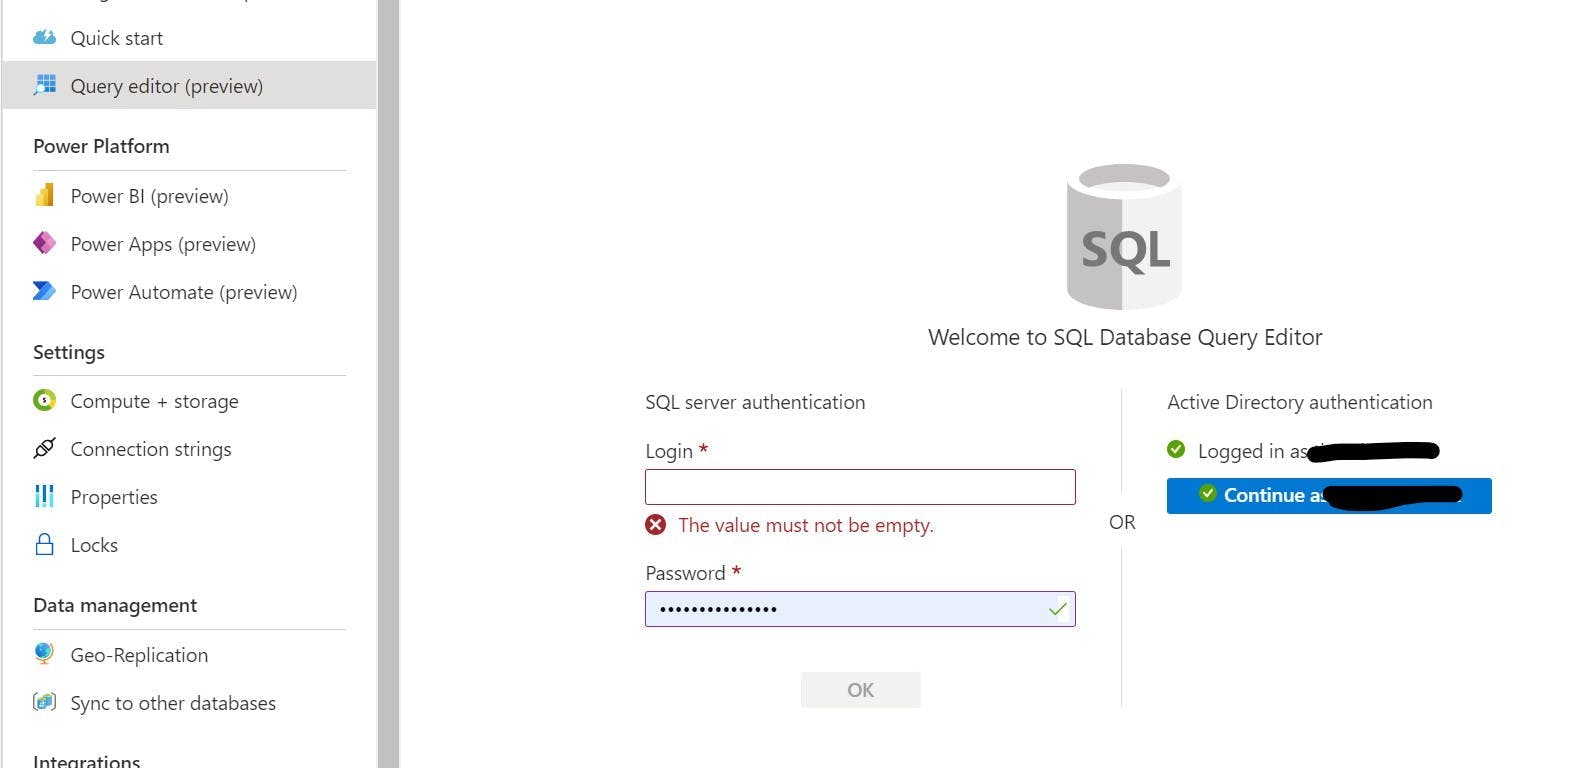
That's it, the members of the group will now be able to access any of the DB's on the server by logging in using Active Directory with Password through SSMS, or through the azure portal using Query Editor.

Query editor will actually give you a nice green tick if you have permission to log in.

To add or remove peoples access to the DB, just add and remove them from the group.

If you can't log in it could be due to a firewall permission for your IP rather than an actual login permission.

Permissions to Specific DBs

Giving everyone admin permission to every DB on the instance might not be what your after. Fine for a dev instance, but probably not something you want for production.

Fortunately the same concept of using groups can make life a lot easier but you will need to do some SQL scripting.

Create your group as above and then make sure your logged in as someone who is an active directory admin for the SQL Server. You can do this with the instructions above or if you want to be the only admin then rather than setting a group to be the admin, just set yourself.

Next log into the DB either using SSMS or Query Editor. Personally I prefer to use Query Editor as I'm doing everything else through the portal.

Our first script is to create an external user in our DB. In our case the external user is the group we want to give permission to rather than a specific user.

1CREATE USER [GROUP NAME]
2FROM EXTERNAL PROVIDER
3WITH DEFAULT_SCHEMA = dbo;

This is called adding a contained user to the DB.

Next we need to give the group some role permissions to do something.

1ALTER ROLE db_datareader ADD MEMBER [GROUP NAME];
2ALTER ROLE db_datawriter ADD MEMBER [GROUP NAME];

Repeat these steps for each DB you want to give the group access too.

The members of your new group should now have permissions to the individual DBs with reader and writer permissions.

If you want to give access to more people, just add them to the group.

Setting IP restrictions in IIS

It's a frequent scenario that a website your in the process of building needs to be accessible over the internet before it should actually be publicly available over the internet. This can come in the form of clients needing to review staging sites before there live, test sites needing to be accessible to testers who may not be in a location that can access private servers, or working jointly with other suppliers.

This scenario presents a lot of dangers such as, the URL of a site could get leaked early ruining a marketing strategy, or the site could end up in Google destroying the SEO value on the clients current site and even worse, actually get real customers visiting it.

There are only 2 real methods of protecting test/staging sites. One is adding authentication to the site restricting access to people with a valid username and password. The other is IP white-listing so only people from a valid IP can access the site.

In the past I've seen people suggest using a robots.txt to tell search engines to ignore the site. This is guaranteed to fail, Google will index a site with a robots file saying not to. Your robot's file may say don't crawl, but that auto generated Sitemap will be obeyed an the files indexed. There will also come a time the robots file gets copied live de-indexing the live site, or someone forgets the file on staging and the staging site is indexed.

Using IIS to set up IP restrictions

Using IIS to set up IP restrictions is quick and easy, and what's best about it is you can set it at the server level and not worry about people forgetting to add it to new sites. Better still you can also easily add configuration at a website level to allow certain people to see certain sites rather than the whole box.

Installing the Feature

First you need to make sure you have the feature installed on IIS. To do this on Windows Server 2012:

  1. Go to Server Manager and click "Add roles and features"
  2. Click next to take you from the Before you begin page to Installation Type
  3. Leave Role-based selected and click next
  4. On the Server Selection screen the server your on should be auto selected. Click next
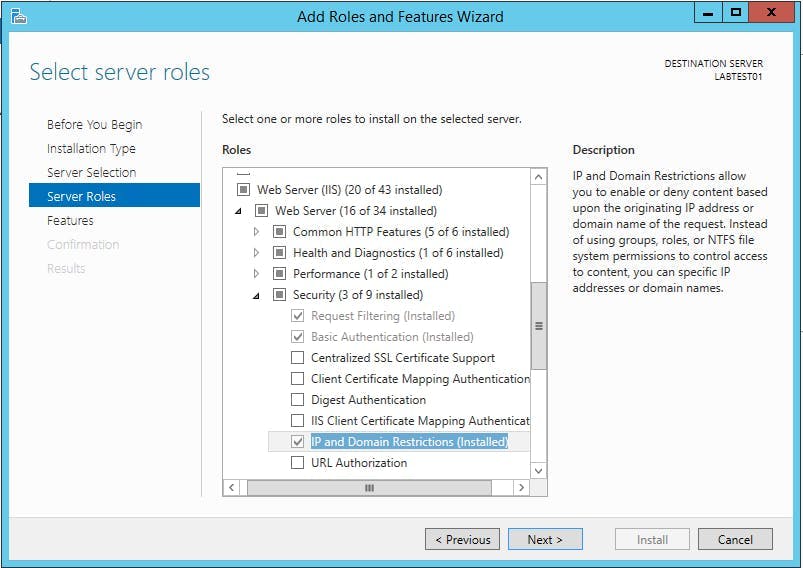
  5. On the Server Roles screen scroll down to "Web Server (IIS)". IP and Domain Restrictions is located under Web Server (IIS) > Web Server > Security
  6. Click the check box on IP and Domain Restrictions if its not already selected and complete the wizard to install the features.

Configuring IIS

The set up an IP restriction in IIS do the following:

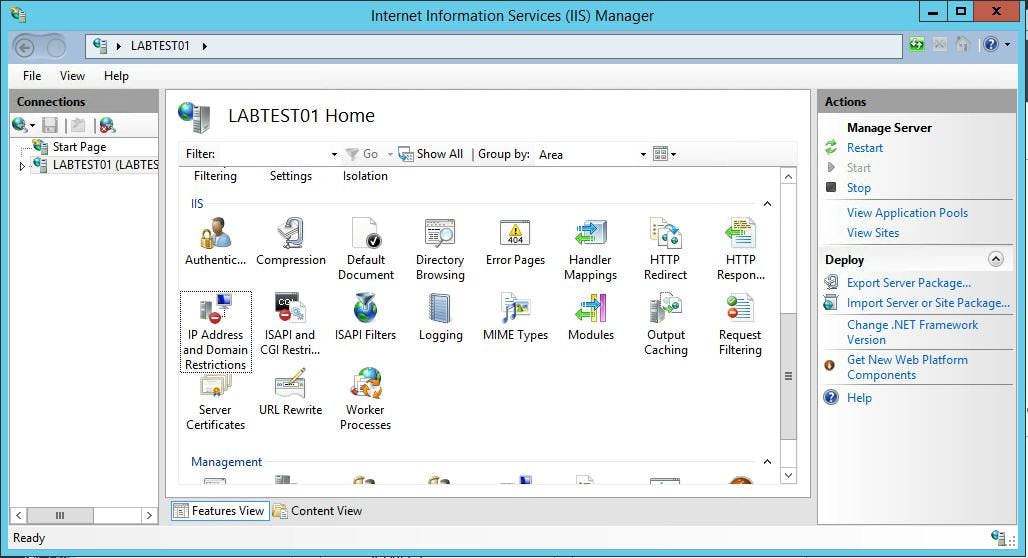
Open IIS and select your server in the left hand treeview. Alternatively if you wanted to add the restrictions to an individual site, select that site.

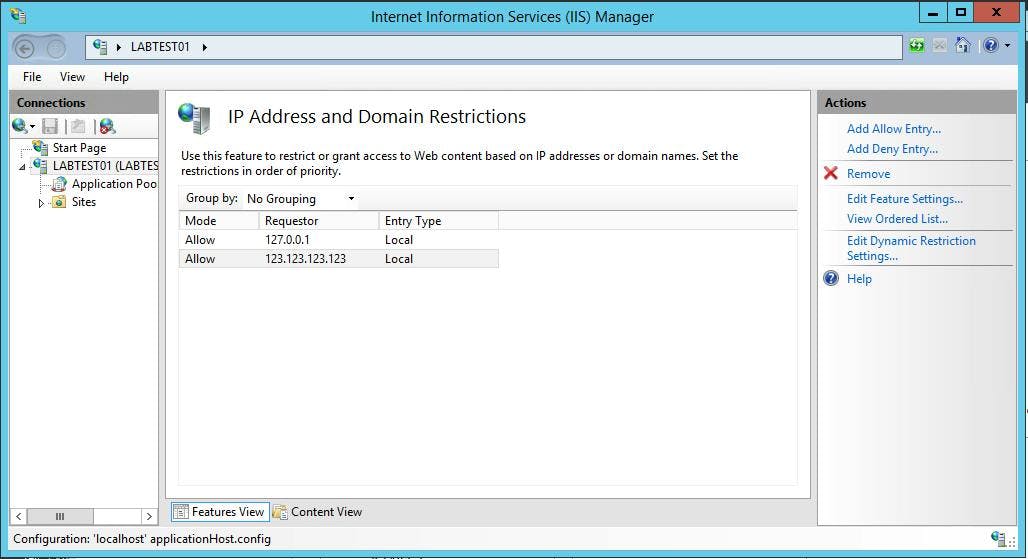
Within the IIS section you should have an item titled IP Address and Domain Restrictions

The configured IP address will be listed out. To add a new one click the "Add Allow Entry" action on the right.

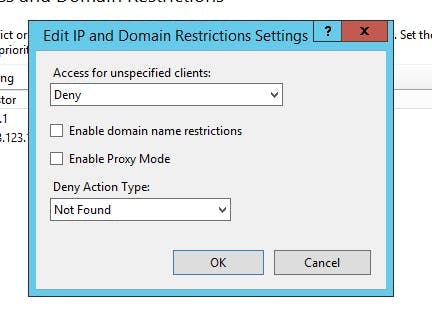
This screen allows you to set up allow and deny lists, but the restrictions don't actually have an effect until you edit the feature settings.

On this screen you need to set the access for unspecified clients to deny. You can also specify a deny action type which alters the status code between unauthorized, forbidden, not found and abort.

What this doesn't do

What this won't do is block all traffic not in the allow list to your server. It will only cover IIS, so if you have other services running on your box like SQL Server, Mongo, Apache etc this will all still be publicly available.