Tag: Sitecore
Managing Redirects in Sitecore

Managing Redirects in Sitecore

One of the most important aspects if not the most important aspect to managing a website is SEO. It doesn’t matter how good your website is, it doesn’t really matter if nobody can find it. Creating good SEO is a lot about having pages match what users are searching for, which then results in a high ranking for those pages. However, a second part to this formula is what happens with a page when it no longer exists. For instance, one day this blog post may no longer be relevant to have on our site, but up until that point search engines will have crawled it, people will have posted links to it and all of this adds to its value which we would to lose should it be removed. An even simpler scenario could be that we rename the blog section to something else and the page still exists under a different URL, but links to it no longer work.

Fortunately, the internet has a way of dealing with this and it’s in the form of a 301 redirect. 301 redirect are an instruction to anyone visiting the URL that the page has permanently moved to a different URL. When you set up a 301 redirect it achieves two things. Firstly, users following a link to your site end up on a relevant page rather a generic page not found message. Secondly search engines recrawling your site update their index with the new page and transfer all the associated value. So, to avoid losing any value associated with a page, whenever you move, rename or remove a page you should also set up a redirect.

Sitecore

Given how important redirects are it’s then surprising that an enterprise CMS platform like Sitecore doesn’t come with a universal way to set redirects up out of the box.

Typically, when we’ve taken over a site one of the support requests we will eventually receive is a question surrounding setting up a redirect from a marketer who’s ended up on Sitecore’s documentation site and is confused why they can’t find any of the things in this article https://doc.sitecore.com/users/sxa/17/sitecore-experience-accelerator/en/map-a-url-redirect.html.

The article appears to suggest that creating redirects is a feature that is supported, however it’s only available to sites built using Sitecore Experience Accelerator rather than the traditional approach.

More often that not, the developers who created the site will have added 301 redirect functionalities but will have done it using the IIS Redirect module, which while serves the purpose of creating redirects does not provide a Sitecore interface for doing so.

301 Redirect Module

Fortunately, there are some open source modules available which add the missing feature to Sitecore. The one we typically work with is neatly named 301 Redirect Module.

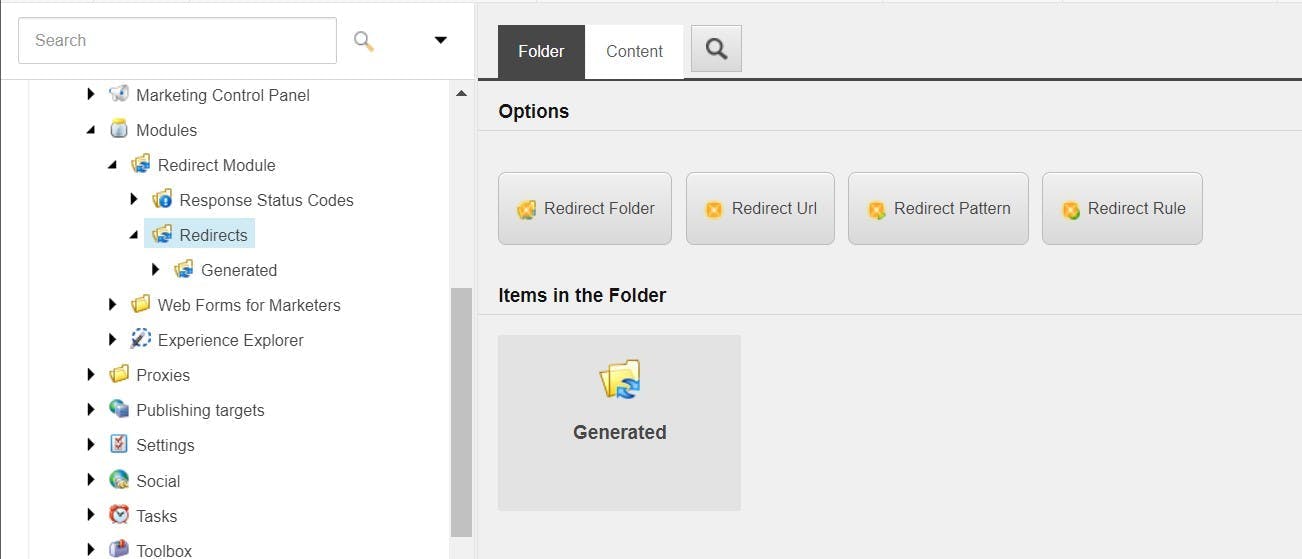
Once installed the module can be found in the System > Modules folder. Clicking on the Redirects folder will give you the option to either create another Redirect Folder to help group your redirect into more manageable folders, Redirect URL, Redirect Pattern or Redirect Rule.

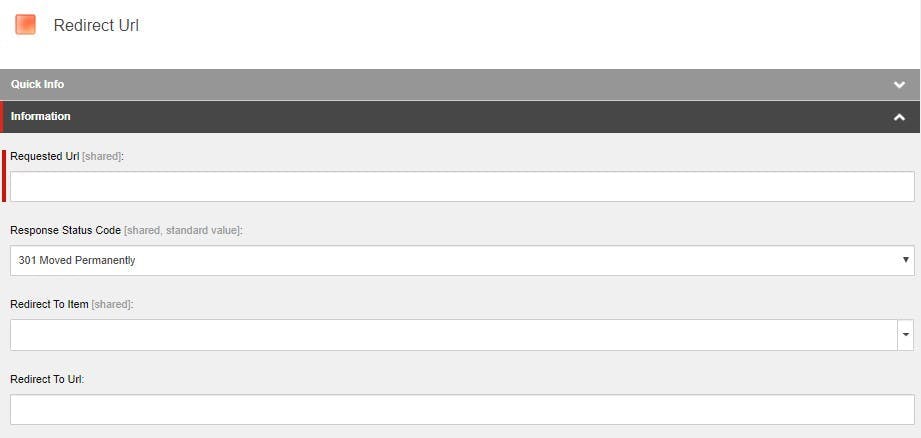
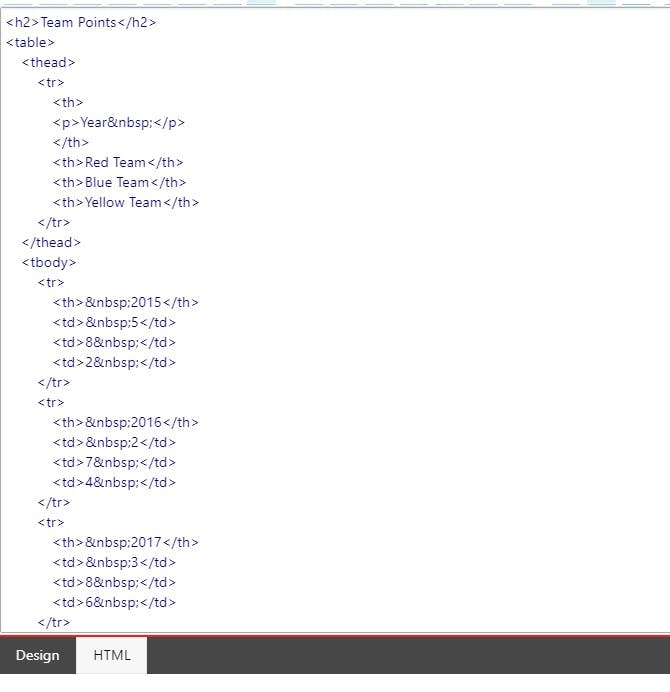
This is by far the most common redirect to be set up. You specify an exact URL that is to be redirected and set the destination as either another exact URL or a Sitecore item. There’s even an option to choose if it should be a permanent or temporary redirect.

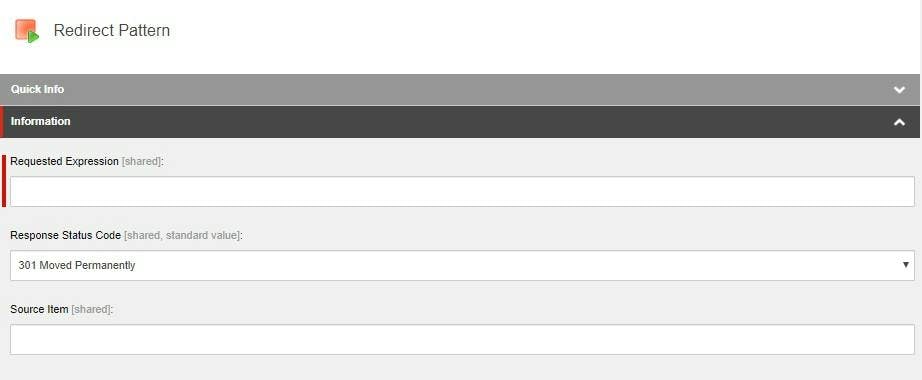
Redirect patterns are slightly more complex and require some knowledge of being able to write regular expressions. However, these are most useful if you ever want to move an entire section of your site. Rather than creating rules for each of the pages under a particular page, one rule can redirect all of them. Not only does this save time when creating the redirects, but it also makes your list of redirects far more manageable.

Auto Generated Rules

One of my favourite features of the 301 Redirect Module is that it can auto generate rules for any pages you move. For instance, if you decide a sub-page should become a top-level page moving it will result in a rule automatically being generated without you having to do a thing.

Summary

A marketer’s ability to manage 301 Redirect is as important as them being able to edit the content on the site and while traditional Sitecore sites may be missing this functionality it can easily be added using 3rd party modules, best of all they’re free!

User Authentication across sub domains in Sitecore

User Authentication across sub domains in Sitecore

The Scenario

In some scenarios you may have sub domains set up on your site, this may be to have an api configured as a separate site, or you may have a microsite set up on a sub domain. Depending on the scenario you may also want a user who it logged in on one of the sites to be logged in on the other.

When providing a login section to a site, after the visitor logs in their authentication is tracked using cookies. Cookies are linked to a domain and as your sites only differ by sub-domain you may be thinking great it should just work, no need for a single sign on solution. But you would be wrong.

The Solution

By default, cookies will be set on a specific domain including the sub-domain unless you tell it otherwise. Fortunately, this is quite easy to do.

In the web.config file, find the section for forms authentication and add an attribute domain set to the top-level domain. Your authentication should now always be set on the top level domain and work across all subdomains.

1<system.web>
2 <authentication mode="None">
3 <forms name=".ASPXAUTH" cookieless="UseCookies" domain="mydomain.com" timeout="30"/>
4 </authentication>
5<system.web>
Connecting Sitecore to Salesforce

Connecting Sitecore to Salesforce

When it comes to creating CMS websites the most common integration requirement is one to a CRM system. In this article I’m going to explain the different methods of integrating Sitecore and Salesforce along with the advantages and disadvantages of each.

Salesforce Web to Lead

The first option isn’t Sitecore specific at all and is functionality provided and supported by Salesforce. Web to Lead allows you to create a HTML form from within Salesforce that when submitted will create a Lead item in Salesforce. To add it to your Sitecore instance can be as simple as copy and pasting the generated HTML and setting up a confirmation page for Salesforce to redirect to once the form has been submitted.

The process for the form submission is then as follows:

With some extra technical input, as the HTML for the form is hosted on your site rather than through an iFrame, it is also possible to customise it with your own CSS and validation to fit in with the rest of your site.

Advantages

  • Very simple to set up
  • Very low in terms of complexity
  • Easy to maintain
  • No duplication of data in Sitecore (simpler for GDPR)
  • Potential for form to be CMS managed by pasting in HTML from Salesforce

Disadvantages

  • Vulnerable to spam
  • No data is fed back into Sitecore analytics
  • Limited to form submissions
  • Limited functionality

For more information on web to lead see: https://www.salesforce.com/products/guide/lead-gen/web-to-lead/

Salesforce Web to Lead plus some custom code

What’s good about web to lead is it provides a simple platform that can be built upon to fix some of its disadvantages.

With some custom code on the Sitecore side, we can change the process from the visitor submitting a form directly to Salesforce, to a form submitting to Sitecore which in turn does an HTTP Post to Salesforce. This gives us the ability to also add in some protection against spam using something like re-captcha and the ability to record some analytics information in Sitecore analytics.

The process for the form submission is as follows:

Advantages

  • Low complexity
  • Easy to maintain
  • No duplication of data in Sitecore (simpler for GDPR)
  • Protected against spam
  • Built on top of Salesforces web to lead functionality

Disadvantages

  • To make fully CMS-able requires a larger bespoke implementation
  • Limited to form submissions

Sitecore Connect for Salesforce CRM

If you’re after something greater than simple lead creation from a form on the site, then another option is the Sitecore Connect for Salesforce CRM module from Sitecore. This is built on top of Sitecore’s data exchange framework and works by syncing data between the two platforms.

Out of the box it is set up with some default mappings for contact information, but this can be expanded to included additional facets of information against a contact.

Using this type of integration as new contacts are created on the site, they will be created in salesforce too. Or a contact being in a salesforce campaign could be synced to the Sitecore instance to customise the users experience there.

For more information on Sitecore Connect for Salesforce CRM see: https://doc.sitecore.com/developers/salesforce-connect/20/sitecore-connect-for-salesforce-crm/en/sitecore-connect-for-salesforce-crm-configuration-guide.html

Advantages

  • Built and supported by Sitecore
  • Ability to build a more complex integration on a framework

Disadvantages

  • Much higher complexity
  • No quick wins for common scenarios such as creating a lead

Fuse IT S4S Connector

Since 2009 Fuse IT have been building a Sitecore to Salesforce connector targeting the biggest use cases for connecting the two platforms.

The connector is installed as packages into both Sitecore and Salesforce and provide out the box functionality such as:

  • Sitecore Forms and Web Forms for Marketers field mapping wizard to create leads in Salesforce. Which gives marketers complete freedom to add a form to a site that creates a lead in Salesforce
  • Sitecore analytics integration to sync behavioural data to salesforce leads and contacts
  • Sitecore personalisation for a contact from Salesforce

The package also includes sample code to enable expanding the solutions with bespoke development.

For more information on S4S see: https://www.fuseit.com/products/sitecore-salesforce-connector/

Advantages

  • Out the box functionality that takes advantages of Sitecore’s features
  • Ability to build a more complex integration on a framework

Disadvantages

  • Additional license fee
  • Creates a dependency that may affect upgrades in the future

Fully Bespoke

Often when you suggest a fully bespoke solution people can take an instant reaction to fear it will be costly, hard to maintain or will break. Writing traditional code often can get viewed as being bad or hard, but the reality is most alternative implementations still involve writing code but just have a nice interface at the start. Depending on the kind of integration your trying to achieve going fully bespoke might be the easiest solution. After all code is essentially an easy tool to achieve a complex scenario and it is generally the scenario which leads to the problem being hard, rather than a developer’s ability to write code in any given language.

A bespoke solution could be something as simple as a webservice being provided by a Salesforce developer that Sitecore will post to, much in the same way as web to lead, but capable of achieving some additional functionality on top.

Or it could be a middleware API layer that is used to connect multiple systems together. E.g. If your site needed to talk to Salesforce and a stock level system at the same time. Or it could be used to completely abstract the CRM system in order to facilitate Salesforce being swapped out with something else in the future.

Advantages

  • Anything’s possible

Disadvantages

  • Could be to complex for simple scenarios
  • Everything must be built
Sitecore strange language switching

Sitecore strange language switching

The other day we started experiencing a strange issue on one of our test sites. Pages were starting to error and looking at the logs the errors were happening in view's which hadn't been updated in a long time. Some of these seemed like the code wasn't robust enough to handle when a datasource hadn't been set (the classic object not set to an instance of an object error), but fixing these just resulted in an error in another. It also didn't explain why this suddenly started happening, not to mention the components in question should have all had data.

Then we noticed that on the first view of any page of the site with a new session the site would display fine even though these were server errors happening. Navigating to any other page or refreshing though caused the server error to return.

This led us to look at the differences between the request headers and we had our answer. On all subsequent requests the language context had been changed to some random thing which there is no content for. The site itself is not a multilanguage site and only has content for en. Adding the language code into the URL would force the context language back and the page would work again.

How language works in Sitecore

To understand what is happening it's good to know how languages in Sitecore work.

Sitecore is built as a platform which can server content in multiple languages. By default you start with one language in the editor (en) but are able to add more. You can read my blog post from a few years ago on how to do this here (https://himynameistim.com/2015/06/30/sitecore-adding-languages-for-a-multilingual-site/).

Sitecore will recognise which language should be displayed based on a language code in a URL. e.g. himynameistim.com/en-gb/ for English - Great Britian. This is done through the strip language pipeline which picks up these languages and sets the context language.

Config for the link manager then controls if links are generated with these language codes in the URL or not. On a single language site you would have this set to never resulting in URL's without a language code and the default language will be used.

The flaw in all of this though is the strip language pipeline always runs, even when your pages only have one lauange. The pipeline also doesn't check if the language it finds in the url is set up as a language on the site, so quite a lot of two letter combinations will work and change the language context. When this is changed, it is changed for the users session meaning it is possible for a url to inadvertedly cause the language context to change for a user on the site when the site only has one language.

Disabling Strip Language

As the site in question only has one language the fix is quite simple. For multilingual sites the solution is a bit harder.

For a single language site you can simply turn off the strip language functionality. You can do this using a patch config file as follows:

1<configuration xmlns:patch="http://www.sitecore.net/xmlconfig/">
2 <sitecore>
3 <settings>
4 <setting name="Languages.AlwaysStripLanguage">
5 <patch:attribute name="value">false</patch:attribute>
6 </setting>
7 </settings>
8 </sitecore>
9</configuration>
Removing port 443 from urls generated by Sitecore

Removing port 443 from urls generated by Sitecore

For as long as I've been working on Sitecore there has been this really annoying issue where setting the link manager to include server url and running under https will cause urls to be generated with the port number included. e.g. https://www.himynameistim.com:443/ which naturally you don't actually want.

To overcome this there are a few methods you can take.

Method 1 - Set the Scheme and Port on you site defenition

This is possibly the smallest change you can make as it's just 2 settings in a config file.

Setting the external port on site node to 80 (yes 80) tricks the link manager code into not appending the port number as it does it for everything other than port 80.

1<configuration xmlns:patch="http://www.sitecore.net/xmlconfig/" xmlns:xdt="http://schemas.microsoft.com/XML-Document-Transform">
2 <sitecore>
3 <sites xdt:Transform="Insert">
4 <site name="website">
5 <patch:attribute name="hostName">www.MySite.com</patch:attribute>
6 <patch:attribute name="rootPath">/sitecore/content/MySite</patch:attribute>
7 <patch:attribute name="scheme">https</patch:attribute>
8 <patch:attribute name="externalPort">80</patch:attribute>
9 </site>
10 </sites>
11 </sitecore>
12</configuration>

What I don't like about this method though, is your setting something to be wrong to get something else to come out right. It's all a bit wrong.

Method 2 - Write your own link provider

The second method which I have generally done is to write your own provider which strips the port number off the generated URL.

For this you will need:

1. A patch file to add the provider:

1<configuration xmlns:patch="http://www.sitecore.net/xmlconfig/">
2 <sitecore>
3 <linkManager defaultProvider="sitecore">
4 <patch:attribute
5 name="defaultProvider"
6 value="CustomLinkProvider" />
7 <providers>
8 <add name="CustomLinkProvider"
9 type="MySite.Services.CustomLinkProvider,
10 MySite"
11 languageEmbedding="never"
12 lowercaseUrls="true"
13 useDisplayName="true"
14 alwaysIncludeServerUrl="true"
15 />
16 </providers>
17 </linkManager>
18 <mediaLibrary>
19 <mediaProvider>
20 <patch:attribute name="type">
21 MySite.Services.NoSslPortMediaProvider, MySite
22 </patch:attribute>
23 </mediaProvider>
24 </mediaLibrary>
25 </sitecore>
26</configuration>

2. A helper method that removes the SSL port

1namespace MySite
2{
3 /// <summary>
4 /// Link Helper is used to remove SSL Port
5 /// </summary>
6 public static class LinkHelper
7 {
8 /// <summary>
9 /// This method removes the 443 port number from url
10 /// </summary>
11 /// <param name="url">The url string being evaluated</param>
12 /// <returns>An updated URL minus 443 port number</returns>
13 public static string RemoveSslPort(string url)
14 {
15 if (string.IsNullOrWhiteSpace(url))
16 {
17 return url;
18 }
19
20 if (url.Contains(":443"))
21 {
22 url = url.Replace(":443", string.Empty);
23 }
24
25 return url;
26 }
27 }
28}

3. The custom link provider which first gets the item URL the regular way and then strips the SSL port

1using Sitecore.Data.Items;
2using Sitecore.Links;
3
4namespace MySite
5{
6 /// <summary>Provide links for resources.</summary>
7 public class CustomLinkProvider : LinkProvider
8 {
9 public override string GetItemUrl(Item item, UrlOptions options)
10 {
11 // Some code which manipulates and exams the item...
12
13 return LinkHelper.RemoveSslPort(base.GetItemUrl(item, options));
14 }
15 }
16}
17

4. The same provider for media

1using Sitecore.Data.Items;
2using Sitecore.Resources.Media;
3
4namespace MySite
5{
6 /// <summary>
7 /// This method removes SSL port number from Media Item URLs
8 /// </summary>
9 public class NoSslPortMediaProvider : MediaProvider
10 {
11 /// <summary>
12 /// Overrides Url mechanism for Media Items
13 /// </summary>
14 /// <param name="item">Sitecore Media Item</param>
15 /// <param name="options">Sitecore Media Url Options object</param>
16 /// <returns>Updated Media Item URL minus 443 port</returns>
17
18 public override string GetMediaUrl(MediaItem item, MediaUrlOptions options)
19 {
20 var mediaUrl = base.GetMediaUrl(item, options);
21 return LinkHelper.RemoveSslPort(mediaUrl);
22 }
23 }
24}

What I don't like about this method is it's messy in the opposite way. The port number is still being added, and we're just adding code to try and fix it after.

Credit to Sabo413 for the code in this example

Method 3 - Official Sitecore Patch

Given that it's Sitecore's bug, it does actually make sense that they fix it. After all people are paying a license fee for support! This simplifies your solution down to 1 extra patch file and a dll. What's better is as it's Sitecores code they have the responsibility of fixing it, if it ever breaks something, and you have less custom code in your repo.

You can get the fix here for Sitecore version 8.1 - 9.0.

So this may leave you wondering how did Sitecore fix it? Well having a look inside the dll reveals they wen't for method 2.

Sitecore: Returning a 404 response on the page requested rather than redirecting to a 404 page

Sitecore: Returning a 404 response on the page requested rather than redirecting to a 404 page

Previously I've blogged about:

but while looking through the posts today, I realised I had never written about how you stop Sitecore from issuing 302 redirects to your 404 page and instead return a 404 on the URL requested with the contents of the 404 page.

While search engines will recognise a 302 response to a 404 as a 404 (in fact they're intelligent enough to work out that a 404 page without a correct response status code is a 404) it's considered SEO best practice for the URL to stay the same and to issue the correct status code.

Creating a NotFoundResolver class

When Sitecore processes a request it will run the httpRequestBegin pipeline, and within that pipeline is a Item Resolver processor that will attempt to find the requested item. If after this the context item is still null then the logic to redirect to the ItemNotFoundUrl will kick in. To stop this happening we can simply add our own process to the pipeline after ItemResolver and set the item.

Our class looks like this:

1using Sitecore;
2using Sitecore.Configuration;
3using Sitecore.Data;
4using Sitecore.Diagnostics;
5using Sitecore.Pipelines.HttpRequest;
6
7namespace Pipelines.HttpRequest
8{
9 public class NotFoundResolver : HttpRequestProcessor
10 {
11 private static readonly string PageNotFoundID = Settings.GetSetting("PageNotFound");
12
13 public override void Process(HttpRequestArgs args)
14 {
15 Assert.ArgumentNotNull(args, nameof(args));
16
17 if ((Context.Item != null) || (Context.Database == null))
18 return;
19
20 if (args.Url.FilePath.StartsWith("/~/"))
21 return;
22
23 var notFoundPage = Context.Database.GetItem(new ID(PageNotFoundID));
24 if (notFoundPage == null)
25 return;
26
27 args.ProcessorItem = notFoundPage;
28 Context.Item = notFoundPage;
29 }
30 }
31}

To add our process to the pipeline we can use a patch file like this:

1<configuration xmlns:patch="http://www.sitecore.net/xmlconfig/">
2 <sitecore>
3 <pipelines>
4 <httpRequestBegin>
5 <processor
6 patch:after="processor[@type='Sitecore.Pipelines.HttpRequest.ItemResolver, Sitecore.Kernel']"
7 type="LabSitecore.Core.Pipelines.NotFoundResolver, LabSitecore.Core" />
8 </httpRequestBegin>
9 </pipelines>
10 <settings>
11 <!-- Page Not Found Item Id -->
12 <setting name="PageNotFound" value="ID OF YOUR 404 PAGE" />
13 </settings>
14 </sitecore>
15</configuration>

Notice the setting for the ID of your 404 page to be loaded as the content.

Remember if you do do this make sure you also follow one of the methods to return a 404 status code, otherwise you will have just made every URL a valid 200 response on your site.

Installing Sitecore 9 when you've installed 9.1

Installing Sitecore 9 when you've installed 9.1

Installing Sitecore 9 was never the easiest of things, particularly when you compare it to how relatively simple Sitecore 8 was. But if you install Sitecore 9.1 on the same machine and then try your trusty Sitecore 9.0 script you may find it's got even harder and there's a bunch of new issues to worry about.

Multiple version of SIF

The first issue your probably going to run into is an error saying a name parameter is missing. Your script hasn't change, but what has changed is the default version of SIF that's now running.

So the first change you need to make is to ensure your running the correct version of SIF. You can do this either by adding the command to your script or running this before calling you install script. It will take effect for the duration of your PowerShell session.

1#Switch to correct vesion of SIF
2Remove-Module -Name SitecoreInstallFramework
3Import-Module -Name SitecoreInstallFramework -RequiredVersion 1.2.1

If you want to check what the active version of SIF is you can do this in a PowerShell window using

1Get-Command -Module SitecoreInstallFramework | Select-Object -Property name, version

Certificates Error - Part 1

Now we're calling the right version of SIF, the next issue I encountered was to do with certs. Specifically I got this error:

1TerminatingError(New-SignedCertificate): "Cannot process argument transformation on parameter 'Signer'. Cannot convert the "System.Object[]" value of type "System.Object[]" to type "System.Security.Cryptography.X509Certificates.X509Certificate2"."
2Install-SitecoreConfiguration : Cannot process argument transformation on parameter 'Signer'. Cannot convert the "System.Object[]" value of type "System.Object[]" to type "System.Security.Cryptography.X509Certificates.X509Certificate2".

This is due to the certificate for Sitecore 9.1 that has been installed. You can remove the certificate but then your Sitecore 9.1 install will break instead.

Alternatively add a "RootCertFilename" to the certificate definition:

1# Install client certificate for xconnect
2$certParams = @{
3 Path = "$SCLocation\xconnect-createcert.json"
4 CertificateName = "$prefix.xconnect_client"
5 RootCertFileName = "SIF121Root"
6}
7Install-SitecoreConfiguration @certParams -Verbose

Certificate Error - Part 2

This error looks exactly the same as the error above but you've already added that Root Cert File Name, so what's happening now.

1Install-SitecoreConfiguration : Cannot process argument transformation on parameter 'Signer'. Cannot convert the
2"System.Object[]" value of type "System.Object[]" to type
3"System.Security.Cryptography.X509Certificates.X509Certificate2".
4At C:\resourceFiles9.0\install.ps1:47 char:1
5+ Install-SitecoreConfiguration @certParams -Verbose
6+ ~~~~~~~~~~~~~~~~~~~~~~~~~~~~~~~~~~~~~~~~~~~~~~~~~~
7 + CategoryInfo : NotSpecified: (:) [Write-Error], WriteErrorException
8 + FullyQualifiedErrorId : Microsoft.PowerShell.Commands.WriteErrorException,Install-SitecoreConfiguration

The error is saying that it expected to find 1 certificate but found many instead. Each time you run the script the number of thumbprints also keeps going up.

TBH I'm not overly certain what causes this as most of the time you get the one root cert and your done forever more. But somehow you get a second and then get you in a loop of repeatedly deleting certificates only to discover they still exist somewhere. You know it's also not the certificate for the 9.1 install as the certificate has the new name you added to it.

For me the issue was although I had deleted them from my personal certificates, trusted root certificates, and even the c:\certificates folder they were being added to, what I needed to do was run this in PowerShell.

1Get-ChildItem -Path "cert:\LocalMachine\Root" | Where-Object { $_.subject -like "*SIF121Root*" }
2 | Remove-Item

If your wanting to find out what certificates are installed on your machine you can run these

1Get-ChildItem -Path "cert:\LocalMachine\Root" | Format-Table Subject, FriendlyName, Thumbprint
2Get-ChildItem -Path "cert:\LocalMachine\My" | Format-Table Subject, FriendlyName, Thumbprint
3Get-ChildItem -Path "cert:\CurrentUser\My" | Format-Table Subject, FriendlyName, Thumbprint

Make sure your config is actually correct

This one is really just my mistake. Multiple versions of Siteocore have meant rather than just having one "C:\reousrcefiles\" folder on my machine (as per instructions), I now have a few with the version post-fixed to the end. It only becomes apparent that the path in the install.ps1 file is wrong part way through the install process.

What I learnt at Sugcon 2019

What I learnt at Sugcon 2019

This year Sugcon came to London which given that's where I'm based is awesome for me. In total it was a 3 day conference starting with Sitecore Experience aimed more at marketers than developers. As a developer I only went to the 2 developer days, so for your benefit here's a summary of everything I saw.

Day 1

Day 1 started with a keynote, sadly life got in the way and I missed the first few hours. I'm told it was good though.

After that the day was split into a mix of sessions in the big room for all and smaller break out sessions where you could pick 1 of 4 to attend.

JSS Immersion - Lessons learned and looking ahead with Anastasiya Flynn

To kick things off I went to a talk on JSS, mostly because JSS is a subject I know very little about. This was something that became even more apparent as the talk went on! At the end of it I came away with an appreciation that I need to invest some time in learning a lot more, but my other take away was a few links on things that will help me out if I ever try some React stuff.

https://www.styled-components.com

https://www.react-spring.io

PAAS It on: Learning's from a year on Sitecore with Criss Titschinger

Criss works as a dev opps person and over the last year went on the journey of having a Sitecore 8.2 install upgraded to 9 using a fully cloud architecture in Azure.

Overall his experience sounded positive but he did have a few warnings from pain he experienced:

  • Beware of cold start up times with web apps. These can be a real performance hit, especially when Azure decides its going to move your web app instance
  • Web app slots share processing usage so when your warming one up, your live one is taking a hit. If you run on the edge of capacity, this will be an issue
  • Azure search is easy to install but it has a field limitation of 1000 to watch out for
  • Data migration in an upgrade takes a long time the second time. It took 9 days to migrate a years data from mongo! Only do it once.
  • Run your upgrade on clean instances and do the code in visual studio.
  • Web apps need to be on the premium service plan. The others are to weak
  • Use elastic pools for your database to save money. The microservice architecture introduces a LOT of new dbs which are going to cost money in azure resources. Most of the time they also don't do that much so put them in a pool to share resources
  • Moving to 9 is going to increase hosting charges. Be honest with clients about it.

Day 2

On Day 2 I got to attend from the start so it was a much fuller day for me.

10x your Sitecore development with Mark Cassidy

The day started with a talk on questioning how long it should take to build a Sitecore site. It was a question that never really got answered but the main thing Mark really raised was, do we over engineer what we do and would simpler actually be enough? He went on to show a time lapse video of himself implementing a bootstrap template in Sitecore which took 15 hours.

To build this site he didn't install any modules (no glass) and used just the standard Sitecore api. As he pointed out, it was all stuff that could be done by a dev with only the basic Sitecore training, which as there's a short supply of devs in the world, we can potentially make better use of who does what.

Extending and implementing cloud architectures with Rob Habraken

After one talk on cloud the day before I almost gave this one a miss, but I'm glad I didn't.

Rob gave us some of his learning's and things to look out for. As the the previous session the theme of Sitecore 9 becoming far more complex came up and he had some interesting takes on it:

  • Use what you need, disable roles that you don't. I see plenty of Sitecore customers not making use of all the features, and when your in a microservice architecture it does raise the question of why even have this stuff turned on. If you don't use marketing automation then you don't need the role running. It's just costing money to do nothing.
  • Scale down when your not using resource. Unlike a VM web apps can not be turned off so they always cost money. You can delete and recreate, but that's a pain. Instead set up a pipeline to scale them to the lowest resource setting when not being used.
  • He went on to discuss and show how we can use azure functions and logic apps to implement our code rather than building into the main Sitecore project. However you should be careful overdoing it as it can become complex quickly and it's easy to end up with a massive unorganised list of individual azure functions.

Automated personalisation with Chris Nash and Niels Kuhnel

Chris and Niels pointed out the flaw in Sitecores reporting on personalised content. How do we know the rate each converts to a goal at? There's the A/B Test report's but that's not quite the same thing.

They went on to show how they had started measuring the display impressions and click through on personalised content. Then linking the results collected in the reporting db up to a Power BI dashboard.

Sitecore identity: A new Sitecore authentication mechanism with Himadri Chakrabarti

Himadri gave us a look at the new Identity Server framework in Sitecore 9.1:

  • Identity server 4 framework
  • Still uses old asp net membership provider underneath
  • Can work with sub providers like Azure

Measure if you want to go faster with Jeremy Davis

Jeremy was in the situation where a site they were developing would have TV adverts during one of the most watch programs on British TV. Naturally he got scared and went looking for tools to help with performance. He told us about two of them:

  • Sitecore debug tool in experience editor showing the time it takes for components to load.
  • Using Visual Studio debugger to monitor processor usage and memory usage.

Both of these tools are very good at pointing you in the direction of smelly code and the best part is you already have them.

Unfortunately it's the kind of demo that really doesn't convert to text to write here.

We released JSS, you'll never guess what happened next with Adam Weber & Kam Figy

Adam and Kam showed us JSS working with SXA and Sitecore Forms. As mentioned before I don't know much about JSS but after this talk I'm convinced I definitely need to.

Right now it doesn't sound like I would make a site using it, but it could definitely be the future of how we build sites.

The stand out thing is being able to keep your Sitecore install unmodified which would essentially lead us to a real SAAS solution where a Sitecore instance could be spun up from the marketplace and then all other functionality added through server-less functions and a headless front end.

What’s new in Sitecore 9.1

What’s new in Sitecore 9.1

At this year’s Sitecore Symposium, Sitecore shared details of the great new features arriving in Sitecore 9.1 that will benefit everyone from developers to marketers, by offering enhancements in everything from machine learning to aid personalisation down to headless support for JavaScript developers.

Sitecore Cortex

Version 9 was the first introduction to Sitecore Cortex name, which is represents the machine learning capabilities found within Sitecore. In version 9 this was limited to Engagement Value, Optimisation and Path Analysis. Version 9.1 however is building on this base by introducing 3 new Cortex powered capabilities to the platform.

Personalisation Suggestions

Sitecore has been offering the ability to create personalised visitor experiences for a long time now, but half the challenge with this has always been knowing what you should personalise and how you should personalise it.

With Sitecore 9.1 you can now direct the results of content tests to be fed into the machine learning server. Sitecore will then analyse the results of the test and if certain segments responded better to one experience over another, if it did then it will suggest that is set up as a personalisation rule.

Content Tag Automation

Search engines and site searches work far better when content has been tagged correctly. However, tagging is a tedious task most content editors would rather do without. Sitecore 9.1 now helps content editors with this task by hooking into the Open Calais API for natural language processing of content-based fields on an item.

Headless Sitecore

At Symposium 2017, Sitecore announced Sitecore JavaScript Services as the first official step into supporting headless setups using Sitecore. Since then this has been available as a preview while the development continued. With Sitecore 9.1 this is now reaching general availability.

The Headless capabilities mean those working with popular frameworks such as Vue, React and Angular can now build rich applications using Sitecore as the backend without needing to write .net code.

Unlike other headless offerings, Sitecore Headless still retains the functionality that makes Sitecore great. Namely, tracking, optimisation, personalisation and there’s even previews in the Sitecore Experience Editor.

And more

These are just 2 of the stand out features coming in Sitecore 9.1, but as well as this there are;

  • Updates to EXM to help avoid spamming recipients while also being able to classify vital emails such as order confirmations to always be sent
  • Enhancements to Sitecore Forms and Marketing Automation that were introduced in Sitecore 9
  • Sitecore Experience Accelerator now supports WCAG 2.0 accessibility guidelines
  • Preview of Project Horizon, the next version of web content editing
  • Simplification of the installation process with SIF 2.0
How to add a table to content in Sitecore

How to add a table to content in Sitecore

Although most of my blog posts are aimed at developers, this one is really for a content editor. When we build sites and do all the checks to make sure they work well for SEO and hit AAA accessibility standards, it's easy to forget that once we're done the content editors are going to take over with the ability to destroy things :) through the rich text editor.

Scenario

As a content editor you need to display some data in your article, and it makes most sense to put in a table.

Adding a table is actually quite straightforward in Sitecore, it's not much different to doing it in Microsoft Word. You click the insert table button and choose the size you want. However the problem that often gets missed is accessibility. While a table is actually very good for a screen reader, it does need to have a bit of info on things like table headings. e.g. are the they top row, the first column or do they exist at all.

Solution

Adding heading information takes a bit of extra work, but not a lot.

  1. Add you table by clicking the Insert table button and choosing the size you want.

2. Fill in your tables content

3. Right click the table and select "Table Properties"

4. Go to the Accessibility tab and set the heading rows and columns. In this example I have set the first row and first column to be marked as headings.

5. Click on and your table will be updated. If your site has styles for table headings these will also show now too.

6. Switching to HTML view will also show the correct HTML tags now being used.

An alternative approach to this, is at step 1 to pick table wizard rather than picking the size of the table. This will open the same wizard as in step 4 and allow you to specify the size of the table here too.