Blog
Integrating with the Windows Phone 8 Media Hub

Integrating with the Windows Phone 8 Media Hub

One of my favourite features of Windows Phone is the ability for apps to integrate with the different hubs on the phone. The Music and Video hub lets developers do this not only by having their app listed in the apps section, but also by feeding data to the new and history lists plus the currently playing tile.

To add a track to the history list have a look at the following code:

1MediaHistoryItem mediaHistoryItem = new MediaHistoryItem();
2mediaHistoryItem.ImageStream = image;
3mediaHistoryItem.Source = "";
4mediaHistoryItem.Title = "Track Title";
5mediaHistoryItem.PlayerContext["playSong"] = "Track Identifier";
6MediaHistory mediaHistory = MediaHistory.Instance;
7
8mediaHistory.WriteRecentPlay(mediaHistoryItem);

To add a track to the new list is relatively similar:

1MediaHistoryItem mediaHistoryItem = new MediaHistoryItem();
2mediaHistoryItem.ImageStream = image;
3mediaHistoryItem.Source = "";
4mediaHistoryItem.Title = "Track Title";
5mediaHistoryItem.PlayerContext["playSong"] = "Track Identifier";
6MediaHistory mediaHistory = MediaHistory.Instance;
7
8mediaHistory.WriteAcquiredItem(mediaHistoryItem);

Some things to note though; Your image must be 173 x 173px, a title must be given that describes what is playing (not just the name of your app) and the keyString property should be populated with an identifier that you can use to identify the track.
When a user presses the tile in either of the new or history lists it will trigger your app to be opened. In the OnNavigatedTo even you can query the QueryString from the NavigationContext to find the identifier for the song selected by the user.

1bool _historyItemLaunch = false; // Indicates whether the app was launched from a MediaHistoryItem.
2const String _playSongKey = "playSong"; // Key for MediaHistoryItem key-value pair.
3Song _playingSong = null; // The song to play.
4
5protected override void OnNavigatedTo(System.Windows.Navigation.NavigationEventArgs e)
6{
7 MediaLibrary library = new MediaLibrary();
8
9 if (NavigationContext.QueryString.ContainsKey(_playSongKey))
10 {
11 // We were launched from a history item.
12 // Change _playingSong even if something was already playing
13 // because the user directly chose a song history item.
14
15 // Use the navigation context to find the song by name.
16 String songToPlay = NavigationContext.QueryString[_playSongKey];
17
18 foreach (Song song in library.Songs)
19 {
20 if (0 == String.Compare(songToPlay, song.Name))
21 {
22 _playingSong = song;
23 break;
24 }
25 }
26
27 // Set a flag to indicate that we were started from a
28 // history item and that we should immediately start
29 // playing the song after the UI has finished loading.
30 _historyItemLaunch = true;
31 }
32}
33
34private void PhoneApplicationPage_Loaded(object sender, RoutedEventArgs e)
35{
36 if (_historyItemLaunch)
37 {
38 // We were launched from a history item, start playing the song.
39 if (_playingSong != null)
40 {
41 MediaPlayer.Play(_playingSong);
42 }
43 }
44}

There is also an option to write to the now playing section of the hub, however if you are playing your track using BackgroundAudioPlaer this is not needed as it is automatically handled for you from the track information.

Creating Training Buddy's Live Tile

Creating Training Buddy's Live Tile

Live tiles are probably the best known feature about Windows Phone. Unlike iOS's plain grid of app icons Microsoft designed their phones home screen to provide users with data without having to open the app. With Windows Phone 8 the feature was updated so that 3rd party apps like Training Buddy could offer full width tiles along with new layout templates.

Adding a live tile to your app is a great idea as it is one of the features users often look for when their choosing an app. The app store also handily points out if an app uses a live tile or not.

The Design

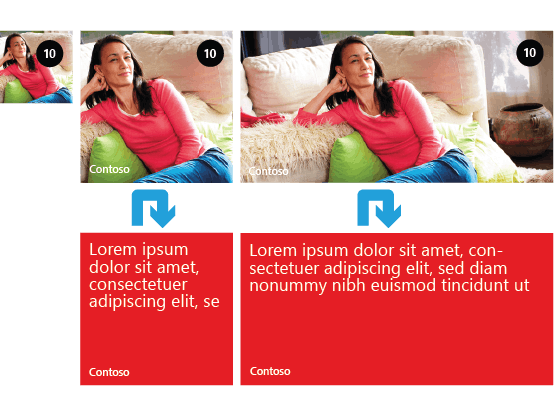
There are 3 tile templates to choose from when you add a live tile to your app. These are Flip, Iconic and Cycle.

Flip gives the illusion that the tile has a front and a back and will flip over after a few seconds.

Iconic has space for an image and a large number, a bit like the icon for messages and emails. When in its largest size there is also wide content zones that can contain text.

Cycle lets you choose 9 images that the app will Cycle through.

For Training Buddy I have used the Iconic template. You will probably find like myself that the type of app you are creating will more than likely determine what template you are going to use. As Training Buddy's live tile was ultimately going to show details of the users last activity, Iconic was the obvious choice. The smaller sizes don't really have enough space to give any activity stats and the large version gives you an additional space for a smaller image that was perfect for the activity type image (running, cycling, walking).

Another alternative is to make a completely custom design and write something in your app to render it as an image. You can then display the image using either the flip or cycle template.

The Code

The second reason you everyone should add live tiles to their app is because the code is so simple (this is the actual code from Training Buddy).

1// Application Tile is always the first Tile, even if it is not pinned to Start.
2 ShellTile TileToFind = ShellTile.ActiveTiles.First();
3
4 // Application should always be found
5 if (TileToFind != null)
6 {
7 string WideContent1 = "";
8 string WideContent2 = "";
9 string WideContent3 = "";
10 string activityLogo = "";
11 if (App.settings.LiveTile)
12 {
13 var lastActivity = (from a in AllActivities
14 orderby a.StartDateTime descending
15 select a).Take(1);
16
17 if (lastActivity.Count() > 0)
18 {
19 if (App.settings.DistanceMeasurement == "Miles")
20 {
21 WideContent3 = "Distance: " + lastActivity.First().Distance.ToString("0.##") + " miles";
22 }
23 else
24 {
25 WideContent3 = "Distance: " + (lastActivity.First().Distance * 1.609344).ToString("0.##") + " km";
26 }
27 WideContent2 = "Date: " + lastActivity.First().StartDateTime.ToShortDateString();
28 switch (lastActivity.First().ActivityType.ToLower())
29 {
30 case "running":
31 WideContent1 = "Last Run";
32 break;
33 case "walking":
34 WideContent1 = "Last Walk";
35 break;
36 case "cycling":
37 WideContent1 = "Last Cycle";
38 break;
39 case "swimming":
40 WideContent1 = "Last Swim";
41 break;
42 }
43
44 activityLogo = "/Assets/" + lastActivity.First().ActivityType + "Black-70.png";
45
46 if (lastActivity.First().CaloriesBurned > 0)
47 {
48 WideContent3 += " Calories: " + lastActivity.First().CaloriesBurned.ToString("0.#");
49 }
50
51 }
52
53 }
54
55 IconicTileData tileDate = new IconicTileData
56 {
57 Title = "Training Buddy",
58 WideContent1 = WideContent1,
59 WideContent2 = WideContent2,
60 WideContent3 = WideContent3,
61 IconImage = new Uri("/Assets/RunningBlack-150.png", UriKind.Relative),
62 SmallIconImage = new Uri(activityLogo, UriKind.Relative)
63 };
64
65 // Update the Application Tile
66 TileToFind.Update(tileDate);
67 }

First I'm finding the application tile. It is possible to create additional tiles for your app which is another great feature, but if you want to just update the main tile it will be the first one returned.

Next I'm checking to see if the user has turned on the live tile or not. If they haven't then I'm just setting the tile back to its default state.

The following lines are then getting the content to display on the tile and building up the strings on local variables.

Lastly and most importantly I'm creating a new instance of IconicTileData and setting each of its properties with the data to show. Then it's just a case of calling Update on the tile instance and providing it with the new IconicTileData object.
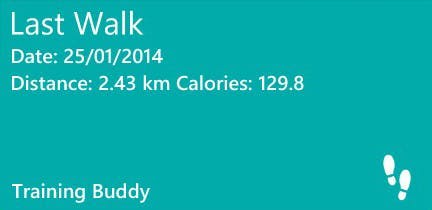
The Tile

And here's the result

Live tiles are really easy to create so if your developing an app you should definitely take the time to add one.

Screenshots in Windows Phone 8

As a person who's used Windows Phone since the very first version I know that one of the missing features was the ability to take screen shots! This was infuriating for developers who wanted a screen shot of their app working to place in the app store (then called marketplace). What made it even worse though was the simulator also lacked the button! Thankfully an update to the simulator fixed this, but the phone was still lacking.

Until..... I don't know when, but the other day I accidentally did it and now know that screenshots are taken by holding power and pressing the windows key before the slide to power off box appears.

I've also hear in WP8.1 this will be replaced with power button and volume down as the requirement for physical back, windows and search buttons is to be removed.

Using Visual Studio with Git Hub

This is one of those great examples of writing a blog post to yourself to remind you how to do something.

If your using Visual Studio 2012 then to add Git support you will need the Visual Studio Tools for Git plugin created by Microsoft's TFS Power Tools Team (http://visualstudiogallery.msdn.microsoft.com/abafc7d6-dcaa-40f4-8a5e-d6724bdb980c), if your using a later version of Visual Studio then it's already built in.

If you're thinking in of using Git Hub as your source control provider then the most basic thing you're going to need to know is how do you get the Git plugin to link up to GitHub. Here's a couple of different methods;

Creating a Project in Git Hub

Click New Repository. Enter a new, Select Public or Private and click Create new Repository.

A new repository will be created in Git Hub

Clone the Project in Visual Studio

Now the project has been created in Git Hub you will need to clone it to your machine so that you can start adding files and sync then back.

Open a new instance of Visual Studio and do the following:

  1. Open the Team Explorer window
  2. Click the connect button
  3. In the list of Local Git Repositories click clone
  4. In the URL box enter the HTTP URL from Git Hub
  5. The second box should auto populate with a location on your hard disk
  6. Click Clone

Creating a Repository on Git Hub using the Git Hub app

Rather than creating the Git Hub repo through the GitHub website you can use their app. Once you've got the app installed and logged in do the following:

  1. Select the GitHub account you want to add the repo to on the left
  2. Click Create button at the top
  3. Enter a name and click create
  4. The repository will be created in GitHub and automatically sync with the folder on your machine

Adding an existing Repository to Visual Studio

If you already have a repository cloned on your machine but it's not showing in Team Explorer you can add it by clicking on Add

  1. Click the Connect button to view the list of local repositories
  2. Click add an enter the path to the repository on your hard drive
  3. Click Add