Blog

HTML5 Series - Video

Like Audio embedding Video in an HTML5 web page is really simple to do and has a very similar syntax.

The video tag can contain multiple source tags to specify videos in different formats as not all browsers support the same ones, and some text to be displayed if the browser does not support any. The video tag can also have a controls element specified to instruct the browser to display controls for the playback.

1<video controls>
2 <source src="URL of video.mp4" type="video/mp4">
3 <source src="URL of alternate video.ogg" type="video/ogg">
4 Your browser doesn't support viodes
5</video>

You can also set the following tags:

autoplay - Specifies that the video should begin playback immediately

loop - Sets the video to repeat

muted - Mutes the audio on playback

poster - Specifies an image to be shown what the video is downloading

preload - Specifies if an how the video should be loaded when the page loads

It is also possible to control a videos playback through JavaScript. You can reload the element, play and pause that track.

1var v = document.getElementById("myVideo");
2v.play();
3v.pause();
4v.load();

HTML5 Series - Location

Being able to get a users location opens up some great functionality especially when used on mobile devices that could be anywhere. HTML5 makes it really easy to capture the users latitude and longitude in just a couple of lines of JavaScript.

What's important to remember though is the user always has the option of denying your request for their location so error handling is very important.

First you need to check to see if the device actually support geolocation by doing navigator.geolocation

1if (navigator.geolocation) {
2 // success code to go here
3} else {
4 alert("location not supported");
5}

Next we need to call navigator.geolocation.getCurrentPosition to get the current location. As capturing a location isn't something that happens instantly (first the browser will check with the user that this is ok and then it may take a few seconds for the device to actually work out the location) you need to provide a function that will be called when the location has been established.

After that accessing the location is easy just look at the coords.latitude and cords.longitude properties on the object that was returned to your callback function.

1<script>
2 function getLocation() {
3 if (navigator.geolocation) {
4 navigator.geolocation.getCurrentPosition(function (location) {
5 document.getElementById("latitude").innerText = location.coords.latitude;
6 document.getElementById("longitude").innerText = location.coords.longitude;
7 }, function (error) {
8 alert(error.code);
9 });
10 } else {
11 alert("location not supported");
12 }
13 }
14</script>
15
16Latitude: <span id="latitude"></span>
17Logitude: <span id="longitude"></span>
18
19<button onclick="getLocation();">Get location</button>
20

HTML5 Series - Audio

Traditionally if you wanted Audio on your page you would embed it in a Flash object. But when Steve Jobs declared that the iPhone would never support Flash or any other plug in's, there was suddenly a demand that browsers would need to support this natively and in a consistent way between browsers.

In HTML5 we can do this using the Audio tag. e.g.

1<audio controls>
2 <source src="url of the file" type="audio/mp3">
3 Your browser doesn't support audio.
4</audio>

The above example demonstrates setting the file source for the audio with the source tag, the controls tag tells the browser to show audio controls and there is also some text that will be displayed if the browser doesn't support audio.

It is also possible to set multiple source tags to reference different file formats as not all browsers support the same ones. Alternatively when setting just one source, a src tag can be placed on the actual audio node rather than as a child element.

Other settings which could be set include:

autoplay - determines if the file should start playing on the page load
loop - specifies that the file should repeat when it's finished
preload - instructs the browser to start downloading the audio file when the page has loaded

HTML5 Series - Flexbox

If you've ever done any WPF, Silverlight, Windows Phone or Windows 8 development using xmal then you will appreciate how good it is to have controls like the StackPanel and Grid, and that HTML is rather lacking in its layout functionality. True you can produce most layouts but it just seems needlessely harder.

Thankfully HTML5 improves on this situation by introducing some new CSS properties.
The first is flexbox. When you define a div as a flexbox you can set its containing items to either space themselves out evenly, or you can set ratio values on each item to say how big it should be compared to the other items in the flexbox and they will stretch to fill the flebox.

Examples
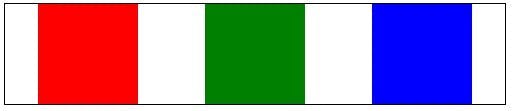
In this example the flexbox is set to distributive which means the containing items will keep there size but distribute themselves evenly in the flexbox.

The key CSS is where the class example 1 sets the display to -ms-flexbox which makes example 1 div a flexbox container, and -ms-flex-pack: distribute, which set the flex mode to distribute the containing items evenly.

1 <style type="text/css">
2 .Example1 {
3 display:-ms-flexbox;
4 -ms-flex-pack:distribute;
5 width:400px;
6 border:solid 1px black;
7 }
8 .Example1 div:nth-child(1) {
9 background-color: red;
10 min-width:80px;
11 min-height:80px;
12 }
13 .Example1 div:nth-child(2) {
14 background-color: green;
15 min-width:80px;
16 min-height:80px;
17 }
18 .Example1 div:nth-child(3) {
19 background-color: blue;
20 min-width:80px;
21 min-height:80px;
22 }
23
24 </style>
25<div class="Example1">
26 <div></div>
27 <div></div>
28 <div></div>
29 </div>

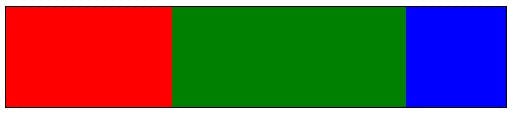
In the next example the containing items have had ratios set so that the second item is twice the width of the first and the third remains at a fixed size.

The key CSS to look at here is on the child div's styles where it says -ms-flex: 1 or -ms-flex: 2.

1<style type="text/css">
2 .Example2 {
3 display:-ms-flexbox;
4 width:400px;
5 border:solid 1px black;
6 }
7 .Example2 div {
8 min-width: 80px;
9 min-height: 80px;
10 }
11 .Example2 div:nth-child(1) {
12 background-color: red;
13 -ms-flex: 1 0 auto;
14 }
15 .Example2 div:nth-child(2) {
16 background-color: green;
17 -ms-flex: 2 0 auto;
18 }
19 .Example2 div:nth-child(3) {
20 background-color: blue;
21 min-width:80px;
22 }
23</style>
24
25<div class="Example2">
26 <div></div>
27 <div></div>
28 <div></div>
29</div>

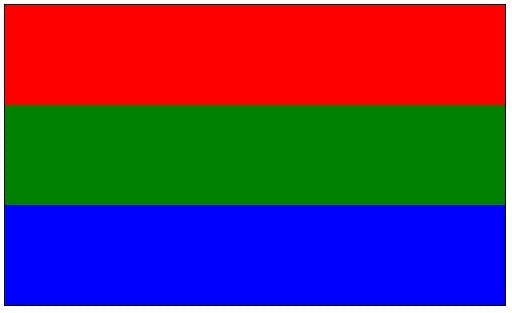
The third example shows how these techniques also work vertically as well as horizontally. See -ms-flex-direction:column on the containing div style.

1<style type="text/css">
2 .Example3 {
3 display:-ms-flexbox;
4 -ms-flex-direction:column;
5 width:400px;
6 border:solid 1px black;
7 }
8 .Example3 div {
9 min-width: 80px;
10 min-height: 80px;
11 }
12 .Example3 div:nth-child(1) {
13 background-color: red;
14 -ms-flex: 1 0 auto;
15 }
16 .Example3 div:nth-child(2) {
17 background-color: green;
18 -ms-flex: 2 0 auto;
19 }
20 .Example3 div:nth-child(3) {
21 background-color: blue;
22 min-width:80px;
23 }
24</style>
25<div class="Example3">
26 <div></div>
27 <div></div>
28 <div></div>
29</div>

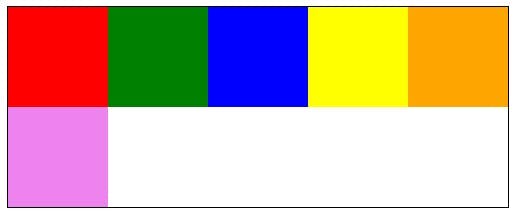
Lastly in the fourth example I've shown how items can be set to wrap when they fill up a line with -ms-flex-wrap:wrap;

1<style type="text/css">
2 .Example4 {
3 display:-ms-flexbox;
4 -ms-flex-wrap:wrap;
5 width:400px;
6 border:solid 1px black;
7 }
8 .Example4 div {
9 min-width: 80px;
10 min-height: 80px;
11 }
12 .Example4 div:nth-child(1) {
13 background-color: red;
14 }
15 .Example4 div:nth-child(2) {
16 background-color: green;
17 }
18 .Example4 div:nth-child(3) {
19 background-color: blue;
20 }
21 .Example4 div:nth-child(4) {
22 background-color: yellow;
23 }
24 .Example4 div:nth-child(5) {
25 background-color: orange;
26 }
27 .Example4 div:nth-child(6) {
28 background-color: violet;
29 }
30</style>
31<div class="Example4">
32 <div></div>
33 <div></div>
34 <div></div>
35 <div></div>
36 <div></div>
37 <div></div>
38 <div></div>
39</div>