Sitecore
Downloading multiple images from Sitecore

Downloading multiple images from Sitecore

Initially it seems like an easy request, "can I have a copy of the images from this folder including all the sub-folders", and then you remember Sitecore stores all the images in the DB so those folders that they're in aren't real file folders for you to copy and paste from. Hopefully you check the admin for an export button only to discover that the only download button for an image is on the individual image, not the folder. Being a developer faced with the prospect of having to click a download button on an unknown number of images, you do what every good developer does and try and find an alternative.

The good news is your in luck, there is a way and I'm going to tell you it.

Sitecore Powershell Extensions

Not only is Sitecore Powershell extensions a great way of writing scripts to interact with your Sitecore DB without having to do code releases. It also comes with the exact script you need!

First head over to the Sitecore Marketplace and download the correct package for your Sitecore version. https://marketplace.sitecore.net/en/Modules/Sitecore_PowerShell_console.aspx

Installation is simple, you just install the package, no config changes needed.

Now go to the media library and right click the folder you want to export. In the context menu, select scripts and then download.

Just like that, a dialogue appears asking you if you want to download the zip it just created. Click download and you will have all the images.

They will even be organized with the correct folders inside.

How to create a custom droplist in Sitecore

How to create a custom droplist in Sitecore

You could call this how to create a custom drop down, or select list, potentially even picker, but if you've ended up here hopefully what your after is a way to create a drop down list in the Sitecore admin populated with options that aren't from Sitecore.

Fortunately this is quite simple to do by creating a new field type. First we will create the code are new custom field type, then add it to the list of field types in the core db and then use it in a template.

Custom Field Type Code

  • Either create a new class library or decide on an existing one to put the code for your new field type in.
    I've imaginatively gone for one called HiMyNameIsTim.Sitecore.FieldTypes
  • Add a reference to Sitecore.Kernel (you can get this from the Sitecore NuGet feed)
  • Create a class for your custom field type
  • Add the following code, replacing the options with your logic to get the values.
1using Sitecore.Web.UI.HtmlControls;
2
3namespace HiMyNameIsTim.Sitecore.FieldTypes
4{
5 public class SchemeDropList : Control
6 {
7 protected override void DoRender(System.Web.UI.HtmlTextWriter output)
8 {
9 output.Write("<select" + ControlAttributes + ">");
10 output.Write("<option></option>");
11
12 string s;
13 if (base.Value == "1")
14 s = "selected";
15 else
16 s = "";
17 output.Write("<option value=\"1\" " + s + ">First</option>");
18
19 if (base.Value == "2")
20 s = "selected";
21 else
22 s = "";
23 output.Write("<option value=\"2\" " + s + ">Second</option>");
24
25 output.Write("</select>");
26
27 RenderChildren(output);
28 }
29 }
30}

  • Publish this into your site
  • Login to the admin and switch to the core db
  • Navigate to "/sitecore/system/Field types/List Types/" in the tree
  • Create a new item of type "/sitecore/templates/System/Templates/Template field type"
  • Populate the assembly and class option with the values for the class you just made. For me this is:
  • Switch to the master DB and create a template using your new field type. Here's mine:
  • Create a page and you should have a drop down list with the values from your class.
Sitecore 10 with headless ASP.NET Core

Sitecore 10 with headless ASP.NET Core

Sitecore 10 is here and with it comes the new developer experience with what Sitecore are calling Sitecore Headless Development.

Now you may be thinking, "didn't Sitecore already have a Headless setup in Sitecore 9" and the answer would be yes, is still exists and is referred to as Sitecore Javascript Services (JSS). What makes this difference is the rendering layer is now using ASP.NET Core rather than Javascript libraries like Angular, VueJS and React. This gives us the benefits of a headless setup without having to program in one language for the back end (C#) and another for the front (JS). It's now C# everywhere.

Before we get any further into what this new experience is, let's clear one thing up. Like Sitecore JSS, this isn't actually a true headless setup, it's decoupled. The subtle difference being that a headless CMS has no rendering engine and has a purpose to feed content to multiple heads that could be anything from a website or app to physical display boards. They generally lack the ability to do things like preview because they have no knowledge of how the content will be rendered. Decoupled on the other hand still has a rendering engine but its been split off from the backend. Headless however is far more of a buzz word right now and alas Sitecore have called this headless.

So how does it work?

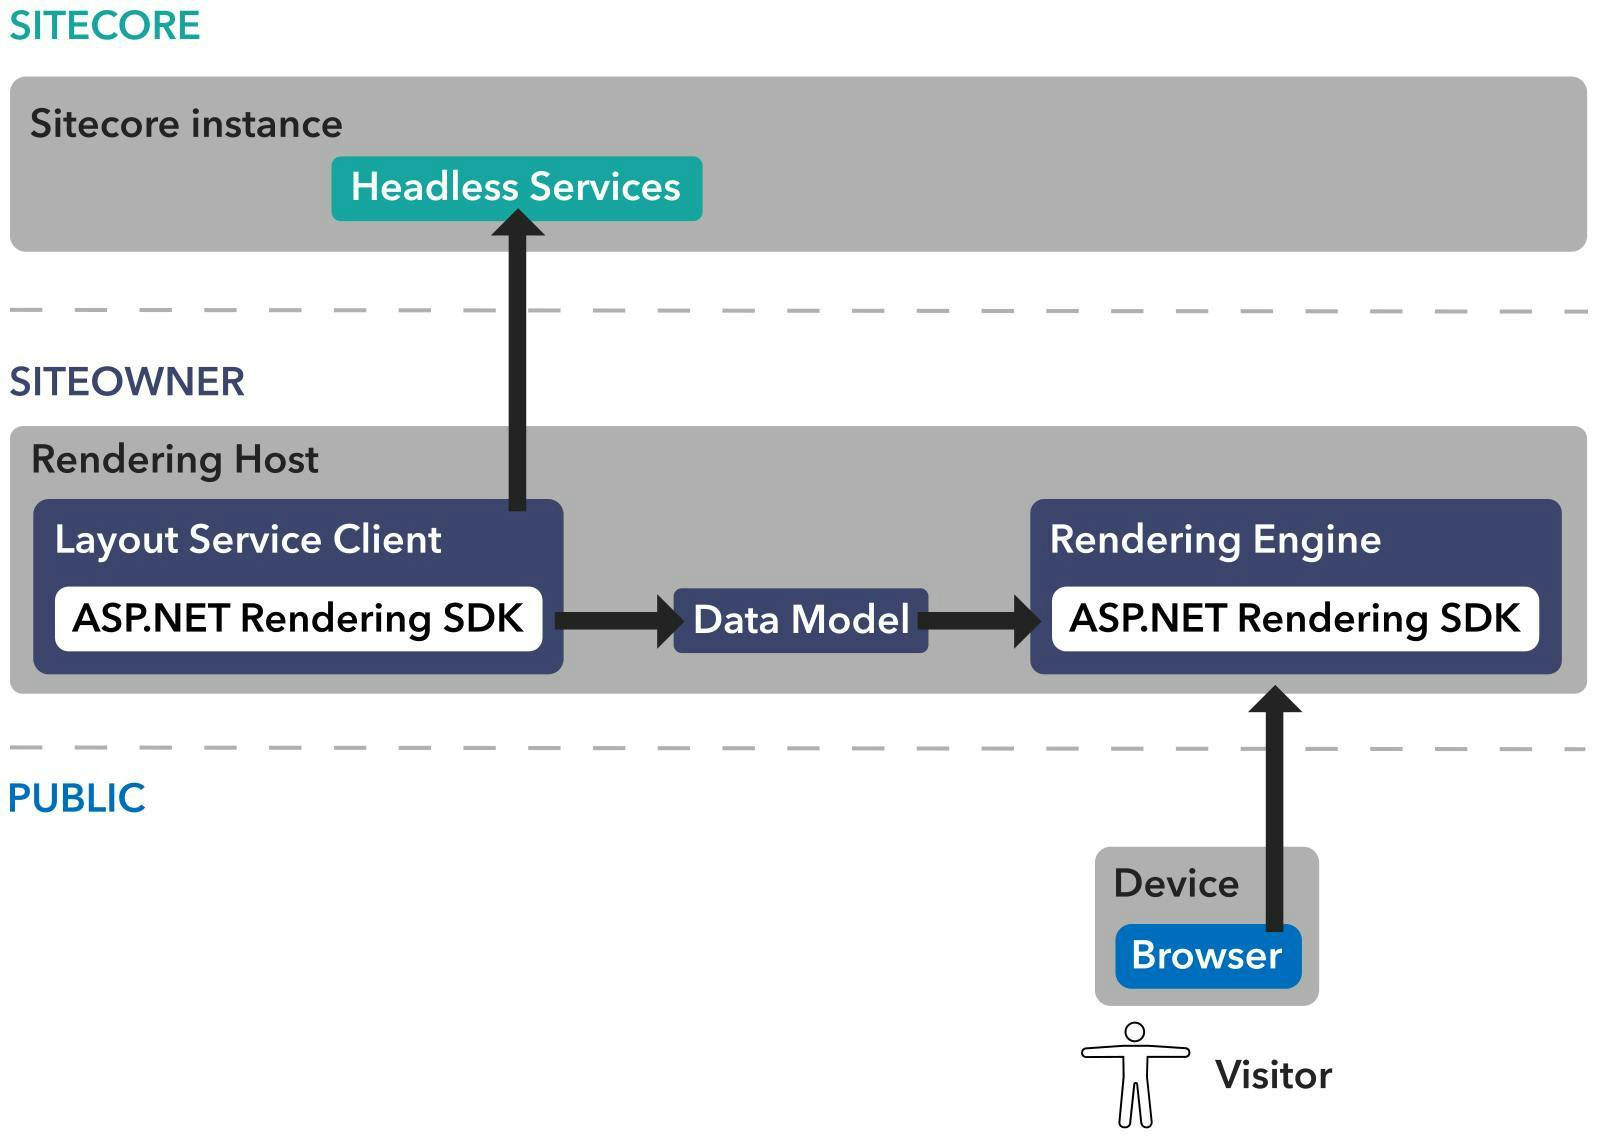
The traditional part of Sitecore is essentially the same as it is now. You still have Content Manager and Content Delivery servers, XConnect, Identity and all the other roles exist just as they did in Sitecore 9. However rather than creating View and Controller Renderings in Sitecore to return HTML, you will now create JSON renderings that will return item data through an API.

Communicating with that API is a new Rendering Host layer written in ASP.NET Core.

So now when a visitor comes to your site they will be interacting with the ASP.NET Core site which in turn will call the Headless Service API on your content delivery server, this will return JSON objects for the item data. The ASP.NET Core site then renders the page and returns it to the visitor.

This may sound like a bit more work, as you now have to setup a completely separate ASP.NET Core site and have that talk to an API but there's good news. Sitecore have written a Sitecore ASP.NET Rendering SDK (included via NuGet) which will do most of the communication with the API for you. Most of what you will actually do is just a mapping of a View in the Rendering Host to a Layout Rendering item in Sitecore. The SDK will take care of the rest.

What's the benefit?

As a developer there are three massive benefits that I can see for this setup.

Installs and Upgrades should be easier

If I had one complaint about Sitecore, it's the amount of config to get the site running. With platforms like Umbraco and EPI, you just include a NuGet package in your project, run it from Visual Studio and you have a working CMS. Sitecore has to be installed in one of countless ways (SIF, GUI, Serverless, Containers) and that install process creates an ever increasing number of roles that all need to communicate with each other, and all need to be upgraded at some point.

Now this isn't quite a SASS model, but it's getting closer. With your rendering host now separated from the Sitecore install there's less reasons to ever touch what gets setup by the installer.

Notice I do say less and not no reason. You will still be making changes to the CM and CD instances. For any type of rendering where you would have written a controller you will likely create what is called a contents resolver class that will need to go on the CM/CD to generate the object for your view.

You can run and debug directly from Visual Studio

Whenever I switch away from working on Sitecore and then go back the first point of pain is always the realisation that I'm going back to a process of Write code in Visual Studio > Publish to local site > Look at local site > if there's a need to debug ctrl+alt+p to attach to process > realize Visual Studio isn't in admin mode so restart Visual Studio etc etc etc, but with this setup it's Write code > Press F5 > watch the lightweight front end instantly spin up and work.

Front End devs only need the ASP.NET Core project

Life is hard for a Front End developer working on Sitecore. There skill set is in HTML and CSS, but they have to work with this beast of a CMS and get updates from the back end devs to work on their local environments. Tools like Feydra help improve the situation, but it's still not perfect.

In theory with a decoupled setup, with the Sitecore instance running on a server somewhere and a decent internet connection, all they now need is the ASP.NET Core Rendering Host project which will run direct from source control. No need to install anything and they can even work on a Mac!

How do you get setup?

To get going is a relatively simple experience due to the fact Siteocre have provided a getting started template (https://doc.sitecore.com/developers/100/developer-tools/en/walkthrough--using-the-getting-started-template.html) and a guide for creating your first model-bound view.

The guide uses a Sitecore Container setup (also new in Sitecore 10) which makes it even easier to get started with (no more installing all those pesky pre-req's like Solr with https and debugging SIF errors).

I ran into a few issues with the containers that came down to ports not being available (if you do get errors, check the documentation for containers, it lists some additional port numbers that need to be free), but once you have it setup I would say you end up with more questions on the container side of things and the rendering host part just works.

What is missing?

This is a first release so obviously some things are missing right now. The biggest things I've come across so far are:

  • Information on how you debug. Wanting to know if an issue is with the API not returning data or the rendering host not rending it lacks any guidance on how to do this right now.
  • Sitecore Forms. A relatively important module for sites which won't be available if you choose this setup.
  • Ability or at least instructions on how the Rendering Host should interact with the Sitecore DB or Search. For instance if you wanted to create an API to provide an autocomplete on a search box, logically you would now create the API in the rendering host, but the best practice way to retrieve the data from Sitecore is not yet clear.
Using Sitecore TDS with Azure Pipelines

Using Sitecore TDS with Azure Pipelines

Sitecore TDS allows developers to serialize Sitecore items into a file format which enables them to be stored in source control. These items can then be turned into a Sitecore update package to be deployed into a Sitecore solution.

With tools like Team City it was possible to install the TDS application on the server, and MSBuild would pick it up in the same way that Visual Studio would when you create a build locally. However, with build tools like Azure Piplelines that are a SAAS service you do not have any access to install components on a server.

If your solution contains a TDS project and you run an Azure Pipeline, you will probably see this error saying that the target 'Build' does not exist in the project.

Fortunately, TDS can be added to a project as a NuGet package. The documentation I found on Hedgehogs site for TDS says the package is unlisted on NuGet.org but can be installed in the normal way if you know what it's called. When I tried this is didn't work, but the NuGet package is also available in the TDS download so we can do it a different way.

Firstly download TDS from Hedgehogs website. https://www.teamdevelopmentforsitecore.com/Download/TDS-Classic

Next create a folder in the root of your drive called LocalNuGet and copy the nuget package from the download into this folder.

Within Visual Studio go to Tools > NuGet Package Manager > Package Manager Settings, and in the window that opens select Package Sources on the left.

Add a new package source and set it to your LocalNuGet folder.

From the package manager screen select your local nuget server as the package source and then add the TDS package to the relevant projects.

When you commit to source control make sure you add the hedgehog package in your projects packages folder. Normally this will be excluded as your build will try and restore the NuGet packages from a NuGet feed rather than containing them in the repo.

If you run your Azure Pipleine now you should get the following error:

This is a great first step as we can now see TDS is being used and we're getting an error from it.

If you're not getting this, then open the csproj file for your solution and check that there are no references to c:\program files (x86)\Hedgehog Development\ you should have something like this:

1<Target Name="EnsureNuGetPackageBuildImports" BeforeTargets="PrepareForBuild">
2 <PropertyGroup>
3 <ErrorText>This project references NuGet package(s) that are missing on this computer. Use NuGet Package Restore to download them. For more information, see http://go.microsoft.com/fwlink/?LinkID=322105. The missing file is {0}.</ErrorText>
4 </PropertyGroup>
5 <Error Condition="!Exists('..\packages\HedgehogDevelopment.TDS.6.0.0.10\build\HedgehogDevelopment.TDS.targets')" Text="$([System.String]::Format('$(ErrorText)', '..\packages\HedgehogDevelopment.TDS.6.0.0.10\build\HedgehogDevelopment.TDS.targets'))" />
6 </Target>
7 <Import Project="..\packages\HedgehogDevelopment.TDS.6.0.0.10\build\HedgehogDevelopment.TDS.targets" Condition="Exists('..\packages\HedgehogDevelopment.TDS.6.0.0.10\build\HedgehogDevelopment.TDS.targets')" />

To fix the product key error we need to add our license details.

Edit your pipeline and then click on the variables button in the top right. Add two new variables:

  • TDS_Key - Which should be set to your license key
  • TDS_Owner - Which should be set to the company name the key is linked to

Now run your pipleline again and the build should succeed