Over the last decade, front end development has matured from a point where CSS and JavaScript were written in badly organised files containing the exact code a browser would interpret, to something that now more resembles back end development.
Pure CSS has become the byte code of the front end world with LESS and Sass becoming the languages of choice. Instead of MSBuild for running a compilation Gulp can be used to automate workflows to compile Sass files, minify them and do whatever else is needed to produce the code for deployment (not really an exact comparison, but you get the point).
To truly achieve a matured development setup though, the final step is to remove those "compiled" css and js files from source control. After all you wouldn't check in a dll with the source code for each build. If your using a build server then this is a relatively easy step to add to your workflow. However the bigger issue is not making life hard for your back end developers.
Without the final CSS and JS files in source control your back end devs may now be faced with a site lacking all style and front end functionality when they hit F5. With LESS and Sass also not really being there thing, they're now left not really knowing what to do, and also not overly happy about having to learn something about front end do continue with there back end work. To make matters worse, Visual Studio often isn't the front end dev's choice of tool so copying the front enders setup isn't an ideal solution either.
The Aim
The ideal solution would be for a back end dev to be able to check out a solution from source control (containing no compiled CSS of JS files), hit F5 in Visual Studio, the final CSS and JS be created as part of the build and the site to run. No opening a command prompt to run a gulp task, or any other process the front end devs may be using. It should be completely invisible to them.
Visual Studio Task Runner
With Visual Studios Task Runner, this is entirely possible.
The Task Runner is built into Visual Studio, so there's no need for the back end dev to install any extra tools, and more importantly, tasks can be linked into a before build event so that the back end dev doesn't need to do anything.
A bit of background on gulp and the task runner
When front end developers set up gulp, they will configure a set of gulp tasks within a file named gulpfile.js (in reality they may actually separate the tasks into multiple files referenced by gulpfile.js, but this file is the important bit). These tasks may look a bit like this:
1gulp.task("min:js", () => {
2 return gulp.src([paths.js, "!" + paths.minJs], { base: "." })
3 .pipe(concat(paths.concatJsDest))
8gulp.task("min:css", () => {
9 return gulp.src([paths.css, "!" + paths.minCss])
10 .pipe(concat(paths.concatCssDest))
12 .pipe(gulp.dest("."));
15gulp.task("min", gulp.series(["min:js", "min:css"]));
In this example there are 3 tasks. The first minifies some JS while the second minifies some CSS. The third is defining a series which runs the first 2.
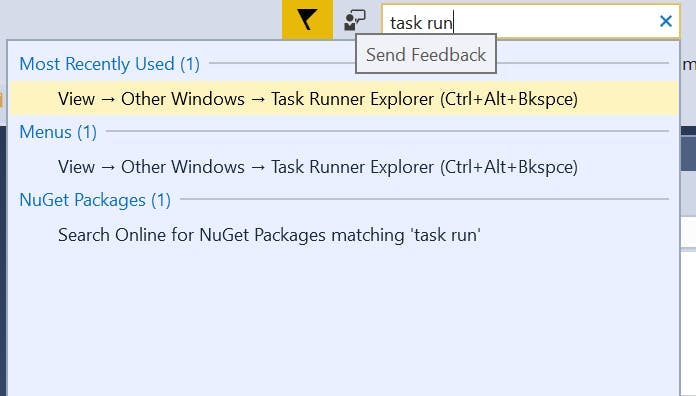
Visual Studios task runner will look file the file called gulpfile.js and pull out all the tasks within it. The task runner window may not be open by default, so to open it type task runner in the search box and select it from the results. Alternatively you can right click the gulpfile in the solution and select Task Runner from the context menu.
The task runner window will open at the bottom of the screen, and will list out all the gulp tasks found within the gulpfile.js file. If the front end devs have organised the tasks into separate files, as long as the gulpfile.js file in the root of the project has some way of referencing them, they will still show up.
If you don't see any of the tasks, and have only just added the file or a task to the file. You may need to click the refresh button.
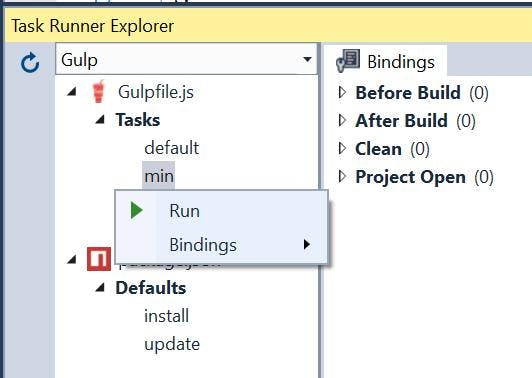
To run a task, simply right click it and then choose Run.
Automating on build
Being able to run a gulp task is handy, but what we're really after is for it to be automated as part of the build.
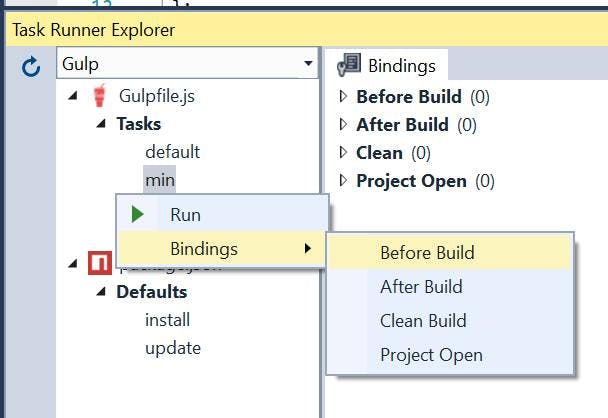
For this we just need to right click the task to be run, and then from the bindings option, select before build.
This will add a comment to the top of the gulpfile.js which Visual Studio will look for to know what task should be run before a build.
1/// <binding BeforeBuild='min' />
With this set, the back end devs no longer need to be concerned with not having any compiled css and js, and with a small amount of knowledge also have the ability to make minor changes to css and js where needed.
Some others tips
Depending on your front end devs setup there could be some additional challenges to overcome.
Front end devs not using Visual Studio
Quite often Visual Studio isn't the choice of dev environment for a front end dev. One issue this can lead to is files missing from the Visual Studio solution. However an easy fix for this is to use wild cards in the csproj file.
If the front end devs code can be grouped into specific folders then use a wild card to include all the files from that folder in the project.
1<None Include="build\js\**\*.js" />
CSS/JS not in the web project
If the front end devs have a separate folder for there work. e.g. they might work with static html files. Then the code may not be in the project what will be run, and therefore nothing will trigger the gulp file to have it's task run.
A simple solution for this is to create a visual studio project for the folder with there work so that it has a build event to be attached to. Make sure your web project also references this project to trigger it to be built when the web project is.
Links
For more info on using Gulp with Visual Studio. Check out Microsofts guide on using Gulp with ASP.NET Core.