Blog
Logging with .net core and Application Insights

Logging with .net core and Application Insights

When you start builing serverless applications like Azure functions or Azure web jobs, one of the first things you will need to contend with is logging.

Traditionally logging was simply achieved by appending rows to a text file that got stored on the same server your application was running on. Tools like log4net made this simpler by bringing some structure to the proces and providing functionality like automatic time stamps, log levels and the ability to configure what logs should actually get written out.

With a serverless application though, writing to the hard disk is a big no no. You have no guarantee how long that server will exist for and when your application moves, that data will be lost. In a world where you might want to scale up and down, having logs split between servers is also hard to retrieve when an error does happen.

.net core

The first bit of good news is that .net core supports a logging API. Here I am configuring it in a web job to output logs to the console and to Application insights. This is part of the host builder config in the program.cs file.

1//3. LOGGING function execution :
2//3 a) for LOCAL - Set up console logging for high-throughput production scenarios.
3hostBuilder.ConfigureLogging((context, b) =>
4{
5 b.AddConsole();
6
7 // If the key exists in appsettings.json, use it to enable Application Insights rather than console logging.
8 //3 b) PROD - When the project runs in Azure, you can't monitor function execution by viewing console output (3 a).
9 // -The recommended monitoring solution is Application Insights. For more information, see Monitor Azure Functions.
10 // -Make sure you have an App Service app and an Application Insights instance to work with.
11 //-Configure the App Service app to use the Application Insights instance and the storage account that you created earlier.
12 //-Set up the project for logging to Application Insights.
13 string instrumentationKey = context.Configuration["APPINSIGHTS_INSTRUMENTATIONKEY"];
14 if (!string.IsNullOrEmpty(instrumentationKey))
15 {
16 b.AddApplicationInsights(o => o.InstrumentationKey = instrumentationKey);
17 }
18});

Microsofts documentation on logging in .NET Core and ASP.NET can be found here.

Creating a log in your code is then as simple as using dependency injection on your classes to inject an instance of ILogger and then using it's functions to create a log.

1public class MyClass
2{
3 private readonly ILogger logger;
4
5 public MyClass(ILogger logger)
6 {
7 this.logger = logger;
8 }
9
10 public void Foo()
11 {
12 try
13 {
14 // Logging information
15 logger.LogInformation("Foo called");
16 }
17 catch (Exception ex)
18 {
19 // Logging an error
20 logger.LogError(ex, "Something went wrong");
21 }
22 }
23}

Application Insights

When your application is running in Azure, Application Insights is where all your logs will live.

What's great about App Insights is it will give you the ability to write queries against all your logs.

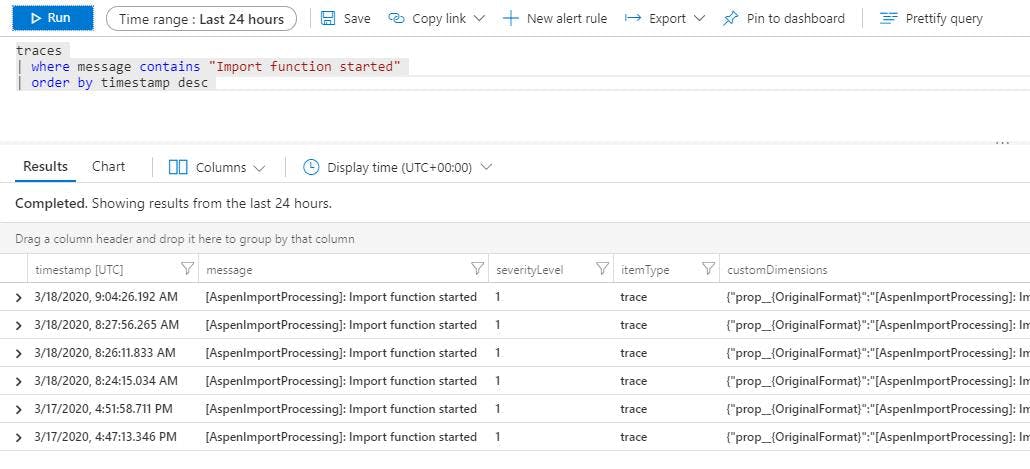
So for instance if I wanted to find all the logs for an import function starting, I can write a filter for messages containing "Import function started".

Queries can also be saved or pinned to a dashboard if they are a query you need to run frequently.

For all regular logs your application makes you need to query the traces. What can be confusing with this though is the errors.

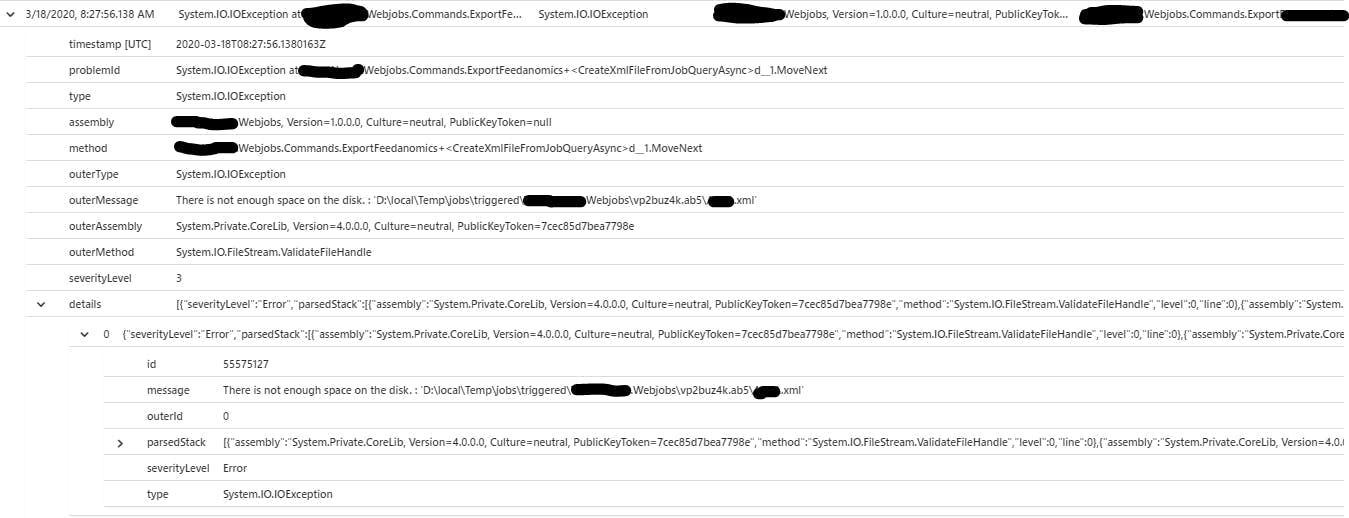
With the code above I had a try catch block and in the catch block I called logger.LogError(ex, "Something went wrong"); so in my logs I expect to see the message and as I passed an exception I also expect to see an exception. But if we look at this example from application insights you will see an error in the traces log but no strack trace or anything else from the exception.

This is just the start of the functionality that Application Insights provides, but if your just starting out, hopefully this is a good indication not only of how easy it is to add logging to your application, but also how much added value App Insights can offer over just having text files.

Why is my Session ID changing on 3D Secure payments?

Why is my Session ID changing on 3D Secure payments?

If you have a website where you are implementing 3D Secure payments, you may find that you have an issue where on receipt of the payment setup confirmation the users Session ID has changed with no apparent cause.

Lets have a quick run through of the payment process in this scenario (this is roughly how SagePay and WorldPay both work):

  1. User completes payment details on your site (some wizardry normally happens at this point with an iFrame for the card number to maintain PCI compliance) and the form is submitted to your server
  2. You server call's an API from the payment gateway to setup a 3D Secure payment. It passes the users Session ID along with all the payment details.
  3. Payment gateway responds with a URL for you to redirect the user too by posting a form to it. You do this, likely in an iFrame so that the page still looks like your website (otherwise it's a very ugly page).
  4. User may or may not get prompted by some sort of authentication by the bank. This could be something like receiving a text message with a code to enter.
  5. When authenticated the user is sent back to your website (in the iFrame) with a post request.
  6. Your server picks out the form details from the request and then calls an API to complete the transaction. In this API call you send the Session ID so that the payment gateway can validate it is the same as the one at the start of the process.
  7. Confirmation shown to the user.

Introducing the Same Site Cookie Policy

In 2020 a change made to how cookies function in browsers to defend against cross site scripting. Troy Hunt has a brilliant explanation of the issue with how cookies used to work and how this has changed here. I'm going to try a much shorter explanation;

When a request is made from a browser, as part of the request all the cookie values for that domain are sent with the request. This will include one for the Session ID. The theory here is that because the cookies are only being sent to the domain which set them in the first place, then information is only being shared back with the place that set it to begin with, which is therefor safe.

However the workings of the internet and what domain a button click might call isn't overly obvious to most people. So what if clicking a link on one site causes the user to be redirected to another site? Answer: all the cookies are still sent. The same thing happens if a form is posted from one site to another site. The problem here is that if you are authenticated on the other website, then its possible for a cross site scripting attack to be using your session via your browser without you even realising you were on the site again. This is why it's always a good idea to log out of websites!

The introduction of the same site policy changes how cookies work with three options:

  1. None: which is what the browsers used to do. i.e. send all the cookies with cross-origin request
  2. Lax: some limits on sending cookies with cross-origin request
  3. Strict: tight limits on sending cookies with cross-origin request

None is sending everything and a strict policy will basically stop cookies from being sent when they have a cross-origin request.

A Lax policy is slightly more interesting though, because it depends if the request is a GET or a POST. If it is a GET then the cookies will still be sent, which means that if you follow a link from another site or a search engine your cookies will still be sent to the site. However a POST (like what the 3D Secure page is doing) will no longer send the cookies.

If the policy isn't set, then Lax is used as the default.

So why is my Session ID changing?

The problem is that post request back to your site, unless the Session ID had a cookie policy of None then the Session ID cookie won't be sent. The server will then see that there is no Session ID and treat the users as if they are new on the site and as a result start a new session. From this point on the user has lost the old session and you can't complete the payment. Worse still they've probably just been logged out and anything else using session data has also been lost.

In .Net 4.7.2 and up, Microsoft has implemented the ability to set the cookie policy of the session ID. You can do this in your web.config file like this:

1<configuration>
2 <system.web>
3 <anonymousIdentification cookieRequireSSL="false" /> <!-- No config attribute for SameSite -->
4 <authentication>
5 <forms cookieSameSite="None" requireSSL="false" />
6 </authentication>
7 <sessionState cookieSameSite="None" /> <!-- No config attribute for Secure -->
8 <roleManager cookieRequireSSL="false" /> <!-- No config attribute for SameSite -->
9 <system.web>
10<configuration>

You can find more about this here. In everything older the policy wont be set and will default to Lax.

However just because you can set the cookie policy to None, it doesn't mean you should. After all, that just re-opens the vulnerability the browser was trying to protect against.

The solution I went with was to have a page that the users is redirected back to from the payment gateway that does nothing other than re-submit the values from the payment gateway to the site again. This way I can be sure of what form data is being posted to the site, and when I re-post it, it is a same site post and not a cross-origin which means the Session ID cookie will be sent.

To stop my initial page setting a new session cookie (which it will try to do because it won't recieve one), I use the IIS URL Rewrite module to strip out the set cookie response headers from the page.

You can do this with an outbound rule as follows:

1<rewrite>
2 <rules>
3 </rules>
4 <outboundRules>
5 <rule name="Remove SetCookie Header" preCondition="Match Payment Page">
6 <match serverVariable="RESPONSE_Set-Cookie" pattern=".*" />
7 <action type="Rewrite" value="" />
8 </rule>
9 <preConditions>
10 <preCondition name="Match Payment Page" logicalGrouping="MatchAny">
11 <add input="{REQUEST_URI}" pattern="PAGE NAME GOES HERE" />
12 </preCondition>
13 </preConditions>
14 </outboundRules>
15 </rewrite>

With this solution the cookies are still secure as the policy is set to Lax and I can take payments using 3D Secure which will soon become a requirement.

What are automated deployments and why do I need them?

What are automated deployments and why do I need them?

When your working on a new website build as either the marketer responsible for the site or the project manager overseeing it’s build, some of the most frustrating tasks to be using up your budget can originate from the IT team and come under the category of setup.

They can suck days even weeks from a project but offer no visible features or benefit to the end user, worse still they often need to come at the start of a project which for people wanting to see a design turn into a webpage just feels like a delay and lack of progress.

Manual Deployments

So, what are automated deployments and why are they worth it? Well first let’s examine what a deployment is to begin with.

When a change or new feature is ready to be built for a site, it will have been turned into a specification and handed over to a development team to build. The developers will then write some code and test it on their local machines, they may even demo it to someone else. At some point though, that work needs to get from their machine to the server(s) it runs on so that other people like QA can see it without using the devs machine. Typically, there will be 3 server environments set up for a website:

  1. Dev / Test – An environment used by the developers and QA to build, test and refactor new features and fixes.
  2. UAT / Staging – An environment used by the website owners / stakeholders that the features have been deployed to for review and approval before they are deployed into production.
  3. Production – The live website that is accessible over the internet.

In a manual deployment setup, the developer is responsible for copying the website into each of the environments. This will generally involve:

  1. Getting the version of code to be deployed from source control.
  2. Publishing a build of the site locally (some languages need to be compiled into machine code, and most modern websites will run a task on the CSS and JavaScript to obfuscate and reduce the file size).
  3. Login to databases and run any scripts to update the database.
  4. Login to the web servers using something like a remote desktop client.
  5. Copy and Paste the new files onto the server.
  6. Make some sort of record that the deployment has been done and what it included.

As you can probably guess each of these steps is prone to human error; What if the developer gets the wrong version from source control? What if they overwrite the wrong folder? What if they miss the database changes? What if they don’t record the deployment, how can we be sure what version is on an environment?

Not only that but it’s also a lengthy task for someone to do. Some parts are just waiting for a code publish to complete or a file copy to finish. For the odd production deploy with a decent checklist this might not be so bad, but for iterating work into QA this can not only make QA fails for minor things really costly to fix, but also result in bundling more and more changes together to cut down the number of releases which then reduces the flow of work feeding into QA and slows the pace at which features can be developed and released.

A Better Way

Now we understand the issues, we certainly don’t want that as a cost throughout the lifetime of our site, so how do we avoid it?

Well, automated deployments quite simply take all these manual steps, automated them with a few bonuses on top. By doing this we remove all the elements of human error and are left with consistent results each time.

There’s two parts to an automated pipeline, the first is build and the second is release.

The build part relates to the first 2 steps of our manual process. We need to get the code from source control and then publish it. Once we’ve done this, we are left with a build that we can assign a release number to. By automating it we’ve also ensured that the build happens the same way each time rather than any differences between developers’ machines being. At this point we can also start detecting build failures and include some automated testing to pick up on errors before even involving QA.

The release part relates to the remaining steps of the manual process. First of all the process of copying files and running scripts now becomes one large script that won’t miss a step and in addition to that, now we have build numbers we can see which build is on each environment and only promote the one we want to the next environment. Because we’re promoting builds rather than doing the whole build process again, we’re also ensuring that the build going to production is the exact same thing that was tested on QA and then reviewed on UAT. With some clever integrations with things like GitHub and Jira we can also automated release notes to say what was included in each of the releases.

Degrees of Automation

It worth noting at this point that there are different degrees of automation and this will greatly affect the cost of setup.

As well as automating the deploy of code, we could also automate the entire server setup through the use or ARM templates in Azure. Different levels of automated testing can be implemented from very low code coverage to very high; a test could even be what the level of code coverage is.

Automation could also extend to include load balancers for green / blue deployments where zero downtime of the site is achieved by using multiple production servers and switching between them while files are being copied.

Is this the CI and CD thing I’ve heard about?

Two terms I deliberately haven’t used in this article is Continuous Integration (CI) and Continuous Delivery (CD) and that’s because although automated deployments forms part of achieving them they are not the same thing and it’s worth knowing how they differ.

Continuous Integration related to the build part of the automated setup and aims to deal with issues arising from multiple developers working on a project. When more than one developer works on a copy of a website locally, both sets are changing in different way to what is contained within source control. The longer this goes on for the bigger the differences get and the harder it will become to merge again. Continuous Integration advocates shortening the gaps between merges to as shorter time as possible, potentially multiple time per day. By having automated tools in place to run a build whenever this happens, issues can be identified as early as possible.

Continuous Delivery relates more to the release aspect of the automated setup and is an aim to be constantly delivering / deploying updates to a solution as fast as possible. By doing this, deployments become trivial and smaller updates are delivered at a much faster pace rather that being queued for one big release. Automation helps make this a reality by removing many of the manual time consuming tasks that are repetitive.

How to create a custom droplist in Sitecore

How to create a custom droplist in Sitecore

You could call this how to create a custom drop down, or select list, potentially even picker, but if you've ended up here hopefully what your after is a way to create a drop down list in the Sitecore admin populated with options that aren't from Sitecore.

Fortunately this is quite simple to do by creating a new field type. First we will create the code are new custom field type, then add it to the list of field types in the core db and then use it in a template.

Custom Field Type Code

  • Either create a new class library or decide on an existing one to put the code for your new field type in.
    I've imaginatively gone for one called HiMyNameIsTim.Sitecore.FieldTypes
  • Add a reference to Sitecore.Kernel (you can get this from the Sitecore NuGet feed)
  • Create a class for your custom field type
  • Add the following code, replacing the options with your logic to get the values.
1using Sitecore.Web.UI.HtmlControls;
2
3namespace HiMyNameIsTim.Sitecore.FieldTypes
4{
5 public class SchemeDropList : Control
6 {
7 protected override void DoRender(System.Web.UI.HtmlTextWriter output)
8 {
9 output.Write("<select" + ControlAttributes + ">");
10 output.Write("<option></option>");
11
12 string s;
13 if (base.Value == "1")
14 s = "selected";
15 else
16 s = "";
17 output.Write("<option value=\"1\" " + s + ">First</option>");
18
19 if (base.Value == "2")
20 s = "selected";
21 else
22 s = "";
23 output.Write("<option value=\"2\" " + s + ">Second</option>");
24
25 output.Write("</select>");
26
27 RenderChildren(output);
28 }
29 }
30}

  • Publish this into your site
  • Login to the admin and switch to the core db
  • Navigate to "/sitecore/system/Field types/List Types/" in the tree
  • Create a new item of type "/sitecore/templates/System/Templates/Template field type"
  • Populate the assembly and class option with the values for the class you just made. For me this is:
  • Switch to the master DB and create a template using your new field type. Here's mine:
  • Create a page and you should have a drop down list with the values from your class.