Tag: Sitecore Languages

Sitecore: Sharing field data across languages

This is the third in a series of blog posts covering everything you should need to know for building a multilingual website in Sitecore.

Part 1 - Adding languages for a multilingual site
Part 2 - Translating text in your presentation

In the first two parts to this series I concentrated on how you can setup Sitecore to allow different language versions of content to be entered. In some instances though your content will contain fields which should remain the same across all language versions. This could be for product sku's, dimensions of an object or possibly image fields.

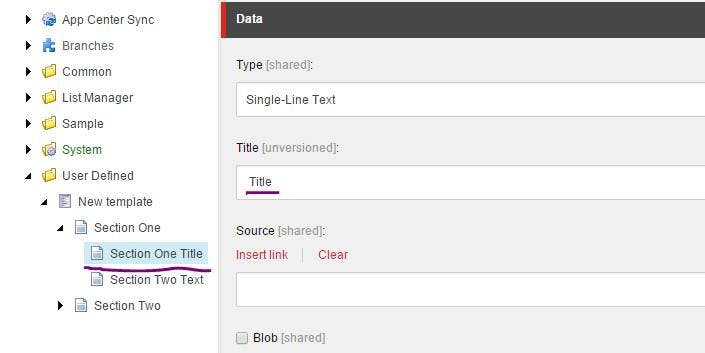
To make a field share it's values over multiple languages, in the template definition tick the shared checkbox against the field.

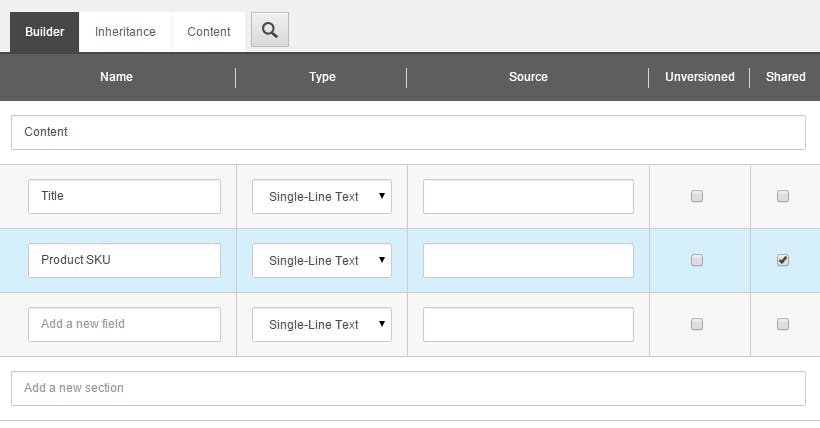
It's worth noting though that as well as making the field value the same across all languages, it will also be shared between all versions within the language.

Although the interface gives the impression that a field can be the default (versioned), unversioned, shared or unversioned and shared. The value of the unversioned checkbox actually become meaningless once shared has been ticked and there really are only 3 options; Versioned, Unversioned and Shared.

Sitecore: Translating text in your presentation

This is the second in a series of blog posts covering everything you should need to know for building a multilingual website in Sitecore.

In Part 1, I covered how to add a language to Sitecore so that content editors could create content in that language. In this post I'm going to show you how to create a dictionary in Sitecore so that hard coded text in your presentation or views can be translated into the relevant language.

Creating the dictionary

A dictionary is created within your content tree and then referenced from the <sites> section of your web.config file.

Somewhere outside of your sites home node (I like to create a settings folder for this sort of thing), create an item of type "Sitecore/templates/System/Dictionary/Dictionary Domain". This will be the root item of your dictionary.

Under your root dictionary item you will be able to create Dictionary Groups and Dictionary Entry's. I find a good way to organise your dictionary is to create a group for each letter of the alphabet and then sort your entry's into each of these based on the key name.

A dictionary entry consists of a Key and a Phrase. The key is the value that will be referenced in code to lookup the entry, and the phrase is the translation that will be returned.

Translations for each language are created using regular language versions of content.

Configuring the site to use the dictionary

For a site to use the dictionary you need to add a dictionaryDomain to the sites node. Below is an example of the default website site updated to use a dictionary called "My Dictionary"

1<site name="website" virtualFolder="/" physicalFolder="/" rootPath="/sitecore/content" startItem="/home" database="web" dictionaryDomain="My Dictionary" domain="extranet" allowDebug="true" cacheHtml="true" htmlCacheSize="50MB" registryCacheSize="0" viewStateCacheSize="0" xslCacheSize="25MB" filteredItemsCacheSize="10MB" enablePreview="true" enableWebEdit="true" enableDebugger="true" disableClientData="false" cacheRenderingParameters="true" renderingParametersCacheSize="10MB" />

Translating text in your view

Now that your dictionary has been set up you can start translating text in your views.

The following line of code will lookup the dictionary entry based on the key and return the phrase for the current context language.

1@Sitecore.Globalization.Translate.Text("dictionary key")

Sitecore: Adding languages for a multilingual site

This is the first in a series of blog posts covering everything you should need to know for building a multilingual site in Sitecore.

The first requirement for a multilingual site is for the content editors to be able to enter content in different languages.

In the top right corner of the content editor on any item, is the language drop down that content editors will use to switch between the language version they are editing. However by default it will only show English : English

Configure the language options

To configure the language options on the drop down:

  • In the content editor go to System > Languages
  • Right click the language node and choose Insert Language
  • A predefined language code drop down lets you pick between a set of predefined languages
  • Click Next, Next, Next until the dialog window closes. The language will be added to the language list and your content editors can start adding there content
  • Starting with Sitecore 8, languages are no longer automatically assigned a corresponding flag as there icon as it is no longer used in the language selector. If you wish to add an icon however you can still do this in the normal way by going to the configure tab, clicking the icon drop down and selecting More Icons. The flags are all still in an icon group called flags.

Item and Field Names in Sitecore

Item and Field names in Sitecore might sound like a simple subject, but there are a few options that you may not be aware of.

Item Names

When you create an item in Sitecore it will ask you for a name to give the item. That name then appears in the content tree and at the top of the details pane to identify what your looking at.

It's also used for the URL in the front end of your site.

All fairly basic stuff. However in this example you will see that I've placed a hyphen between "Company" and "News" to make the the URL a little more friendly, rather than having a space or no gap at all. While good for the URL it comes at a sacrifice to the admin experience where a gap would be nicer.

On a multilingual site the URL's are also still using this same name. If your languages are English and US English that may be ok, but if your second language is French then they would probably prefer a URL in French.

Display Names

This is where Display Names come in. By setting a Display Name for your item you can configure a name to show in the admin that contains the space which can also differ per language.

However at this point the URL on the front end of your site will still be "Company News". Through a config setting though you can set Sitecore to use item display names rather than the item name when constructing a URL.

1<configuration xmlns:patch="http://www.sitecore.net/xmlconfig/">
2 <sitecore>
3 <linkManager>
4 <providers>
5 <add name="sitecore">
6 <patch:attribute name="useDisplayName">true</patch:attribute>
7 </add>
8 </providers>
9 </linkManager>
10 </sitecore>
11</configuration>

Of course at this point your URL will be back to having a space within it.

Field Names

When you define a template in Sitecore you create add a section name and then add a field within that section. All simple stuff, however what you generally find is you have to prefix the name of your fields with the name of the section. This is because when it comes to accessing the field data in code, the sections don't exist and you need a way to avoid having two fields just called "Title" or "Text".

While this solves the issue from a code perspective, for content editors it's far from ideal.

Fortunately there is a solution to this. By navigating to the actual field item within the content tree, we can specify a Title for the field that will be used in the editor rather than its name.

On top of that if you click the Configure tab and select Help, you can enter some help text that will appear next to the field name in the content editor.