Blog
Data Fetching options with NextJS

Data Fetching options with NextJS

When it comes to building websites in node, I'm a big fan of using NextJS. There's a lot of static site generators around but one of the things I really like about NextJS is not only the fact you have different options for data fetching, but that they're also really easy to use.

Static Generation

If you've somehow missed it, static site generation is the idea that to make your site run as fast as possible for every user, you pre-generate all the pages so that when a visitor makes a request for the page, all the server needs to do is return a file. It's a bit like the start of the internet when everything was an html file, before we became clever and started generating files dynamically on the fly. With all the processing removed, the time to first byte is greatly reduced.

To do this with NextJs you add a function called getStaticProps to your page and when the site is built, this will get all the static content and make it available to the page to be pre-generated.

1export async function getStaticProps(context) {
2 return {
3 props: {}, // will be passed to the page component as props
4 }
5}

Or if your using TypeScript.

1import { GetStaticProps } from 'next'
2
3export const getStaticProps: GetStaticProps = async (context) => {
4 // ...
5}

Static Generation for Dynamic Paths

So that last example would generate content for a page, but what if you have a headless CMS and unlimited pages. You certainly couldn't create a file for each one with it's own getStaticProps function.

For this there is getStaticPaths. Like getStaticProps this function will run at the build time and is used to find and return all the dynamic paths for the page. Think of your page as the page template and this function is getting all the pages that relate to it. This is how I generate all the blog post pages on this site.

The function returns an object with two values. First paths which is a list of all the routes and the parameters for them. e.g. a list of the id's to get the data for a page with. The second is fallback: false, this tells NextJs that if the request is for a route not in the paths list, then returns a 404.

1export async function getStaticPaths() {
2 return {
3 paths: [
4 { params: { ... } }
5 ],
6 fallback: false
7 };
8}

The params are then passed to the getStaticProps function so that it can pre-generate all the page content.

1// This also gets called at build time
2export async function getStaticProps({ params }) {
3 // params contains the post `id`.
4 // If the route is like /posts/1, then params.id is 1
5 const res = await fetch(`https://.../posts/${params.id}`)
6 const post = await res.json()
7
8 // Pass post data to the page via props
9 return { props: { post } }
10}

If you'd prefer Typescript then this is the alternative.

1import { GetStaticPaths } from 'next'
2
3export const getStaticPaths: GetStaticPaths = async () => {
4 // ...
5}

The Good Old Dynamic Way

Static's great, but sometimes are pages just aren't static enough for it to make sense. Here's where getServerSideProps comes in. With getServerSideProps your page will get generated on the server at runtime.

At this point you head may explode because at some point someone told you static site generators were faster, more secure etc because nothing runs on the server. Well erm.................. there is a server and it can generate files, so they were er... wrong.

1export async function getServerSideProps(context) {
2 return {
3 props: {}, // will be passed to the page component as props
4 }
5}

Or with TypeScript.

1import { GetServerSideProps } from 'next'
2
3export const getServerSideProps: GetServerSideProps = async (context) => {
4 // ...
5}

Incremental Static Regeneration

Lets take are mind back to that first static page generation. It's great for the end user, but the downside is that each time you need to change something on a page you have to regenerate the entire site. On a big site, that's an issue.

Incremental Static Regeneration lets you tell NextJs that while you want the page the be pre-built, you also want that version to expire and get generated again. Think of this like the expiry time on a CDN, but configured at a page level in your site.

To use it the getStaticProps function needs to return a revalidate value. This gives the instruction of up to how frequently the page should be generated.

1export async function getStaticProps() {
2 const res = await fetch('https://.../posts')
3 const posts = await res.json()
4
5 return {
6 props: {
7 posts,
8 },
9 // Next.js will attempt to re-generate the page:
10 // - When a request comes in
11 // - At most once every 10 seconds
12 revalidate: 10, // In seconds
13 }
14}

Part Static Generation

So lets say we don't need our pages to expire other than when we rebuild the site, and we also don't want to generate every page in our site because there 2000 of them and it will take ages, but there's also some really important pages that we don't want any user to have to wait for.

Well if we go back to our static generation for dynamic routes example and take another look at that fallback value we can do something different.

Fallback can be set to 3 values, false, true and blocking. False will return a 404 if the route didn't exist, but true and blocking gives us an option to decide at runtime if we want to generate a page or issue a 404.

Setting fallback to true will return a fallback page, getStaticProps will then generate the page and this will then get swapped with the fallback version. Blocking is similar but will wait for the new page to be generated rather than initially issuing a fallback.

By doing this, the paths we return in the props will get generated at build time (we can restrict this to just our important pages), and all the others will function like a regular CDN.

Summary

So as you can see, there's a whole host of options to fetching data, when you do it, how you do it, how long it lives for and I didn't even cover the fact you could still fetch data dynamically when the page has loaded on the client! If we did this then we can pre-generate all the static parts of our page and then populate other bits dynamically after on the client.

Protecting Azure Resources from Deletion

Protecting Azure Resources from Deletion

There's a lot we can do in Azure to protect our resources from harm.

First security permissions can be set up using active directory groups, so that access can be restrict to certain member to actually do anything with a resource. There's the fact that resources exist on more than one server so that if a server fails another already has a copy ready to switch to. We can even use ARM templates to have our entire infrastructure written as code that can be redeployed should the worst happen.

However what if we have some blob storage with some important data and we accidentally just go and delete it? Sometimes human error just happens, sure we can recreate it with our ARM template, but the contents will be gone.

Or maybe we're not using ARM templates and did everything through the portal so we'd really like to just make sure we didn't delete stuff by accident.

Azure Resource Locks

One thing we can do is to set up Azure Resource Locks. This isn't the same thing as setting up backups (you should absolutely do that to), but this is a nice extra thing you can do to prevent you from deleting something by accident. It's also really simple to do too.

In the Portal

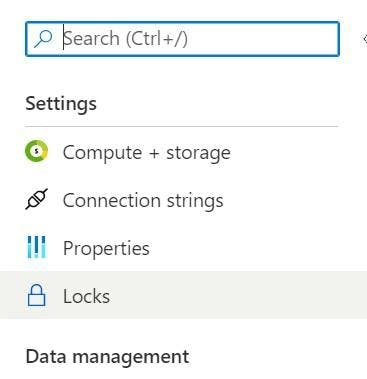
If your doing everything direct in the portal, open your resource and look for locks in the left nav.

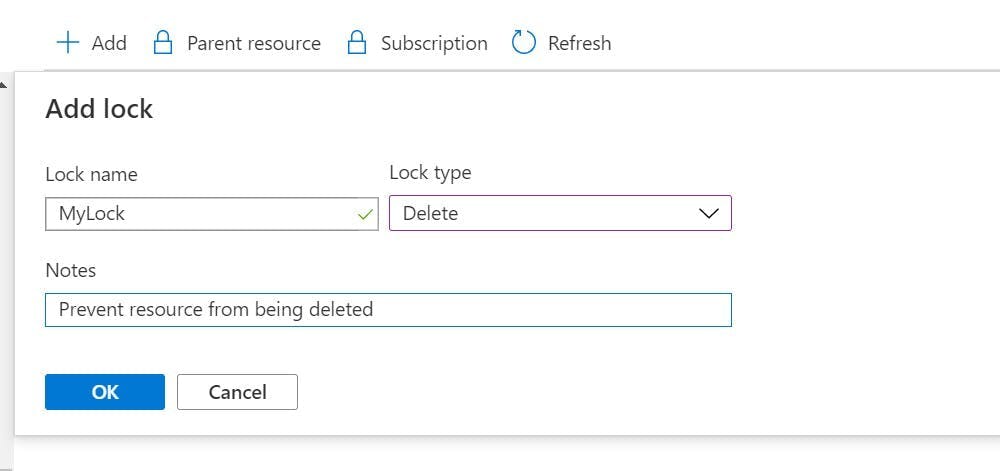
Now click the add button. Give it a name, lock type of delete and a note for what it does.

Now if you try and delete the resource you get a friendly error message saying you can't.

ARM Template

If your using ARM templates to manage your infrastructure, then you need this little snippet of code added to your template file.

1 {
2 "type": "Microsoft.Authorization/locks",
3 "apiVersion": "2016-09-01",
4 "name": "NAME OF LOCK GOES HERE",
5 "scope": "[concat('Microsoft.Sql/servers/databases/', parameters('database_name'))]",
6 "dependsOn": [
7 "[resourceId('Microsoft.Sql/servers/databases/', parameters('database_name'))]"
8 ],
9 "properties": {
10 "level": "CanNotDelete",
11 "notes": "DESCRIPTION SAYING IT SHOULDNT BE DELETED GOES HERE"
12 }
13 }

Notice the scope and depends on section. These need to reference the item you want to protect.

Data Factory - Dynamic mappings in Data Flow

Data Factory - Dynamic mappings in Data Flow

Azure Data Factory and Data Flows make transforming data from one format to another super simple with it's code free approach. However that doesn't mean we want to construct entire data flows when changing mappings from one value to another.

For example if my source data contained a field for favourite creature with value An for Ants, and Ca for Cats I could do the transformation using an iif expression in a derived column task. But in a few weeks time if I needed to add Ba for Bats, editing the whole Data Flow seems like a lot of work, not to mention nested iif statements are going to be come ugly and confusing.

One option would be to have the list of conversions as another source in the flow and do a join, but then this means having that data stored somewhere like blob storage.

Instead a solution I have is to pass the data in as a parameter to the data flow. Data Factory doesn't have an array parameter but we can put a comma separated list in as a string. e.g. An=Ants, Ba=Bats, Ca=Cats.

Then in our derived columns expression we can do this:

1iif(instr($ParameterString, toString(SourceValue) + "=")==0,"No Mapping",
2 substring(
3 substring($ParameterString, instr($ParameterString, toString(SourceValue) + "=")),
4 length(toString(SourceValue))+2,
5 iif(instr(substring($ParameterString,instr($ParameterString, toString(SourceValue) + "=")+length(toString(SourceValue))+2),",") > 0,
6 instr(substring($ParameterString,instr($ParameterString, toString(SourceValue) + "=")+length(toString(SourceValue))+2),","),
7 length(substring($ParameterString,instr($ParameterString, toString(SourceValue) + "=")))
8 )
9 )
10 )

There's quite a lot going on here so lets break it down

1iif(instr($ParameterString, toString(SourceValue) + "=")==0,"No Mapping",

First we are doing an iif to check if our Source Value (the value from our dataset) exists within the Parameter String. If it doesn't then we're setting the value to "No Mapping"

1 substring(

If the value does exist then we need to grab just the part we want. So we need a sub string and we need to get everything after the source values equals to the next comma.

A reminder the parameters for substring are substring(<string to subset>: string,<from 1-based index>: integral, [<number of characters>: integral])

1 substring($ParameterString, instr($ParameterString, toString(SourceValue) + "=")),

Our first parameter needs to be the string to subset, that's going to come from our ParameterString, but we're going to do another substring on it to ignore everything before the one we ant to match.

So if our ParameterString was set too:

An=Ants, Ba=Bats, Ca=Cats

and our Source Value was Ba we would now have:

Ba=Bats, Ca=Cats

1 length(toString(SourceValue))+2,

Next is the start index which will be the length of our source value + 2. If we ended the substring now we would get.

Bats, Ca=Cats

1 iif(instr(substring($ParameterString,instr($ParameterString, toString(SourceValue) + "=")+length(toString(SourceValue))+2),",") > 0,
2 instr(substring($ParameterString,instr($ParameterString, toString(SourceValue) + "=")+length(toString(SourceValue))+2),","),
3 length(substring($ParameterString,instr($ParameterString, toString(SourceValue) + "=")))
4 )
5 )

The final parameter for the substring is a bit more complex, but it's similar to what we have just done.

Two scenarios need to be catered for:

  1. If there's more items in the list left then there will be a comma separating them. If this is the case then we need to get the position of the first comma in what we have left.
  2. If there isn't anything else in the list then there will be no comma. In this instance we need to get the length of what remains.

With that our substring will now return Bats

Managing SQL Azure Users in the Portal

Managing SQL Azure Users in the Portal

Managing users for a SQL Azure DB is something which I have found is more complex that you would expect. A lot of guides will also tell you it's something which can't be done through the admin portal and needs to be done using scripts in the DB.

This is true to some extent. If you want to set specific role permissions to a DB then you have to do it by assigning roles through SQL scripts. Also if you want to set usernames and passwords at a DB level rather than using Active Directory then this also needs to be done in the DB.

However if you want to give a bunch of active directory users admin access to all the DB's in a server or if you want to give a group of people the same access then this can be done through the azure portal.

Admin Permissions For All

When you create your DB instance an admin user will get created, and for some teams you could just share the password. However sharing passwords isn't that great and there is a better way.

In the Azure Portal search for groups in the big search box at the top.

Create a security group with a sensible name, description and add all the members who you want to give admin permission to.

Go to your SQL server resource (this is the parent of the database), and got to the Azure Active Directory setting.

Click the top button to Set Admin, choose your new group and then click save. This will create the user with the correct permissions in the master DB of the server.

That's it, the members of the group will now be able to access any of the DB's on the server by logging in using Active Directory with Password through SSMS, or through the azure portal using Query Editor.

Query editor will actually give you a nice green tick if you have permission to log in.

To add or remove peoples access to the DB, just add and remove them from the group.

If you can't log in it could be due to a firewall permission for your IP rather than an actual login permission.

Permissions to Specific DBs

Giving everyone admin permission to every DB on the instance might not be what your after. Fine for a dev instance, but probably not something you want for production.

Fortunately the same concept of using groups can make life a lot easier but you will need to do some SQL scripting.

Create your group as above and then make sure your logged in as someone who is an active directory admin for the SQL Server. You can do this with the instructions above or if you want to be the only admin then rather than setting a group to be the admin, just set yourself.

Next log into the DB either using SSMS or Query Editor. Personally I prefer to use Query Editor as I'm doing everything else through the portal.

Our first script is to create an external user in our DB. In our case the external user is the group we want to give permission to rather than a specific user.

1CREATE USER [GROUP NAME]
2FROM EXTERNAL PROVIDER
3WITH DEFAULT_SCHEMA = dbo;

This is called adding a contained user to the DB.

Next we need to give the group some role permissions to do something.

1ALTER ROLE db_datareader ADD MEMBER [GROUP NAME];
2ALTER ROLE db_datawriter ADD MEMBER [GROUP NAME];

Repeat these steps for each DB you want to give the group access too.

The members of your new group should now have permissions to the individual DBs with reader and writer permissions.

If you want to give access to more people, just add them to the group.