Blog
The importance of build numbers

The importance of build numbers

If I were to make a prediction, I would say that build numbers are something that are rarely treated as being important in the agency world of web development. That's not to say milestone releases aren't given names like "Phase 2", "August Release" or a major feature name, but every build / release of a project in between, I'd sense largely have build numbers either ignored or never created.

It's also easy to see why, after all it's not like we're producing software that's going out to the masses to be installed. The solution is essentially just ending up having 1 install on a set of servers. When a new version is built, that replaces everything that came before it and if a bug is found we generally roll forward and fix the bug rather than ever reverting back.

Why use build numbers?

So when we're constantly coding and improving applications in an agile world why should we care about and use build numbers?

To put it quite simply its just an easy way to identify a snapshot of code that could have actually have been built and then released to a server. This becomes hugely useful in scenarios such as:

  • A bug being reported by an end user
  • An issue being identified by some performance monitoring
  • An issue being picked up in some functionality further on from the site. e.g. in an integration

Without build numbers the only way to react to these scenarios is to look at commit dates in source control or manual release notes that may have been created to try and work out where an issue may have been created and what changed at that time. If the issue had subsequently been fixed you also can't really give a version description when it was fixed other than a rough date.

Other advantages of build numbers can include:

  • Being able to reference a specific version that has been pen tested
  • Referencing a version that's been tested with integrations
  • Having approval to release a specific version rather than just the latest on master
  • Anywhere you want to have a conversation referencing releases

Build numbers for deploys

The first step to use build numbers and with the rise in CI, possibly the one thing most people are doing is to start creating build numbers via a build server. By using any type of build server you will end up with build numbers. This instantly gives you a way to know when a build was created and what commits were new within the build.

Start involving an automated deployment setup either using your build server or with other tools like Octopus Deploy and you will now start to get a record of when each build was deployed to each server.

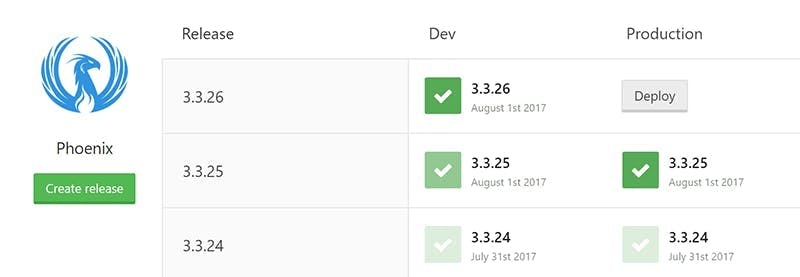
Now you have an easy way to not only reference what build was on each environment and when through the deploy history, but also a way to see what went into a build through the build servers change log.

Tag builds in source control

Being able to see the changes that went into each build on your build server is all very good, but it's still not an ideal situation for finding the exact code version a build relates to.

Thankfully if your using Team City it's really easy to set it up to create a tag in your source control with each build number. Simply go to the build features section of your projects configuration and add a feature called "VCS Labeling". This is a step that happens post build in the background and will create a tag in source control including the build number. It has lots of other configuration options, so if you need different tag formats for different branches its got you covered.

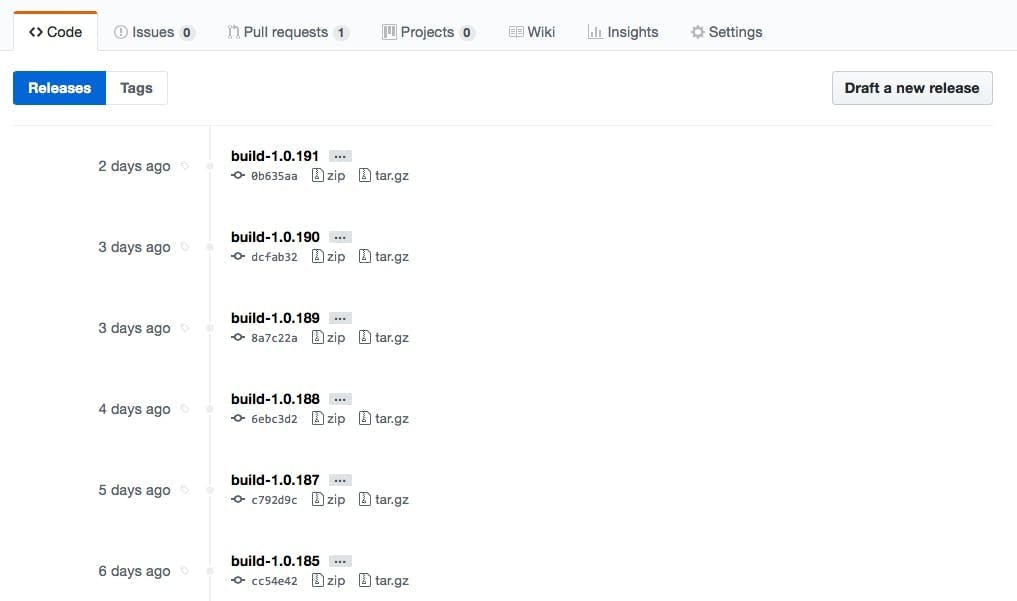
If your using GitHub once this is turned on you will be able to see a list of all the tags in the releases section.

Update Assembly info

Being able to identify a build in source control and view a history of what should have been on a server at a particular time is all very good, but its also a good idea to be able to easily identify a build for a published version of code. That way just by looking at the code on a server you can tell which build version it is, and not rely on your deployment tool to be correct.

If your using Team City this also also made super simple through a build feature called "Assembly info patcher". When using this the build number will automatically get patched in without having to edit AssemblyInfo.cs.

Conclusion

By following these tips you will now be able to identify a version by looking at the published code, see a history of when each version was not only built but also released to each environment and also have an easy way to find the exact source for that build.

The build number can then be used in any conversations around when a bug was introduced and also be referenced in release notes so everyone can keep track of what versions included what fix's in a simple to understand format.

Invert list selection with Sitecore PowerShell

Invert list selection with Sitecore PowerShell

I recently needed to run a script on a block of Sitecore content in invert the selection of a checklist and multilist. As I couldn't find any example of how to do this at the time, I thought I'd share what I wrote.

1#script to update tier
2Get-ChildItem -r -Path "master:\content\Home" -Language * | ForEach-Object {
3 if ($_.PSobject.Properties.name -match "Tier") {
4 [String[]]$tiers = $_.Tier -split "\|"
5
6 $_.Editing.BeginEdit()
7 $newtiers = Get-ChildItem 'master:\content\Lookups\Tiers\' | Where-Object { $tiers -notcontains $_.Id }
8 $_.Tier = $newtiers.Id -join "|"
9 $_.Editing.EndEdit()
10 }
11}

Get-ChildItem -r -Path "master:\content\Home" -Language * | ForEach-Object {

This line is getting the child items from the home node in the master db. The -r specified that it should be recursive and the -Language * specifies to include all languages. The results are then piped to a for each loop.

if ($_.PSobject.Properties.name -match "Tier") {

The field I needed to update was called Tier, as this was included in multiple templates I checked that the object included a field called Tier, rather than checking the template types.

[String[]]$tiers = $_.Tier -split "\|"

List fields in Sitecore get stored as a pipe separated list of the item Id's for the selected items. In order to do a comparison in Powershell I needed to turn the string back into an array using the split command. Notice the backslash that is needed before the pipe.

$_.Editing.BeginEdit()

To edit an item you need to begin an edit

$newtiers = Get-ChildItem 'master:\content\Components\Lookups\Tiers\' | Where-Object { $tiers -notcontains $_.Id }

This is where we get the new list of tiers to set as the selected ones for the item. The Get-ChildItem command is retrieving the original options that could be selected and the where-object statement is then excluding the ones that are in the $tiers array we just made.

$_.Tier = $newtiers.Id -join "|"

To save the new list we need to convert the results of the query into a pipe separated list using a join.

$_.Editing.EndEdit() } }

End the editing to save and close the the if and loop statements.

Top features in Sitecore 9

Top features in Sitecore 9

Sitecore 9 is out and with it comes cool new whizzy stuff. Here's my top features from the new version of the platform.

#1 - New Forms module

I think everyone would agree that Web Forms for Marketers was starting to show it's age and the UI was getting a bit dated compared to the rest of Sitecore.

The new Forms module, which is just called forms is completely new from the ground up. It has a new drag and drop UI with long awaited support for multiple page forms.

Like WFFM, the module is extendable through custom save actions and comes with a number of useful default ones out of the box.

There is no upgrade option for moving a WFFM form to the new module but WFFM will continue to work on Sitecore 9 and is being dropped in Sitecore 9.1.

I think more than anything the UX improvements will make a real difference for users by being much simpler to understand and will drive to much more use.

#2 - Marketing Automation

In Sitecore 9 Engagement Plans are being replaced with Marketing Automation. Like the forms module, this is completely new from the group up rather than an UI update to the existing Engagement Plans.

The new Marketing Automation module has a really easy to use drag and drop ui which is a vast improvement over the old Silverlight implementation engagement plans had. It's also directly accessible from the dashboard rather than being hidden in the Marketing Control Centre.

One of the biggest changes (aside from the UI) is there is now no need to enrol users in a plan at a specific state either by code or a wffm save action. I found this one of the most confusing aspects to end users who were expecting creating states with a trigger to automatically add people once they had triggered a goal, so this is great to see fixed.

Plans now have very clear start and end points with a number of options on the start node (goals, events), which can be combined to trigger who should be added to the plan.

Overall for the moment you try creating a plan just to see what it can do, the whole process is so much simpler that I think this will have a significant aspect on users. Engagement Plans were something that needed to be learn 't in order to get anything out of them, and wernt intuitive enough leading to frustration. With Marketing Automation I think a lot of people that were put off before will now benefit from this module.

#3 - xConnect

xConnect is a new service layer that sits between xDB and the client. That could be the CMS, a device or some other custom server side process that needs to read or write xDB data.

With xConnect as the service layer this means that no system has direct access to the collection database or search indexes. Any system wanting to access this data will go through xConnect which also helps with support for things like GDPR.

xConnect is installed separately from Sitecore itself and does not have any dependencies on the Sitecore kernel. When you install Sitecore locally you will see two IIS entries, one for Sitecore and one for xConnect. Communication with xConnect is done via a set of RESTful API's over HTTPS, making integrating with it extremely simple to do.

What xConnect really brings to the table is the ability to scale an combine many more systems rather than just the CMS. e.g. Phone Apps.

#4 - Sitecore Installation Framework (SIF)

Installing Sitecore 9 is very different to previous versions (see my Sitecore 9 installation tips here), gone are the days of copying a web-root and restoring some db's. The entire installation is now done with a new framework based on PowerShell scripts.

While this is going to create a pain point in the amount of time it takes to get started. It will almost certainly vastly improve DevOps tasks as it opens up numerous options to put the installation scripts in deployment pipelines.

Sitecore 9 installation tips

Sitecore 9 installation tips

Sitecore 9 released this week and with it comes a whole new installation process. Gone are the days you could just download the web root and restore some dbs or just run the installation gui and enter a db connection string. Sitecore 9 has some fairly fundamental architectural changes with multiple IIS entries and and some windows services to go with it. Server roles are now also being properly configured rather than updating config files to match what it says in an excel doc.

Along with these changes, the installation process has moved to be based on powershell scripts, which on one hand has made things a bit harder, but it also brings great positives that the process can now be customized with scripts that are repeatable without the risk of mistakes.

Here's my tips for a smooth local installation (production installs are different to a local install).

Tip #1 - Check the Prerequisites and Requirements

It sounds obvious but when presented with a new toy you want to play with it as fast as possible, and with a 49 page document the urge is there to skip to the installation and hope for the best.

Skipping however is likely to result in install failures as the installer relies on modules such as Web Deploy and the right version of SQL Server which were not needed for the version you may already have installed.

Tip #2 - Make sure you have the right versions

You may have SQL and Solr but are they the right version?

SQL Express 2016

Sitecore 9 supports SQL Server 2014 SP2 and SQL Server 2016. Now that SQL Server 2017 is out, actually finding the link for 2016 express has become a challenge, but here it is.

Download SQL Server 2016 Express

Solr 6.6.1

Sirecore 9 supports Solr version 6.6.1. I typically use Bitnami Solr as it's a lot easier to install than doing Solr on it's own. Like SQL though the latest version is newer than what Sitecore supports and finding the link to the older one can be a bit of a challenge.

Download Bitnami Solr 6.6.1

Tip #3 - Solr requires SSL

By default Solr does not install with SSL turned on, but without it your install will fail. More specifically it will fail trying to start an xConnect service.

Enabling SSL for Solr

To create a self-signed certificate for Solr we can use the JDK Keytool which if you've installed Solr you should already have installed.

Note: These instructions are based on this guide from Apache and this blog post from Jason St-Cyr.

  1. Open command prompt
  2. Change to the Solr ‘etc’ directory
1cd "{SOLR_HOME}\server\etc"

3. Execute the keygentool command

1"{JAVA_HOME}\bin\keytool.exe" -genkeypair -alias solr-ssl -keyalg RSA -keysize 2048 -keypass secret -storepass secret -validity 9999 -keystore solr-ssl.keystore.jks -ext SAN=DNS:localhost,IP:127.0.0.1 -dname "CN=localhost, OU=Organizational Unit, O=Organization, L=Location, ST=State, C=Country"

This will generate the keystore with a password of ‘secret’ as valid for localhost and 127.0.0.1. You can add other DNS and IPs as desired, or skip hostname verification.

4. Convert generated JKS to PKCS12

1 "{JAVA_HOME}\bin\keytool.exe" -importkeystore -srckeystore solr-ssl.keystore.jks -destkeystore solr-ssl.keystore.p12 -srcstoretype jks -deststoretype pkcs12

5. Enter password when prompted. The password ‘secret’ was used in the previous step. Remember to use your password instead if you changed it in the keygen command parameters.

6. Open Windows Explorer and navigate to the ‘etc’ directory (“{SOLR_HOME}\server\etc”)

7. Double-click on the generated ‘p12’ file (solr-ssl.keystore.p12 if you used the default parameters from the previous steps)

8. In the wizard, specify the following values (there will be some extras you can ignore):

Store Location: Local Machine

File name: Leave as provided

Password: secret

Certificate Store: Trusted Root Certification Authorities

Remember to use your password instead if you changed it during the previous steps.

9. Open the solr.in.cmd file for editing (e.g. {SOLR_HOME}\bin\solr.in.cmd)

10. Un-comment the SSL settings:

1set SOLR_SSL_KEY_STORE=etc/solr-ssl.keystore.jks
2set SOLR_SSL_KEY_STORE_PASSWORD=secret
3set SOLR_SSL_TRUST_STORE=etc/solr-ssl.keystore.jks
4set SOLR_SSL_TRUST_STORE_PASSWORD=secret
5set SOLR_SSL_NEED_CLIENT_AUTH=false
6set SOLR_SSL_WANT_CLIENT_AUTH=false

11. Restart SOLR to pick up the changes.

Tip #4 - Close management studio

I'm not sure if this was a one off thing, but with management studio open my installation failed with a single user access issue.

Tip #5 - Check the logs

The installation script will output logs to the folder it runs in. If your installation fails it will reference a log file. To find out why the installation failed or get some more info go and check the log referenced.