
Update local Git branch list
Ever had the issue where your Git repo has a branch that your local hasn't picked up on? This can often happen when a branch has just been created.
The solution is simple just run...
1$ git remote update origin
Ever had the issue where your Git repo has a branch that your local hasn't picked up on? This can often happen when a branch has just been created.
The solution is simple just run...
1$ git remote update origin
I just found this bog post on how to get the shipping cost for a custom shipping method you may have implemented using IShippingMethodService and thought I would share it here.
http://www.davejsaunders.com/2014/10/20/display-the-cost-of-your-ucommerce-custom-shipping-service.html
A common requirement when displaying shipping methods is to show the price against each, and for the built in uCommerce shipping methods there's a handy GetPriceForCurrency() method on the shipping method object. However if that shipping method is a custom one, it just returns 0.
1var allShippingMethods = TransactionLibrary.GetShippingMethods(country);2var currency = purchaseOrder.BillingCurrency;34foreach (var shippingMethod in allShippingMethods)5{6 var cost = shippingMethod.GetPriceForCurrency(currency);7}
The correct way to get your shipping price is to manually call your service to get the price to be calculated.
As we don't know which implementation of IShippingMethodService will be used we first need to call GetShippingMethodService() to get it.
After that we just need to populate a new Shipment object we the details our custom method needs and then call the CalculateShippingPrice method.
1var purchaseOrder = TransactionLibrary.GetBasket().PurchaseOrder;2var allShippingMethods = TransactionLibrary.GetShippingMethods(country);34foreach (var shippingMethod in allShippingMethods)5{6 // Get the IShippingMethodService for this ShippingMethod7 var shippingService = shippingMethod.GetShippingMethodService();89 // Construct a fake shipping method to call the service with10 var shipment = new Shipment11 {12 ShippingMethod = shippingMethod,13 OrderLines = purchaseOrder.OrderLines,14 PurchaseOrder = purchaseOrder,15 ShipmentAddress = purchaseOrder.BillingAddress16 };1718 var shippingMethodPrice19 = shippingService.CalculateShippingPrice(shipment);20}

There's always been reasons for pages to be served using https rather than http, such as login pages, payment screens etc. Now more than ever it's become advisable to have entire sites running in https. Server speeds have increased to a level where the extra processing involved in encrypting page content is less of a concern, and Google now also gives a boost to a pages page ranking in Google (not necessarily significant, but every little helps).
If all your pages work in https and http you'll also need to make sure one does a redirect to the other, otherwise rather than getting the tiny page rank boost from Google, you'll be suffering from having duplicate pages on your site.
Redirecting to https with URL Rewrite
To set up a rule to redirect all pages from is relatively simple, just add the following to your IIS URL Rewrite rules.
1<rule name="Redirect to HTTPS" stopProcessing="true">2 <conditions>3 <add input="{HTTPS}" pattern="^OFF$" />4 </conditions>5 <action type="Redirect" url="https://{HTTP_HOST}{REQUEST_URI}" appendQueryString="false" />6</rule>
The conditions will ensure any page not on https will be caught and the redirect will do a 301 to the same page but on https.
I've seen some posts/examples and discussions surrounding if the redirect type should be a 301 or a 303 when you redirect to https.
Personally I would choose 301 Moved Permanently as you want search engines etc to all update and point to the new url. You've decided that your url from now on should be https, it's not a temporary redirection and you want any link ranking to be transfered to the new url.
Excluding some URL's
There's every chance you don't actually want every url to redirect to https. You may have a specific folder that can be accessed on either for compatibility with some other "thing". This can be accomplished by adding a match rule that is negated. e.g.
1<rule name="Redirect to HTTPS" stopProcessing="true">2 <match url="images" negate="true" />3 <conditions>4 <add input="{HTTPS}" pattern="^OFF$" />5 </conditions>6 <action type="Redirect" url="https://{HTTP_HOST}{REQUEST_URI}" appendQueryString="false" />7</rule>
In this example any url with the word images in would be excluded from the rewrite rule.
From Sitecore 8 the EXM module now uses lists to manage mailing lists rather than roles against a user. The built in Subscription form control that comes with EXM has also been updated to add contacts to this list. However the subscription control remains WebForms only, so if you implementing an MVC solution you're going to need to write your own. There's also many other scenarios where you may want to programmatically create and add a contact to a list.
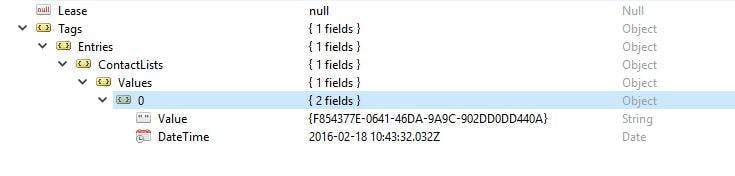
Under the hood, contact lists aren’t even a list at all. Rather they are actually just a Facet on the Contact record that contains the list id's for all the lists the contact is a part of. You can see this by looking in the contacts collection in the analytics mongo db.
Or in the Contacts table in the Reporting SQL db.

If you wanted to add a contact to a list you could in theory just add the relevant tag to the contact record like this:
1public void AddContactToList(Contact contact, Item list)2{3 using (new SecurityDisabler())4 {5 contact.Tags.Set("ContactLists", list.ID.ToString());6 }7}
But I wouldn't. The problem with this approach is your going to miss out any logic that will handle updating the counts of contacts in contact lists. Best to use one of the provided list api's instead.
Sitecore has a ContactListManager object that has a method to associate contacts with lists. All you need to do is create an instance of it and pass it a list of contacts.
1public void AddContactToList(ContactData contact, ContactList list)2{3 ContactListManager listManager = Sitecore.Configuration.Factory.CreateObject("contactListManager", false) as ContactListManager;45 List<ContactData> contactList = new List<ContactData>();6 contactList.Add(contact);78 listManager.AssociateContacts(list, contactList);9}
Just like adding a contact, there's also a handy method for removing one too.
1public void RemoveContactFromList(ContactData contact, ContactList list)2{3 ContactListManager listManager = Sitecore.Configuration.Factory.CreateObject("contactListManager", false) as ContactListManager;45 List<ContactData> contactList = new List<ContactData>();6 contactList.Add(contact);78 listManager.RemoveContactAssociations(list, contactList);9}
Chances are you don't have a ContactData object (Sitecore.ListManagement.ContentSearch.Model.ContactData) and instead probably have a tracking contact (Sitecore.Analytics.Tracking.Contact). For the purposes of adding and removing a contact from a list, all your ContactData object really needs is its identifier, which you can do with the following:
1public ContactData ConvertContactToContactData(Sitecore.Analytics.Tracking.Contact contact)2{3 return new ContactData()4 {5 Identifier = contact.Identifiers.Identifier6 };7}