REST APIs are great, but they can result in either your application making an excessive number of requests to multiple endpoints, then only using a small percentage of the data returned. Or you end up making a large number of endpoints for specific purposes and now have maintenance hell to deal with.
If that's your situation then one option is to look at replacing some of that functionality with a Graph QL API. I'm not going to dig into what Graph QL APIs are (that's been covered by many people before me), but what I will do is show you how to make one in an Azure Function.
Your starting point is to use Hot Chocolate by Chilli Cream, not only does it have a fun meaningless name, but it also offers some great simple-to-use functionality. However, despite stating it works with Azure Functions, the documentation is all for ASP.NET Core, which is not the same thing.
Another issue I have with the documentation is that it doesn't explain particularly well how you configure it to work with a data access layer. Examples either have methods that return a dataset containing all related data, or they use Entity Framework, which as you generally wouldn't use your DB schema as an API schema feels like cheating.
So here is my guide from file new project to a working Graph QL API in an Azure Function.
File New Project
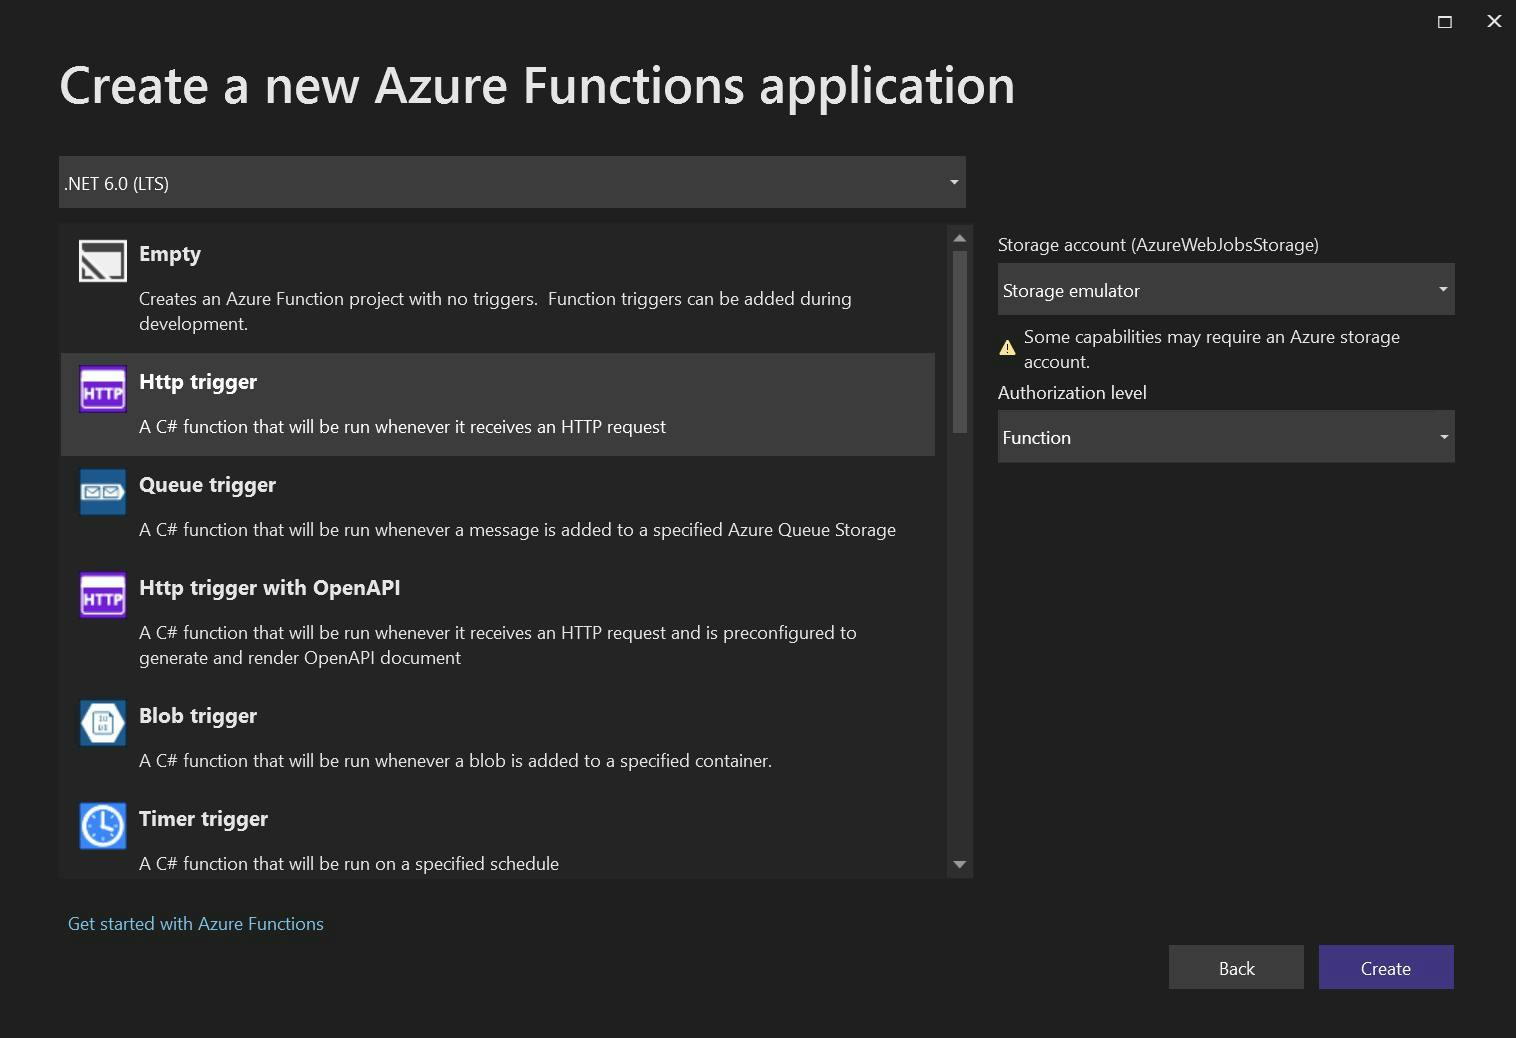
Starting right at the beginning, open Visual Studio and create a new Azure Function. For this demo, I'm using .NET 6 as that's the latest at the time of writing, and am going to create an HTTP trigger.
For a data source, I've created a hard-coded repository containing Schools, Classes, and Students. Schools contain multiple classes and classes contain multiple students. Each repository contains functions to get all, get by id or get by the thing it's related to. e.g. Get Students by Class. Here's my code for it.
1using AzureFunctionWithGraphApi.Models;
2using System.Collections.Generic;
5namespace AzureFunctionWithGraphApi.DataAccess
7 public interface ISchoolRepository
10 School GetById(int id);
13 public interface IClassRepository
16 Class GetById(int id);
17 List<Class> GetBySchool(int schoolId);
20 public interface IStudentRepository {
22 Student GetById(int id);
23 List<Student> GetByClass(int classId);
26 public static class DemoData
28 public static List<School> Schools = new List<School>()
30 new School() {Id = 1, Name = "Foo School"},
31 new School() {Id = 2 , Name = "Boo School"},
34 public static List<Class> ClassList = new List<Class>()
36 new Class() {Id = 3, SchoolId = 1, Name = "Red Class", YearGroup = 1},
37 new Class() {Id = 4, SchoolId = 1, Name = "Blue Class", YearGroup = 2},
38 new Class() {Id =5, SchoolId = 2, Name = "Yellow Class", YearGroup = 1},
39 new Class(){Id = 6, SchoolId = 2, Name = "Green Class", YearGroup = 2}
42 public static List<Student> Students = new List<Student>()
44 new Student() {Id = 1, ClassId = 3, FirstName = "John", Surname = "Smith"},
45 new Student() {Id = 2, ClassId = 3, FirstName = "Sam", Surname = "Smith"},
46 new Student() {Id = 3, ClassId = 4, FirstName = "Eric", Surname = "Smith"},
47 new Student() {Id = 4, ClassId = 4, FirstName = "Rachel", Surname = "Smith"},
48 new Student() {Id = 5, ClassId = 5, FirstName = "Tom", Surname = "Smith"},
49 new Student() {Id = 6, ClassId = 5, FirstName = "Sally", Surname = "Smith"},
50 new Student() {Id = 7, ClassId = 6, FirstName = "Sharon", Surname = "Smith"},
51 new Student() {Id = 8, ClassId = 6, FirstName = "Kate", Surname = "Smith"}
55 public class SchoolRepository : ISchoolRepository
57 public List<School> All()
59 return DemoData.Schools;
62 public School GetById(int id)
64 return DemoData.Schools.Where(x => x.Id == id).FirstOrDefault();
68 public class ClassRepository : IClassRepository
70 public List<Class> All()
72 return DemoData.ClassList;
75 public Class GetById(int id)
77 return DemoData.ClassList.Where(x => x.Id == id).FirstOrDefault();
80 public List<Class> GetBySchool(int schoolId)
82 return DemoData.ClassList.Where((x) => x.SchoolId == schoolId).ToList();
86 public class StudentRepository : IStudentRepository
88 public List<Student> All()
90 return DemoData.Students;
93 public List<Student> GetByClass(int classId)
95 return DemoData.Students.Where((x) => x.ClassId == classId).ToList();
98 public Student GetById(int id)
100 return DemoData.Students.Where(x => x.Id == id).FirstOrDefault();
If you want to use it, you'll also need the related models.
3 public int Id { get; set; }
4 public string Name { get; set; }
9 public int Id { get; set; }
10 public int SchoolId { get; set; }
11 public int YearGroup { get; set; }
12 public string Name { get; set; }
17 public int Id { get; set; }
18 public int ClassId { get; set; }
19 public string FirstName { get; set; }
20 public string Surname { get; set; }
Create a Graph QL API
With our project and data access layer created, lets get on with how to create a Graph QL in a .NET Azure Function.
Hot chocolate will provide all the functionality and can be added to your solution via Nuget. Just search for Hot Chocolate and make sure you pick the Azure Function version.
The HTTP Endpoint we created when creating the function needs updating to provide the route for the graph API.
1using System.Threading.Tasks;
2using Microsoft.AspNetCore.Mvc;
3using Microsoft.Azure.WebJobs;
4using Microsoft.Azure.WebJobs.Extensions.Http;
5using Microsoft.AspNetCore.Http;
6using Microsoft.Extensions.Logging;
7using HotChocolate.AzureFunctions;
9namespace AzureFunctionWithGraphApi
11 public class GraphQlApi
13 [FunctionName("HttpExample")]
14 public async Task<IActionResult> Run(
15 [HttpTrigger(AuthorizationLevel.Anonymous, "get", "post", Route = "graphql/{**slug}")] HttpRequest req,
16 [GraphQL] IGraphQLRequestExecutor executor,
19 log.LogInformation("C# HTTP trigger function processed a request.");
21 return await executor.ExecuteAsync(req);
Next we need to configure what queries can be performed on the graph. For my example, I'm replicating the Get All and Get By Id methods from my data access layer.
One thing to note here is although I'm using dependency injection for my repositories they are using resolver injection on the methods rather than constructor injection. You can read more about why this is on the Chilli Cream site here, but essentially constructor injector won't work.
1using AzureFunctionWithGraphApi.DataAccess;
2using AzureFunctionWithGraphApi.Models;
4using System.Collections.Generic;
6namespace AzureFunctionWithGraphApi
10 public List<School> GetSchools([Service] ISchoolRepository schoolRepository)
12 return schoolRepository.All();
14 public School GetSchoolById([Service] ISchoolRepository schoolRepository, int schoolId)
16 return schoolRepository.GetById(schoolId);
19 public List<Class> GetClasses([Service] IClassRepository classRepository)
21 return classRepository.All();
23 public Class GetClassById([Service] IClassRepository classRepository, int classId)
25 return classRepository.GetById(classId);
28 public List<Class> GetClassesBySchoolId([Service] IClassRepository classRepository, int schoolId)
30 return classRepository.GetBySchool(schoolId);
33 public List<Student> GetStudents([Service] IStudentRepository studentRepository)
35 return studentRepository.All();
37 public Student GetStudentById([Service] IStudentRepository studentRepository, int studentId)
39 return studentRepository.GetById(studentId);
42 public List<Student> GetStudentsBySchoolId([Service] IStudentRepository studentRepository, int classId)
44 return studentRepository.GetByClass(classId);
At this point (apart from the fact we haven't configured the startup file with our DI) you will now have a Graph QL API but it won't be able to load any related items. You will however be able to pick which fields you want from the datasets.
To add the related data we need to create extension methods for our models. These inject the instance of the item using Hot Chocolates Parent attribute, and the repository we're going to use to get the data.
1using AzureFunctionWithGraphApi.DataAccess;
2using AzureFunctionWithGraphApi.Models;
4using HotChocolate.Types;
5using System.Collections.Generic;
7namespace AzureFunctionWithGraphApi
9 [ExtendObjectType(typeof(School))]
10 public class SchoolExtensions
12 public List<Class> GetClasses([Parent] School school, [Service] IClassRepository classRepository)
14 return classRepository.GetBySchool(school.Id);
18 [ExtendObjectType(typeof(Class))]
19 public class ClassExtensions
21 public School GetSchool([Parent] Class schoolClass, [Service] ISchoolRepository schoolRepository)
23 return schoolRepository.GetById(schoolClass.SchoolId);
25 public List<Student> GetStudents([Parent] Class schoolClass, [Service] IStudentRepository studentRepository)
27 return studentRepository.GetByClass(schoolClass.Id);
31 [ExtendObjectType(typeof(Student))]
32 public class StudentExtensions
34 public Class GetClass([Parent] Student student, [Service] IClassRepository classRepository)
36 return classRepository.GetById(student.ClassId);
Now all that's left is to configure our startup file. This file no longer gets created when you create the Azure Function so you'll need to add it yourself.
Here's mine. As you can see I'm registering the dependency injection for my repositories, and also configuring the GraphQL. This needs to include the query class we made and any extension classes.
1using AzureFunctionWithGraphApi.DataAccess;
2using Microsoft.Azure.Functions.Extensions.DependencyInjection;
3using Microsoft.Extensions.DependencyInjection;
5[assembly: FunctionsStartup(typeof(AzureFunctionWithGraphApi.Startup))]
6namespace AzureFunctionWithGraphApi
8 public class Startup : FunctionsStartup
10 public override void Configure(IFunctionsHostBuilder builder)
12 builder.Services.AddScoped<ISchoolRepository, SchoolRepository>();
13 builder.Services.AddScoped<IClassRepository, ClassRepository>();
14 builder.Services.AddScoped<IStudentRepository, StudentRepository>();
16 builder.AddGraphQLFunction()
17 .AddQueryType<Query>()
18 .AddTypeExtension<SchoolExtensions>()
19 .AddTypeExtension<ClassExtensions>()
20 .AddTypeExtension<StudentExtensions>();
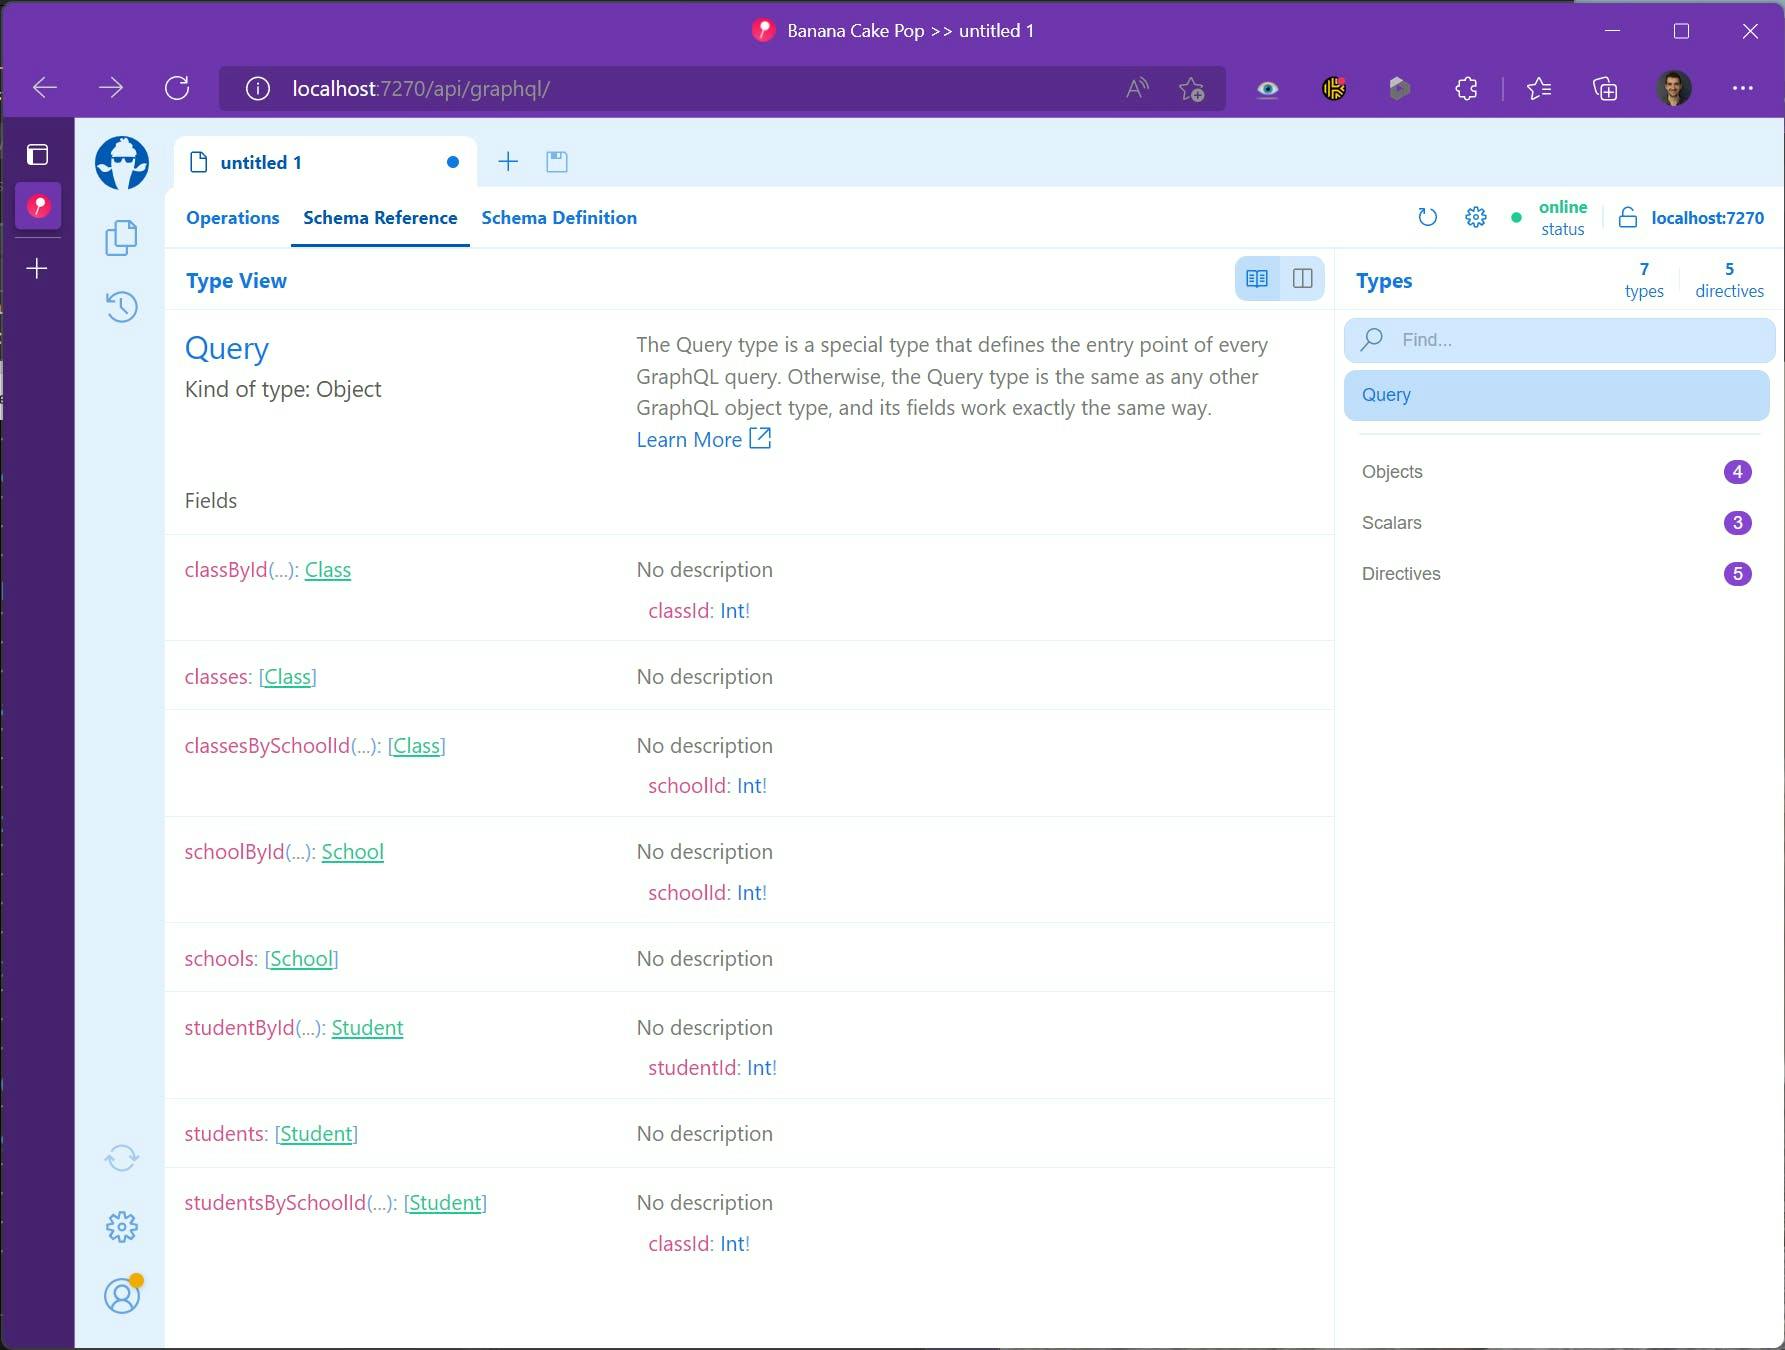
Run the Application and navigate in a browser to it's one route and you should get see the Banana Cake Pop UI to be able to view your schema.
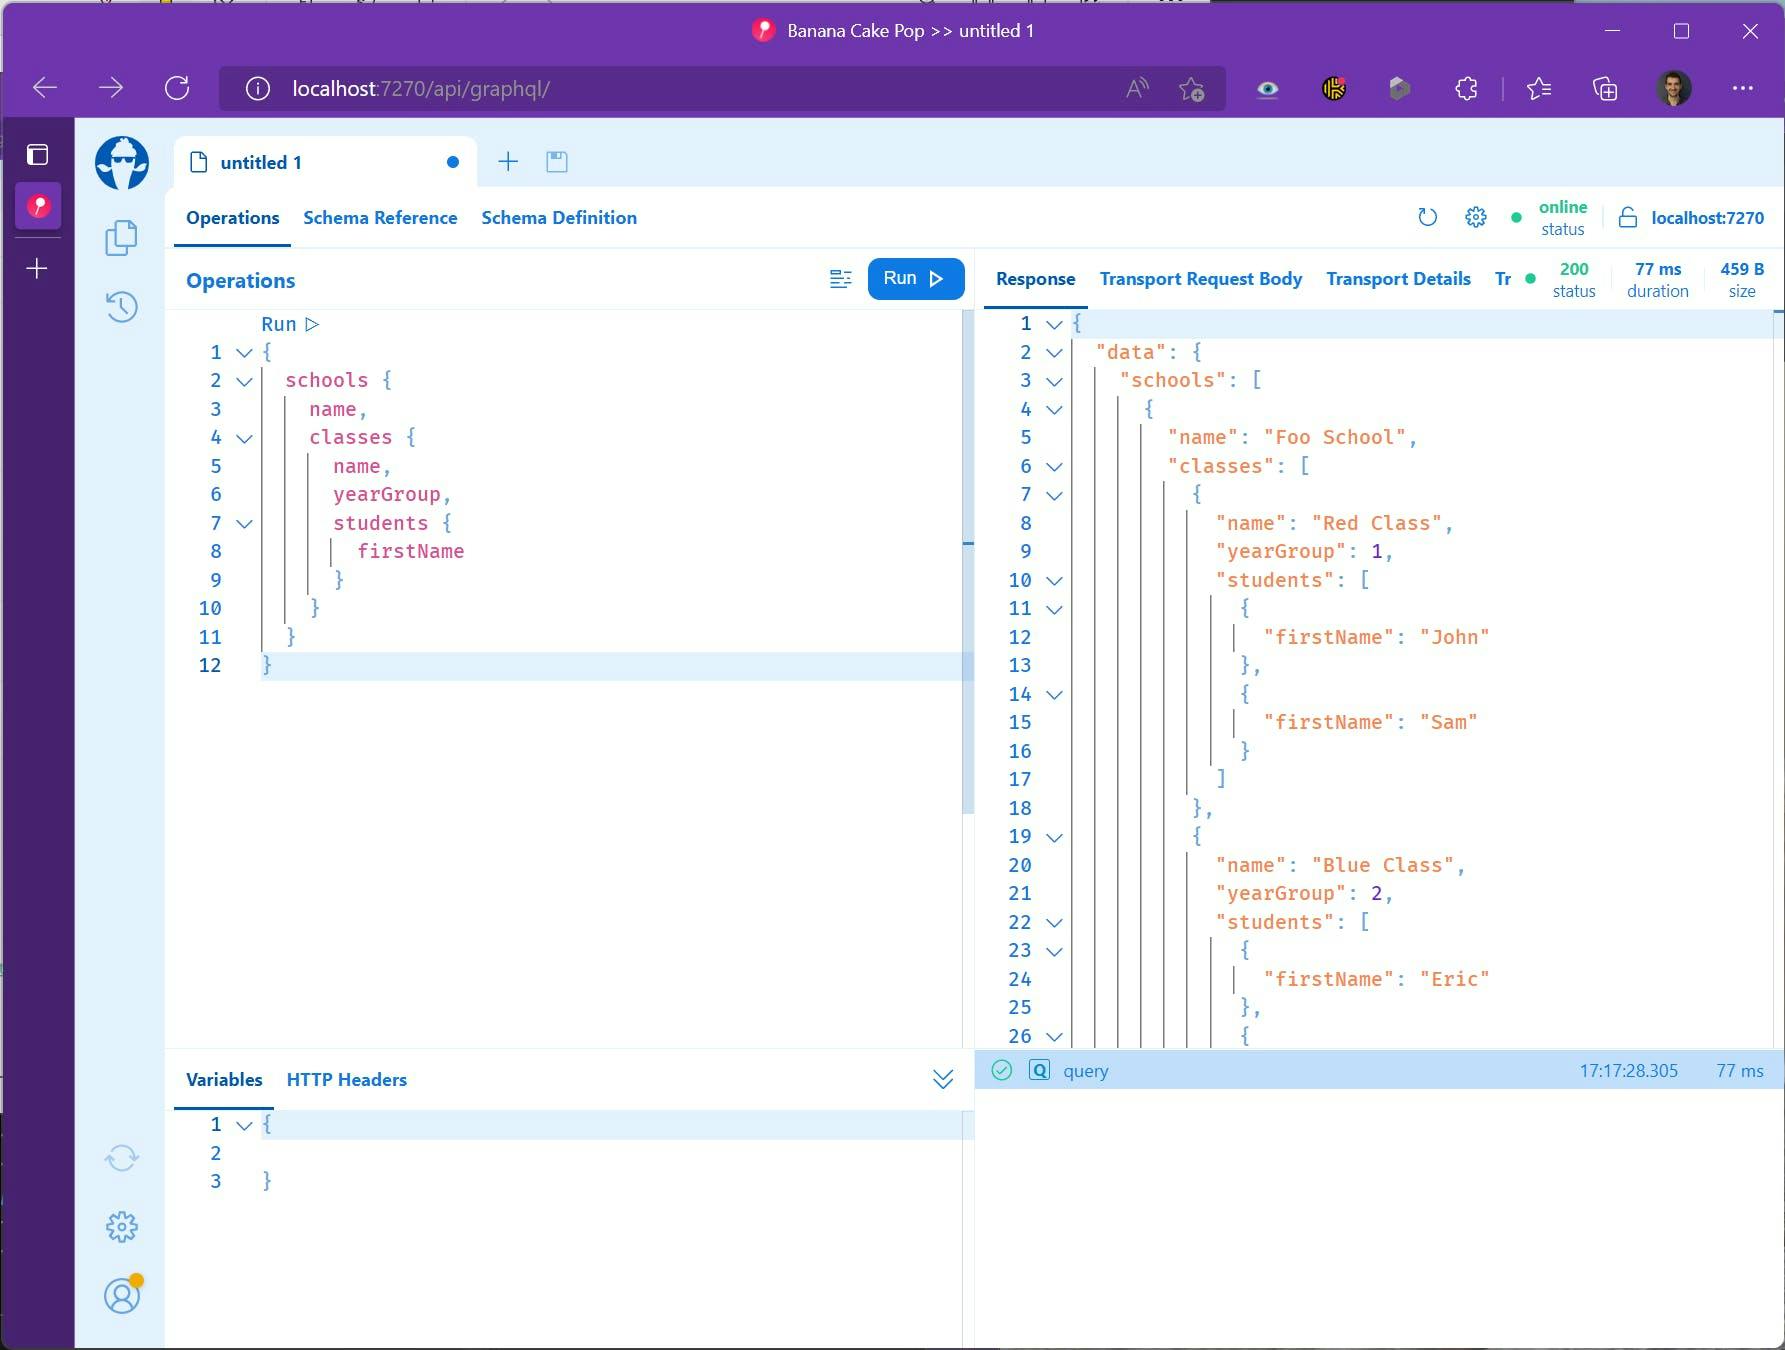
You can also test out queries selecting just the data you want even on related items.
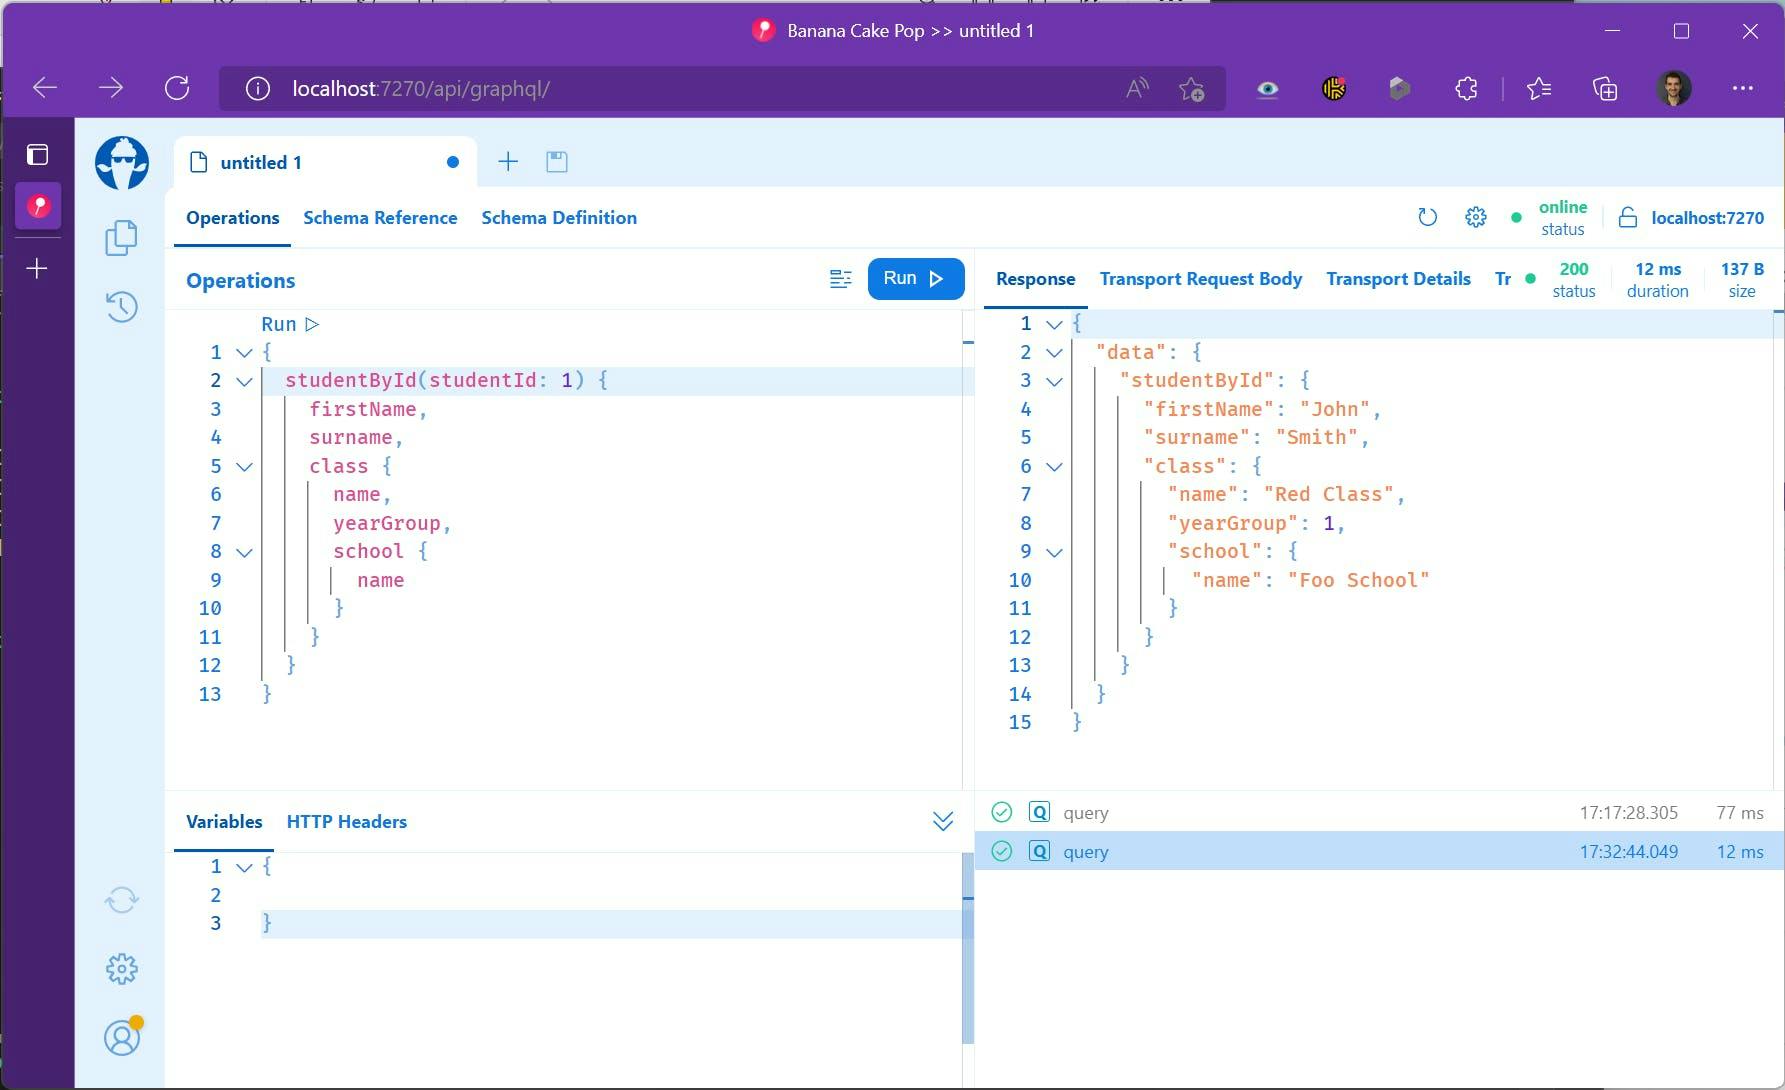
We could even start with selecting a specific student and pull in their related class and school info.
The Bad News
All of this is great and in fact, even more, functionality is available to be added, but there is some bad news. Not all of Hot Chocolates functionality actually works in an Azure Function, specifically authentication.
You can read about Hot Chocolates implementation of Authentication and Authorization here however it uses ASP.NET Core authentication middleware and Authorize attributes which do not work in Azure Functions. So unless you want your Graph QL API to be fully public you may be out of luck with this being a solution.
Code for this Demo
Now for the good news, if you want to try this without typing all the code, you can get a copy of it from my GitHub here.
https://github.com/timgriff84/AzureFunctionWithGraphApi