Tag: TypeScript
Storybook + NextJs with TypeScript Paths set

Storybook + NextJs with TypeScript Paths set

Previously I have written about making your code neater by using TypeScript paths. Since then I have found that the NextJs create app Wizzard now asks you about setting this, so that from the get-go you will now likely start with it set in an application and have neater code for the better.

However, if you then try using Storybook then you're likely to see an error Module not found: Error: Can't resolve '@/components...' on any component that has an import using one of the paths.

Storybook error relating to paths

Quite simply, Storybook does not pick up the setting in your tsconfig.json file and it has no idea where to import the module from.

To get around this issue we need to also tell Storybook about the paths we've set in .storybook\main.ts. We do this by adding a resolve alias to the config returned by webpackFinal. The code example here sets an alias that will match the default path set by NextJs in its create app wizzard.

1import type { StorybookConfig } from "@storybook/nextjs";
2import path from "path";
3
4const config: StorybookConfig = {
5 // Other config removed for clarity
6 webpackFinal: async (config, { configType }) => {
7 if (!config.resolve) {
8 return config;
9 }
10
11 config.resolve.alias = {
12 ...config.resolve.alias,
13 "@": path.resolve(__dirname, "../src"),
14 };
15
16 return config;
17 },
18};
19export default config;
20

Of course if you have other paths set then you can add them here as well. When you next run storybook the error should be gone and your components now show in Storybooks UI.

Parallel API calls in JavaScript

Parallel API calls in JavaScript

Although JavaScript is single-threaded, it is relatively simple to avoid blocking the thread by writing code in an asynchronous style through the use of functions with an async keyword that returns a promise and only awaiting when you need it.

For example, the following code contains an API call in an async function.

1 private async CallAPI() {
2 const response = await axios.get('https://fooapi.com/Films')
3
4 console.log(response.data)
5 }

If we wanted to call two APIs then we could do the following.

1 private async CallAPI() {
2 const response = await axios.get('https://fooapi.com/Films')
3 const response2 = await axios.get('https://fooapi.com/Music')
4
5 console.log(response.data)
6 console.log(response2.data)
7 }
8

However because both API calls are being immediately awaited, this will result in the execution of the function stopping while it waits for the result of the first API call before making the second.

As we don't need that response to make the second API call, we can improve the performance of the code by moving the await keywords to the point we actually need the responses. Both API calls will now be made in parallel rather than the second waiting for the first to finish.

1private async CallAPI() {
2 const response = axios.get('https://fooapi.com/Films')
3 const response2 = axios.get('https://fooapi.com/Music')
4
5 console.log(await response.data)
6 console.log(await response2.data)
7}

Call an API for each item in an array in parallel

Those initial examples were quite easy to understand, but what if we have a scenario where you get a list of films showing at the cinema on a particular day and display the show times for each? You have two APIs at your disposal; The first returns all the films and the second returns the showtimes for a given film.

To get all the data you need you first need to call the API to get the films and then loop through them to call the second API and get the show times.

1interface Film {
2 id: string
3 name: string
4 showtimes: ShowTime[]
5}
6
7interface ShowTime {
8 date: Date
9}
10
11class FilmService {
12 public async GetShowtimes(): Promise<Film[]> {
13 const filmResponse = axios.get('https://fooapi.com/Films')
14
15 const films: Film[] = []
16 for (let e of (await filmResponse).data) {
17 console.log("Get Showtimes")
18 const showTimes = await axios.get(
19 `https://fooapi.com/Films/${e.id}/ShowTimes`
20 )
21 console.log("Got Showtimes")
22
23 films.push({
24 id: e.id,
25 name: e.name,
26 showtimes: showTimes.data,
27 })
28 }
29
30 return films
31 }
32}
33
34// Output
35// Get Showtimes
36// Got Showtimes
37// Get Showtimes
38// Got Showtimes
39// Get Showtimes
40// Got Showtimes

The problem with this code though is that its execution length will be the films API call response time + (showtime API response time * the number of films).

As each call to the second API have no dependencies on each other, it doesn't make any sense for them to have to be performed sequentially in the loop.

Instead, we can refactor for loop to be a map calling an async function which returns the new array and make use of Promise.all() to ensure they have all completed before returning the results.

1interface Film {
2 id: string
3 name: string
4}
5
6interface FilmWithShowtime extends Film {
7 showtimes: ShowTime[]
8}
9
10interface ShowTime {
11 date: Date
12}
13
14class FilmService {
15 public async GetShowtimes(): Promise<FilmWithShowtime[]> {
16 const filmResponse = await axios.get('https://fooapi.com/Films')
17
18 const films: FilmWithShowtime[] = await Promise.all(
19 filmResponse.data.map(async (e: Film) => {
20 return await this.getFilmWithShowtimes(e)
21 })
22 )
23
24 return films
25 }
26
27 private async getFilmWithShowtimes(film: Film): Promise<FilmWithShowtime> {
28 console.log("Get Showtimes")
29 const showTimes = await axios.get(
30 `https://fooapi.com/Films/${film.id}/ShowTimes`
31 )
32
33 console.log("Got Showtimes")
34
35 return {
36 id: film.id,
37 name: film.name,
38 showtimes: showTimes.data,
39 }
40 }
41}
42
43// Output
44// Get Showtimes
45// Get Showtimes
46// Get Showtimes
47// Got Showtimes
48// Got Showtimes
49// Got Showtimes
50

The API calls for show times will now app be made in parallel reducing the overall execution time of the code.

Making your code neater with TypeScript Paths

Making your code neater with TypeScript Paths

When I started doing development with TypeScript one of the first things that irked me was all those relative paths in import statements.

Code organisation and creating layers for maintainability is one of the things I'm most OCD about, so things like a service to call Prismics API end up in a folder called services. However, to then use it in a NextJs page a few folders deep ends up with an import statement such as this.

1import { prismicService } from '../../../src/services/Prismic/Prismic.service'

Yuck. Look at all those ../../ and to make things worse this also means if you move a file its no longer pointing in the right place.

Fortunately, there is a solution. Typescript supports path mapping through the tsconfig.json file.

First set a base URL property in the compiler options.

1{
2 "compilerOptions": {
3 "baseUrl": ".",
4 }
5}

At this point, you could get rid of all those ../ and just start at the src. e.g.

1import { prismicService } from 'src/services/Prismic/Prismic.service'

This is a lot better and we can now move files around, but it's still not perfect. The fact it's in a folder called src is a bit irrelevant for my liking.

Using the path's property we can define a grouping even lower down. e.g.

1// tsconfig.json
2{
3 "compilerOptions": {
4 "baseUrl": ".",
5 "paths": {
6 "@Services/*": ["src/services/*"]
7 }
8 }
9}
10
11// New import
12import { prismicService } from '@Services/Prismic/Prismic.service'

For more information on TypeScript paths check out the official documentation here.

Going a bit further

As well as just making your code a bit easier to read. This also makes a simple solution to swapping out code in a way that would otherwise need a dependency injection framework.

Coming from a .net background where dependency injection and interfaces are frequently used there can be a desire to do it with TypeScript too. Although it is possible (you can read my blog post on dependency injection with NextJs and Tsyringe here) it has quite a heavy overhead to the amount of code you need to write.

A simpler solution can be like what Vercel have done in NextJs commerce for the different providers.

Check out this part of their tsconfig file.

1 "paths": {
2 "@lib/*": ["lib/*"],
3 "@utils/*": ["utils/*"],
4 "@config/*": ["config/*"],
5 "@assets/*": ["assets/*"],
6 "@components/*": ["components/*"],
7 "@commerce": ["../packages/commerce/src"],
8 "@commerce/*": ["../packages/commerce/src/*"],
9 "@framework": ["../packages/local/src"],
10 "@framework/*": ["../packages/local/src/*"]
11 }

That @framework section at the end defaults to local, but gets swapped out to a commerce provider like bigcommerce or shopify. As each one implements the same methods, anything importing from @framework simply uses the correct code when the solution is built.

Debugging VueJS + TypeScript with VS Code - Part 2

Debugging VueJS + TypeScript with VS Code - Part 2

In the past I have written about how to setup VS Code to debug a VueJS + TypeScript project. Since writing that article it's a method I've continued to use and it works well. It's quick to spin up and quite reliably allows you to place breakpoints in code.

However one aspect of it that I don't like is it's not so much "Run and Debug" from VSCode, it's more just the debug part, as to use it you must first go to a terminal and run your VueJS application.

There's two problems with this:

1. Most of the time you will just run the application not debugging (because why debug when you don't have an issue), therefore when you need it, you have to redo what you just did that caused an error. Instinctively there is then a desire to guess at what was wrong rather than going to the extra effort of debugging (frequently when you do this your guess is wrong and you end up spending more time guessing at what was wrong than using the tool that will tell you).

2. As the debugger generally isn't running, exceptions never get flagged up, and unless you have the browser console open (and check it), you can remain oblivious to something going wrong in your app.

There is a solution though, and it's quite simple!

Using VS Code to launch via npm

First follow through my previous guide on debugging a VueJS and TypeScript application.

Next, in your launch.config file add a new configuration with the definition below. This will run the command in a debug terminal, effectively doing the same thing as you typing npm run serve.

1{
2 "command": "npm run serve",
3 "name": "Run npm serve",
4 "request": "launch",
5 "type": "node-terminal"
6 },

To get both our new and old configuration to run you can add a compound definition, that does both at the same time.

Here's mine.

1"compounds": [
2 {
3 "name": "Run and Debug",
4 "configurations": ["Run npm serve", "vuejs: edge"]
5 }
6 ],

My complete file now looks like this. Note you don't need configurations for edge and chrome, just use the one for the browser you use.

1{
2 // Use IntelliSense to learn about possible attributes.
3 // Hover to view descriptions of existing attributes.
4 // For more information, visit: https://go.microsoft.com/fwlink/?linkid=830387
5 "version": "0.2.0",
6 "compounds": [
7 {
8 "name": "Run and Debug",
9 "configurations": ["Run npm serve", "vuejs: edge"]
10 }
11 ],
12 "configurations": [
13 {
14 "command": "npm run serve",
15 "name": "Run npm serve",
16 "request": "launch",
17 "type": "node-terminal"
18 },
19 {
20 "type": "pwa-msedge",
21 "request": "launch",
22 "name": "vuejs: edge",
23 "url": "http://localhost:8080",
24 "webRoot": "${workspaceFolder}",
25 "breakOnLoad": true,
26 "sourceMapPathOverrides": {
27 "webpack:///./*": "${webRoot}/*"
28 },
29 "skipFiles": ["${workspaceFolder}/node_modules/**/*"]
30 },
31 {
32 "type": "chrome",
33 "request": "launch",
34 "name": "vuejs: chrome",
35 "url": "http://localhost:8080",
36 "webRoot": "${workspaceFolder}",
37 "breakOnLoad": true,
38 "sourceMapPathOverrides": {
39 "webpack:///./*": "${webRoot}/*"
40 },
41 "skipFiles": ["${workspaceFolder}/node_modules/**/*"]
42 }
43 ]
44}
45

Now whenever you want to run the application, just run the compound Run and Debug and your VueJS app will start up and launch in your browser.

Dependency Injection with NextJS and TypeScript

Dependency Injection with NextJS and TypeScript

Coming from a backend world, one thing that stands out when you start writing code in JavaScript, be it React, NextJS, Vue etc, is there's no great focus on code structure. Things like TypeScript bring back the concept of type checking that you'd be used to with a compiled language, and NextJS will give anyone familiar with ASP.NET MVC an alternative pattern for how a website should be constructed. But you can get the whole way through the NextJS tutorial without concepts like single responsibility, inversion of control or CQRS being mentioned once.

Now if your building a small site, maybe you can get away with not knowing or imlementing these things, but if you want to make code that's scalable or maintainable, it doesn't matter if you write in JavaScript or C# the same issues will exist but fortunately the same solutions do too.

Code Smells

Lets take a look at one of the functions on this site which gets the latest blog posts on the homepage.

1import gql from 'graphql-tag';
2import { Client, ApolClient } from '../prismicHelpers'
3
4// Models
5import { FeaturedPost } from "../../Models/FeaturedPost"
6
7const latestPostsQuery = gql`
8query latestPosts($category: String) {
9 allPosts (where : {category: $category}, first : 10, sortBy: post_date_DESC){
10 edges {
11 node {
12 category {
13 ... on Categories {
14 name
15 }
16 },
17 title,
18 image,
19 post_date
20 _meta {
21 uid
22 }
23 }
24 }
25 }
26}
27`;
28
29export const getLatestPosts = async (category?: String) : Promise<FeaturedPost[]> => {
30 const queryOptions = {
31 query: latestPostsQuery,
32 variables: { category },
33 };
34
35 return new Promise((resolve, reject) => { ApolClient.query(queryOptions).then(response => {
36 var posts: Array<FeaturedPost> = [];
37 response.data.allPosts.edges.map((edge: { node: { title: { text: any; }[]; category: any; image: any; post_date: Date; _meta: { uid: any; }; }; }, key: any) => {
38 posts.push({
39 type: "post",
40 title: edge.node.title[0].text,
41 image: edge.node.image,
42 uid: edge.node._meta.uid,
43 category: edge.node.category?.name,
44 postDate: edge.node.post_date
45 })
46 })
47 resolve( posts);
48 }).catch(error => {
49 reject(error);
50 });
51});
52};

This bit of code queries Prismic's GraphQL API to get the latest 10 articles for a category and then maps the result onto an internal FeaturedPost model.

Some good things about it:

  • The Prismic logic is abstracted away from the rest of the application by mapping the results to a model.
  • It follows single responsibility by doing just 1 job.
  • All config for the API (e.g. URI) are separated into a common function rather than being duplicated.

However even though I've seen countless JavaScript examples which don't even do these good things, if this were C# and I was reviewing a pull request, I'd say it smelt and needed changing.

Here's some bad things about it:

  • It's taking a dependency on Apollo Client, which while is a great client for doing GraphQL queries, at the rate JS frameworks come and go we can't say we'll never replace it and in a large application that has countless queries that would be a lot of code to update.
  • There's also no way anything can call this without also taking a dependency on it. That means I now have a hierarchy of at least 3 functions with each one dependent on the next. If I ever wanted to add unit tests to my project I'd have a big problem.

Dependency Injection using TSyringe

These issues can be solved using Dependency Injection. There's quite a few around but the one I've chosen is TSyringe (https://github.com/microsoft/tsyringe).

It's built by Microsoft, which gives me some confidence in the amount of QA that will have gone into it, but more importantly it works the way I expect a DI framework to work. There's a good chance this could be because I'm used to working in the Microsoft stack and it therefore has natural similarities to DI frameworks in their own languages.

How to add TSyringe to a NextJS project

There's nothing specifically NextJS about TSyringe, you could use it with any TypeScript/JavaScript project, it just happens that that's what my blog is built using. However it also had a few issues getting it to work and I couldn't any articles around which explained how.

To set it up...

First install the package tsyring and reflect-metadata using npm.

1npm install --save tsyringe reflect-metadata

Modify your tsconfig.json file to include the following settings, which will allow the use of decorators in TypeScript.

1{
2 "compilerOptions": {
3 "experimentalDecorators": true,
4 "emitDecoratorMetadata": true
5 }
6}

Now there's a few more packages your going to need. As of NextJS 12, Babel is no longer used and has been replaced with SWC to provide faster compile times. However TSyringe and most other DI frameworks use decorators to function (hence the tsconfig.js setting to turn them on), but the setting for SWC to allow this set to false in NextJS and there's no way for you to provide your own config. Fortunately Babel is still supported and you can customise it. Hopefully a future version of NextJS will address this.

Install the following packages as dependencies.

1npm install -D @babel/core @babel/plugin-proposal-class-properties @babel/plugin-proposal-decorators babel-plugin-transform-typescript-metadata

Add a .bablerc file to your project with the following settings.

1{
2 "presets": ["next/babel"],
3 "plugins": [
4 "babel-plugin-transform-typescript-metadata",
5 ["@babel/plugin-proposal-decorators", { "legacy": true }],
6 ["@babel/plugin-proposal-class-properties", { "loose": true }]
7 ]
8}

Finally add this import to your _app.tsx file.

1import "reflect-metadata";

Using TSyringe

We're now ready to convert the code I had before into something more maintainable.

First I'm going to create a GraphQL Client interface which all my queries will use when they want to call a graph API. This has one function called query, which my functions will pass the graph syntax too along with a variables object.

1import { DocumentNode } from "graphql";
2
3export interface graphClient {
4 query(query: DocumentNode, variables?: {}): any;
5}

With this interface I can now turn my getLatestPosts function into a class with a constructor that will take in the instance of graphClient.

1import { inject, injectable } from "tsyringe";
2import { iGetLatestPosts } from "./iGetLatestPosts";
3import gql from "graphql-tag";
4import { graphClient } from "../iGraphQl";
5
6// Models
7import { FeaturedPost } from "../../Models/FeaturedPost";
8
9@injectable()
10export class getLatestPosts implements iGetLatestPosts {
11 graphClient: graphClient;
12
13 constructor(@inject("graphClient") private graphClientParam: graphClient) {
14 this.graphClient = graphClientParam;
15 }
16
17 private latestPostsQuery = gql`
18 query latestPosts($category: String) {
19 allPosts(
20 where: { category: $category }
21 first: 10
22 sortBy: post_date_DESC
23 ) {
24 edges {
25 node {
26 category {
27 ... on Categories {
28 name
29 }
30 }
31 title
32 image
33 post_date
34 _meta {
35 uid
36 }
37 }
38 }
39 }
40 }
41 `;
42
43 public getLatestPosts = async (
44 category?: String
45 ): Promise<FeaturedPost[]> => {
46 return new Promise((resolve, reject) => {
47 this.graphClient
48 .query(this.latestPostsQuery, { category })
49 .then((response: any) => {
50 var posts: Array<FeaturedPost> = [];
51 response.data.allPosts.edges.map(
52 (
53 edge: {
54 node: {
55 title: { text: any }[];
56 category: any;
57 image: any;
58 post_date: Date;
59 _meta: { uid: any };
60 };
61 },
62 key: any
63 ) => {
64 posts.push({
65 type: "post",
66 title: edge.node.title[0].text,
67 image: edge.node.image,
68 uid: edge.node._meta.uid,
69 category: edge.node.category?.name,
70 postDate: edge.node.post_date,
71 });
72 }
73 );
74 resolve(posts);
75 })
76 .catch((error: any) => {
77 reject(error);
78 });
79 });
80 };
81}

Some things to note in this new class.

  • It's also now implementing an interface so that it can instantiated using DI.
  • The @injectable decorator allows TSyringe to inject the dependencies at runtime.
  • The constructor is decorating a parameter with @inject("graphClient") which means that parameter will be injected at runtime with whatever is configured against the graphClient token.
  • There are imports from tsyringe.
  • There are no references to the implementation of graphClient.
  • My function now has zero dependencies on Apollo Client and doesn't even know it's being used.

My implementation of graphClient looks like this.

1import { autoInjectable } from "tsyringe";
2import { DocumentNode } from "apollo-link";
3import ApolloClient from "apollo-client";
4import { NormalizedCacheObject } from "apollo-cache-inmemory";
5import { graphClient } from "./iGraphQl";
6
7@autoInjectable()
8export class apolloGraphClient implements graphClient {
9 apolloClient: ApolloClient<NormalizedCacheObject>;
10
11 constructor(apolloClient: ApolloClient<NormalizedCacheObject>) {
12 this.apolloClient = apolloClient;
13 }
14
15 public query = async (query: DocumentNode, variables?: {}): Promise<any> => {
16 const queryOptions = {
17 query: query,
18 variables: variables,
19 };
20
21 return new Promise((resolve, reject) => {
22 this.apolloClient
23 .query(queryOptions)
24 .then((response: any) => {
25 resolve(response);
26 })
27 .catch((error: any) => {
28 reject(error);
29 });
30 });
31 };
32}

Essentially all this function does is pass the parameters to the query function to an Apollo Client's query function. The Apollo Client itself is also being injected!

You may have expected this file to also instantiate the Apollo Client, and it could have, but I've gone to the extreme and the single purpose of this file is to act as a bridge between the business logic queries and what client is being used, so for that reason its injected.

You'll also notice that this time I'm decorating the class with @autoInjectable() and there is no decorator on the constructor parameter. More on this in a bit.

The homepage page for this site now looks like this.

1import Head from "next/head";
2
3import React, { useState } from "react";
4import { container } from "tsyringe";
5import { GetStaticProps } from "next";
6import Layout from "../layouts/layout";
7import { FeaturedRow1, FeaturedRow1Model } from "../components/featured-row-1";
8import SectionHeading from "../components/section-heading";
9import { iGetLatestPosts } from "../utils/queries/iGetLatestPosts";
10
11export default function Home({
12 latestPosts,
13 webDevelopmentPosts,
14 sitecorePosts,
15 devOpsPosts,
16}: {
17 latestPosts: FeaturedRow1Model;
18 webDevelopmentPosts: FeaturedRow1Model;
19 sitecorePosts: FeaturedRow1Model;
20 devOpsPosts: FeaturedRow1Model;
21}) {
22 return (
23 <Layout>
24 <Head>
25 <title>Hi My Name Is Tim</title>
26 </Head>
27 <SectionHeading heading="Latest Posts" link="blog"></SectionHeading>
28 <FeaturedRow1 posts={latestPosts}></FeaturedRow1>
29 <SectionHeading heading="Web Development" link="web-development"></SectionHeading>
30 <FeaturedRow1 posts={webDevelopmentPosts}></FeaturedRow1>
31 <SectionHeading heading="Sitecore" link="sitecore"></SectionHeading>
32 <FeaturedRow1 posts={sitecorePosts}></FeaturedRow1>
33 <SectionHeading heading="Devops" link="devops"></SectionHeading>
34 <FeaturedRow1 posts={devOpsPosts}></FeaturedRow1>
35 </Layout>
36 );
37}
38
39export const getStaticProps: GetStaticProps = async () => {
40 // Resolve interface for iGetLatestPosts
41 const instance = container.resolve<iGetLatestPosts>("iGetLatestPosts");
42
43 const latestPosts = await instance.getLatestPosts();
44 const webDevelopmentPosts = await instance.getLatestPosts("X8kFhxIAACcAn9oY");
45 const devOpsPosts = await instance.getLatestPosts("X8kFlRIAACkAn9pa");
46 const sitecorePosts = await instance.getLatestPosts("X8kFeBIAACkAn9nV");
47
48 return {
49 props: {
50 latestPosts: latestPosts,
51 devOpsPosts: devOpsPosts,
52 sitecorePosts: sitecorePosts,
53 webDevelopmentPosts: webDevelopmentPosts,
54 },
55 };
56};

Pages in NextJS TypeScript don't use classes, so we can't do constructor injection to get the instance of our getLatestPosts query class. Instead we are using container.resolve<iGetLatestPosts>("iGetLatestPosts") to get the instance to token name iGetLatestPosts from the DI container.

Lastly in the _app.tsx file I am registering the classes on the container. I'm only including the relevant bit of the file here.

1container.registerInstance(
2 ApolloClient,
3 new ApolloClient({
4 link: PrismicLink({
5 uri: prismicGraphUri,
6 repositoryName: prismicRepoName,
7 }),
8 cache: new InMemoryCache({ fragmentMatcher }),
9 })
10);
11
12container.register("graphClient", apolloGraphClient);
13container.register("iGetLatestPosts", getLatestPosts);

For the Apollo Client I am using register instance to register a specific instance and creating it at the same time. Notice the first parameter is the class name.

For the graph client and getLatestPosts query I am using the register method and rather than creating the instance of my implementation, just passing the class as the second parameter. The framework will handle creating an instance of them for me.

Notice the first parameter for the second two are strings rather than the actual interfaces. These are token names that the container will use to reference the instance value. With the Apollo Client, the framework will figure out the token name when it adds it to the container, but it can't do the same for an interface (if you try you will get an interface cannot be used as a type error) so you have to provide the token name instead. This is also the reason why the graph client implementation didn't need to use a string to inject the class instance in the constructor, whereas the other places did.

Personally I feel this is a weakness in the framework as it also means there is no type checking either when registering or resolving from the container.

Summary

We have seen that using JavaScript doesn't prevent us from using the same concepts as we would with any other more traditional backend language.

We've also seen how a NextJS application while slightly more awkward, can still be set up to use dependency injections.

Finally we've had a look at how to actually configure some code to have complete separation between logic within a solution.

Debugging VueJS + TypeScript with VS Code

Debugging VueJS + TypeScript with VS Code

I recently asked a developer working with VueJS how they do debugging and they told me console.log. Not wanting to go back to the dark ages of development I went and found the solution myself.

The VueJS website has a guide on how to do debugging with VS Code https://vuejs.org/v2/cookbook/debugging-in-vscode.html however the instructions they give don't work with TypeScript. Interestingly it does get you far enough to set breakpoints within either Chrome or Edge, but I don't really count that as a solution. The idea of debugging is you step through your code and see everything that is happening, not step through a copy of your code and then go and find the corresponding file in your code editor.

After a bit of digging I managed to get it to work, so here's my solution.

Prerequisites

This part is essentially as per the VueJS guide.

Make sure you have VS Code installed and install the Debugger for Chrome. Don't worry if you use Edge, the same extension will work.

Create your project with the vue-cli, following the instructions in the Vue CLI Guide. When you do this make sure you pick Typescript.

Displaying Source Code in the Browser

This isn't what we're after but it's still a step we must do.

Create a file called vue.config.js in the root of your solution and paste the following into it. This creates the mapping for the debugger to map compressed files back to the original.

1module.exports = {
2 configureWebpack: {
3 devtool: 'source-map'
4 }
5}

Configure debugging from VS Code

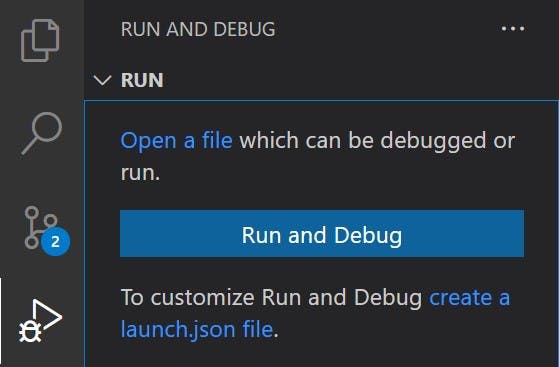
In VS Code select the Run and Debug button on the left and click the Run and Debug button. If you don't see this button it probably means that you already have a launch.json file defined. Instead a cog will appear at the top to edit the existing settings.

VS Code Run and Debug

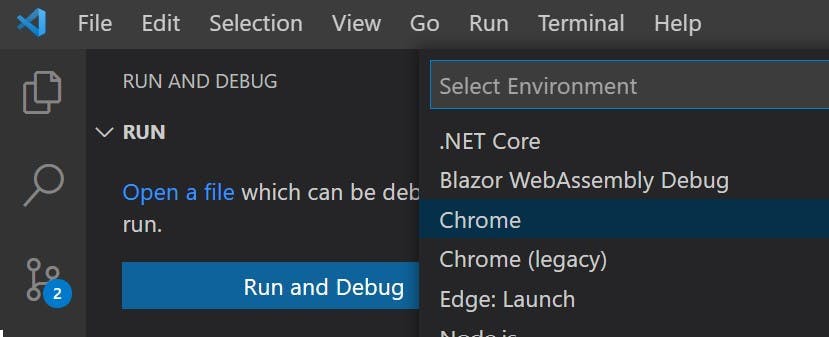
From the options choose either Chrome or Edge.

VS Code select Chrome

This will create a launch.json file with some defaults filled out. Replace the contents of the file with the below (this is the part which differs from the instructions on VueJS's site).

I have included 2 configurations, one for debugging with Chrome and the other for Edge. They are both essentially the same and just launch a different browser.

1{
2 // Use IntelliSense to learn about possible attributes.
3 // Hover to view descriptions of existing attributes.
4 // For more information, visit: https://go.microsoft.com/fwlink/?linkid=830387
5 "version": "0.2.0",
6 "configurations": [
7 {
8 "type": "pwa-msedge",
9 "request": "launch",
10 "name": "vuejs: edge",
11 "url": "http://localhost:8080",
12 "webRoot": "${workspaceFolder}",
13 "breakOnLoad": true,
14 "sourceMapPathOverrides": {
15 "webpack:///./*": "${webRoot}/*"
16 },
17 "skipFiles": [
18 "${workspaceFolder}/node_modules/**/*"
19 ]
20 },
21 {
22 "type": "chrome",
23 "request": "launch",
24 "name": "vuejs: chrome",
25 "url": "http://localhost:8080",
26 "webRoot": "${workspaceFolder}",
27 "breakOnLoad": true,
28 "sourceMapPathOverrides": {
29 "webpack:///./*": "${webRoot}/*"
30 },
31 "skipFiles": [
32 "${workspaceFolder}/node_modules/**/*"
33 ]
34 }
35 ]
36}

Debug from VS Code

To start your debugging you still need to start the application from a terminal with npm run serve. The debugging experience is more like Visual Studios attaching to a process rather than running application by clicking start.

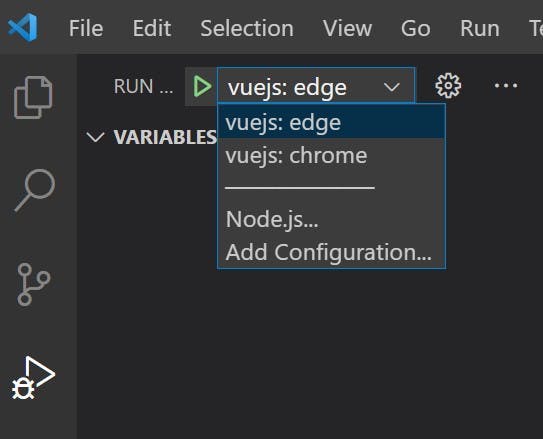
Once your application is running, to attach the debugger either press either F5 or go to the run and debug tab, make sure your browser of choice is selected and click the green play button. Your browser of choice will now open and VS Code should be attached and any break points you create will be hit.

Typescript: What to do when your third party NPM module doesn't have type declarations

Typescript: What to do when your third party NPM module doesn't have type declarations

As a developer who has probably spent slightly more time doing backend work than front end, and also who's front end work has been more about SPAs than making things look pretty, I really like what TypeScript brings to writing JavaScript. While it's often a nice break from C# to do write some code that doesn't require you to go and define every object there obviously a lot of benefits to do this (otherwise we would just make everything dynamic in C'#). Having file name's show up red in VS Code when there's a type error is a really nice feature.

However if you want to set your compiler options to strict, you will more than likely run into an issue with third part code coming from NPM. In the form of:

Type error: Could not find a declaration file for module MODULE NAME HERE

Here's a screen grab of the compiler error from my build server...

It's offering a nice line of hope by suggesting I run an npm command to add in the types. Sometime this works, but as not everyone feels the need to adopt TypeScript you'll find there's times when it doesn't.

The only solution to this is to write your own.

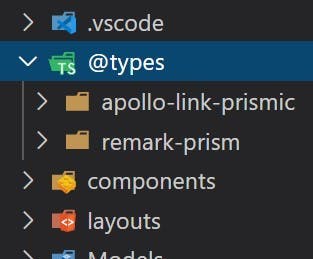
Type Definitions are stored in the node_modules folder, but as that isn't something you'll want to be adding to source control you'll need another folder. I call mine @types and have it in the root. Within that folder you then need a folder for each module requiring type definitions. The name of each folder should match the module name.

Here's mine:

To make the actual declaration file you'll need to name it index.d.ts and place it in the folder you just created. You can read more about how declaration files should be structured here, however there's an issue with writing a declaration file for a third party module.

1. It's very confusing to work out everything that should go in it

2. It's not your module so it might change

Unless your planning on helping develop the module and create the official type declarations, I suggest an easier option.

Create a file that looks like this:

1/// <reference types="node" />
2
3declare module 'module name here';

This is enough to satisfy the compiler. You won't get accurate types for the module, but they would only ever be as good as your interpretation anyway. This will at least unlock the ability for the rest of your application to continue functioning for strict type checking.

Sitecore SPEAK 3 - Creating an application

Sitecore SPEAK 3 - Creating an application

At the end of last year I wrote a post on A first look at Sitecore SPEAK 3 which gave an overview of what Speak is, and the large architecture change that has happened between Speak 1/2 to 3.

In this post I'm going to share my experience on how to set up a Speak 3 application with Angular.

Step 1 - Creating the Angular project

To start your going to need a few things installed:

  • An IDE - I'm using VS Code
  • NodeJs - This is to get access to node package manager and to run your application in debug mode
  • Angular

If you don't already have Node and Angular installed, I suggest going through Angular's quick start guide. If your also new to Angular I suggest going through their Tour of Heroes tutorial first. This will give you a good understanding of how Angular applications are built and some knowledge around a few key files.

One you've got everything installed, create a new angular project from the command line.

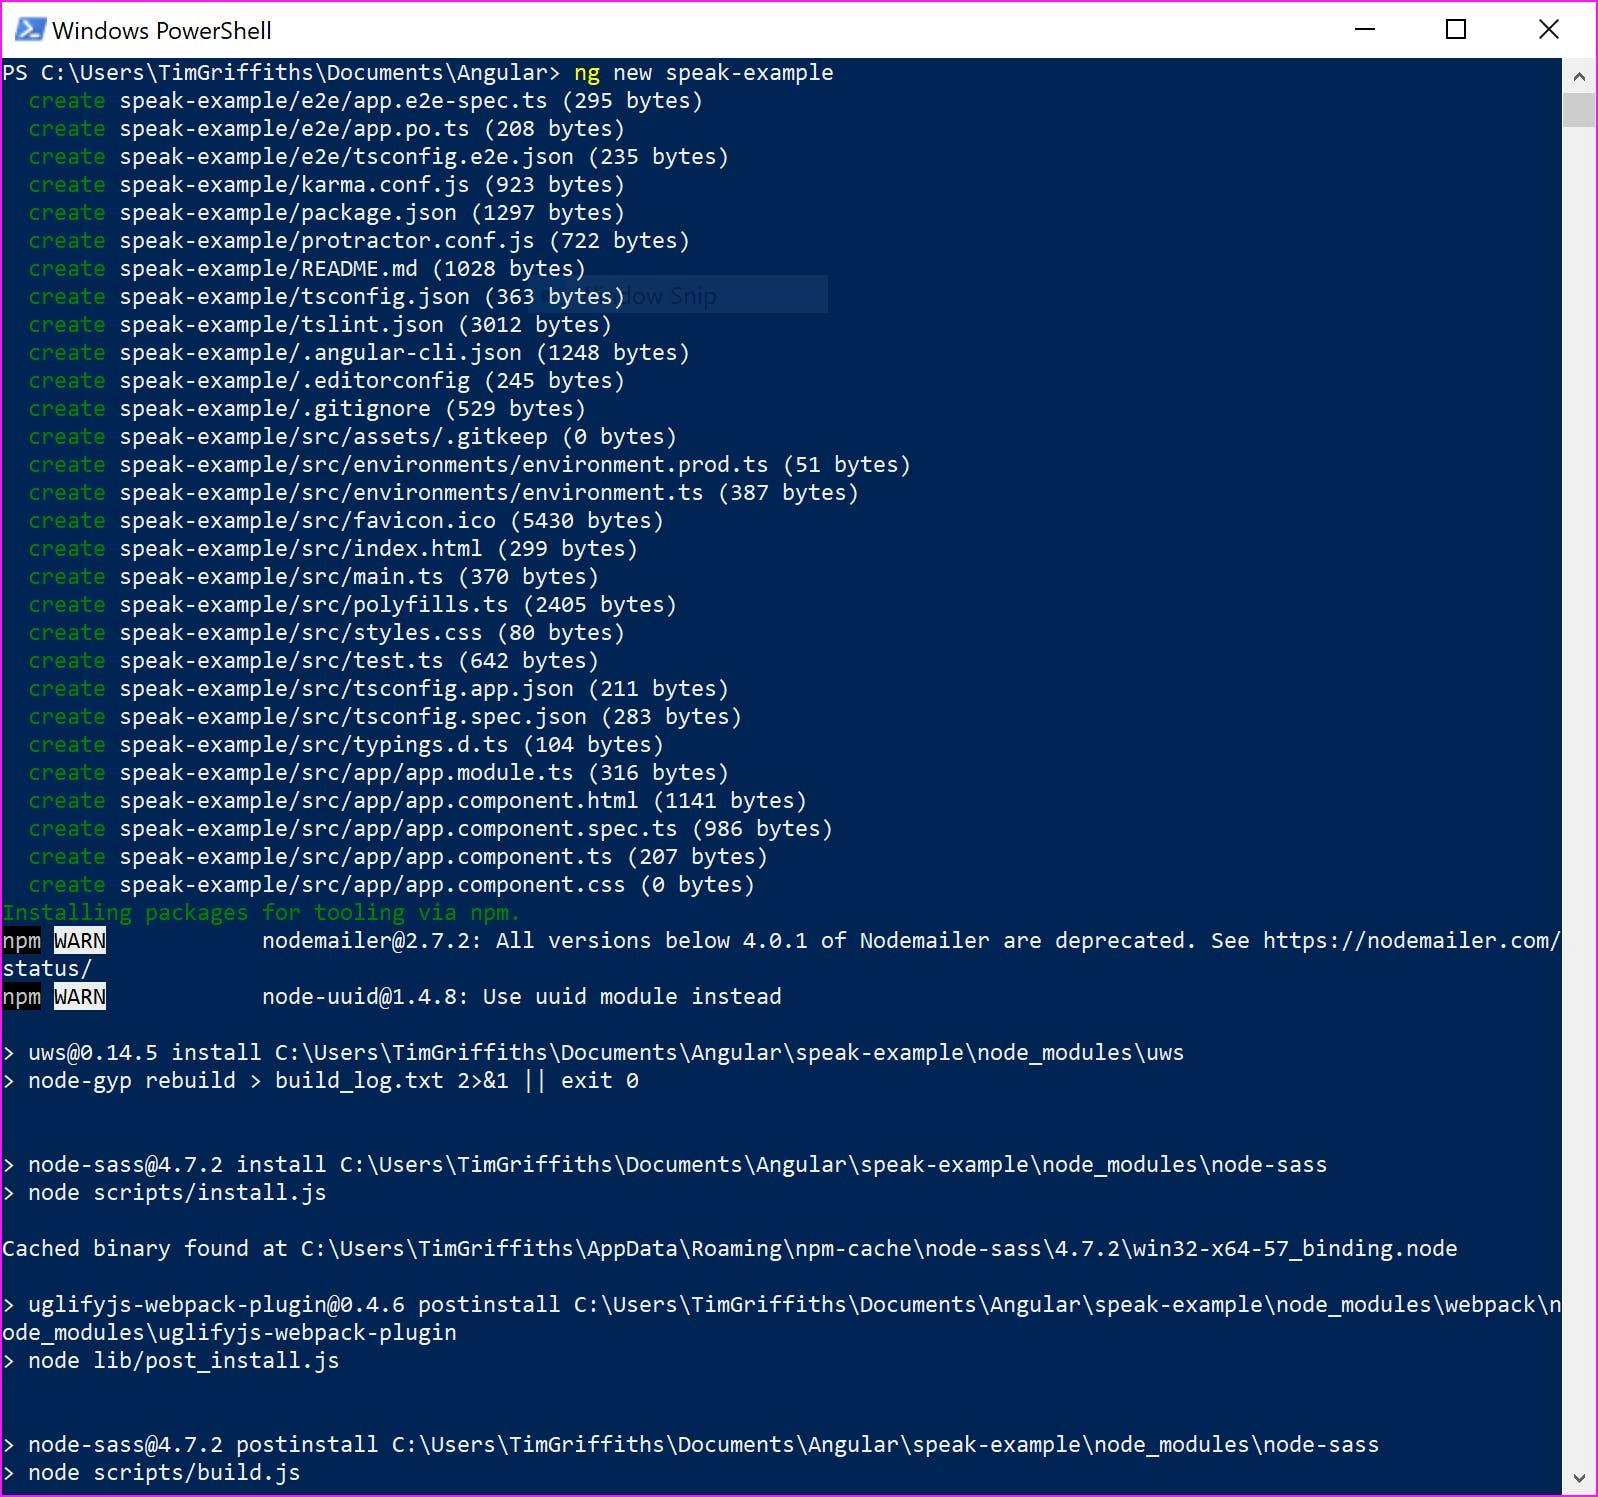
1ng new app-name

At this point you could try manually installing the various modules Sitecore provide, covering things like common components, logout functionality etc. However I personally found this a bit awkward. Unless you know what your doing your probably going to run into issues such as compatibility between the latest version of Angular and the Sitecore components (at time of writing Angular is on version 5 but Speak 3 only supports Angular 4).

Instead I would recommend downloading the sample application from https://dev.sitecore.net/Downloads/Sitecore_SPEAK/3/Sitecore_SPEAK_3.aspx and then copy over the .npmrc and package.json file to your solution.

By including these files, the .npmrc file will add a reference to Sitecores package repository and the package.json file will make sure the right packages and versions will be installed. Use npm to install the packages.

1npm install

Next we need to update a couple of files in the application to reference some Sitecore specific bits. This is explained in Sitecores documentation, in my examples though I've also included referencing some modules that you are likely to use.

app.module.ts

The app module file defines the modules that are going to be used in the application. Here we need to add the references to the Sitecore modules.

1import { BrowserModule } from '@angular/platform-browser'; import { NgModule } from '@angular/core'; import { ScAccountInformationModule } from '@speak/ng-bcl/account-information'; import { ScActionBarModule } from '@speak/ng-bcl/action-bar'; import { ScApplicationHeaderModule } from '@speak/ng-bcl/application-header'; import { ScButtonModule } from '@speak/ng-bcl/button'; import { ScGlobalHeaderModule } from '@speak/ng-bcl/global-header'; import { ScGlobalLogoModule } from '@speak/ng-bcl/global-logo'; import { ScIconModule } from '@speak/ng-bcl/icon'; import { ScMenuCategory, ScMenuItem, ScMenuItemLink, ScMenuModule } from '@speak/ng-bcl/menu'; import { ScTableModule } from '@speak/ng-bcl/table'; import { ScPageModule } from '@speak/ng-bcl/page'; import { CONTEXT, DICTIONARY } from '@speak/ng-bcl'; import { NgScModule } from '@speak/ng-sc'; import { AppComponent } from './app.component'; @NgModule({ declarations: [ AppComponent ], imports: [ BrowserModule, ScAccountInformationModule, ScActionBarModule, ScApplicationHeaderModule, ScButtonModule, ScGlobalHeaderModule, ScGlobalLogoModule, ScIconModule, ScPageModule, ScMenuModule, ScTableModule, NgScModule.forRoot({ contextToken: CONTEXT, // Provide Sitecore context for SPEAK 3 Components (optional) dictionaryToken: DICTIONARY, // Provide translations for SPEAK 3 Components (optional) translateItemId: '0C979B7C-077E-4E99-9B15-B49592405891', // ItemId where your application stores translation items (optional) authItemId: '1BC79B7C-012E-4E9C-9B15-B4959B123653' // ItemId where your application stores user access authorization (optional) }) ], providers: [], bootstrap: [AppComponent] }) export class AppModule { }

app.component.ts

The component file needs updating to call init on the ngScService.

1import { Component, OnInit } from '@angular/core'; import { NgScService } from '@speak/ng-sc'; @Component({ selector: 'app-root', templateUrl: './app.component.html', styleUrls: ['./app.component.css'] }) export class AppComponent implements OnInit { constructor( private ngScService: NgScService ) {} ngOnInit() { this.ngScService.init(); } }

.angular-cli.json

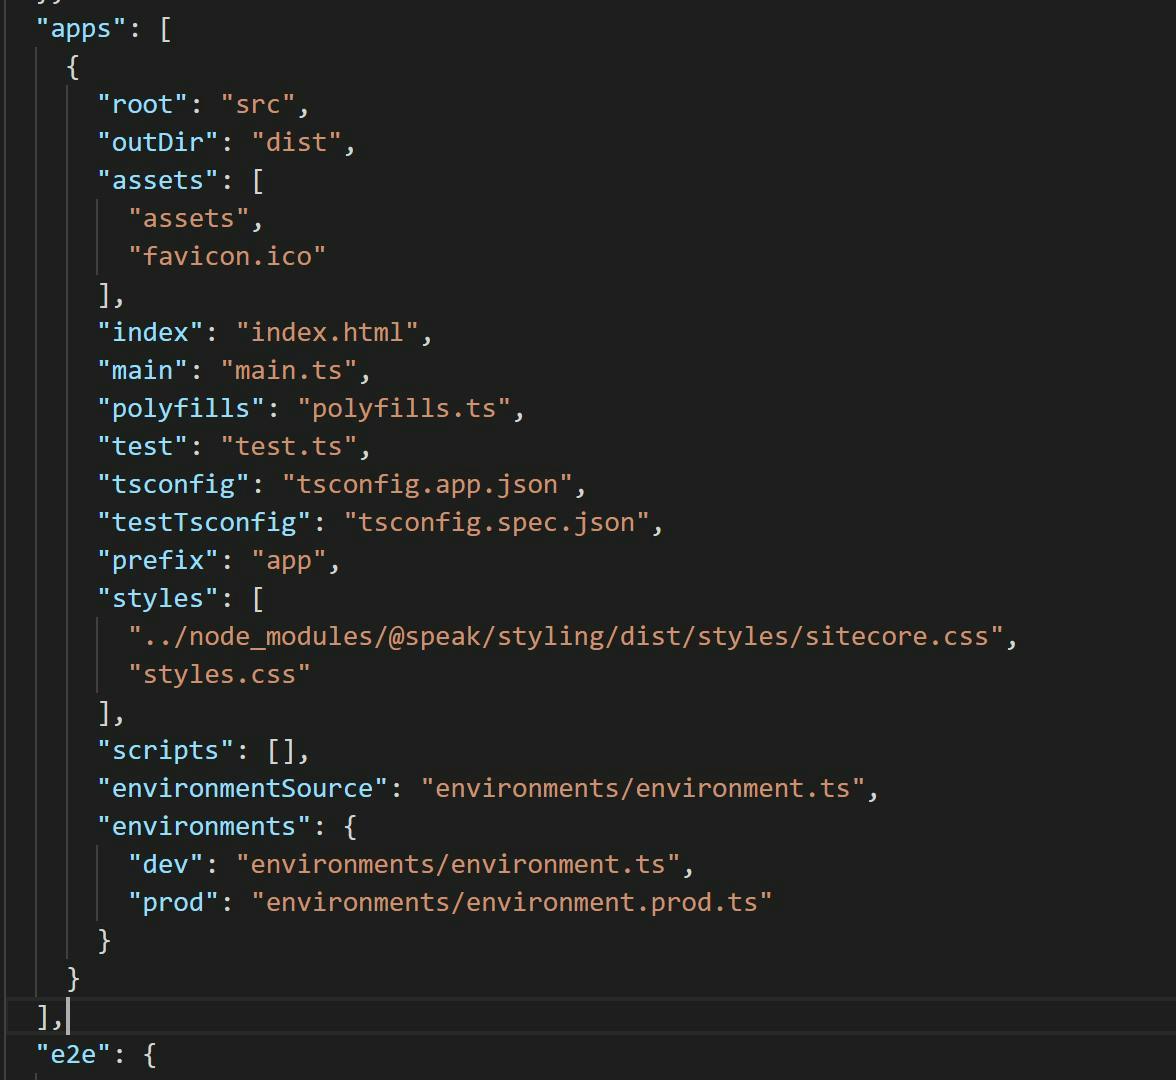
In the angular-cli.json file you will see a styles section which references the main css file in the solution. Here you will need to add an additional reference to Sitecores css file.

1../node_modules/@speak/styling/dist/styles/sitecore.css

Launch

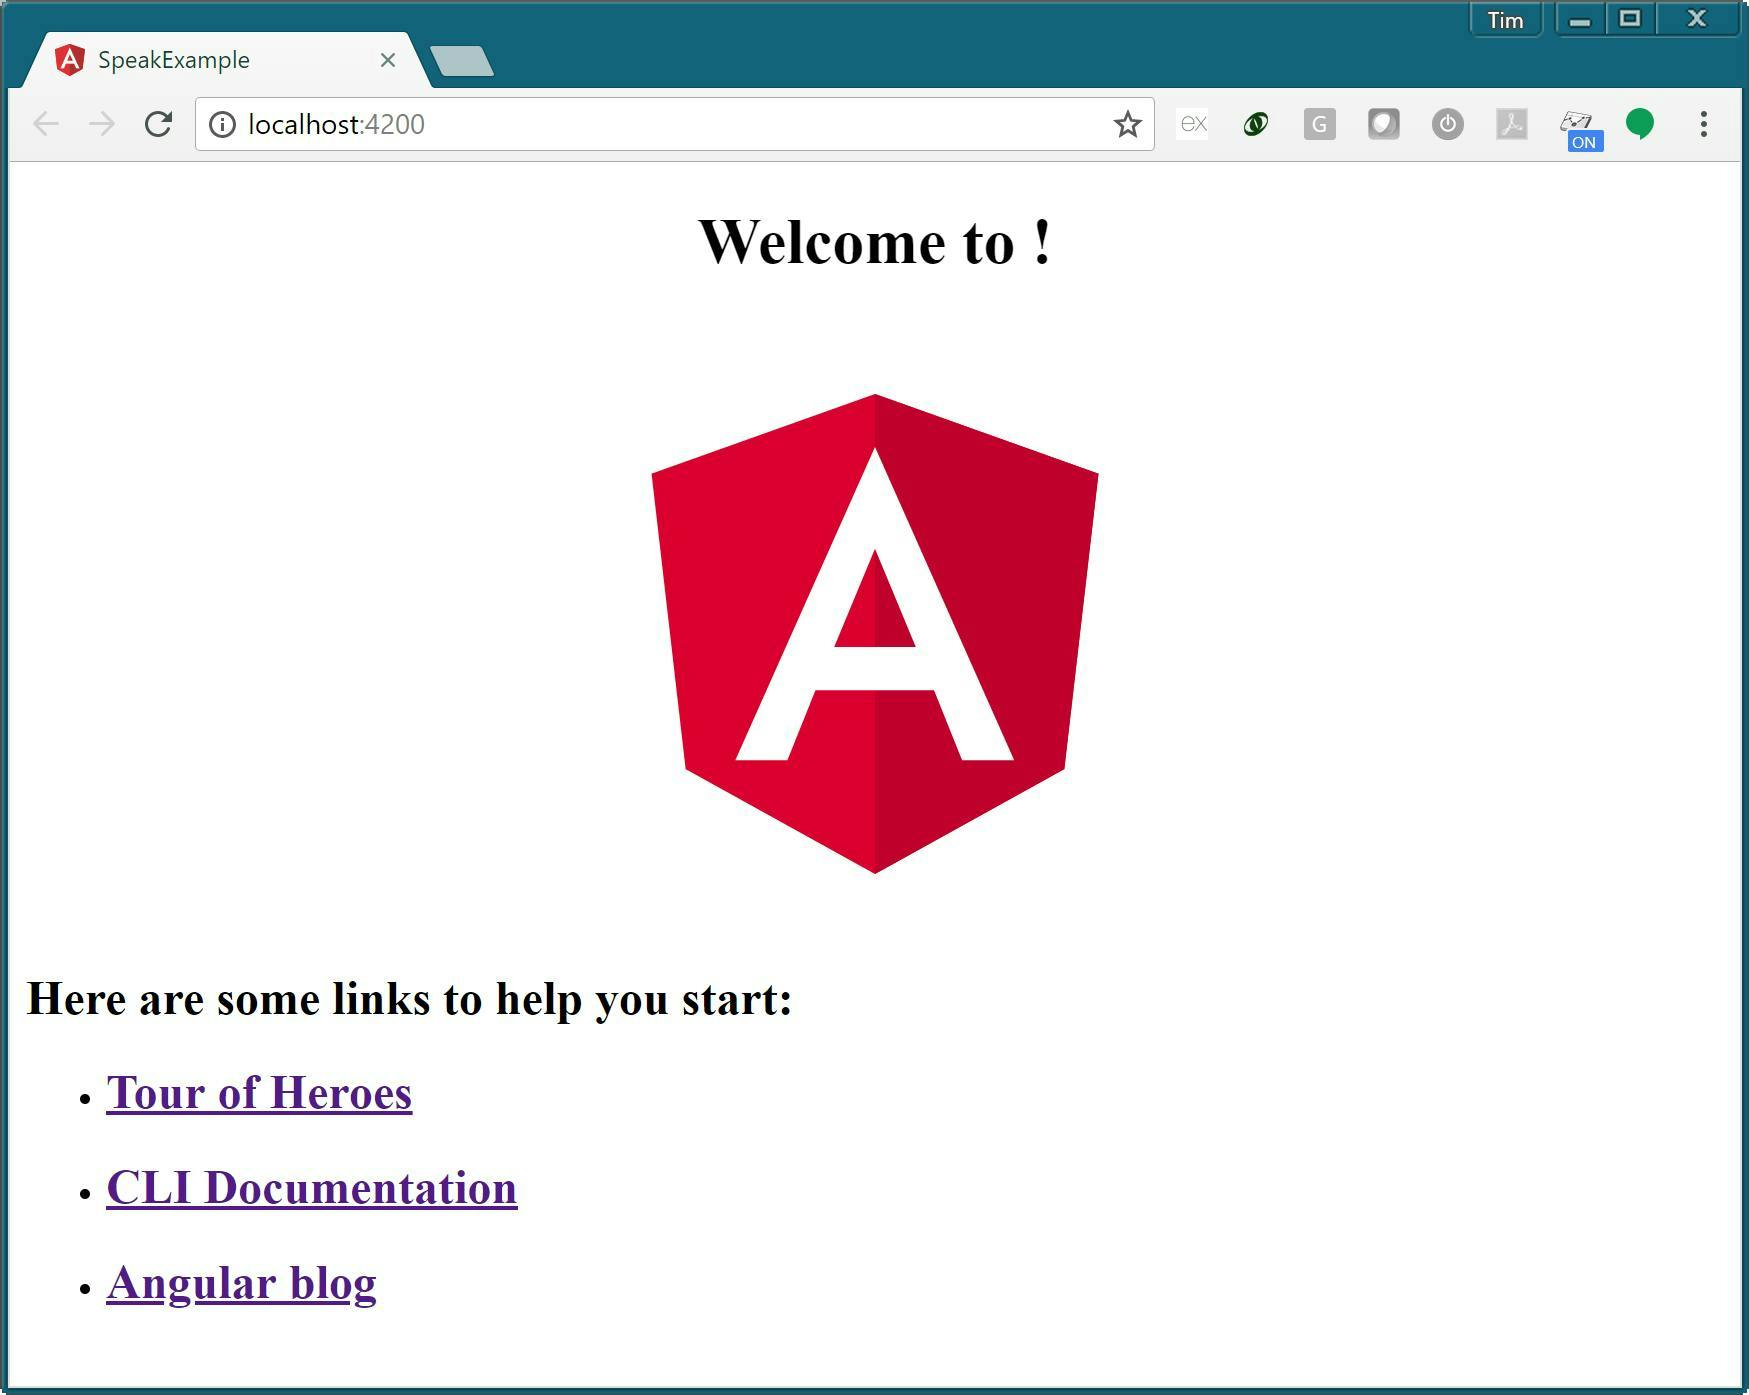
You can now launch your application from the command line and see the default start screen.

1ng serve --open

Step 2 - Building your application

It's not time to start building your application. If you don't know Angular I suggest going through a couple of tutorials, and go from there. I'm not going to go into any details about how Angular apps are and should be written, but I am going to go through a few of the Sitecore controls needed to make an application that fit's the Sitecore admin.

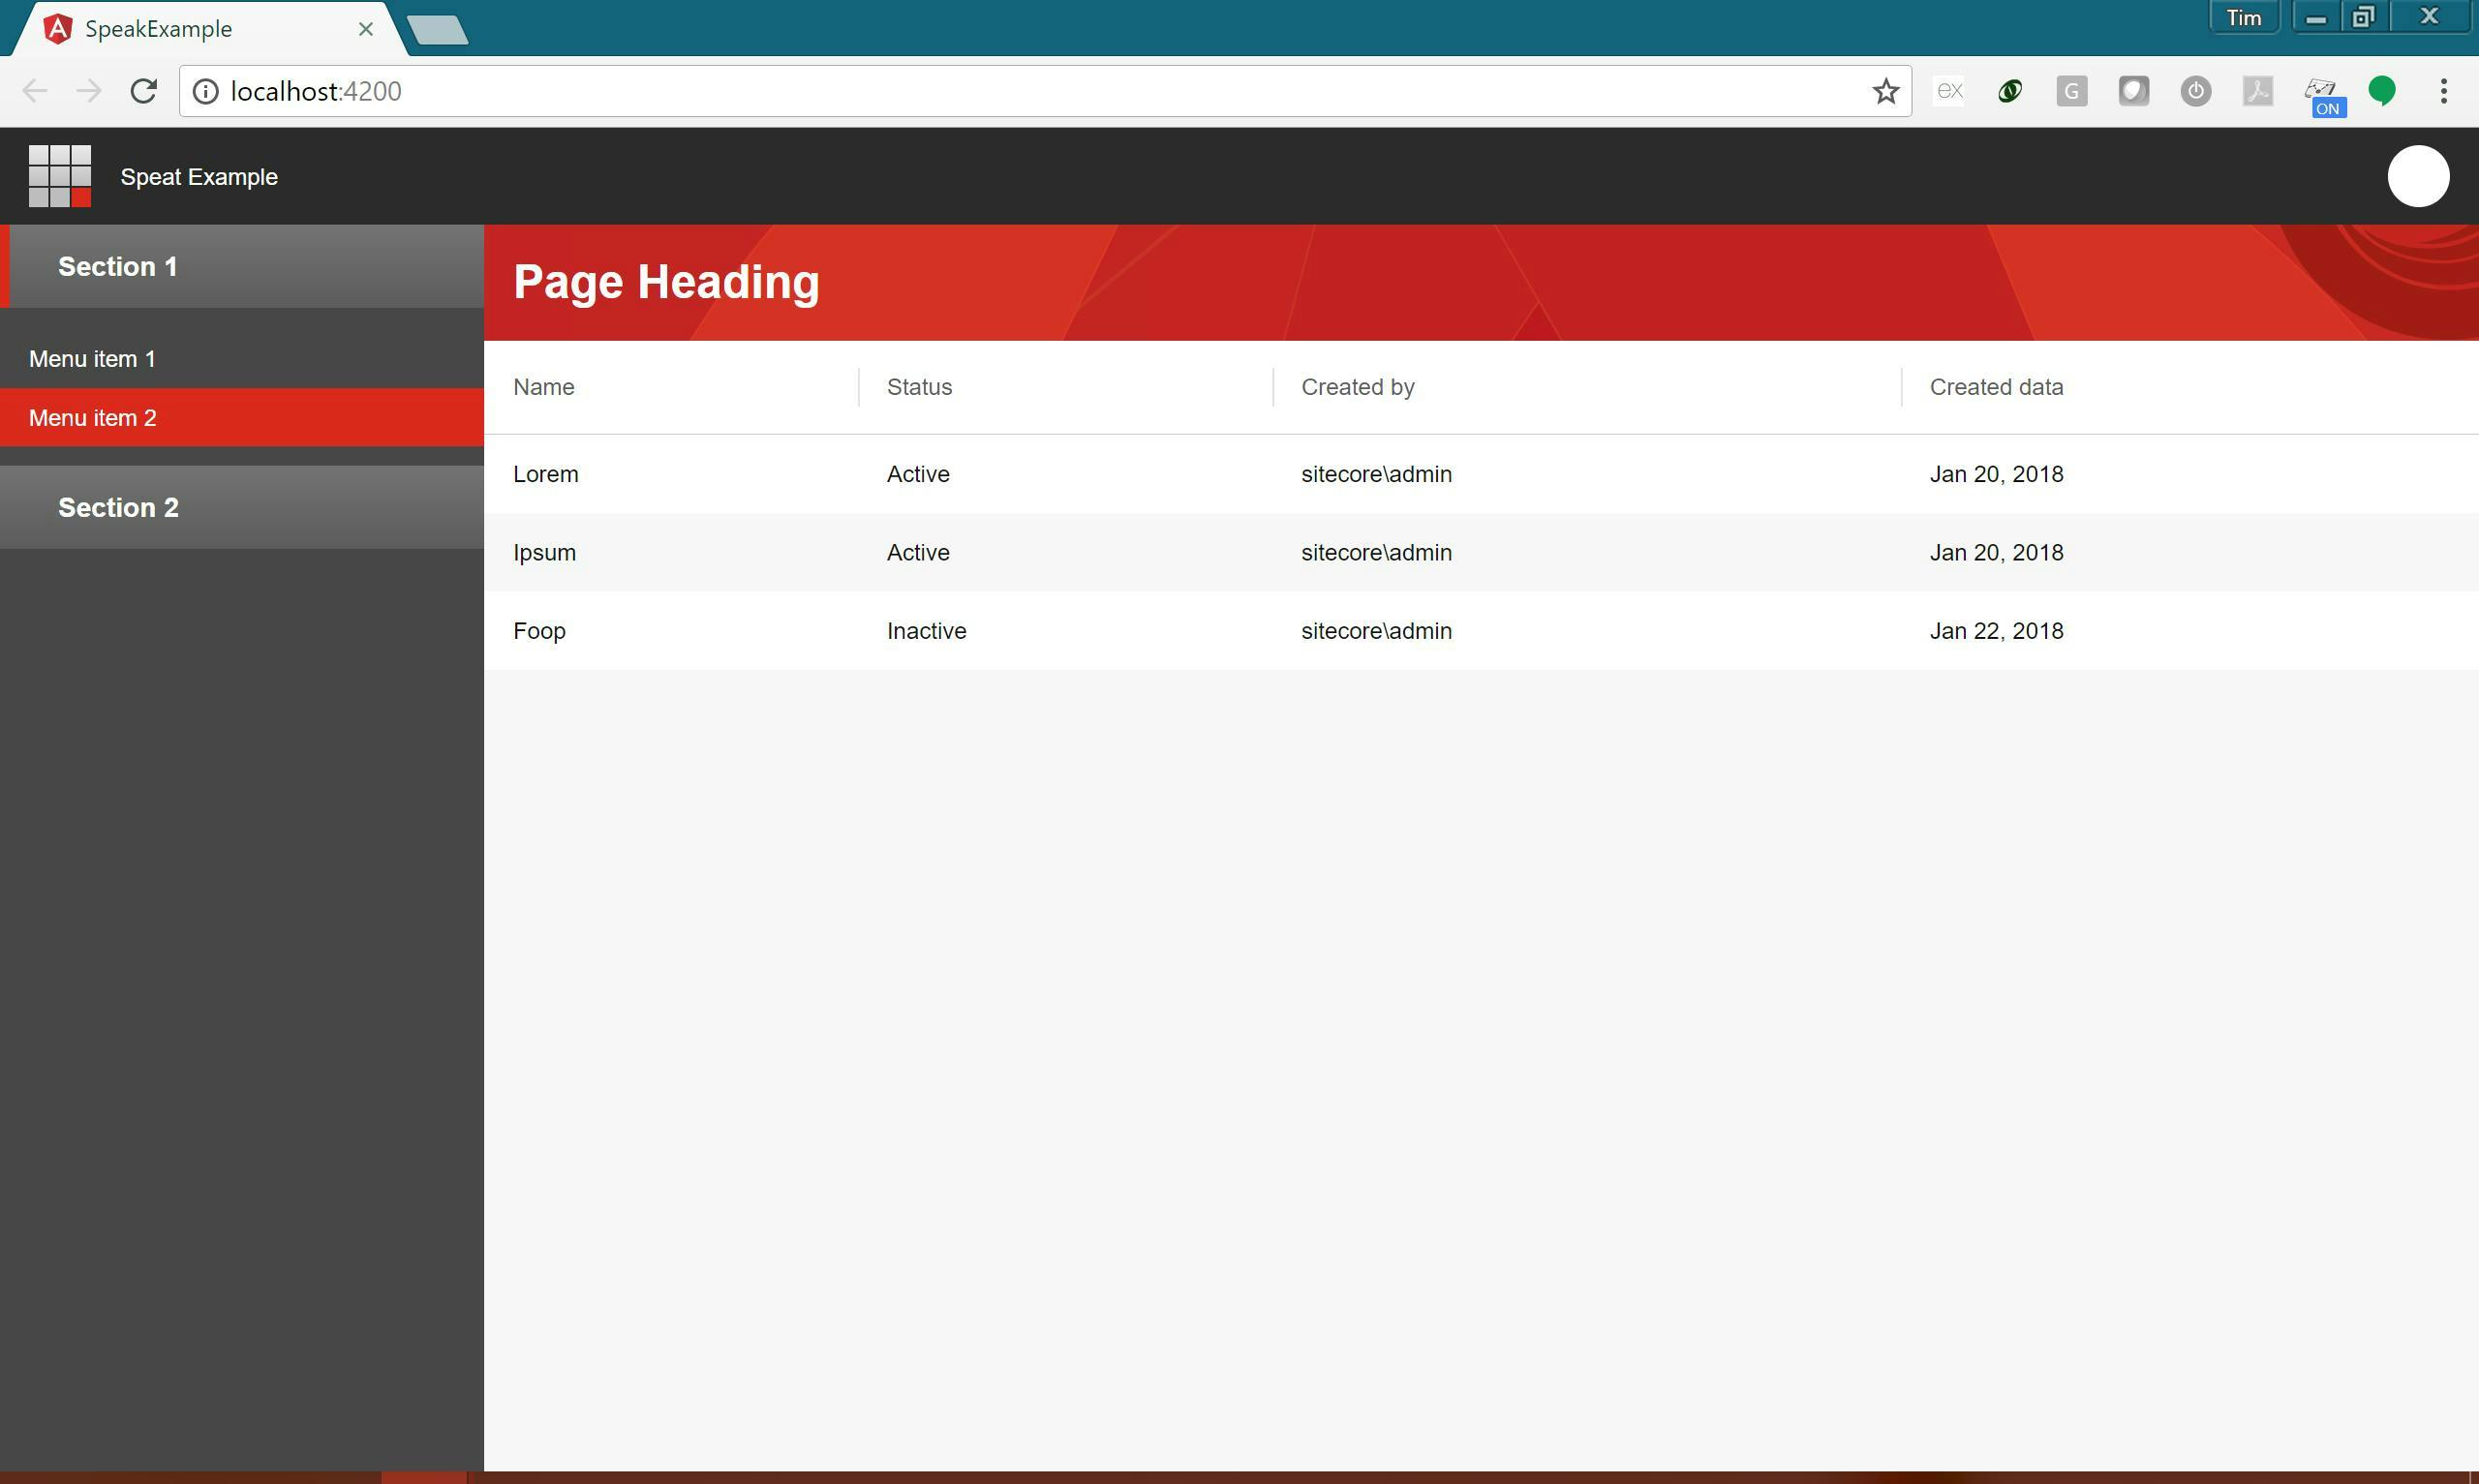
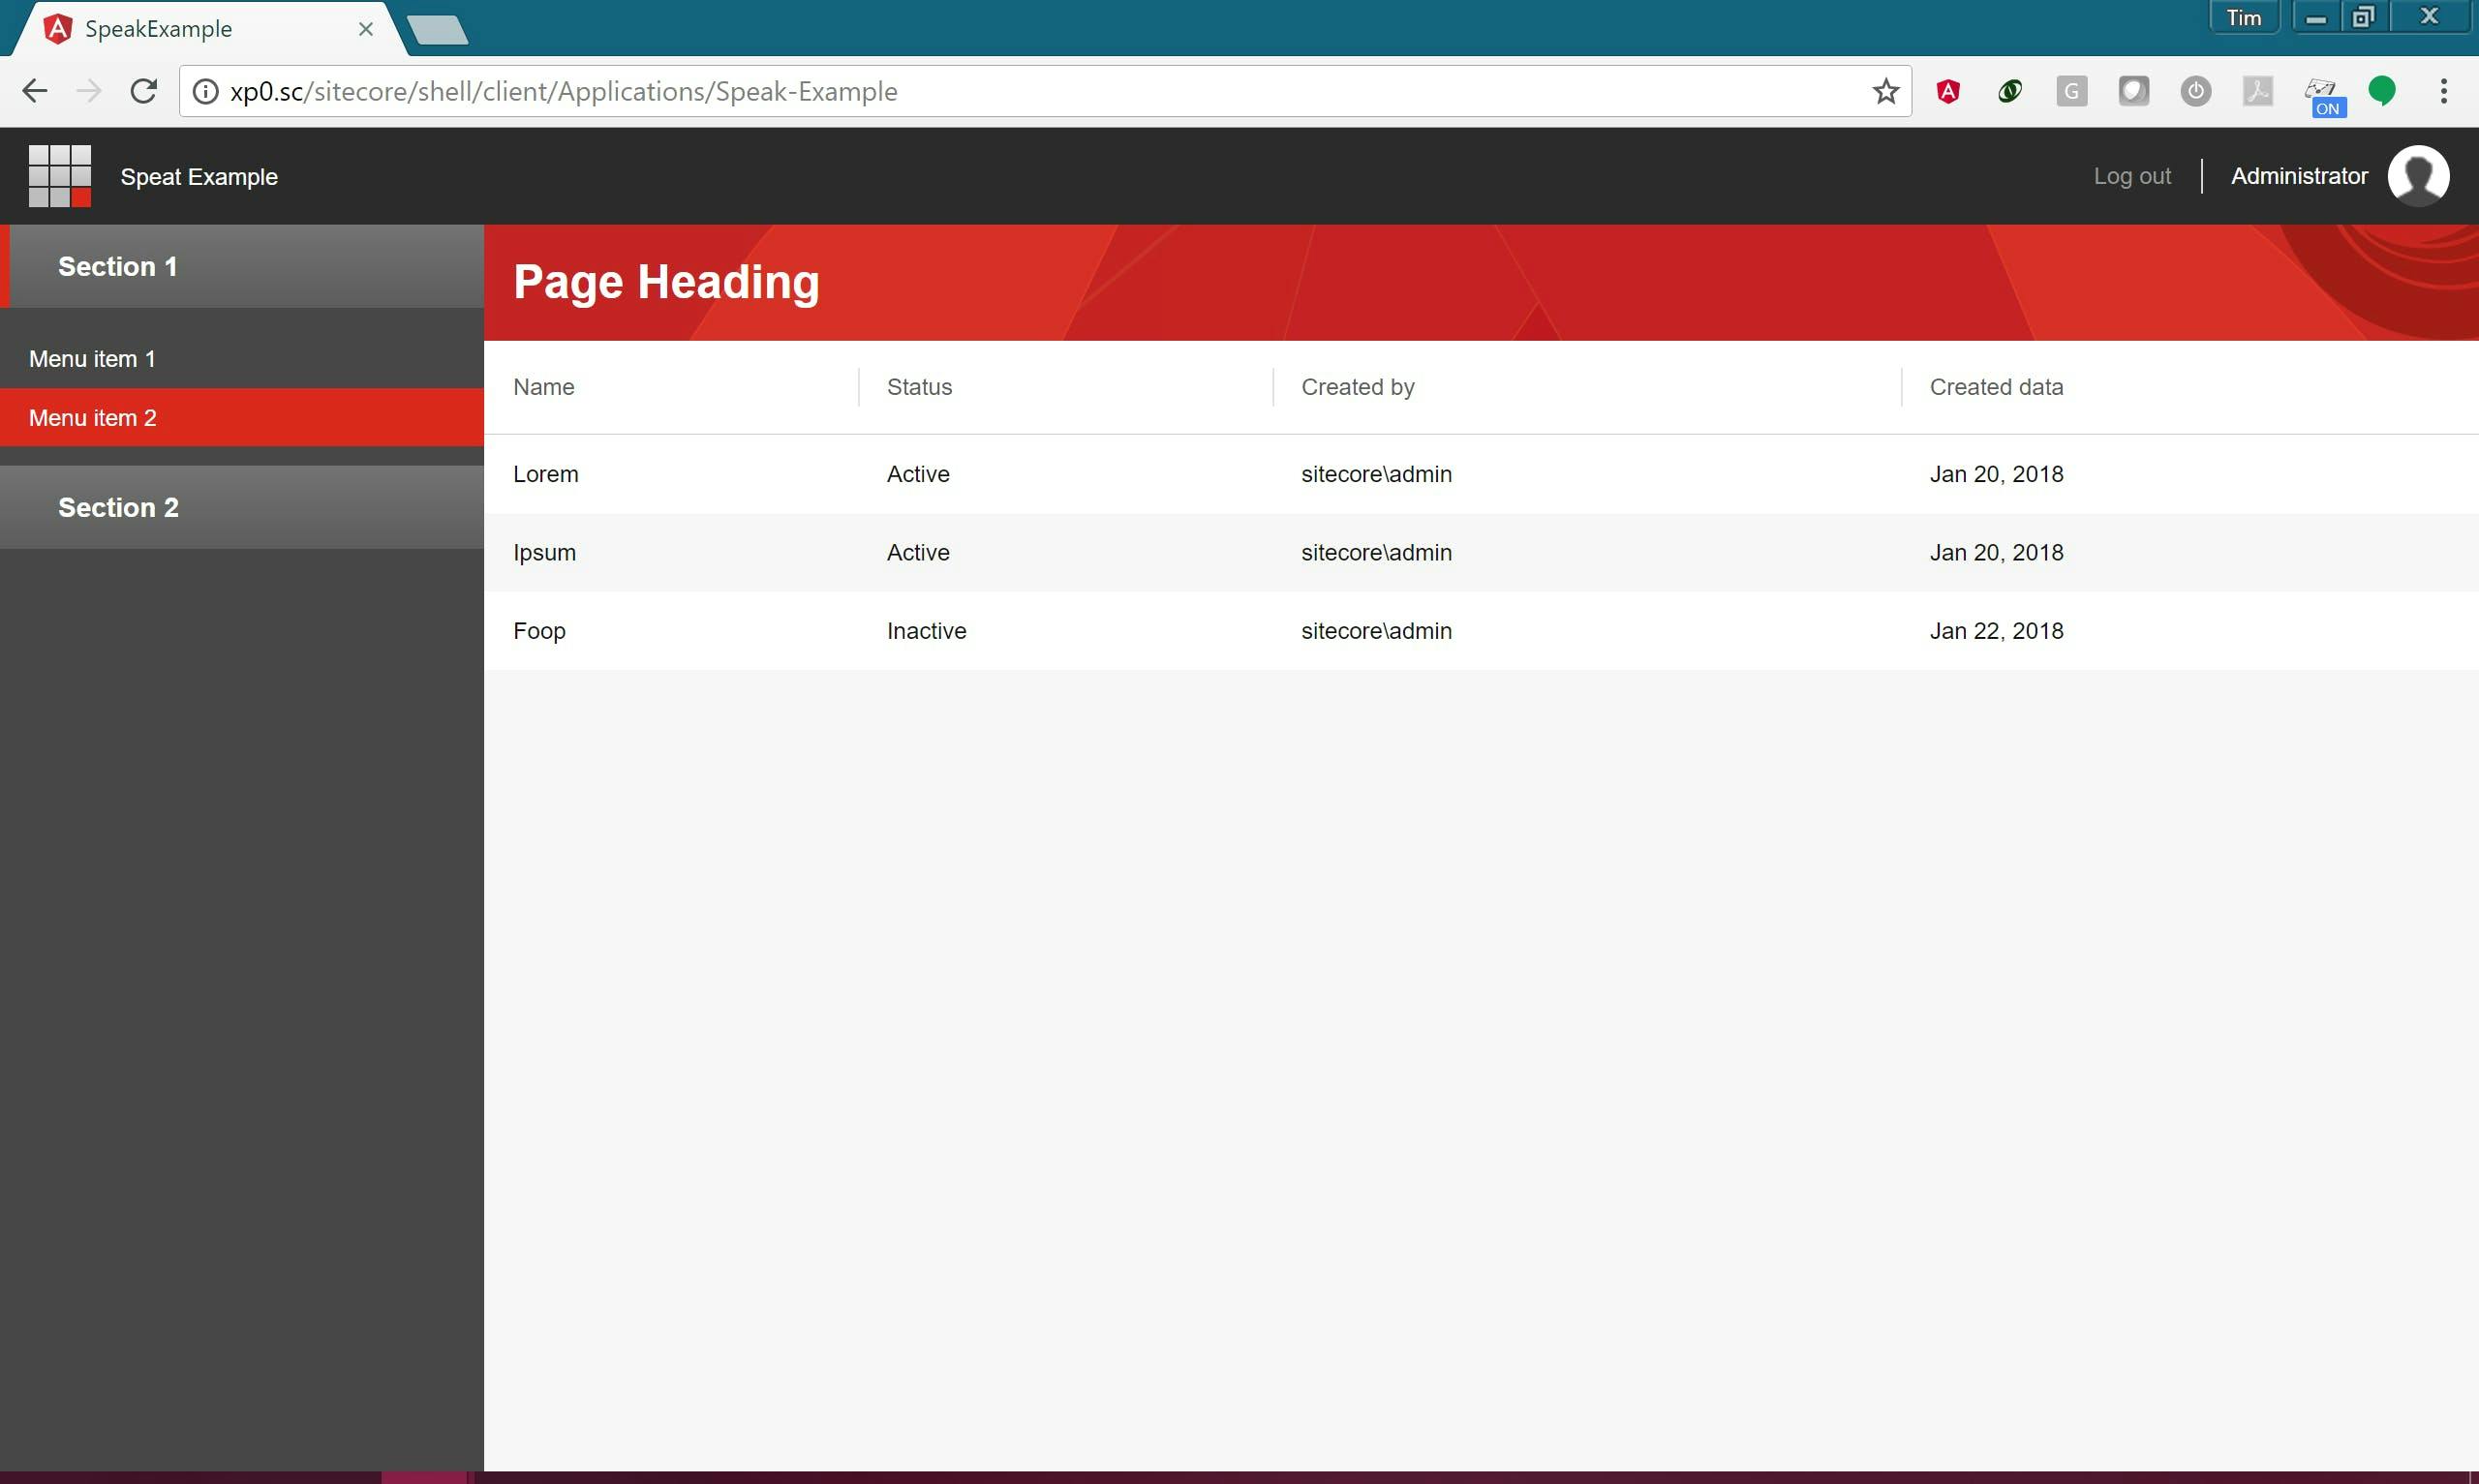
Example Page

To make this page first I cleared out everything from app.component.html and started adding some Sitecore components. Normally you would start generating your own components to represent things like pages, but for the purposes of the example I placing everything in the one file.

To start I have a sc-page containing a header. This comes out of Sitecores demo application and will give you the standard bar that sites at the top of the Sitecore admin, informing users where they are.

1<div> <a href="#"></a> <!-- AccountInformation gets accountName and accountImageUrl automatically from Sitecore context which is configured in AppModule --> </div>

To create the menu I'm using an sc-menu. Notice how some items are marked as active.

1<aside> <a>Menu item 1</a> <a>Menu item 2</a> <a>Menu item 3</a> <a>Menu item 4</a> </aside>

Lastly to create the main content of the page I'm using a scPageAppHeader, scPageContent and an scTable for the table.

1<div> </div> <article> <table> <thead> <tr> <th>Name</th> <th>Status</th> <th>Created by</th> <th>Created data</th> </tr> </thead> <tbody> <tr> <td>Lorem</td> <td>Active</td> <td>sitecore\admin</td> <td>Jan 20, 2018</td> </tr> <tr> <td>Ipsum</td> <td>Active</td> <td>sitecore\admin</td> <td>Jan 20, 2018</td> </tr> <tr> <td>Foop</td> <td>Inactive</td> <td>sitecore\admin</td> <td>Jan 22, 2018</td> </tr> </tbody> </table> </article>

The complete code looks like this:

1<div> <a href="#"></a> <!-- AccountInformation gets accountName and accountImageUrl automatically from Sitecore context which is configured in AppModule --> </div> <aside> <a>Menu item 1</a> <a>Menu item 2</a> <a>Menu item 3</a> <a>Menu item 4</a> </aside> <div> </div> <article> <table> <thead> <tr> <th>Name</th> <th>Status</th> <th>Created by</th> <th>Created data</th> </tr> </thead> <tbody> <tr> <td>Lorem</td> <td>Active</td> <td>sitecore\admin</td> <td>Jan 20, 2018</td> </tr> <tr> <td>Ipsum</td> <td>Active</td> <td>sitecore\admin</td> <td>Jan 20, 2018</td> </tr> <tr> <td>Foop</td> <td>Inactive</td> <td>sitecore\admin</td> <td>Jan 22, 2018</td> </tr> </tbody> </table> </article>

To avoid some build errors later on we also need to update the app.components.ts file (think of this as a code behind file), to have an additional property and service.

1import { Component, OnInit } from '@angular/core'; import { NgScService } from '@speak/ng-sc'; import { SciLogoutService } from '@speak/ng-sc/logout'; @Component({ selector: 'app-root', templateUrl: './app.component.html', styleUrls: ['./app.component.css'] }) export class AppComponent implements OnInit { isNavigationShown = false; constructor( private ngScService: NgScService, public logoutService: SciLogoutService ) {} ngOnInit() { this.ngScService.init(); } }

How to find more components

Unfortunately the Sitecore documentation doesn't currently contain a list of what's available. However if you look in your node_modules folder there is a change log containing information on each component here \node_modules\@speak\ng-bcl\CHANGELOG.md.

Step 3 - Publishing the application

Once you've built the application you need to publish it and copy it into Sitecore.

There are some differences in the way a Speak 3 Angular application needs to work which differ from the normal way an Angular application runs. Among others these include having an index.apsx page rather than an index.html and the application not being located in the root of a site. You can read more about this in Sitecores documentation. The good news though is Sitecore have provided a post build step to sort this out for you.

If you copied the package.json file at the beginning this will already be set up, one thing you do need to do though is update the base location to be where your application is going to live.

Once this is done you can run a build.

1npm run-script build

Note this is using npm to run the build script from the packages.json file rather than doing a regular ng build from Angulars CLI.

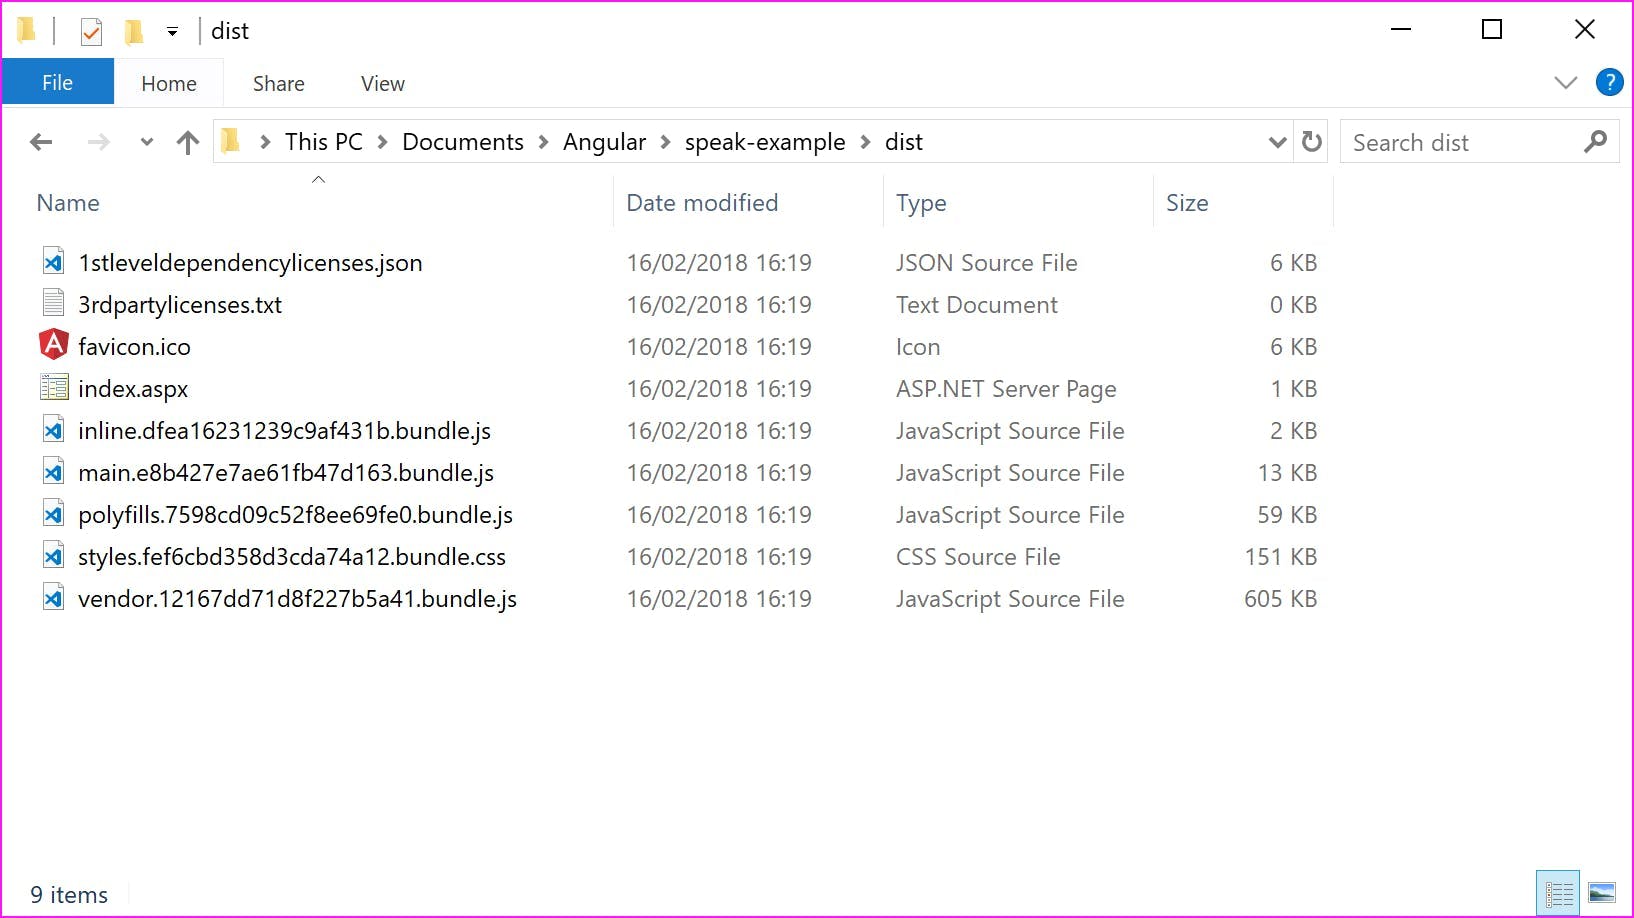
If all succeeds your dist folder will now contain a compiled version of the application.

Copy these files into the destination folder in your Sitecore site. For me this is \sitecore\shell\client\Applications\Speak-Example. You should now be able to log in and view your application.

Notice the logout button now functions and the current user is displayed in the top right. The menu sections are also collapsible, but other than that our application doesn't actually do anything.

Moving on from this there's lot's more to cover on building out the functionality in the application and you may have also noticed in the app.module.ts file a reference for translations which I never created, but this should be enough to get anyone started with building an Angular Speak 3 project and then publishing it into Sitecore.

Related Links

Speak 3 Official documentation
Speak 3 Downloads