Tag: TeamCity
Adding Build Statuses to Pull Requests with TeamCity and GitHub

Adding Build Statuses to Pull Requests with TeamCity and GitHub

I'm always looking for ways to improve our build server setup and improve our overall efficiency. So a recent change I've made is to get Team City to start building pull requests and pushing the resulting status back to GitHub.

This improves our dev flow by eliminating the need to do any testing on a pull request if we can already see it will fail a build. Previously someone doing a code review would only find out once they've checked out the change and built it locally, or even worse after approving the request and then breaking the build.

What's particularly good with this setup, is it's testing the resulting merge rather than just the branch being merged in.

Team City Setup

As this is covering a different scenario to our normal build processes which are focused on preparing a build version to be deployed, I set this up as a second build configuration on our projects.

Version Control Settings Root (VCS Root)

The VCS Root needs to be configured to fetch each pull request that is creating in GitHub. To do this, you will need to add a Branch specification which will tell Team City to monitor additional branches rather than just the default branch specified.

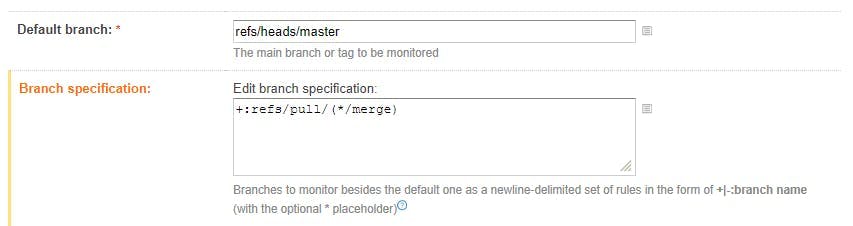
I'm using the branch specification +:refs/pull/(*/merge) .

This syntax is telling Team City to monitor references to pull for pull request, the * refers to any pull request, and the merge indicates that we only want to resulting merge of the pull request.

When you create a pull request in GitHub, this merge reference is automatically created for what the resulting merge would look like.

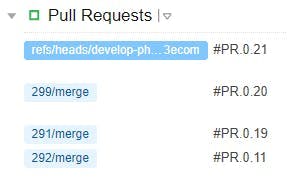
In the projects list, builds will now get labels indicating what they were for:
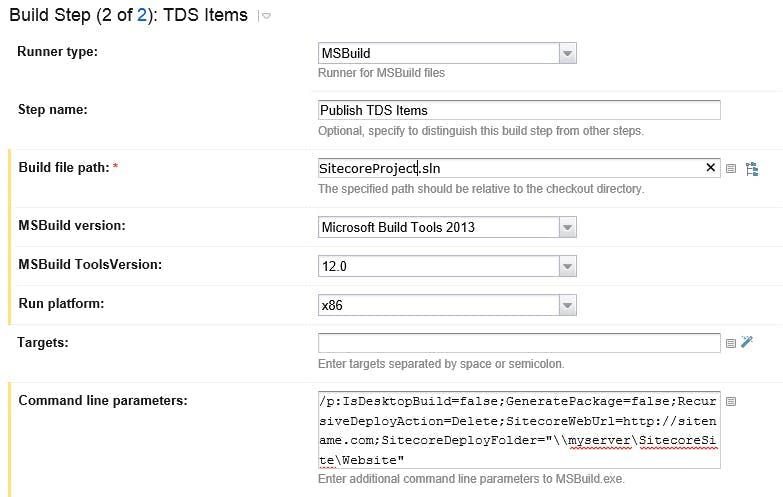
Build Steps

I created my build configurations by duplicating the existing ones we have that take care of creating builds to be passed onto Octopus Deploy for release. If you do this, it's important to remember to disable all the steps you no longer need.

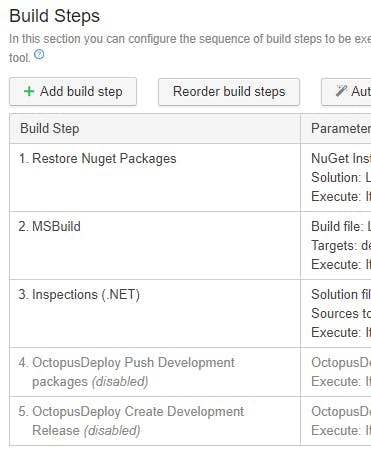
The less steps you have the quicker your build will run and the quicker the pull request will be updated with a status. Ideally you want the process to finish before someone starts doing a code review! Steps like running Inspections may prove counter productive if the builds are never finished on time.

Triggers

Having a build running automatically for your releases can be a drain on server resources, particularly if you never have any intention of actually doing a deploy for most of them. For this reason our builds are set to manual.

However for statuses to be of any use, they're going to need to be running automatically so that the status is ready for the code reviewer, so we need to add a VCS Trigger.
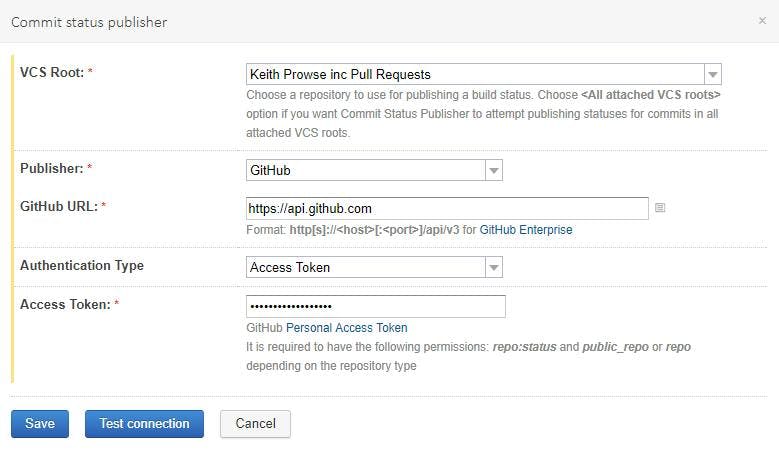
Build Features

To get Team City to start posting status updates back to GitHub we need to add a build feature. If your on a version of TeamCity prior between 7.1 and 10 then there is a plugin you can grab here https://github.com/jonnyzzz/TeamCity.GitHub. If your on a newer version of TeamCity. i.e. 10+ then the build feature is now built in and is called Commit status publisher. The built in version also has support for Bitbucket, Gerrit, GitLab, JetBrains Upsource and Visual Studio Team Services.

Add the build feature and fill in the config settings.

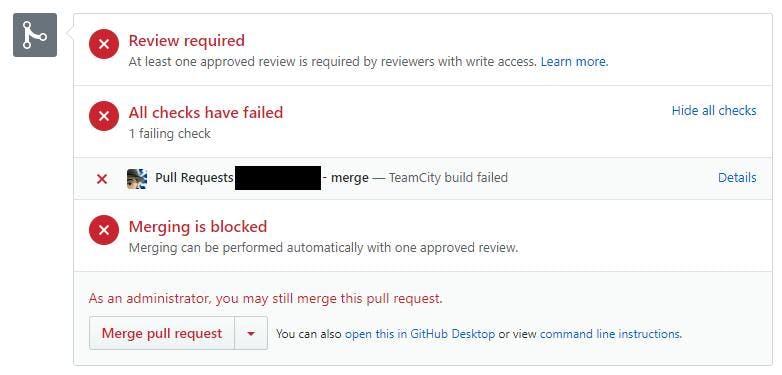
And that's it. Your pull requests will now automatically build and have the status sent back to GitHub.

Not only will you be able to see this status in GitHub, you'll also be able to click a details link to see the build. Useful in the event that it's failed and you want to see why.

Sitecore Continuous Integration with Team City and TDS

There are a lot of articles around on how to do automated deployments / continuous integration with Sitecore, which if you're new to the tools will likely leave you slightly baffled. This article will hopefully show you exactly what you need to do and explain why.

Solution Overview

  1. TDS is used by developers to serialize their Sitecore item changes and push them into source control
  2. Team City is used to detect the changes and run a build script
  3. Team City uses Web Deploy to push the code changes to the web server
  4. Team City calls MSBuild which will trigger TDS which is installed on the server to deploy Sitecore items to the destination server

Prerequisites

  • You have a build server with Team City installed and know how to set it up to do a web deploy
  • You are already using TDS and have your Sitecore items serialized in source control
  • Essentially you know how to do the first 3 steps and just need help with Step 4

Step by Step

UNC Share

On your web server you need to set up a UNC Share on your website's folder. When TDS does a deploy it will install a web service on your website through this share, do the item deployment and then remove the web service again.

The share needs to give permission to the user that your Team City Build Agent runs as. To find out which user your Build Agent is using:

  1. open the list of services and find TeamCity Build Agent in the list
  2. right click and select "Properties"
  3. in the "Log On" tab you will be able to see which Windows User is being used

Team City Config

In your Team City's build configuration settings for your project, add a new build step with the following config:

Runner Type: MSBuild
Step Name: Publish TDS Items (or some other identifier)
Build file path: Path to your projects .sln file
Command line parameters:

  • SitecoreDeployFolder: TDS will use this file path to install a web-service on your site to publish the items through.
  • SitecoreWebUrl: This is the url of the site you are going to update. TDS will use this when it tries to call the web service it installed.
  • IsDesktopBuild: false
  • GeneratePackage: false
  • RecursiveDeployAction: Delete
1/p:IsDesktopBuild=false;GeneratePackage=false;RecursiveDeployAction=Delete;SitecoreWebUrl=URL OF SITE;SitecoreDeployFolder="UNC PATH TO YOUR SITECORE SITE"

Setting the command line parameters here will take precedence over any that have been included in your TDS projects solution file (which are liable to be overwritten by a developer).

That's it!

It's that easy. If you run your build script now your items should all be published to Sitecore.

Alternatives

This certainly isn't the only way to setup automated deployments and nor is it without issues. The fact a share needs to be set up between the Web Server and the Build Server, could cause an issue with security and may just not be possible if you're using a cloud server.

Rather than using TDS to deploy the Sitecore items you could use TDS to create a .update package. These would normally be installed through an admin webpage (not great for CI) but there is an open source project called Sitecore Ship that will expose a REST endpoint for the package to be posted to. Brad Curtis has written an excellent guide to this setup here (http://www.bradcurtis.com/sitecore-automated-deployments-with-tds-web-deploy-and-sitecore-ship/), however at the time of writing Sitecore Ship isn't compatible with Sitecore 7.5 or 8.

Another alternative to installing the update package is to use the TDS Package Installer. This is a tool Hedgehog provide alongside TDS for installing the update package. In this scenario you would need the tool installed on your web server and some way to call it. Jason Bert has written a setup guide for this example (http://www.jasonbert.com/2013/11/03/continuous-integration-deployment-with-sitecore/) however as well as Team City, you will also need Octopus Deploy to call the package installer. Octopus Deploy works by having what it calls Tentacles on each server you deploy to, making it easy to set up scripts to call programs on that server.

Sticking with the example using just TDS, you could also use TDS to deploy the solutions files as well as Sitecore items rather than using Web Deploy. However the downside here is that TDS is unable to modify your Web.Config file, which is one reason to stick with Web Deploy.