Web Development

Increasing the Maximum file size for Web.Config

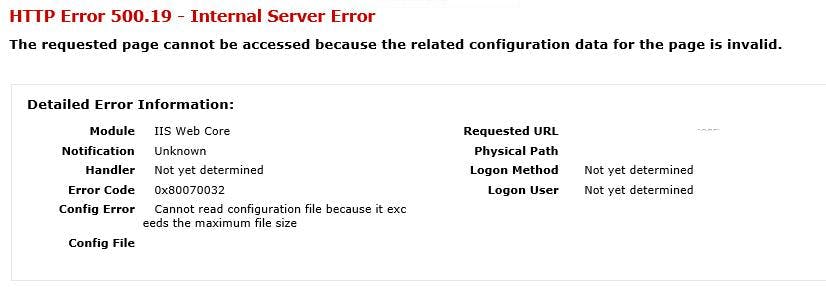
This can happen in any ASP.NET Web Application, but as Sitecore 8's default web.config file is now 246 kb this makes it extremely susceptible to exceeding the default 250 kb limit.

To change the size limit you need to modify/create the following registry keys:

HKLM\SOFTWARE\Microsoft\InetStp\Configuration\MaxWebConfigFileSizeInKB  (REG_DWORD)

On 64-bit machines you may also have to update the following as well

HKLM\SOFTWARE\Wow6432Node\Microsoft\InetStp\Configuration\MaxWebConfigFileSizeInKB (REG_DWORD)

You will probably find that these keys need to be created, rather than just being updated. After changing them you will also need to reset IIS.

Alternatively

Alternatively you can leave the default values at 250 kb and split the web.config files into separate files.

More information on doing this can be found here:

http://www.davidturvey.com/blog/index.php/2009/10/how-to-split-the-web-config-into-mutliple-files/

My personal preference for Sitecore projects is to update the the max file size as this allows keeping the web.config file as close to the default install as possible. The benefit of doing this is it makes upgrades easier, rather than needing to know why your web.config doesn't match the installation instructions.

Bundling and Minification error with IIS7

.NETs standard tools for bundling and minification are a great asset to the platform solving a lot of problems with only a few lines of code.

However if using IIS 7.0 you may run into a strange issue where the path to your bundles gets created but a 404 is returned whenever there accessed. The functionality is obviously installed and working otherwise the URL wouldn't be created, but a 404 clearly isn't what you want.

The solution lies in your web.config file by setting runAllManagedModulesForAllRequests to true

1<system.webServer>
2 <modules runAllManagedModulesForAllRequests="true">
3 </modules>
4</system.webServer>
Two Google Maps Tips

Two Google Maps Tips

Centre a map on a collection of pins

The basic way to centre a Google Map is to give it co-ordinates of where you want the map to centre. But what if you have a collection of pin/markers and you want to show all of them but don't know beforehand where they will be.

The solution is to create a LatLngBounds object and for each of your pins call the extend method of your bounds object. Once this is done call fitBounds on your map.

1var bounds = new google.maps.LatLngBounds();
2
3$.each(mapMarkers(), function(index, value) {
4 bounds.extend(value.marker.position);
5});
6
7map.fitBounds(bounds);

Loading a map in a hidden div

The reason for doing this could be that you have a set of tabs and a non-visible one contains the Google Map. If you instantiate a Google Map when it isn't visible you end up with the smallest map size possible.

One popular solution for this is to only create the map when the tab is being displayed, which is a good option as it means the map is only loaded when it's viewed. However if your using something like Knockout to bind you've views to a model it may not be possible to attach an event to the tab change.

Google Maps actually have an event handler for just this scenario called resize. You simply need to trigger it at the point in which you can size the map.

1google.maps.event.trigger(map, 'resize')

Using Visual Studio with Git Hub

This is one of those great examples of writing a blog post to yourself to remind you how to do something.

If your using Visual Studio 2012 then to add Git support you will need the Visual Studio Tools for Git plugin created by Microsoft's TFS Power Tools Team (http://visualstudiogallery.msdn.microsoft.com/abafc7d6-dcaa-40f4-8a5e-d6724bdb980c), if your using a later version of Visual Studio then it's already built in.

If you're thinking in of using Git Hub as your source control provider then the most basic thing you're going to need to know is how do you get the Git plugin to link up to GitHub. Here's a couple of different methods;

Creating a Project in Git Hub

Click New Repository. Enter a new, Select Public or Private and click Create new Repository.

A new repository will be created in Git Hub

Clone the Project in Visual Studio

Now the project has been created in Git Hub you will need to clone it to your machine so that you can start adding files and sync then back.

Open a new instance of Visual Studio and do the following:

  1. Open the Team Explorer window
  2. Click the connect button
  3. In the list of Local Git Repositories click clone
  4. In the URL box enter the HTTP URL from Git Hub
  5. The second box should auto populate with a location on your hard disk
  6. Click Clone

Creating a Repository on Git Hub using the Git Hub app

Rather than creating the Git Hub repo through the GitHub website you can use their app. Once you've got the app installed and logged in do the following:

  1. Select the GitHub account you want to add the repo to on the left
  2. Click Create button at the top
  3. Enter a name and click create
  4. The repository will be created in GitHub and automatically sync with the folder on your machine

Adding an existing Repository to Visual Studio

If you already have a repository cloned on your machine but it's not showing in Team Explorer you can add it by clicking on Add

  1. Click the Connect button to view the list of local repositories
  2. Click add an enter the path to the repository on your hard drive
  3. Click Add