Tag: Sitecore

Extending personalisation options using the SBOS Accelerator

A few weeks ago I blogged about extending profile matching over multiple visits in Sitecore. The basis of the post was to look at options on how you could extend Sitecore so that personalisation could use historical persona data rather than just data from the current session.

In this post I'm going to be looking at the SBOS Accelerators module which lists as one of its features "Historical Conditional Renderings".

So what does it do?

Rather than change the way data gets recorded about a user, the SBOS Accelerator adds an additional 5 personalization rules to the rule set editor. These are:

  • where the specific campaign has been triggered within x days
  • where the specific goal has been triggered within x days
  • where behaviour based on last x days matches the specific pattern card in the specific profile
  • where the specific page has been visited within x days
  • where the value of specific profile key compares to specific value, based on behaviour from last x days

As well as allowing a rule to look at profile data over a number of days, the days option can also be changed to look at profile data over a number of visits.

This option of allowing us to specify a number of days or a number of visits helps to overcome the issue of data needing to degrade at different rates over time. We can set rules to promote something that a user may still be interested in by limiting the data to the last week, or we can target personality traits that shouldn't change by taking a few months into consideration.

What's important to note though is profile data is still being recorded on a per visit basis, so we still don't have an overall accumulation of points over time and an assigned pattern card is still being based on an individual visit. But we're able to create rules based on pattern cards assigned in multiple visits.

Some things to note

The SBOS Accelerators are currently only available for Sitecore versions 6.6 - 7.2. It currently hasn't been updated to work with the new Mongo based analytics db in 7.5+.

The module has been written by Sitecore Support and is marked as being tested by Sitecore, so you can expect a decent level of reliability. However it is not covered by your Support agreement with Sitecore so you may not get any help with issues you encounter. The source for the module is available for you to edit though.

Links

SBOS Accelerators on the Sitecore Marketplace

Team Development for Sitecore (TDS) with Github

f your using Team Development for Sitecore (TDS) and Github or Git as your source control you may experience an issue where TDS is unable to create/update some of the items in Sitecore, due to a content length issue.

The error will look something like this:

Failed to load version 1 for language en
Length of field content does not match the content-length attribute. File name: name, field id: {id}

What's happening comes down to how Github encodes line ending. If your item contains a Rich Text field you can end up with data that has been serialized with both CRLF and LF as the line feed. This will have been included in the content length. However when you push to Git, the CRLF value will have been removed making the content length value incorrect.

To overcome this issue you need to update your .gitattributes file to treat these files differently. Just add this to your file:

# TDS files should be treated as binary
*.item -text

How do I create a .gitattributes file?

If you don't have a .gitattributes file you may run into an issue with windows where it won't let you create it, due to requiring a file-name rather than just an extension.

To create the file:

  1. Create the text file gitattributes.txt
  2. Open it in a text editor and add your rules, then save and close
  3. Hold SHIFT, right click the folder you're in, then select Open command window here
  4. Then rename the file in the command line, with ren gitiattributes.txt .gitattributes

Sitecore: Extend profile matching over multiple visits

In Sitecore, to gain a better understanding of our visitors interests we have the ability to define Profile Keys and Cards to tag our content with. As our visitors navigate through the site, this data is used by Sitecore to build a profile of the visitor. A pre-defined Pattern Card that most resembles the visitors profile is then assigned to the visitor which can be used as the basis of selecting the content that should be displayed on a page for that visitor.

However what this doesn't do is carry the visitors profile over multiple sessions. Each time a visitor comes back to the site within a new session, the visitors profile key values are reset back to zero.

So what's Sitecore actually doing?

Before working out how to carry this information between visits, lets look at how a profile is actually being created.

If we look in the Profiles table within the Analytics database we can see the profile data that’s been recorded for a visitors visit.

The Pattern Values column contains the current profile key scores for each key the visitor has a score for. e.g.

background=40;scope=50

If the visitor was to visit a page which has scope score of 5 and background score of 10 these values would be added to the visitors current key scores. e.g.

background=50;scope=55

When a pattern card is assigned, the card with the closest shape of keys is chosen. e.g. If the visitor has a high value for background and low value for scope they will be assigned a pattern card with similar proportional key values.

How do we extend this over multiple visits?

So the easiest way to carry the visit information from one visit to the next would be to simply copy the profile key values from the last session to the next. The code for this would look similar to the following:

1var currentVisitIndex = Tracker.CurrentVisit.VisitorVisitIndex;
2
3if (currentVisitIndex <= 1 || !Tracker.CurrentVisit.Profiles.Any())
4{
5 return;
6}
7
8var previousProfiles = Tracker.Visitor.GetVisit(currentVisitIndex - 1, VisitLoadOptions.All).Profiles;
9
10foreach (var profile in previousProfiles)
11{
12 var currentProfile = Tracker.CurrentVisit.GetOrCreateProfile(profile.ProfileName);
13
14 currentProfile.BeginEdit();
15
16 foreach (var ProfileKey in profile.Values)
17 {
18 currentProfile.Score(ProfileKey.Key, ProfileKey.Value);
19 }
20 currentProfile.UpdatePattern();
21
22 currentProfile.EndEdit();
23}

Now the visitors profile is how it was when they left and crucially we can use this data to personalize the sites homepage for the visitor.

So why shouldn't we do this?

As simple as this is, it comes with one potentially massive downside. If we go back to the way the profile values are built up they key values are essentially just being accumulated. Each time the visitor visits an item with a background score of 10, the visitors background profile key score in increased by 10.

Our visitors are humans going through different stages of there life, with constantly changing jobs and interests. There's nothing to ever reduce a profile keys score other than the fact everything is normally zeroed on each visit. By copying the data from the last visit on the start of the next this would never happen and the profile key's will continue to count up forever. The key value obtained from an item viewed 2 months ago would counted as just as important as the value from another key viewed on an item today.

So if you were running a travel site and a visitor looked at summer holidays for 3 weeks they will have a profile highly weighted towards summer holidays. If they then started to look at winter holidays we wouldn't want them to have to look at winter holidays for 3 weeks just to have an even likeness of summer and winter.

Overcoming this issue isn't so simple and largely depends on your business needs. If your visitors interests could change each week then you need something that will degrade the old visit data values quickly. Whereas if your trying to differentiate between people that are in a 2 week vs 6 month buying pattern, you need to retain that data a lot longer.

Some things we can do when copying the data from the visitors previous profile though could include:

  • Halving the profile scores, or reducing by a different factor. This would reduce the importance of values obtained on previous visits. So if a visitor received a 10 on the first visit, it would be worth 5 on the second, 2.5 on the third etc
  • Look at the date of the last visit. Is it to old to be relevant still or can we use the age to determine what factor we should reduce the scores by
  • Look at a combination of multiple last visits to establish what the recent scores were

All these ideas though need to be used on conjunction with what your trying to profile. If it's age then you know people are going to get older. If it's an interest that will change frequently then you know the data needs to degrade quickly, but if it's male/female then that doesn't necessarily need to degrade at all.

Pragmatically add request tracking for an item in Sitecore

Sitecore's Engagement Analytic's engine automatically tracks all page requests. When you assign profile cards to items this also triggers data about a persons interests to start being built up against their visit record, which can then be used to create a personalized site experience.

However what if you want items that are not pages to also contribute to a users profile?

This scenario came about with a recent site we took over that the client wanted to add personalisation too. The site (for unknown reasons) had been built with one product page which looked at a querystring parameter to determine the product information to be displayed (the querystring format was hidden from end users through the use of a URL rewrite). Product data was being stored as Sitecore items allowing them to have profile cards assigned, but as the item was never visited the profile cards values were never applied to the users profile.

After a bit of searching through the Sitecore.Analytics.dll I stumbled across the TrackingFieldProcessor class. This class contains a process function that takes an item parameter an in turn triggers all the functionality for processing campaigns, profiles and events related to the item.

To use it your code would look like this:

1Sitecore.Data.Database db = Sitecore.Configuration.Factory.GetDatabase("web"); (new TrackingFieldProcessor()).Process(db.GetItem(new ID("395BDEF7-16CB-4C94-B9B6-A6EAC148401F")));

This will cause the profile key values to be updated but in the visitor history it still looks like the visitor was only looking at the one page. To change those values we can do this:

1VisitorDataSet.PagesRow rawUrl = Tracker.CurrentVisit.GetOrCreateCurrentPage();
2rawUrl.Url = "new url value";
3rawUrl.UrlText = "new url value";

Note: I was unable to find any documentation on these functions, or any official way of doing this. Use at your own risk!

Updating the response headers on your 404 Page in Sitecore

A few weeks ago I blogged about how to create a custom 404 Page in Sitecore. Following on from that, one thing you may notice in the response header of your 404 Page is the status code is 200 Ok, rather than 404 Page not found.

When Sitecore can't find a page what actually happens is a 302 redirect is issued to the page not found page, which as its an ordinary page will return a 200 Ok. Thankfully Google is actually quite good at detecting pages a being 404's even when they return the wrong status code, but it would be better if our sites issues the correct headers.

Method 1

The simplest solution is to create a view rendering with the following logic and place it somewhere on your page not found page. This will update the response headers with the correct values.

1@{
2 Response.TrySkipIisCustomErrors = true;
3 Response.StatusCode = 404;
4 Response.StatusDescription = "Page not found";
5}

However personally I don't think this a particularly neat solution. The contents of a view should really be left for what's going in a page rather than interfering with its headers, even if it does have access to the Response object.

Method 2

Rather than using a view my solution is to add some code to the httpRequestEnd pipeline that will check the context items Id against a setting where we will store the Id of the 404 page item in Sitecore and if the two match then update the response header.

The solution will look like this

Pipeline logic

1using Sitecore.Configuration;
2using Sitecore.Data;
3using Sitecore.Pipelines.HttpRequest;
4
5namespace Pipelines.HttpRequest
6{
7 public class PageNotFoundResponseHeader : HttpRequestProcessor
8 {
9 private static readonly string PageNotFoundID = Settings.GetSetting("PageNotFound");
10
11 public override void Process(HttpRequestArgs args)
12 {
13 if (Sitecore.Context.Item != null && Sitecore.Context.Item.ID == new ID(PageNotFoundID))
14 {
15 args.Context.Response.TrySkipIisCustomErrors = true;
16 args.Context.Response.StatusCode = 404;
17 args.Context.Response.StatusDescription = "Page not found";
18 }
19 }
20 }
21}

Patch config file

1<configuration xmlns:patch="http://www.sitecore.net/xmlconfig/">
2 <sitecore>
3 <pipelines>
4 <httpRequestEnd>
5 <processor
6 patch:after="processor[@type='Sitecore.Pipelines.PreprocessRequest.CheckIgnoreFlag, Sitecore.Kernel']"
7 type="Pipelines.HttpRequest.PageNotFoundResponseHeader, MyProjectName" />
8 </httpRequestEnd>
9 </pipelines>
10 <settings>
11 <!-- Page Not Found Item Id -->
12 <setting name="PageNotFound" value="ID of 404 Page" />
13 </settings>
14 </sitecore>
15</configuration>

What's the TrySkipIisCustomErrors property

Quite simply this stops a scenario where you end up on IIS's 404 page rather than your own. If you don't set this, when you update the header status code to 404, IIS likes to return the page from it's settings rather than continuing with your own.

Sitecore Search and Indexing: Creating a simple search

With Sitecore 7, Sitecore introduced the new Sitecore.ContentSearch API which out of the box can query Lucene and SOLR based index's.

Searching the index's has been made easier through Linq to Sitecore that allows you to construct a query using Linq, the same as you would use with things like Entity Framework or Linq to SQL.

To do a query you first need a search context. Here I'm getting the a context on one of the default index's:

1using (var context = ContentSearchManager.GetIndex("sitecore_web_index").CreateSearchContext()) { ... }

Next a simple query would look like this. Here I'm doing a where parameter on the "body" field:

1using (var context = ContentSearchManager.GetIndex("sitecore_web_index").CreateSearchContext())
2{
3 IQueryable<SearchResultItem> searchQuery = context.GetQueryable<SearchResultItem>().Where(item => item["body"] == “Sitecore”)
4}

But what if you want to add a search to your site. Typically you would want to filter on more than one field, what the user enters may be a collection of words rather than an exact phrase and you'd also like some intelligent ordering to your results.

Here I am splitting the search term on spaces and then building a predicate that has an "or" between each of its conditions. For each condition rather than doing a .Contains on a specific field, I'm doing it on a content field that will contain data for all fields in the item.

1using (var context = ContentSearchManager.GetIndex("sitecore_web_index").CreateSearchContext())
2{
3 IQueryable<SearchResultItem> query = context.GetQueryable<SearchResultItem>();
4
5 var predicate = PredicateBuilder.True<SearchResultItem>();
6
7 foreach (string term in criteria.Split(new[] { ' ' }, StringSplitOptions.RemoveEmptyEntries))
8 {
9 predicate = predicate.Or(p => p.Content.Contains(searchTerm.Trim()));
10 }
11
12 SearchResults<SearchResultItem> searchResults = query.Where(predicate).GetResults();
13
14 results = (from hit in searchResults.Hits
15 select hit.Document).ToList();
16}

The intelligent ordering of results you will get for free based on what was search for.

SEO Friendly URL's in Sitecore

As silly as it seams to the average developer, URL's are an important factor when it comes to SEO. As ridiculous as some of the requirements are (like not having spaces in a URL) they are unfortunately requirements that we have to live with. Here's how to deal with not having upper case letters in a URL, replacing spaces with hyphens and getting rid of that pesky aspx extension.

Removing Spaces from a URL

A space in a URL actually gets translated to %20, which for the average user isn't very readable. I would argue that as well as doing the translation, browsers could actually just hide this fact from users, and Google could also hide it as well. But alas that hasn't happened and the accepted solution is to replace spaces with a hyphen.

Within a patch config file add the following:

1<encodeNameReplacements>
2 <replace mode="on" find=" " replaceWith="-" />
3</encodeNameReplacements>

What this will do is replace every space in an items name with a hyphen as links are rendered. When a request comes into Sitecore it will also replace all hyphens with a space, so that the URL's still resolve.

However this does cause a problem for any items you have that already had a hyphen in them. Sadly the best we can do for this is to stop content editors including hyphens in item names with the following config patch:

1<settings>
2 <setting name="InvalidItemNameChars">
3 <patch:attribute name="value">\/:?&amp;quot;&amp;lt;&amp;gt;|[]-</patch:attribute>
4 </setting>
5</settings>

Make URLs all lower case

Believe it or not URL's are actually case sensitive. Maybe not in the Windows / IIS world, but with Linux and the rest of the web they are. So the simplest solution is to make all the URL's on the site lower case.

Sitecore 6.6 and above

If your using Sitecore 6.6 or above then you in luck, there's a config setting on the linkManager to set all urls to lower case

1<linkManager defaultProvider="sitecore">
2 <providers>
3 <add name="sitecore">
4 <patch:attribute name="lowercaseUrls">true</patch:attribute>
5 </add>
6 </providers>
7</linkManager>

Sitecore 6.5 and below

If you using 6.5 or below you need to do a little more work.

One way is using the same encodeNameReplacements config as we used before and replace every upper case letter in the alphabet with the lower case equivalent.

1<encodeNameReplacements>
2 <replace mode="on" find="A" replaceWith="a" />
3 <replace mode="on" find="B" replaceWith="b" />
4 <replace mode="on" find="C" replaceWith="c" />
5 <replace mode="on" find="D" replaceWith="d" />
6</encodeNameReplacements>

Personally this doesn't seen the nicest solution and I expect will lead to a lot of replace functions being called.

Another solution is to create a class that overrides the Sitecores LinkProvider and simply makes the result of GetItemUrl lowercase

1namespace YourNamespace.Providers
2{
3 public class LinkProvider : Sitecore.Links.LinkProvider
4 {
5 public override string GetItemUrl(Sitecore.Data.Items.Item item, Sitecore.Links.UrlOptions urlOptions)
6 {
7 return base.GetItemUrl(item, urlOptions).ToLower();
8 }
9 }
10}

And then add a patch config to tell Sitecore to use your LinkManager rather than the default.

1<linkManager defaultProvider="sitecore">
2 <providers>
3 <add name="sitecore">
4 <patch:attribute name="type">YourNamespace.Providers.LinkProvider, YourProjectName</patch:attribute>
5 </add>
6 </providers>
7</linkManager>

Getting rid of the aspx extension

By default Sitecore puts a .aspx extension on the end of a url. Changing it is just a config setting:

1<linkManager defaultProvider="sitecore">
2 <providers>
3 <add name="sitecore">
4 <patch:attribute name="addAspxExtension">false</patch:attribute>
5 </add>
6 </providers>
7</linkManager>

Creating a custom 404 Page in Sitecore

Nobody wants to see the standard Sitecore 404 page. Thankfully it's really easy to change the error pages a user is redirected to through some config settings.

Your error pages can be pages in Sitecore or static HTML files. For 404 pages I would normally use a Sitecore page, that way content authors can still manage its content. For an Error Page I would recommend a static html file to avoid issues with the Error page potentially error-ing.

Add these to a patch file and update the urls accordingly:

1<configuration xmlns:patch="http://www.sitecore.net/xmlconfig/">
2 <sitecore>
3 <settings>
4 <!-- ITEM NOT FOUND HANDLER
5 Url of page handling 'Item not found' errors
6 -->
7 <setting name="ItemNotFoundUrl">
8 <patch:attribute name="value">/ErrorPages/404.html</patch:attribute>
9 </setting>
10 <!-- LINK ITEM NOT FOUND HANDLER
11 Url of page handling 'Link item not found' errors
12 -->
13 <setting name="LinkItemNotFoundUrl">
14 <patch:attribute name="value">/ErrorPages/404.html</patch:attribute>
15 </setting>
16 <!-- LAYOUT NOT FOUND HANDLER
17 Url of page handling 'Layout not found' errors
18 -->
19 <setting name="LayoutNotFoundUrl">
20 <patch:attribute name="value">/ErrorPages/404.html</patch:attribute>
21 </setting>
22 <!-- ERROR HANDLER
23 Url of page handling generic errors
24 -->
25 <setting name="ErrorPage">
26 <patch:attribute name="value">/ErrorPages/Error.html</patch:attribute>
27 </setting>
28 </settings>
29 </sitecore>
30</configuration>

These settings are already defined in the web.config file and changing them here will have the same effect, but I recommend adding patch config files as it will make your solution easier to update in the future.

Getting the URL of a Sitecore Item

You may expect a Sitecore Item to contain a property for its URL, however to actually get the URL of an item you need to use the LinkManager class.

There are also a few different options when getting an items URL, such as if you include the language code or not.

The following example gets the URL for an item with no language code and has a path relative to the site it is in. This is useful when your Sitecore instance may have multiple sites running and your home node isn't at the root of the content tree.

1Sitecore.Links.UrlOptions urlOptions = new Sitecore.Links.UrlOptions(); urlOptions.SiteResolving = true; urlOptions.LanguageEmbedding = Sitecore.Links.LanguageEmbedding.Never; string url = Sitecore.Links.LinkManager.GetItemUrl(item, urlOptions);

Sitecore: Setting the login page title

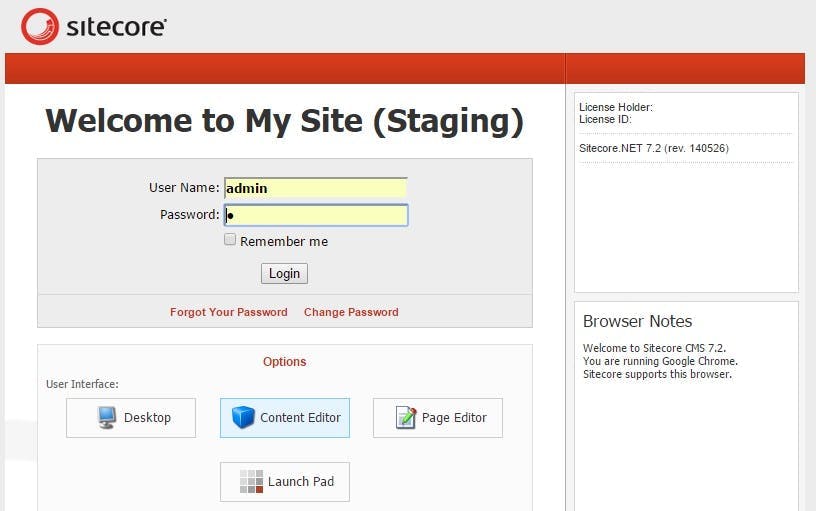
If you have multiple Sitecore sites or separate environments (e.g. Development, Test, Staging), a good way to tell them apart is by setting the title on the login page.

The best way of doing this is by creating a patch file with the following contents:

1<configuration xmlns:patch="http://www.sitecore.net/xmlconfig/">
2 <sitecore>
3 <settings>
4 <setting name="WelcomeTitle">
5 <patch:attribute name="value">LOGIN PAGE TITLE GOES HERE</patch:attribute>
6 </setting>
7 </settings>
8 </sitecore>
9</configuration>