Tag: Sitecore

Sitecore Continuous Integration with Team City and TDS

There are a lot of articles around on how to do automated deployments / continuous integration with Sitecore, which if you're new to the tools will likely leave you slightly baffled. This article will hopefully show you exactly what you need to do and explain why.

Solution Overview

  1. TDS is used by developers to serialize their Sitecore item changes and push them into source control
  2. Team City is used to detect the changes and run a build script
  3. Team City uses Web Deploy to push the code changes to the web server
  4. Team City calls MSBuild which will trigger TDS which is installed on the server to deploy Sitecore items to the destination server

Prerequisites

  • You have a build server with Team City installed and know how to set it up to do a web deploy
  • You are already using TDS and have your Sitecore items serialized in source control
  • Essentially you know how to do the first 3 steps and just need help with Step 4

Step by Step

UNC Share

On your web server you need to set up a UNC Share on your website's folder. When TDS does a deploy it will install a web service on your website through this share, do the item deployment and then remove the web service again.

The share needs to give permission to the user that your Team City Build Agent runs as. To find out which user your Build Agent is using:

  1. open the list of services and find TeamCity Build Agent in the list
  2. right click and select "Properties"
  3. in the "Log On" tab you will be able to see which Windows User is being used

Team City Config

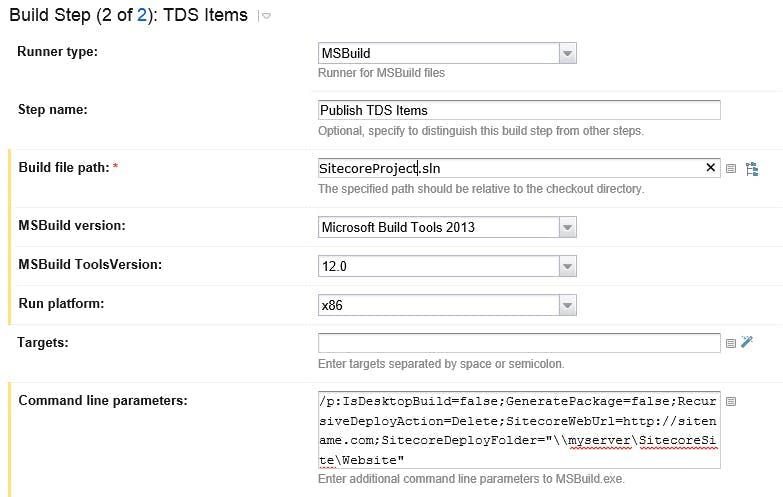
In your Team City's build configuration settings for your project, add a new build step with the following config:

Runner Type: MSBuild
Step Name: Publish TDS Items (or some other identifier)
Build file path: Path to your projects .sln file
Command line parameters:

  • SitecoreDeployFolder: TDS will use this file path to install a web-service on your site to publish the items through.
  • SitecoreWebUrl: This is the url of the site you are going to update. TDS will use this when it tries to call the web service it installed.
  • IsDesktopBuild: false
  • GeneratePackage: false
  • RecursiveDeployAction: Delete
1/p:IsDesktopBuild=false;GeneratePackage=false;RecursiveDeployAction=Delete;SitecoreWebUrl=URL OF SITE;SitecoreDeployFolder="UNC PATH TO YOUR SITECORE SITE"

Setting the command line parameters here will take precedence over any that have been included in your TDS projects solution file (which are liable to be overwritten by a developer).
That's it!

It's that easy. If you run your build script now your items should all be published to Sitecore.

Alternatives

This certainly isn't the only way to setup automated deployments and nor is it without issues. The fact a share needs to be set up between the Web Server and the Build Server, could cause an issue with security and may just not be possible if you're using a cloud server.

Rather than using TDS to deploy the Sitecore items you could use TDS to create a .update package. These would normally be installed through an admin webpage (not great for CI) but there is an open source project called Sitecore Ship that will expose a REST endpoint for the package to be posted to. Brad Curtis has written an excellent guide to this setup here (http://www.bradcurtis.com/sitecore-automated-deployments-with-tds-web-deploy-and-sitecore-ship/), however at the time of writing Sitecore Ship isn't compatible with Sitecore 7.5 or 8.

Another alternative to installing the update package is to use the TDS Package Installer. This is a tool Hedgehog provide alongside TDS for installing the update package. In this scenario you would need the tool installed on your web server and some way to call it. Jason Bert has written a setup guide for this example (http://www.jasonbert.com/2013/11/03/continuous-integration-deployment-with-sitecore/) however as well as Team City, you will also need Octopus Deploy to call the package installer. Octopus Deploy works by having what it calls Tentacles on each server you deploy to, making it easy to set up scripts to call programs on that server.

Sticking with the example using just TDS, you could also use TDS to deploy the solutions files as well as Sitecore items rather than using Web Deploy. However the downside here is that TDS is unable to modify your Web.Config file, which is one reason to stick with Web Deploy.
Muddlings with Sitecore Index's

On a recent Sitecore project we needed to have a faceted product search. For this we opted to use the Lucene based Search and Indexing functionality that comes with Sitecore. Overall this proved very easy to use, but here are the details of a couple of issues we encountered.

Items Duplicating on Publish and never Deleting

The first issue we found was that although the index was being built and we could read it. If we ever deleted an item, it wasn't removed from the index. Equally if you ever saved and published an item, it would become duplicated in the index.

Doing a manual rebuild of the index would clear the items back down to what we would normally expect. But for some reason changes were clearly just being added to the index rather than updating it.

Looking through Sitecores "Sitecore Search and Indexing Guide" (http://sdn.sitecore.net/upload/sitecore7/75/sitecore_search_and_indexing_guide_sc75-a4.pdf) wasn't much help, as far as we could tell the index was set up correctly. Comparing to the default index that comes with a blank install of Sitecore didn't help much either.

In the end it transpired in your index's field name definition you must include a field for "_uniqueid". We had assumed that some sort of config like this must be needed, however Sitecore's indexing guide doesn't actually mention it anywhere.

1<fieldNames hint="raw:AddFieldByFieldName">
2 <field fieldName="_uniqueid" storageType="YES" indexType="TOKENIZED" vectorType="NO" boost="1f" type="System.String" settingType="Sitecore.ContentSearch.LuceneProvider.LuceneSearchFieldConfiguration, Sitecore.ContentSearch.LuceneProvider">
3 <analyzer type="Sitecore.ContentSearch.LuceneProvider.Analyzers.LowerCaseKeywordAnalyzer, Sitecore.ContentSearch.LuceneProvider" />
4 </field>

Index not updating in the Content Delivery environment

At this point our index's were working fine in our own test environments. Upon deploying to our clients servers however the index's were never updating on either there Content Management or Content Delivery servers. Doing a manual rebuild of the index would cause the Content Management servers index to update, but the Content Delivery servers index constantly remained empty.

Clearly there was some sort of difference between there's and our environments. We didn't have any direct access to there servers, so we checked out the config settings that are view-able by going to /sitecore/admin/showconfig.aspx

Sure enough there was a difference.

This Sitecore install was running 7.2 and prior to that the latest version they had used was 6.6. They had set up a custom config setting which removed the hooks section from config. This was because some of the default hooks Sitecore has interfered with performance monitoring tools they use on there sites. Unfortunately it was also removing a hook that loads Sitecore.ContentSearch. Without this index's are never updated on events.

1<hooks>
2<hook type="Sitecore.ContentSearch.Hooks.Initializer, Sitecore.ContentSearch" patch:source="Sitecore.ContentSearch.config"/>
3</hooks>

Item and Field Names in Sitecore

Item and Field names in Sitecore might sound like a simple subject, but there are a few options that you may not be aware of.

Item Names

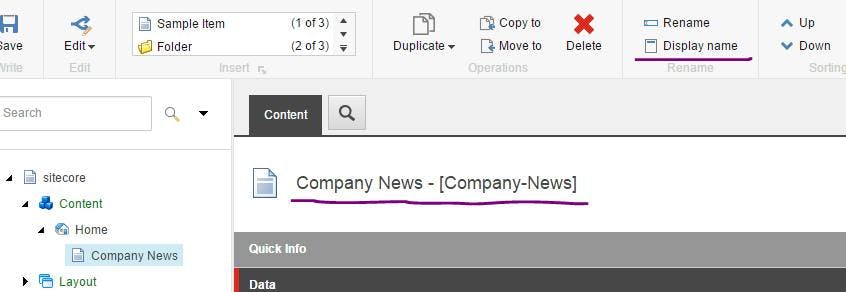
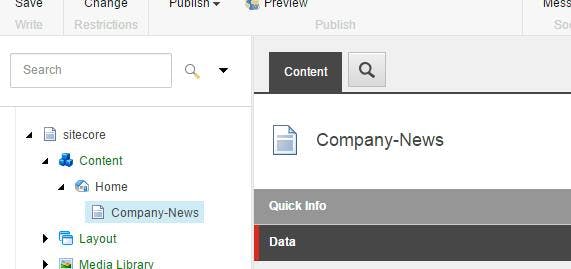
When you create an item in Sitecore it will ask you for a name to give the item. That name then appears in the content tree and at the top of the details pane to identify what your looking at.

It's also used for the URL in the front end of your site.

All fairly basic stuff. However in this example you will see that I've placed a hyphen between "Company" and "News" to make the the URL a little more friendly, rather than having a space or no gap at all. While good for the URL it comes at a sacrifice to the admin experience where a gap would be nicer.

On a multilingual site the URL's are also still using this same name. If your languages are English and US English that may be ok, but if your second language is French then they would probably prefer a URL in French.

Display Names

This is where Display Names come in. By setting a Display Name for your item you can configure a name to show in the admin that contains the space which can also differ per language.

However at this point the URL on the front end of your site will still be "Company News". Through a config setting though you can set Sitecore to use item display names rather than the item name when constructing a URL.

1<configuration xmlns:patch="http://www.sitecore.net/xmlconfig/">
2 <sitecore>
3 <linkManager>
4 <providers>
5 <add name="sitecore">
6 <patch:attribute name="useDisplayName">true</patch:attribute>
7 </add>
8 </providers>
9 </linkManager>
10 </sitecore>
11</configuration>

Of course at this point your URL will be back to having a space within it.

Field Names

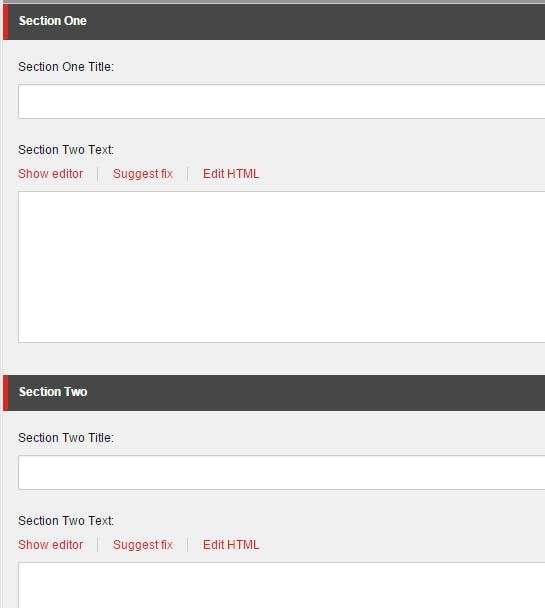
When you define a template in Sitecore you create add a section name and then add a field within that section. All simple stuff, however what you generally find is you have to prefix the name of your fields with the name of the section. This is because when it comes to accessing the field data in code, the sections don't exist and you need a way to avoid having two fields just called "Title" or "Text".

While this solves the issue from a code perspective, for content editors it's far from ideal.

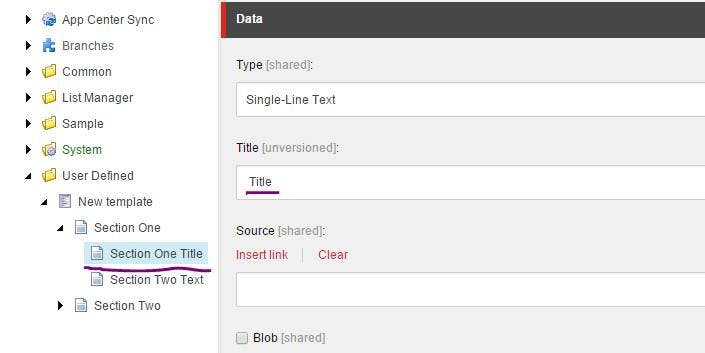
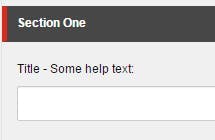
Fortunately there is a solution to this. By navigating to the actual field item within the content tree, we can specify a Title for the field that will be used in the editor rather than its name.

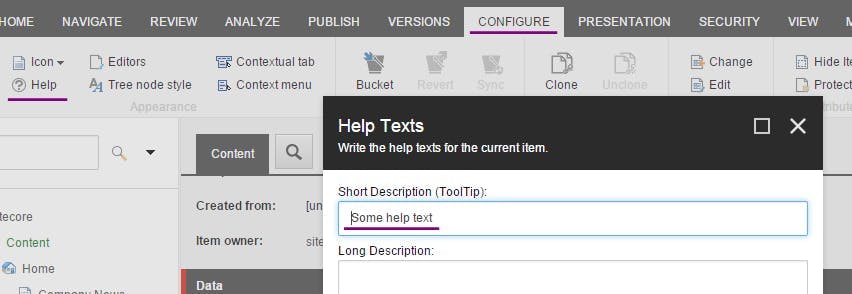
On top of that if you click the Configure tab and select Help, you can enter some help text that will appear next to the field name in the content editor.

Sitecore: Data binding to a datasource rather than the context

By default when you place a Sitecore control. e.g. on a page it will bind to the pages context item even if the rendering has had a Data Source set against it.

MVC - View Renderings

If your Sitecore solution is MVC based and you are using a View Rendering then this is simple. Make sure your view's model is set to Sitecore.Mvc.Presentation.RenderingModel and then pass Model.Item as the item parameter to the Sitecore HTML helper function for rendering a field.

1@using Sitecore.Mvc
2@using Sitecore.Mvc.Presentation
3
4@model Sitecore.Mvc.Presentation.RenderingModel
5
6<div>
7 <h2>@Html.Sitecore().Field("Title", Model.Item)</h2>
8 <div>@Html.Sitecore().Field("Content", Model.Item)</div>
9</div>

WebForms - Sublayouts

However if your Sitecore solution is using WebForms with sub-layouts then thing's get a little trickier. Unlike with the View Rendering there is no equivalent of Model.Item so a bit of work is required to get the Data Source Item.

If you check to see if the controls parent is a sublayout, you can then cast it as a sublayout and access the datasource property from their. You will then need to set the Item property of each of the Sitecore Controls in your sublayout. In this example the Sitecore Control is being referenced by controlled in the code.

1Item DataSource;
2if (Parent is Sublayout)
3 DataSource = Sitecore.Context.Database.GetItem(((Sublayout)Parent).DataSource);
4
5controlId.Item = DataSource;

Bundling and Minification with Sitecore

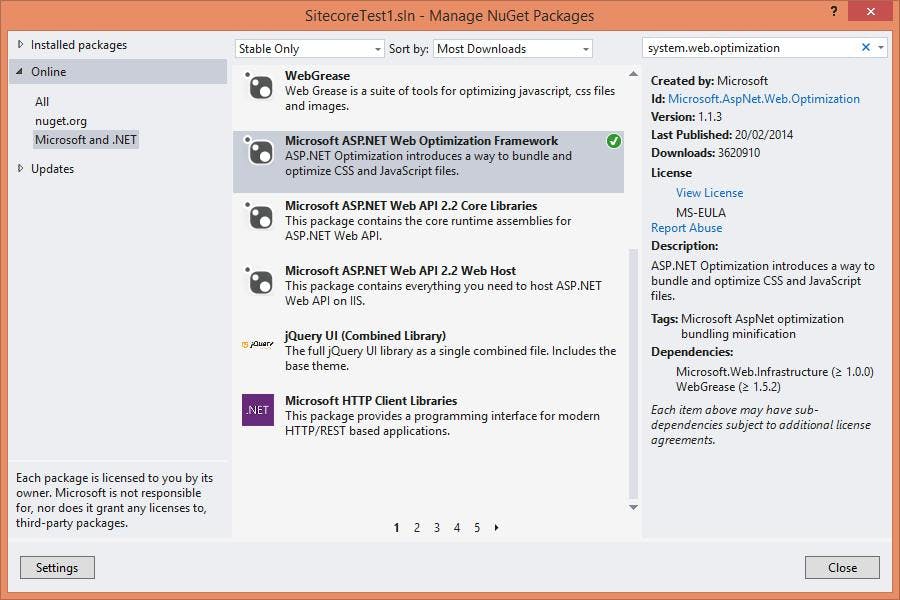
There's various ways to add bundling and minification to a site, but one of the easiest is to use Microsoft's support from the Microsoft.AspNet.Web.Optimization package. This implementation has some great features including:

  • Automatically create the bundles and minify them as files are changed
  • Create unique urls to each version of a bundle to force browser refreshing of the file
  • Debug mode which outputs links to the raw files rather than the bundled minified version

The functionality is also fully compatible with Sitecore. To use it in your Sitecore solution follow these steps:

1. Add Microsoft.AspNet.Web.Optimization to your project from NuGet. This is the package from Microsoft that contains the functionality to do bundling and minification


2. Create your CSS and Javascript bundles. Where you put the logic for this is up to you but it will need to run when the application starts. Outside of Sitecore my main development is on bespoke ASP.NET MVC and Web API projects so I like to organise startup scripts into an App_Start folder and reference it from the Application_Start event in the global ascx file.

If you are running a Sitecore instance with multiple sites or if you do not have direct access to the production config files, it may be better to keep the logic separate and use a pipeline to create the bundles.

My bundle definitions would look something like this

1using System;
2using System.Collections.Generic;
3using System.Linq;
4using System.Web;
5using System.Web.Optimization;
6
7public class BundleConfig
8{
9 public static void RegisterBundles(BundleCollection bundles)
10 {
11 bundles.Add(new ScriptBundle("~/bundles/scripts").Include(
12 "~/Scripts/jquery-{version}.js",
13 "~/Scripts/bootstrap.js"));
14
15 bundles.Add(new StyleBundle("~/bundles/css").Include(
16 "~/Content/bootstrap.css",
17 "~/css/site.css"));
18 }
19}

And in my Global.asax.cs file I would have some logic like this to call the other function

1protected void Application_Start(object sender, EventArgs e)
2{
3 BundleConfig.RegisterBundles(System.Web.Optimization.BundleTable.Bundles);
4}

3. Replace your Javascript/CSS references in your layout or rendering files with a call to render the bundle

Webforms

1<%: System.Web.Optimization.Scripts.Render("~/bundles/scripts") %>
2<%: System.Web.Optimization.Styles.Render("~/bundles/css") %>

MVC

1@Scripts.Render("~/bundles/scripts")
2@Styles.Render("~/bundles/css")

4. In your web.config file there are a couple of changes needed to get things to work.

First you need to set an ignore url prefix to stop Sitecore trying to resolve the URL to the bundle. In this example mine is called bundles (note: you should add the prefix the what is already in your config file. e.g. |/bundles)

1<!-- IGNORE URLS
2 Set IgnoreUrlPrefixes to a '|' separated list of url prefixes that should not be
3 regarded and processed as friendly urls (ie. forms etc.)
4-->
5<setting name="IgnoreUrlPrefixes" value="/sitecore/default.aspx|/trace.axd|/webresource.axd|/sitecore/shell/Controls/Rich Text Editor/Telerik.Web.UI.DialogHandler.aspx|/sitecore/shell/applications/content manager/telerik.web.ui.dialoghandler.aspx|/sitecore/shell/Controls/Rich Text Editor/Telerik.Web.UI.SpellCheckHandler.axd|/Telerik.Web.UI.WebResource.axd|/sitecore/admin/upgrade/|/layouts/testing|/bundles" />
6

Next a dependant assembly binding needs to be set up for Web Grease. Without it you will see an error about the Web Grease version number

1<dependentAssembly>
2 <assemblyIdentity name="WebGrease" publicKeyToken="31bf3856ad364e35" />
3 <bindingRedirect oldVersion="0.0.0.0-1.5.2.14234" newVersion="1.5.2.14234" />
4</dependentAssembly>

If you have done this and are still getting a version number error check the assembly binding tag. Older versions of Sitecore have the applies to property set which may be only applying the bindings to .Net 2 and you may be using .Net 4.

1<assemblyBinding xmlns="urn:schemas-microsoft-com:asm.v1" appliesTo="v2.0.50727">

5. If you are using IIS7 you will also need to make a change in your web.config file

1<system.webServer>
2 <modules runAllManagedModulesForAllRequests="true">
3 </modules>
4</system.webServer>

6. Publish your changes into your Sitecore site. Depending if you have compilation mode set to debug or not you will now either have a bundle reference for all your JavaScript and CSS or the individual file references.

Sitecore MVC Page Editor: Combining a General Link with an Image

Sitecore's Page Editor provides content authors a simple way to edit content, visually seeing the changes as they make them. To make fields on a page editable though the Page Editor simply use the field renderer function to put a field's content on the page. When the page is viewed in page editor mode the function will output all the necessary html and JavaScript to make the page editor functionality work.

1@Html.Sitecore().Field("Title", Model.Item)

But what if your page needs to render the contents of one field inside another? e.g. You could have a link on an image or a link surrounding a combination of other fields.

In an xslt rendering you could simply nest one tag within another:

1<sc:link field="Image Link">
2 <sc:image field="Image" />
3</sc:link>

When you click the item in the Page Editor the toolbar would then combine the icons for the General Link field and the Image field so that you can edit the image and update the link. But with a ViewRendering in MVC, the Razer syntax used for views doesn't support nesting items in this way.

Thankfully Sitecore have considered this and rather than using the Field function they have included a BeginField and EndField function. Between the two you can place your nested fields:

1@Html.Sitecore().BeginField("Image Link", Model.Item)
2@Html.Sitecore().Field("Image", Model.Item)
3@Html.Sitecore().EndField()

Unfortunately it doesn't quite work right. The page will render correctly and the toolbar will show both options, however editing anything results in the content disappearing until you refresh the page. Thankfully there is a work around to get it to work:

1@Html.Sitecore().BeginField("Image Link", Model.Item, new { haschildren = true })
2@Html.Sitecore().Field("Image", Model.Item)
3@Html.Sitecore().EndField()

Sitemap XML for Sitecore

The simplest description of a Sitemap is a file that list all the URL’s on a site for a Search Engine to crawl. Traditionally web crawlers would follow links on pages within a site and rely on them to discover new pages and index them. Sitemaps add a layer of intelligence to this by providing a list of URL’s up front and also adding additional metadata such as when the page was last updates, how often it changes and how important the page is.

For more information on Sitemaps have a look at sitemaps.org

Introducing Sitemap XML for Sitecore

Out of the box Sitecore doesn’t provide any built in functionality for auto generating a sitemap, but a good module on the Sitecore Marketplace is Sitemap XML (https://marketplace.sitecore.net/en/Modules/Sitemap_XML.aspx). This module will generate a schema compliant sitemap file in the root of your site on each publish of the site.

There are a couple of issue you might experience when trying to use it:

Publishing Error

Once you’ve installed the module and attempted a full site publish you will likely get an error like this…

1Job started: Publish to 'web'|Items created: 0|Items deleted: 0|Items updated: 78|Items skipped: 15877|#Exception: System.Reflection.TargetInvocationException: Exception has been thrown by the target of an invocation. ---&gt; System.NullReferenceException: Object reference not set to an instance of an object.
2 at Sitecore.Modules.SitemapXML.SitemapManager.BuildSiteMap(String sitename, String sitemapUrlNew)
3 at Sitecore.Modules.SitemapXML.SitemapManager..ctor()
4 at Sitecore.Modules.SitemapXML.SitemapHandler.RefreshSitemap(Object sender, EventArgs args)
5 at Sitecore.Events.Event.EventSubscribers.RaiseEvent(String eventName, Object[] parameters, EventResult result)
6 at Sitecore.Events.Event.RaiseEvent(String eventName, Object[] parameters)
7 at Sitecore.Publishing.Publisher.NotifyEnd()
8 at Sitecore.Publishing.Publisher.Publish()
9 --- End of inner exception stack trace ---
10 at System.RuntimeMethodHandle.InvokeMethod(Object target, Object[] arguments, Signature sig, Boolean constructor)
11 at System.Reflection.RuntimeMethodInfo.UnsafeInvokeInternal(Object obj, Object[] parameters, Object[] arguments)
12 at System.Reflection.RuntimeMethodInfo.Invoke(Object obj, BindingFlags invokeAttr, Binder binder, Object[] parameters, CultureInfo culture)
13 at System.Reflection.MethodBase.Invoke(Object obj, Object[] parameters)
14 at (Object , Object[] )
15 at Sitecore.Pipelines.CorePipeline.Run(PipelineArgs args)
16 at Sitecore.Jobs.Job.ThreadEntry(Object state)

Going by the comments on the Sitecore marketplace this happens to quite a lot of people and unfortunately the limited documentation for the module doesn't explain the cause.

When you install the module it will create a config file called SitemapXML.config within App_Config\Include. By default that config will have the following 2 lines:

1<site name="website_1" filename="sitemap1.xml" serverUrl="www.site1domain.com" />
2<site name="website_2" filename="sitemap2.xml" serverUrl="www.site2domain.com"/>

These websites don't exist which is what causes the error. So to fix simply change the name of your website and the URL can be left blank. e.g.

1<site name="website" filename="sitemap.xml" serverUrl="" />

Multiple Server Setup

If you're Sitecore installation is using separate servers for content management and content delivery you'll notice that your only generating sitemaps on your content management server.

To set up your content delivery server to start generating the files update the event node in the config file from

1<event name="publish:end">

to

1<event name="publish:end:remote">

and also make sure you have both the SitemapXML.dll file and config file on your content deliver server.

Responsive Images in Sitecore

By default, when you add an image to a page in Sitecore using the <sc:Image > control it will render height and width attributes on the resulting html. These are based on the images dimensions or any height and width properties you may have set server side.

The benefit of doing this is that when the browser renders the page, it already knows what space the image will take up before the image has loaded. This reduces the number of repaints the browser has to make and ultimately speeds up the page rendering time. If the height and width weren't specified then a repaint would happen after the image was loaded as the size would now be known.

However this can cause an issue when you are producing a responsive site that changes its layout based on the size of a device or width of a browser window. Because responsive design is done though CSS media tags the server does not know what the height and width of the image will be, unfortunately there's also no built in way to tell Sitecore to stop rendering the height and width tags. Not very good when you want to size your image to 100% width of an area that can change size.

The solution is to create a Pipeline. Pipelines are Sitecore's way of enabling you change how Sitecore works and their not overly complex to implement.

To create a pipeline that will affect the way an Image field is rendered your first need to create a GetImageFieldValueResponsive class as follows. The name of the class can be anything you want but I've called it GetImageFieldValueResponsive as it will be called after Sitecores GetImageFieldValue class.

1namespace SitecoreCustomization.Pipelines.RenderField
2{
3 public class GetImageFieldValueResponsive
4 {
5 public void Process(RenderFieldArgs args)
6 {
7 if (args.FieldTypeKey != "image")
8 return;
9 if (args.Parameters.ContainsKey("responsive"))
10 {
11 string imageTag = args.Result.FirstPart;
12 imageTag = Regex.Replace(imageTag, @"(&lt;img[^&gt;]*?)\s+height\s*=\s*\S+", "$1", RegexOptions.IgnoreCase);
13 imageTag = Regex.Replace(imageTag, @"(&lt;img[^&gt;]*?)\s+width\s*=\s*\S+", "$1", RegexOptions.IgnoreCase);
14 imageTag = Regex.Replace(imageTag, @"(&lt;img[^&gt;]*?)\s+responsive\s*=\s*\S+", "$1", RegexOptions.IgnoreCase);
15 args.Result.FirstPart = imageTag;
16
17 }
18 }
19 }
20}

The process function in the class is what will get called as the control is rendered. First it will check that the field type is an image and then will look to see if there is a parameter called responsive. This will allow us to control when Sitecore should output height and width tags and when it shouldn't. Lastly some Regex is used to remove the height, width and responsive properties from the image tag that will already have been generated by this point.

Next we need to tell Sitecore to start using this pipeline. We do this by creating a RenderField.config file and placing it in the App_Config\Include folder of your Sitecore solution.

1<configuration xmlns:patch="http://www.sitecore.net/xmlconfig/">
2 <sitecore>
3 <pipelines>
4 <renderField>
5 <processor
6 patch:after="*[@type='Sitecore.Pipelines.RenderField.GetImageFieldValue, Sitecore.Kernel']"
7 type="SitecoreCustomization.Pipelines.RenderField.GetImageFieldValueResponsive, DLLNameOfWhereYouCreatedTheClass"/>
8 </renderField>
9 </pipelines>
10 </sitecore>
11</configuration>

Lastly your control will need to have an attribute to say it should be responsive. For an xslt rendering your code will look like this:

1<sc:image field="Image" responsive="1" />

And for an ascx sublayout it will look like this:

1<sc:Image runat="server" Field="Image" Parameters="responsive=1" />