Tag: Azure
Protecting Azure Resources from Deletion

Protecting Azure Resources from Deletion

There's a lot we can do in Azure to protect our resources from harm.

First security permissions can be set up using active directory groups, so that access can be restrict to certain member to actually do anything with a resource. There's the fact that resources exist on more than one server so that if a server fails another already has a copy ready to switch to. We can even use ARM templates to have our entire infrastructure written as code that can be redeployed should the worst happen.

However what if we have some blob storage with some important data and we accidentally just go and delete it? Sometimes human error just happens, sure we can recreate it with our ARM template, but the contents will be gone.

Or maybe we're not using ARM templates and did everything through the portal so we'd really like to just make sure we didn't delete stuff by accident.

Azure Resource Locks

One thing we can do is to set up Azure Resource Locks. This isn't the same thing as setting up backups (you should absolutely do that to), but this is a nice extra thing you can do to prevent you from deleting something by accident. It's also really simple to do too.

In the Portal

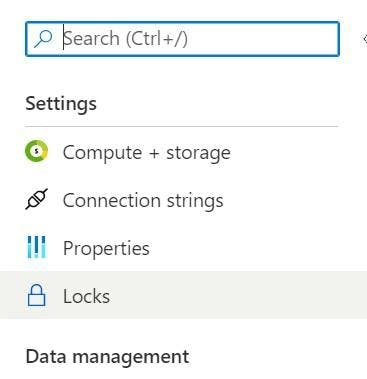
If your doing everything direct in the portal, open your resource and look for locks in the left nav.

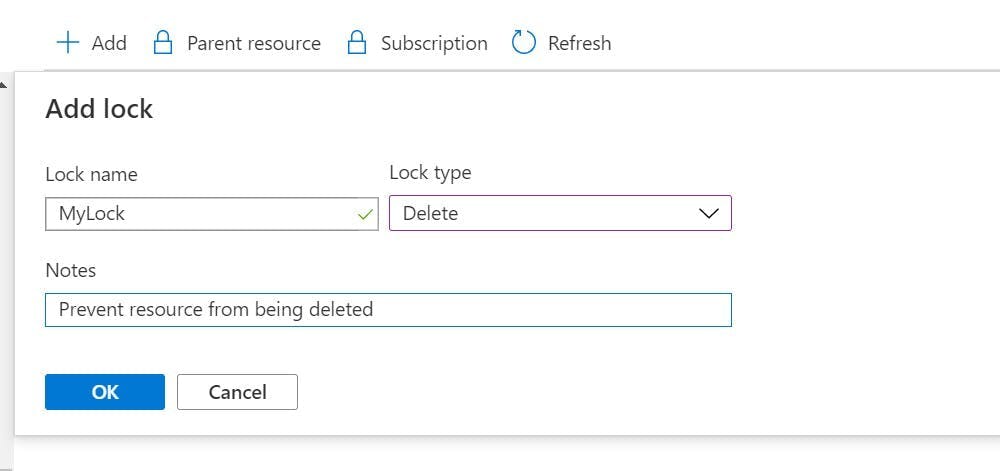
Now click the add button. Give it a name, lock type of delete and a note for what it does.

Now if you try and delete the resource you get a friendly error message saying you can't.

ARM Template

If your using ARM templates to manage your infrastructure, then you need this little snippet of code added to your template file.

1 {
2 "type": "Microsoft.Authorization/locks",
3 "apiVersion": "2016-09-01",
4 "name": "NAME OF LOCK GOES HERE",
5 "scope": "[concat('Microsoft.Sql/servers/databases/', parameters('database_name'))]",
6 "dependsOn": [
7 "[resourceId('Microsoft.Sql/servers/databases/', parameters('database_name'))]"
8 ],
9 "properties": {
10 "level": "CanNotDelete",
11 "notes": "DESCRIPTION SAYING IT SHOULDNT BE DELETED GOES HERE"
12 }
13 }

Notice the scope and depends on section. These need to reference the item you want to protect.

Data Factory - Dynamic mappings in Data Flow

Data Factory - Dynamic mappings in Data Flow

Azure Data Factory and Data Flows make transforming data from one format to another super simple with it's code free approach. However that doesn't mean we want to construct entire data flows when changing mappings from one value to another.

For example if my source data contained a field for favourite creature with value An for Ants, and Ca for Cats I could do the transformation using an iif expression in a derived column task. But in a few weeks time if I needed to add Ba for Bats, editing the whole Data Flow seems like a lot of work, not to mention nested iif statements are going to be come ugly and confusing.

One option would be to have the list of conversions as another source in the flow and do a join, but then this means having that data stored somewhere like blob storage.

Instead a solution I have is to pass the data in as a parameter to the data flow. Data Factory doesn't have an array parameter but we can put a comma separated list in as a string. e.g. An=Ants, Ba=Bats, Ca=Cats.

Then in our derived columns expression we can do this:

1iif(instr($ParameterString, toString(SourceValue) + "=")==0,"No Mapping",
2 substring(
3 substring($ParameterString, instr($ParameterString, toString(SourceValue) + "=")),
4 length(toString(SourceValue))+2,
5 iif(instr(substring($ParameterString,instr($ParameterString, toString(SourceValue) + "=")+length(toString(SourceValue))+2),",") > 0,
6 instr(substring($ParameterString,instr($ParameterString, toString(SourceValue) + "=")+length(toString(SourceValue))+2),","),
7 length(substring($ParameterString,instr($ParameterString, toString(SourceValue) + "=")))
8 )
9 )
10 )

There's quite a lot going on here so lets break it down

1iif(instr($ParameterString, toString(SourceValue) + "=")==0,"No Mapping",

First we are doing an iif to check if our Source Value (the value from our dataset) exists within the Parameter String. If it doesn't then we're setting the value to "No Mapping"

1 substring(

If the value does exist then we need to grab just the part we want. So we need a sub string and we need to get everything after the source values equals to the next comma.

A reminder the parameters for substring are substring(<string to subset>: string,<from 1-based index>: integral, [<number of characters>: integral])

1 substring($ParameterString, instr($ParameterString, toString(SourceValue) + "=")),

Our first parameter needs to be the string to subset, that's going to come from our ParameterString, but we're going to do another substring on it to ignore everything before the one we ant to match.

So if our ParameterString was set too:

An=Ants, Ba=Bats, Ca=Cats

and our Source Value was Ba we would now have:

Ba=Bats, Ca=Cats

1 length(toString(SourceValue))+2,

Next is the start index which will be the length of our source value + 2. If we ended the substring now we would get.

Bats, Ca=Cats

1 iif(instr(substring($ParameterString,instr($ParameterString, toString(SourceValue) + "=")+length(toString(SourceValue))+2),",") > 0,
2 instr(substring($ParameterString,instr($ParameterString, toString(SourceValue) + "=")+length(toString(SourceValue))+2),","),
3 length(substring($ParameterString,instr($ParameterString, toString(SourceValue) + "=")))
4 )
5 )

The final parameter for the substring is a bit more complex, but it's similar to what we have just done.

Two scenarios need to be catered for:

  1. If there's more items in the list left then there will be a comma separating them. If this is the case then we need to get the position of the first comma in what we have left.
  2. If there isn't anything else in the list then there will be no comma. In this instance we need to get the length of what remains.

With that our substring will now return Bats

Managing SQL Azure Users in the Portal

Managing SQL Azure Users in the Portal

Managing users for a SQL Azure DB is something which I have found is more complex that you would expect. A lot of guides will also tell you it's something which can't be done through the admin portal and needs to be done using scripts in the DB.

This is true to some extent. If you want to set specific role permissions to a DB then you have to do it by assigning roles through SQL scripts. Also if you want to set usernames and passwords at a DB level rather than using Active Directory then this also needs to be done in the DB.

However if you want to give a bunch of active directory users admin access to all the DB's in a server or if you want to give a group of people the same access then this can be done through the azure portal.

Admin Permissions For All

When you create your DB instance an admin user will get created, and for some teams you could just share the password. However sharing passwords isn't that great and there is a better way.

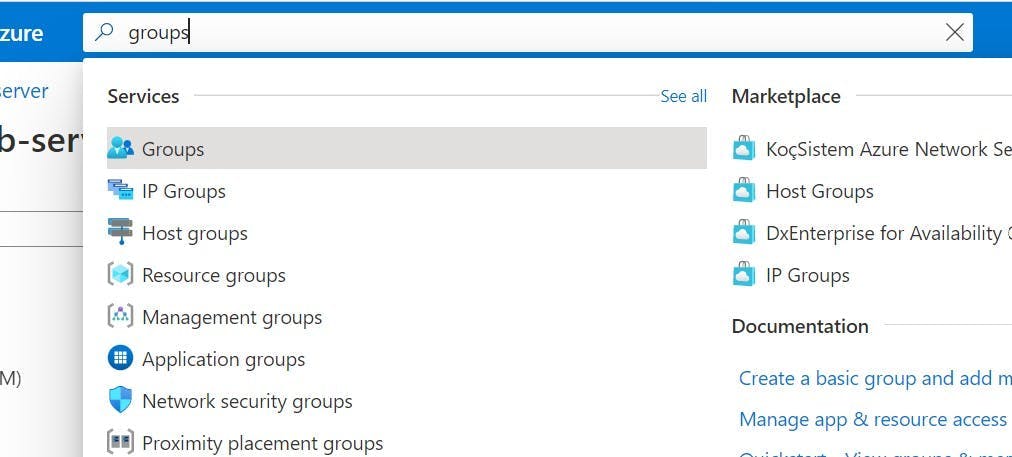
In the Azure Portal search for groups in the big search box at the top.

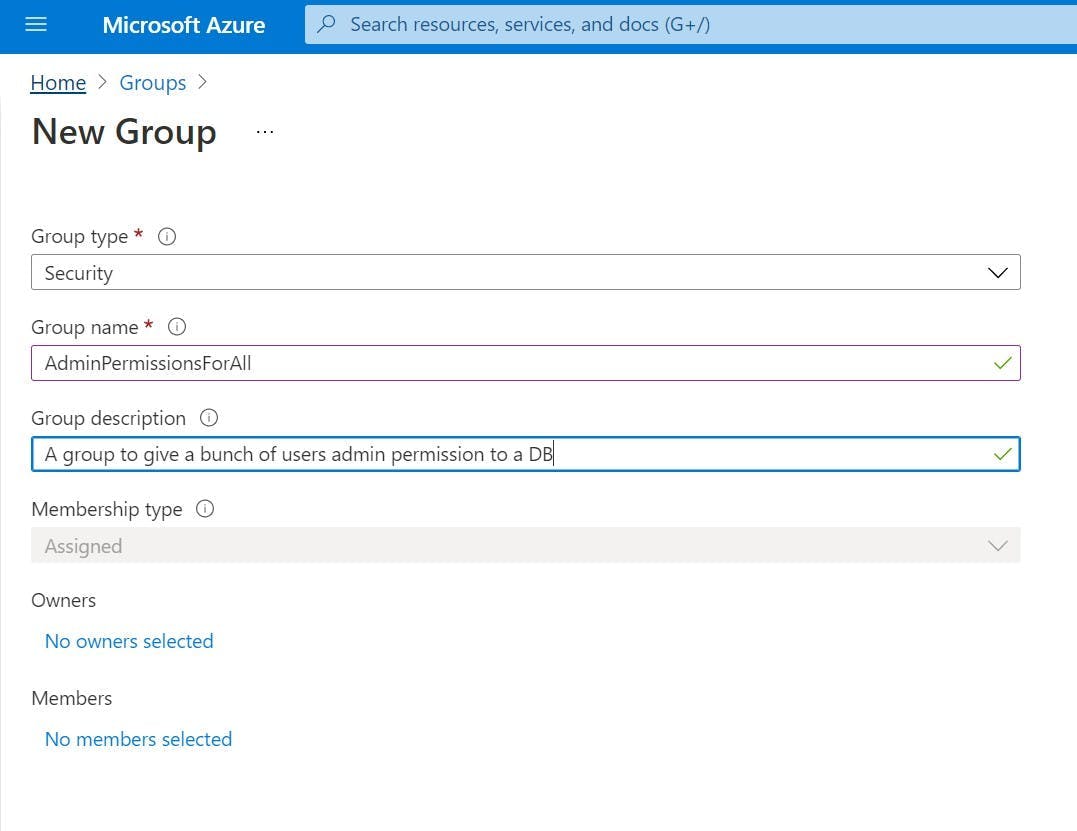
Create a security group with a sensible name, description and add all the members who you want to give admin permission to.

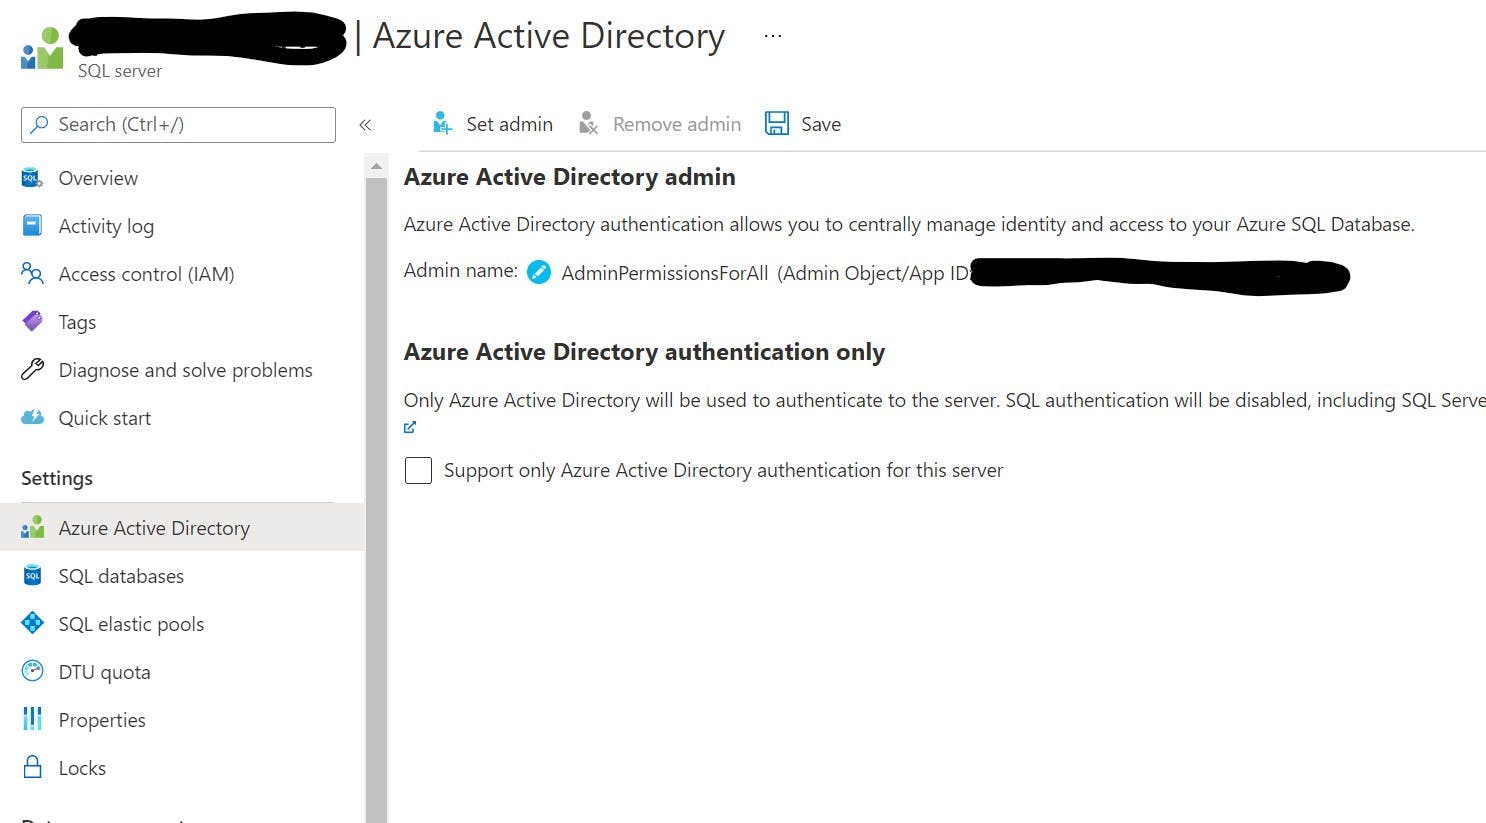
Go to your SQL server resource (this is the parent of the database), and got to the Azure Active Directory setting.

Click the top button to Set Admin, choose your new group and then click save. This will create the user with the correct permissions in the master DB of the server.

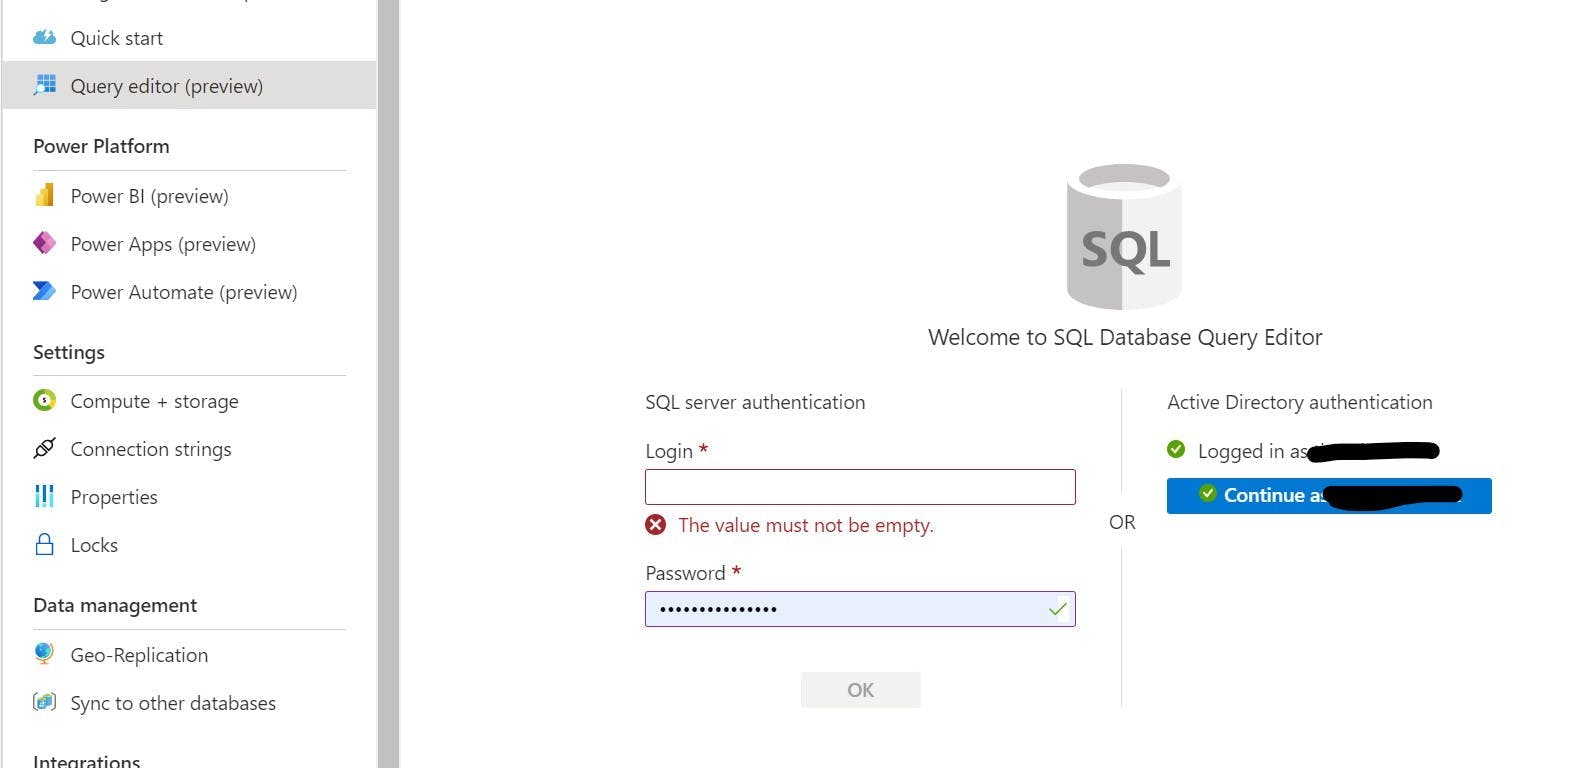
That's it, the members of the group will now be able to access any of the DB's on the server by logging in using Active Directory with Password through SSMS, or through the azure portal using Query Editor.

Query editor will actually give you a nice green tick if you have permission to log in.

To add or remove peoples access to the DB, just add and remove them from the group.

If you can't log in it could be due to a firewall permission for your IP rather than an actual login permission.

Permissions to Specific DBs

Giving everyone admin permission to every DB on the instance might not be what your after. Fine for a dev instance, but probably not something you want for production.

Fortunately the same concept of using groups can make life a lot easier but you will need to do some SQL scripting.

Create your group as above and then make sure your logged in as someone who is an active directory admin for the SQL Server. You can do this with the instructions above or if you want to be the only admin then rather than setting a group to be the admin, just set yourself.

Next log into the DB either using SSMS or Query Editor. Personally I prefer to use Query Editor as I'm doing everything else through the portal.

Our first script is to create an external user in our DB. In our case the external user is the group we want to give permission to rather than a specific user.

1CREATE USER [GROUP NAME]
2FROM EXTERNAL PROVIDER
3WITH DEFAULT_SCHEMA = dbo;

This is called adding a contained user to the DB.

Next we need to give the group some role permissions to do something.

1ALTER ROLE db_datareader ADD MEMBER [GROUP NAME];
2ALTER ROLE db_datawriter ADD MEMBER [GROUP NAME];

Repeat these steps for each DB you want to give the group access too.

The members of your new group should now have permissions to the individual DBs with reader and writer permissions.

If you want to give access to more people, just add them to the group.

Data Factory: How to upsert a record in SQL

Data Factory: How to upsert a record in SQL

When importing data to a database we want to do one of three things, insert the record if it doesn't already exist, update the record if it does or potentially delete the record.

For the first two, if your writing a stored procedure this often can lead to a bit of SQL that looks something like this:

1IF EXISTS(SELECT 1 FROM DestinationTable WHERE Foo = @keyValue)
2BEGIN
3 UPDATE DestinationTable
4 SET Baa = @otherValue
5 WHERE Foo = @keyValue
6END
7ELSE
8BEGIN
9 INSERT INTO DestinationTable(Foo, Baa)
10 VALUES (@keyValue, @otherValue)
11END

Essentially an IF statement to see if they record exists based on some matching criteria.

Data Factory - Mapping Data Flows

With a mapping data flow, data is inserted into a SQL DB using a Sink. The Sink let's you specify a dataset (which will specify the table to write to), along with mapping options to map the stream data to the destination fields. However the decision on if a row is an Insert/Update/Delete must already be specified!

Let's use an example of some data containing a persons First Name, Last Name and Age. Here's the table in my DB;

And here's a CSV I have to import;

1FirstName,LastName,Age
2John,Doe,10
3Jane,Doe,25
4James,Doe,50

As you can see in my import data Jane's age has changed, there's a new entry for James and Janet doesn't exist (but I do want to keep here in the DB). There's also no ID's in my source data as that's an identity created by SQL.

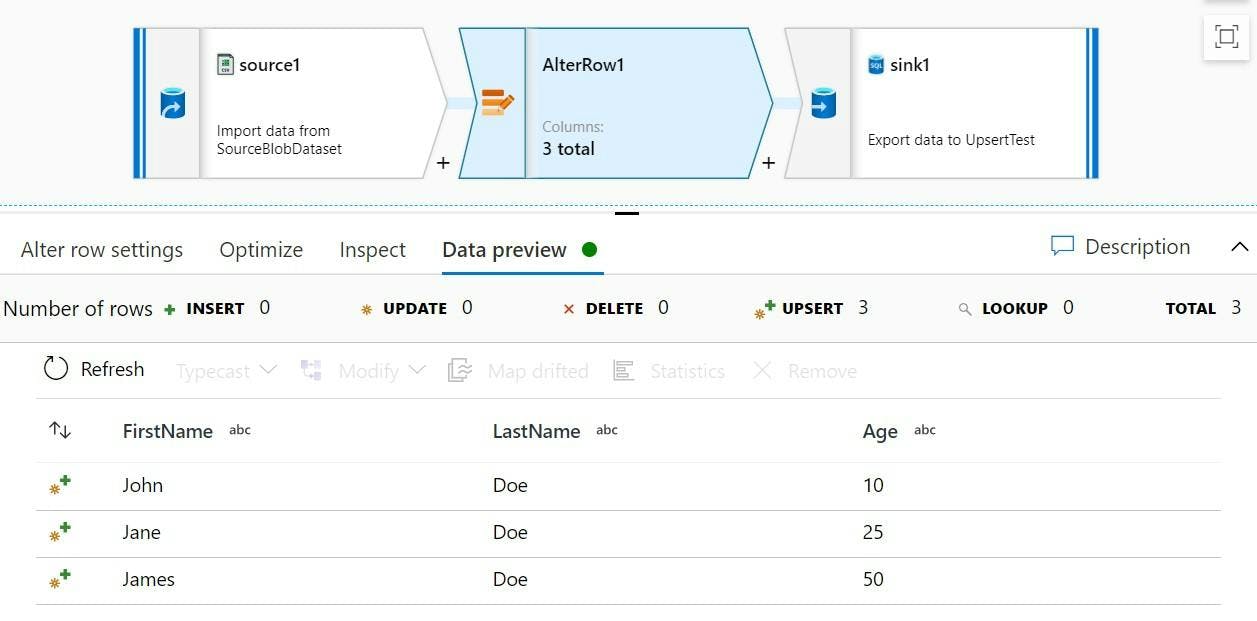
If I look at the Data preview on my source in the Data Flow, I can see the 3 rows from my CSV, but notice there is also a little green plus symbol next to each one.

This means that they are currently being treated as Inserts. Which while true for one of them is not for the others. If we were to connect this to the sink it would result in 3 new records being added to the DB, rather than two being updated.

To change the Insert to an update you need an alert row step. This allows us to define rules to state what should be an insert and what should be an update.

However to know if something should be an insert or an update requires knowledge of what is in the DB. To do that would mean a second source, followed by a join on First Name/Last Name and then conditions based on which rows have an ID from the DB or not. This all seems a bit needlessly complicated, and it is.

Upsert

When using a SQL sink there is a 4th option for what kind of method should be used and that is an Upsert. An upsert will result in a SQL merge being used. SQL Merges take a set of source data, compare it to the data already in the table based on some matching keys and then decide to either update or insert new records based on the result.

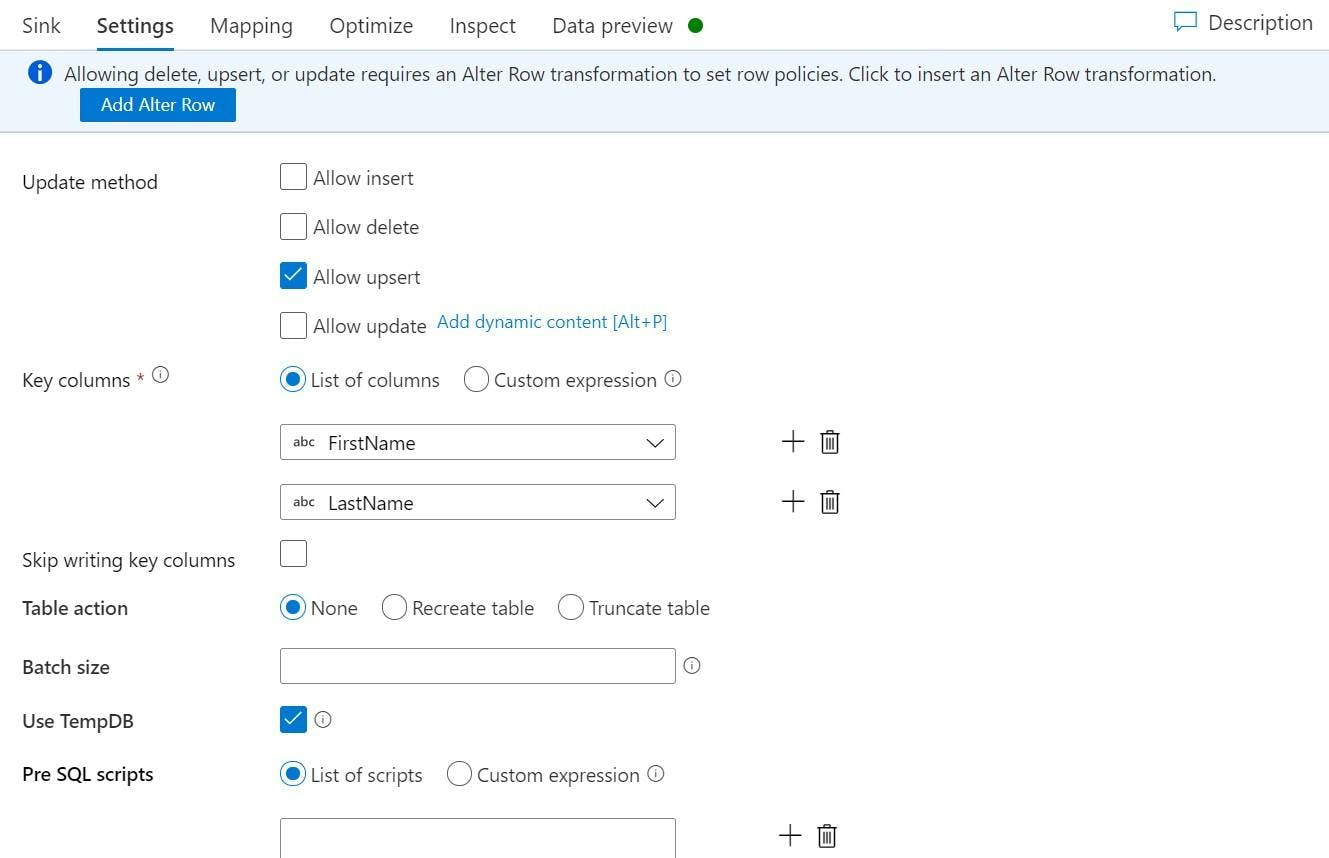
On the sink's Settings tab untick Allow insert and tick Allow upsert. When you tick Allow upsert properties for Key columns will appear which is where you specify which columns should be used as a key. For me this is FirstName and LastName.

If you don't already have an Alter Row step it will warn you that this is missing.

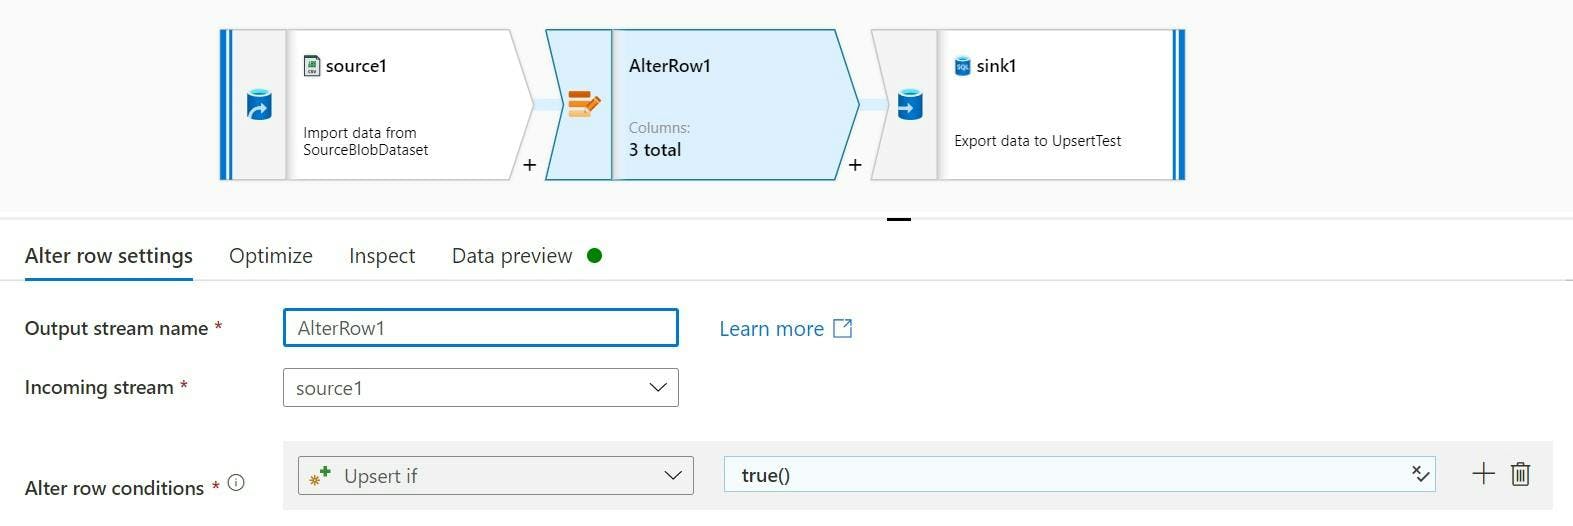
Even though we are only doing what equates to a SQL merge, you still need to alter the rows to say they should be an upsert rather than an insert.

As we are upserting everything our condition can just be set to return true rather than analysing any row data.

And there we have it, all rows will be treated as an upsert. If we look at the Data preview we can now see the upsert icon on each row.

And if we look at the table after running the pipeline, we can see that Janes age has been update, James has been added and John and Janet stayed the same.

Data Factory: Importing multiple files with transformations

Data Factory: Importing multiple files with transformations

Let's assume you have a folder containing a bunch of files that you need to import somewhere. e.g. a database or another file store, and in the process of doing that you also need to transform the data in some sort of way.

One option would be to use a pipeline activity like Get Metadata to get your list of files, a ForEach to loop through them and a Mapping Data Flow within the for each to process each file.

This all sounds quite reasonable, but there's a catch. Each time we use a Data Flow activity, that activity will spin-up a Azure Databricks environment to run the Data Flow. So if you have 100 files to import, then that's 100 Databricks environments that will get created.

An alternative is to do everything within one Data Flow activity, resulting in just one Databrick environment being created.

One Data Flow

In your dataset configuration specify a filepath to a folder rather than an individual file (you probably actually had it this way for the Get Metadata activity).

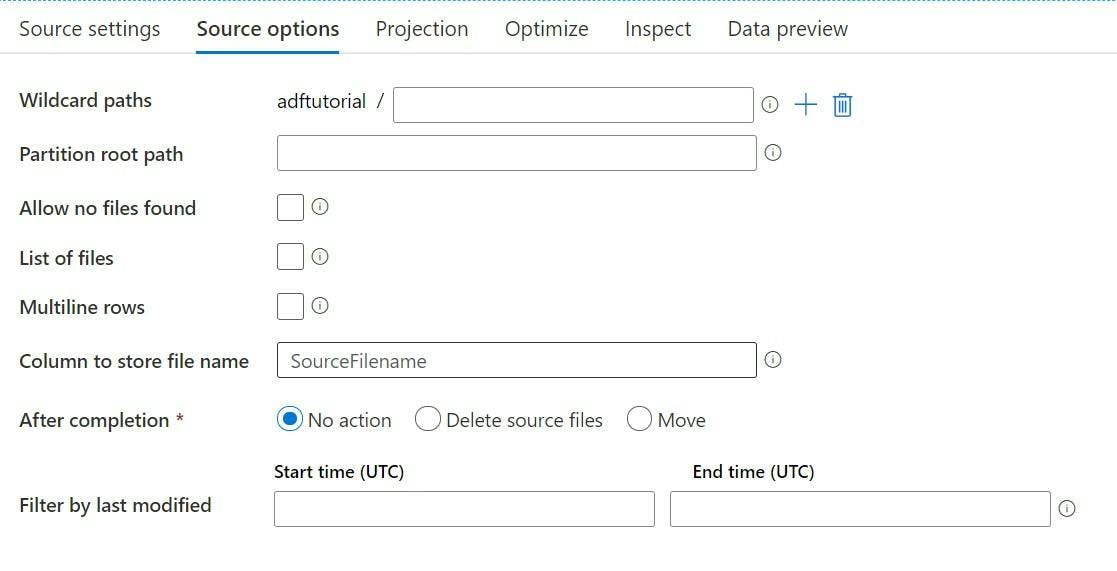
In your data flow source object, pick your dataset. In the source options you can specify a wildcard path to filter what's in the folder, or leave it blank to load every file.

Now when the source is run it will load data from all files.

One major difference to note is now rather than iteratively going through each file we're loading them all in one go which changes how you may think of things.

If you need to know which file a particular row came from then the source options has a field where you can specify a column name for the file to be added to.

Your data now includes data from every file, and the filename it came from.

Equivalent of the Octopus Package Library for Azure Devops

Equivalent of the Octopus Package Library for Azure Devops

I’ve been using Team City and Octopus deploy in our CI setups for several years, but over the last 6 months have slowly been moving over to use Azure Devops. This is mostly to move away from needing to keep an application like Team City updated by switching to a SAAS service. Octopus is available as a SAAS service, but as Azure Devops is also capable of doing releases I opted to start with that rather than using Octopus again.

One of my first challenges was how you replace Octopus’s package library. The solutions I’m working on (which are generally Sitecore based), consist of the application we write and store in Source Control, and all the other pre-built parts of Sitecore which we don’t store in source control.

With Octopus deploy we would add these static parts to the Octopus package library and then release a combination of them and our application to a server, wiping what is there before we do. That then gives us the exact same deploy on every target.

With Azure Devops however, things are a bit different.

Azure Artifacts

The closest equivalent of the package library is Azure Artifacts. Rather than a primary purpose being to upload packages to be included in a deploy. The goal of Artifacts is more inline with the output of a pipeline being saved to an Artifact which can then be a package feed for things like NuGet or npm.

Unfortunately, there is also no UI to directly upload a NuGet package to an Artifact feed like there is with Octopus’s package library. However, it is possible to upload a pre-built NuGet package another way using NuGet.exe itself.

Manually uploading a NuGet package to Azure Artifacts

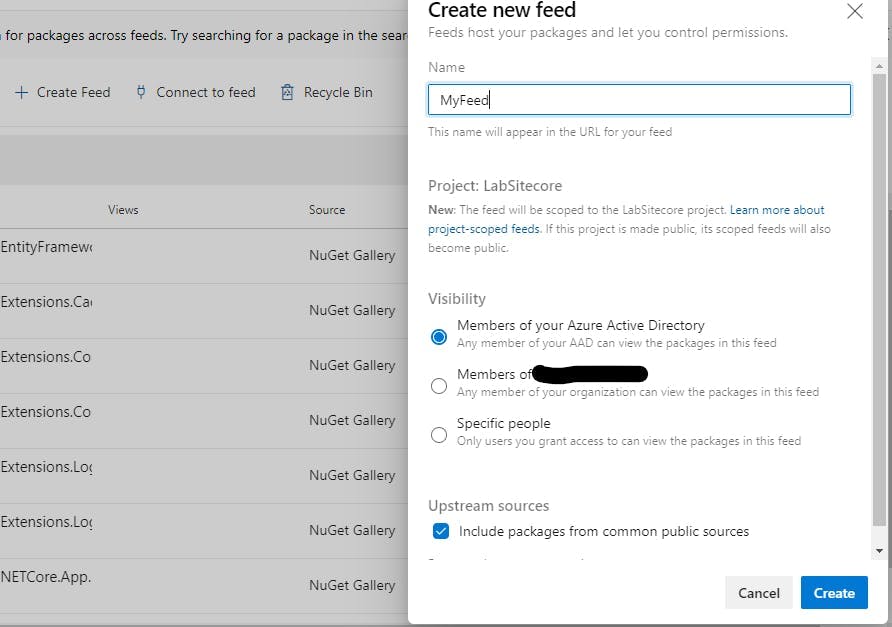
To start you need to create a feed for your package to uploaded to.

Login to Azure DevOps and got to Artifacts. Click Create feed and give it a name.

Click connect to feed and select NuGet.exe. You will see under the heading project setup a nuget.config file to add to your solution.

Create an empty solution in Visual Studio and add a nuget.config file to the root folder using the source from the website. It will look something like this;

1<?xml version="1.0" encoding="utf-8"?>
2<configuration>
3 <packageSources>
4 <clear />
5 <add key="MyFeed" value="https://pkgs.dev.azure.com/.../_packaging/MyFeed/nuget/v3/index.json" />
6 </packageSources>
7</configuration>

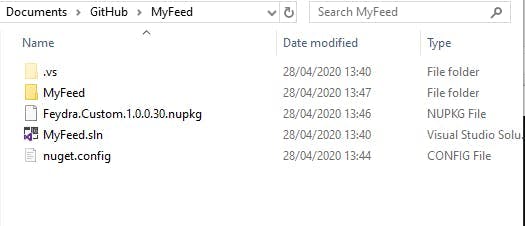
Copy the NuGet package you would like you publish into the root folder as well. I’m using a package we have created for a tool called Feydra. My folder now looks like this.

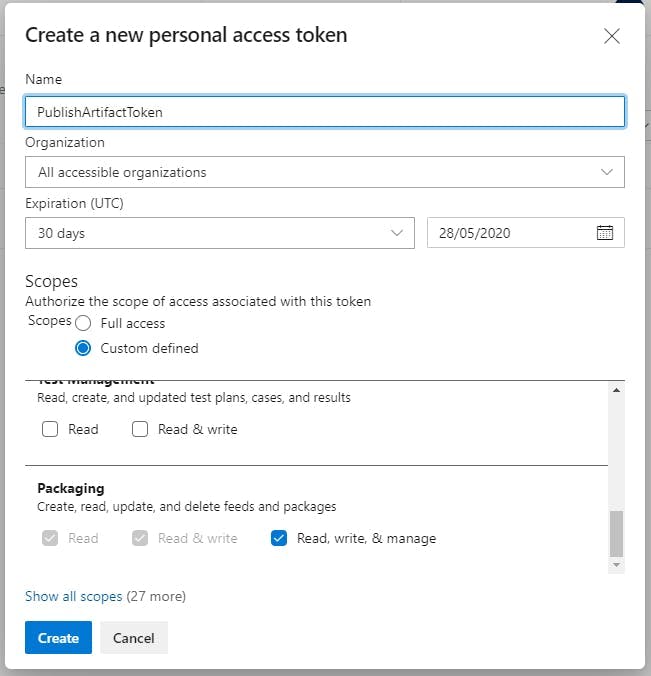
Before we can publish into our NuGet feed we need to setup a personal access token. This is done from within Azure Devops.

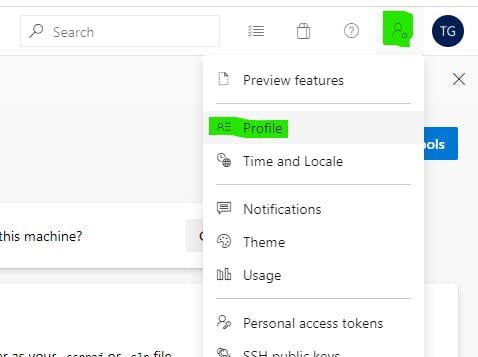
In the top right corner click the person icon and then select profile. On the profile screen you will see a section called Personal access tokens under Security.

From here click New Token and give it the Read, write & manage permission for Packaging.

You will be given a token which you should save a copy of.

Now we are ready to publish are NuGet package to the Artifact feed.

Open a command prompt at the folder containing your solution file and run the following commands

1nuget push -Source <SourceName> -ApiKey az <PackagePath>

For me this is as follows:

1nuget push -Source MyFeed -ApiKey az .\Feydra.Custom.1.0.0.30.nupkg

You will then be prompted for a username and password which you should use the personal access token for both.

Refresh the feed on the website and you should see you package added to it, ready to be included in a release pipeline.

Using Sitecore TDS with Azure Pipelines

Using Sitecore TDS with Azure Pipelines

Sitecore TDS allows developers to serialize Sitecore items into a file format which enables them to be stored in source control. These items can then be turned into a Sitecore update package to be deployed into a Sitecore solution.

With tools like Team City it was possible to install the TDS application on the server, and MSBuild would pick it up in the same way that Visual Studio would when you create a build locally. However, with build tools like Azure Piplelines that are a SAAS service you do not have any access to install components on a server.

If your solution contains a TDS project and you run an Azure Pipeline, you will probably see this error saying that the target 'Build' does not exist in the project.

Fortunately, TDS can be added to a project as a NuGet package. The documentation I found on Hedgehogs site for TDS says the package is unlisted on NuGet.org but can be installed in the normal way if you know what it's called. When I tried this is didn't work, but the NuGet package is also available in the TDS download so we can do it a different way.

Firstly download TDS from Hedgehogs website. https://www.teamdevelopmentforsitecore.com/Download/TDS-Classic

Next create a folder in the root of your drive called LocalNuGet and copy the nuget package from the download into this folder.

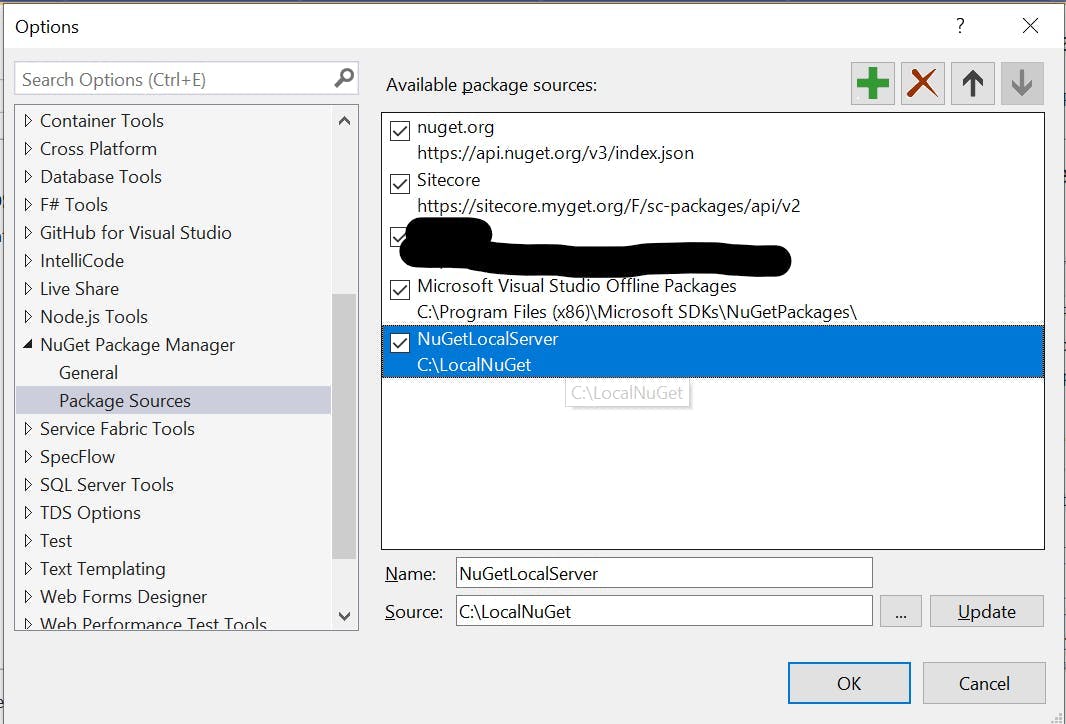
Within Visual Studio go to Tools > NuGet Package Manager > Package Manager Settings, and in the window that opens select Package Sources on the left.

Add a new package source and set it to your LocalNuGet folder.

From the package manager screen select your local nuget server as the package source and then add the TDS package to the relevant projects.

When you commit to source control make sure you add the hedgehog package in your projects packages folder. Normally this will be excluded as your build will try and restore the NuGet packages from a NuGet feed rather than containing them in the repo.

If you run your Azure Pipleine now you should get the following error:

This is a great first step as we can now see TDS is being used and we're getting an error from it.

If you're not getting this, then open the csproj file for your solution and check that there are no references to c:\program files (x86)\Hedgehog Development\ you should have something like this:

1<Target Name="EnsureNuGetPackageBuildImports" BeforeTargets="PrepareForBuild">
2 <PropertyGroup>
3 <ErrorText>This project references NuGet package(s) that are missing on this computer. Use NuGet Package Restore to download them. For more information, see http://go.microsoft.com/fwlink/?LinkID=322105. The missing file is {0}.</ErrorText>
4 </PropertyGroup>
5 <Error Condition="!Exists('..\packages\HedgehogDevelopment.TDS.6.0.0.10\build\HedgehogDevelopment.TDS.targets')" Text="$([System.String]::Format('$(ErrorText)', '..\packages\HedgehogDevelopment.TDS.6.0.0.10\build\HedgehogDevelopment.TDS.targets'))" />
6 </Target>
7 <Import Project="..\packages\HedgehogDevelopment.TDS.6.0.0.10\build\HedgehogDevelopment.TDS.targets" Condition="Exists('..\packages\HedgehogDevelopment.TDS.6.0.0.10\build\HedgehogDevelopment.TDS.targets')" />

To fix the product key error we need to add our license details.

Edit your pipeline and then click on the variables button in the top right. Add two new variables:

  • TDS_Key - Which should be set to your license key
  • TDS_Owner - Which should be set to the company name the key is linked to

Now run your pipleline again and the build should succeed

Top reasons .Net is amazing for prototyping

Top reasons .Net is amazing for prototyping

The other day someone told me .net was slow to get something built, and to be fair to the person I can see why he would have thought that. Most of his interaction with .net projects have been on complex with large enterprise applications that often have integrated multiple other applications.

However, I would maintain that .net is a framework that is actually really fast to develop on and that what he had perceived as being slow was the complexities of a project rather than the actual coding time.

In fact, I would say it's so fast to get something built in it, it actually becomes the fastest thing to develop a prototype in. Here are my top reasons why.

ASP.NET Core

ASP.NET Core inherits all the best bits from the ASP.NET Framework that came before it, giving the framework almost 20 years of refinement since its original release in 2002. The days of WebForms in the original ASP.NET are now long behind us and we now have the choice of building web applications with either MVC or Razor Pages.

Razor provides the perfect combination of a view language providing helpers to render your html without limiting what can be done on the front end. How you code your HTML is still completely up to you, the helpers just provide features like binding that make it even faster to do.
Another great thing about .Net core over that which came before it, is its platform independent. Rather than being confined to just Windows, you can run it on Mac or Linux too.

Great starter templates

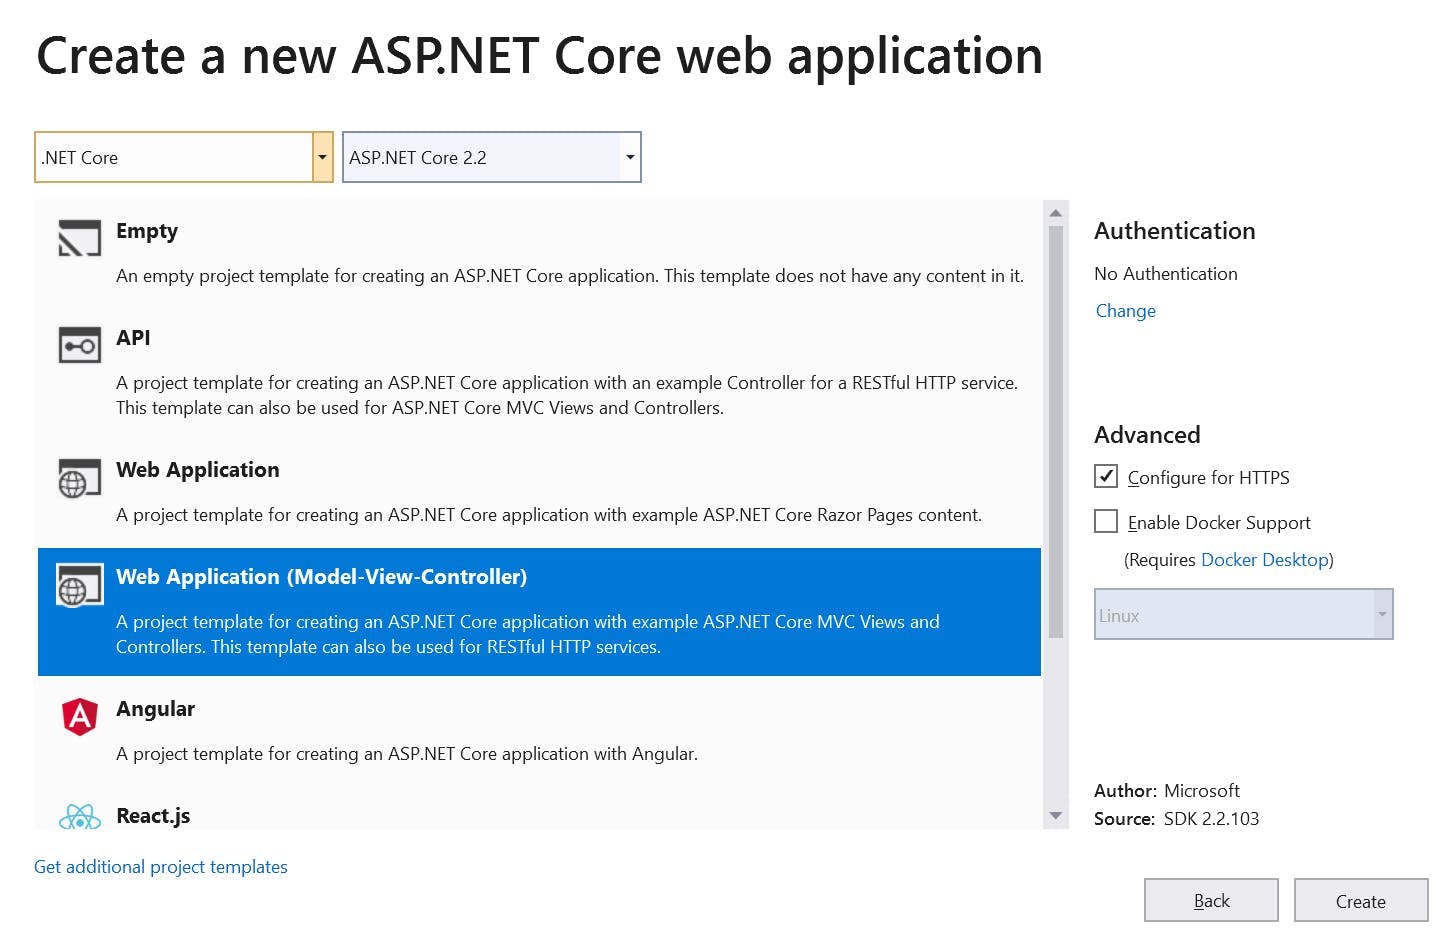
What kicks of a great prototype project is starting with great templates, and ASP.NET Core has a bunch.

As already mentioned, you can build a Web Application with either Razor Pages or MVC, but the templates also provide you with the base for building an API, Angular App, React.js or React.js and Redux or you can simply create an Empty application.

My preference is to go for MVC as it's what I'm the most familiar with and a key thing for rapidly building a prototype is that you develop rapidly. The idea is to focus on creating something new and unique, not learn how to develop in a new framework.

The MVC Web Application gives you a base site to work with a few pages already set up, bootstrap and jQuery are already included so you start right at the point of working on your logic rather than spending time doing setup.

SQL Server and EF Core

I've always been a bit of a database guy. I'm not sure why, but its a topic that has always just made sense to me, and despite being a topic that can get quite complex, the reasons behind it being complex always feel logical.

When it comes to building a prototype though there are two aspects which make storage with .net core super simple.

Firstly, Entity Framework Core (EF Core) means you don't really need to know any SQL or spend any time writing it. It helps if you do, but at a minimum all you need to be doing is creating a model in your code, adding a few lines for a DB context that tells EF.Core that a model is a table and how they relate. Then turn on migrations and you're done. When you run the application, the DB gets created for you and each time you change your model, you just add another migration and the next time the application runs the application the DB schema gets updated.

Querying your DB is done by writing LINQ queries against your entity framework model, allowing you to have next to no understanding of SQL and how the DB works. Everything is just done by magic for you.

The second part is SQL Server and its different versions. Often when you think of SQL Server you think of the big DB engine with its many many components that you install on a server or your local machine but there's two others which are even more important. LocalDB and Azure SQL.

LocalDB is an option that can be installed as part of Visual Studio. No separate application is needed or services to be running in the background. It is essentially the minimum required to start the DB engine to be used for development purposes. In practical terms this means when you start your application EF.Core can run off a LocalDB which didn't require any setup, but as far as your application in concerned it is no different than working with any other version of SQL Server.

Azure SQL as the name implies is SQL Server on Azure. The only thing I really need to say about this is that you can swap LocalDB and Azure SQL with ease. They may be different but as far as your prototype is concerned, they are the same.

Scaffolding

The only thing quicker than writing code is having someone else do it for you. So we've created our application from a template, added a model which generated our database and now its time to create some pages. Well the good news is it's still not time to write much code because Visual Studio can scaffold out pages based on our model for us!

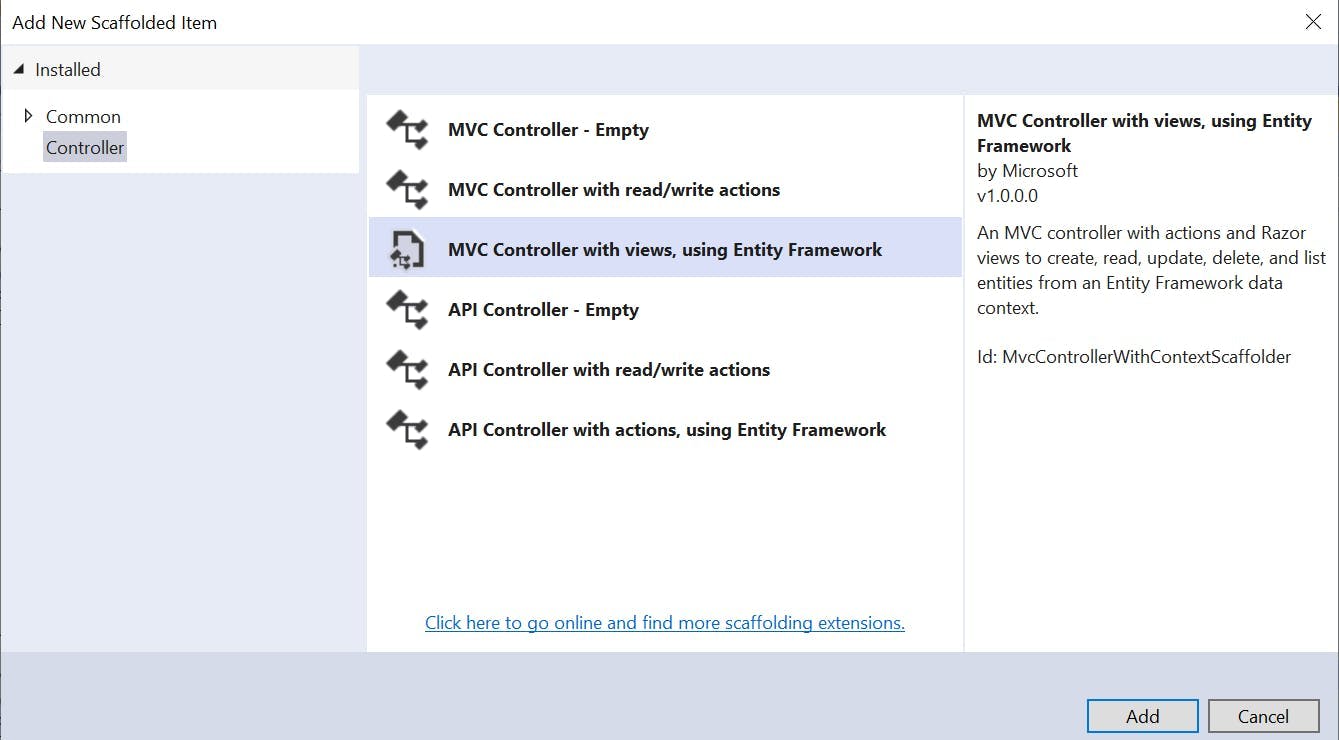
Adding a controller to our project in Visual Studio gives us some options on what should be generated for us, one of which is MVC Controller with views, using Entity Framework. What that means is given a model it will create controllers and views for listing items, creating them, editing them and deleting them. No coding by us required!

Now it's unlikely that is exactly what you're after, but it's generally a good starting place and deleting code you don't need is far quicker then writing it.

Azure

Lastly there is Azure. You may have spotted a theme to all these points and that is they all remove any effort required to do any setup and instead focus on building your own logic, and this point is no different.

I remember a time, when if I wanted a server to put an application on, I had to request it, and then wait a while. What I would get back would either be a server that already had resources running on it, or a blank server that would need applications installed on it. e.g. SQL Server or .Net Framework. IIS wouldn't have been configured and it would be a number of hours before my application would be running.

With Azure you don't even really need to leave Visual Studio. From the publish dialog box you can create a new App Service and DB, and then publish. All the connection strings are sorted out for you. There are service plans which cost next to nothing, a domain is configured for you and at the end of the publish the website opens and is working. The whole process has taken less than 10 minutes.

How to create a shared access signature for a specific folder in Azure Storage

How to create a shared access signature for a specific folder in Azure Storage

As we move into a serverless wold where devlopment work is done less on generic multipurpose servers that require patching both to the OS and to the application installed on them, things become easier and in some cases cheaper.

For instance I am currently working on a project that needs to send and recieve XML files from different sources and with no other requirements for a server, Azure storage seemed the perfect fit. As it's just a storage service you pay for what you need and nothing more. All the patching and maintencance of API's is provided by Microsoft and we have an instant place to store out files. Ideal!

However new technology always comes with new challenges. My first issue came with the plan on how we would be getting files in and out with partners. This isn't the first time I've worked with Azure File Storage, but it is the first time I did it without an opps person setting things up. Previously we used FTP, which while dated works with a lot of applications. Like a headphone jack it's not the most glamorus of connection, but it works, everyone knows how it works and everyone has things that work with it. However it transpires that despite Azure storage being 10 years old and reciving requests for FTP from the start, Microsoft have decided to go the same route as Apple with the headphone jack and not have it. Instead the only option for an integration is REST. As it transpires the opps people I had worked with in the past when faced with this issue had just put a VM infront of it, which kind of defeats the point of using Azure storage in the first place!

So we're going with REST and Microsoft provide quite a straightforward REST API all good so far, but how do we limit access? Well there's a guide to Using the Azure Storage REST API which contains a section on creating an authorisation header. It's long and overly complex, but does point you in the direction that to do this you need a Shared Access Signature. The other option is an access key, but this is something you should never give away to a third party.

Shared Access Signature

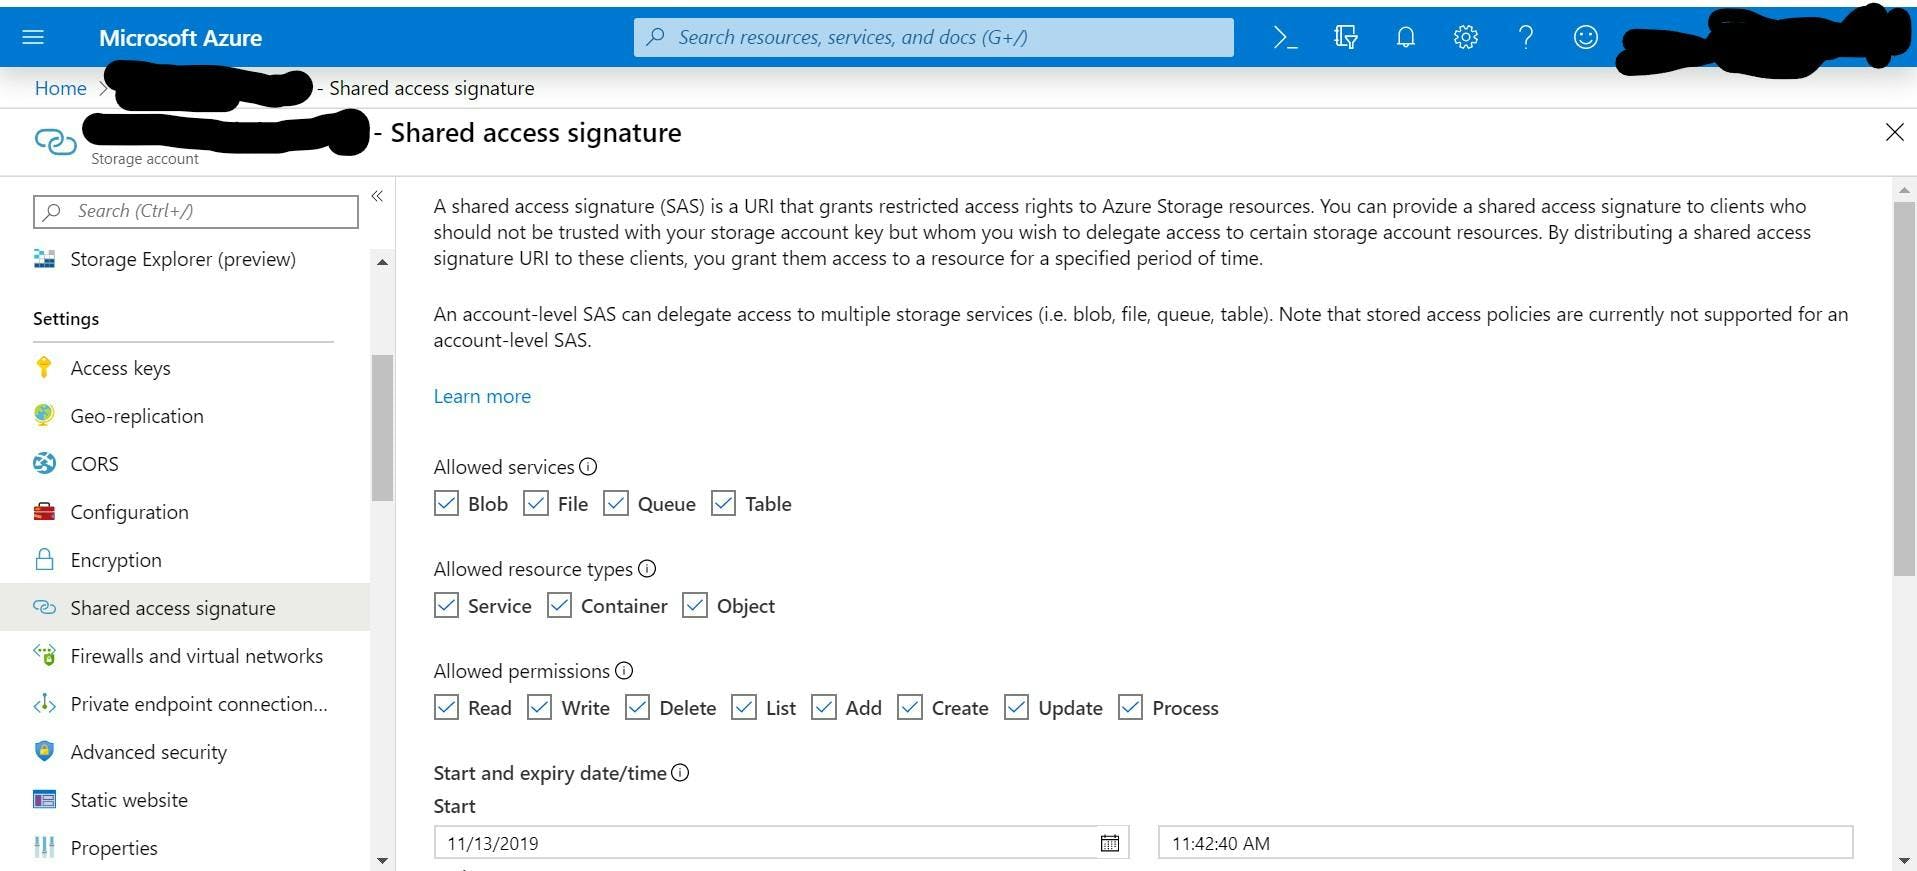
After a bit more digging through the documentation (and just clicking the thing that sounded right in the potal) I found this documentation on creating an Account SAS which sounded like what I wanted (it wasn't, but it's close).

With a shared access signature you can say what kind of service should be allowed, what permissions they should have, IP address's, start and end dates. All awesome things.

Once I had this I could then use the REST API, but there was a problem. I could access every folder in the storage account and there was no way to stop this! For integrating with 2 third partys they would both be able to access each others stuff, and our own private stuff.

There is also no way to revoke the SAS once it's been generated other than refreshing the access keys which would affect everyone.

Folder Level Shared Access Signature

After a bit more research I found what I was looking for. How to create a shared access signature at a folder or item level and how to link it to a policy.

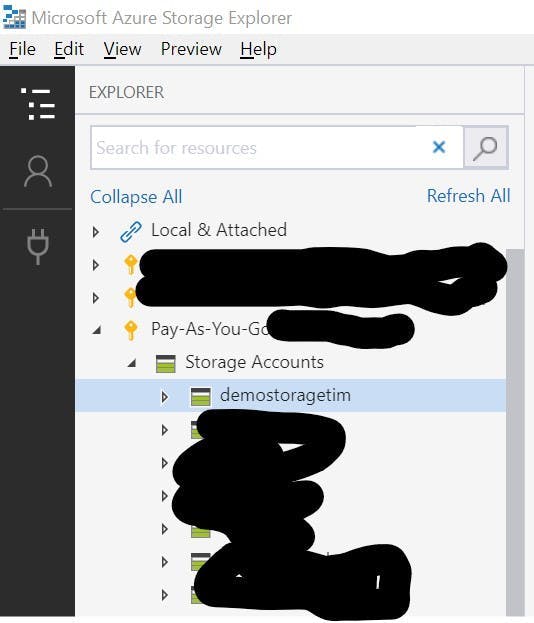
The first thing you need is Azure Storage Explorer. Once your set up with this you will be able to view all your storage accounts.

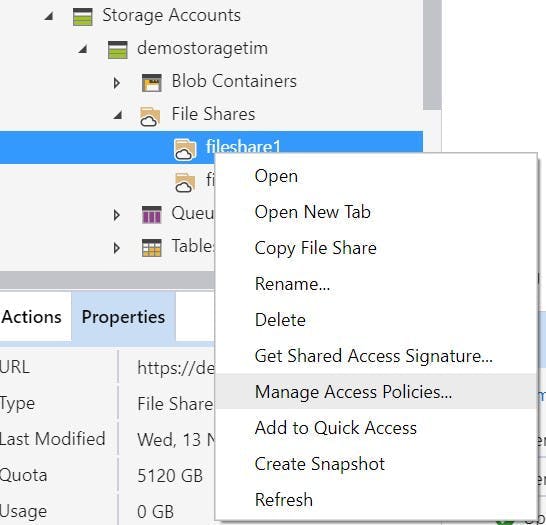
From here you are able to browse to the folder you want to share right click it and choose Manage Access Policies.

This will open a dialoge to manage the policies for this specific object rather than the account.

Here you can set all the same permissions as you could for a signature at an account level but now for a specific object and against a policy rather than an actual signature, meaning the policy can be updated in the future with no change to the signature.

Better still you can remove the policy which will then invalidate any signature using it.

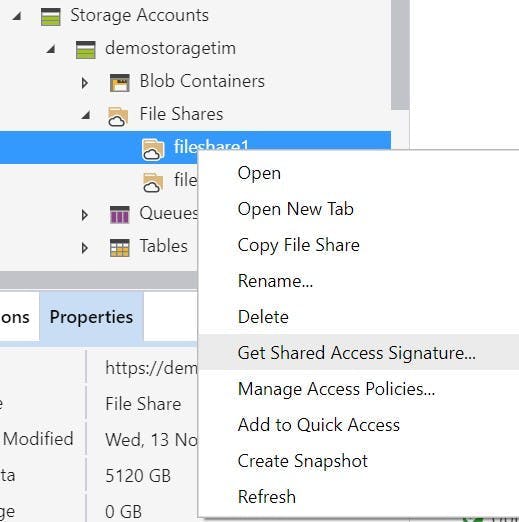
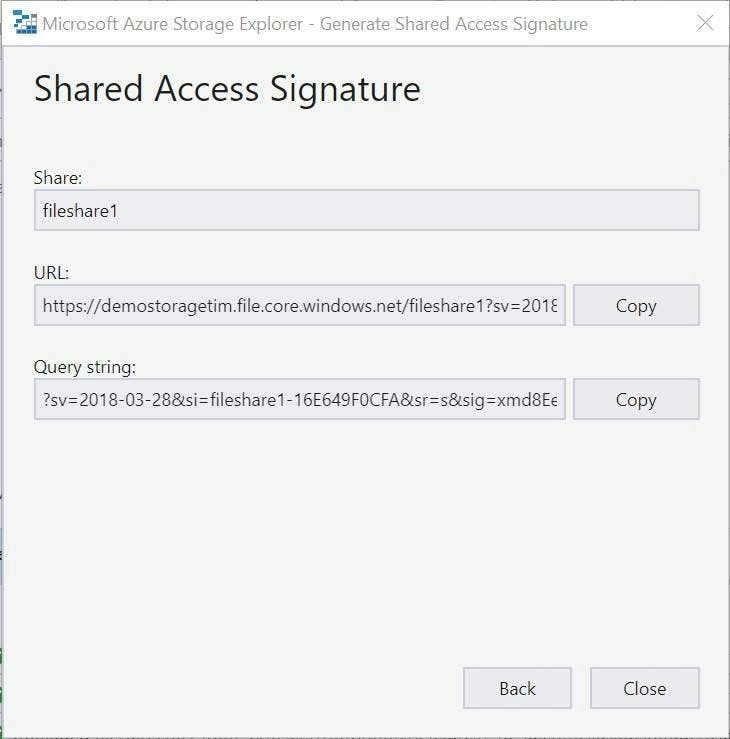
For the actual signature key right click the same folder and click Get Shared Access Signature.

Then in the dialoge select the policy from the drop down rather than spcifying the individual permissions.

Click create and you can copy the keys.

You now have an access key that is limited to a specific folder rather than the entire account.

This is only possible to do though one of the code/scripting interfaces. e.g. PowerShell or the storage explorer. The azure portal will only let you get signatures at an account level.

What I learnt at Sugcon 2019

What I learnt at Sugcon 2019

This year Sugcon came to London which given that's where I'm based is awesome for me. In total it was a 3 day conference starting with Sitecore Experience aimed more at marketers than developers. As a developer I only went to the 2 developer days, so for your benefit here's a summary of everything I saw.

Day 1

Day 1 started with a keynote, sadly life got in the way and I missed the first few hours. I'm told it was good though.

After that the day was split into a mix of sessions in the big room for all and smaller break out sessions where you could pick 1 of 4 to attend.

JSS Immersion - Lessons learned and looking ahead with Anastasiya Flynn

To kick things off I went to a talk on JSS, mostly because JSS is a subject I know very little about. This was something that became even more apparent as the talk went on! At the end of it I came away with an appreciation that I need to invest some time in learning a lot more, but my other take away was a few links on things that will help me out if I ever try some React stuff.

https://www.styled-components.com

https://www.react-spring.io

PAAS It on: Learning's from a year on Sitecore with Criss Titschinger

Criss works as a dev opps person and over the last year went on the journey of having a Sitecore 8.2 install upgraded to 9 using a fully cloud architecture in Azure.

Overall his experience sounded positive but he did have a few warnings from pain he experienced:

  • Beware of cold start up times with web apps. These can be a real performance hit, especially when Azure decides its going to move your web app instance
  • Web app slots share processing usage so when your warming one up, your live one is taking a hit. If you run on the edge of capacity, this will be an issue
  • Azure search is easy to install but it has a field limitation of 1000 to watch out for
  • Data migration in an upgrade takes a long time the second time. It took 9 days to migrate a years data from mongo! Only do it once.
  • Run your upgrade on clean instances and do the code in visual studio.
  • Web apps need to be on the premium service plan. The others are to weak
  • Use elastic pools for your database to save money. The microservice architecture introduces a LOT of new dbs which are going to cost money in azure resources. Most of the time they also don't do that much so put them in a pool to share resources
  • Moving to 9 is going to increase hosting charges. Be honest with clients about it.

Day 2

On Day 2 I got to attend from the start so it was a much fuller day for me.

10x your Sitecore development with Mark Cassidy

The day started with a talk on questioning how long it should take to build a Sitecore site. It was a question that never really got answered but the main thing Mark really raised was, do we over engineer what we do and would simpler actually be enough? He went on to show a time lapse video of himself implementing a bootstrap template in Sitecore which took 15 hours.

To build this site he didn't install any modules (no glass) and used just the standard Sitecore api. As he pointed out, it was all stuff that could be done by a dev with only the basic Sitecore training, which as there's a short supply of devs in the world, we can potentially make better use of who does what.

Extending and implementing cloud architectures with Rob Habraken

After one talk on cloud the day before I almost gave this one a miss, but I'm glad I didn't.

Rob gave us some of his learning's and things to look out for. As the the previous session the theme of Sitecore 9 becoming far more complex came up and he had some interesting takes on it:

  • Use what you need, disable roles that you don't. I see plenty of Sitecore customers not making use of all the features, and when your in a microservice architecture it does raise the question of why even have this stuff turned on. If you don't use marketing automation then you don't need the role running. It's just costing money to do nothing.
  • Scale down when your not using resource. Unlike a VM web apps can not be turned off so they always cost money. You can delete and recreate, but that's a pain. Instead set up a pipeline to scale them to the lowest resource setting when not being used.
  • He went on to discuss and show how we can use azure functions and logic apps to implement our code rather than building into the main Sitecore project. However you should be careful overdoing it as it can become complex quickly and it's easy to end up with a massive unorganised list of individual azure functions.

Automated personalisation with Chris Nash and Niels Kuhnel

Chris and Niels pointed out the flaw in Sitecores reporting on personalised content. How do we know the rate each converts to a goal at? There's the A/B Test report's but that's not quite the same thing.

They went on to show how they had started measuring the display impressions and click through on personalised content. Then linking the results collected in the reporting db up to a Power BI dashboard.

Sitecore identity: A new Sitecore authentication mechanism with Himadri Chakrabarti

Himadri gave us a look at the new Identity Server framework in Sitecore 9.1:

  • Identity server 4 framework
  • Still uses old asp net membership provider underneath
  • Can work with sub providers like Azure

Measure if you want to go faster with Jeremy Davis

Jeremy was in the situation where a site they were developing would have TV adverts during one of the most watch programs on British TV. Naturally he got scared and went looking for tools to help with performance. He told us about two of them:

  • Sitecore debug tool in experience editor showing the time it takes for components to load.
  • Using Visual Studio debugger to monitor processor usage and memory usage.

Both of these tools are very good at pointing you in the direction of smelly code and the best part is you already have them.

Unfortunately it's the kind of demo that really doesn't convert to text to write here.

We released JSS, you'll never guess what happened next with Adam Weber & Kam Figy

Adam and Kam showed us JSS working with SXA and Sitecore Forms. As mentioned before I don't know much about JSS but after this talk I'm convinced I definitely need to.

Right now it doesn't sound like I would make a site using it, but it could definitely be the future of how we build sites.

The stand out thing is being able to keep your Sitecore install unmodified which would essentially lead us to a real SAAS solution where a Sitecore instance could be spun up from the marketplace and then all other functionality added through server-less functions and a headless front end.